When deploying this site on Fastly CDN (Varnish), everything worked except for a redirect issue on the home page. After extensive troubleshooting, I discovered the cause of the problem. I felt it was important to document this to save you time if you encounter the same issue.
The issue I had only on the home page :
ERR_TOO_MANY_REDIRECTS
How to fix it
Add to your wp-config.php the following code :
if (!empty($_SERVER['HTTP_X_FORWARDED_HOST'])) {
    $_SERVER['HTTP_HOST'] = $_SERVER['HTTP_X_FORWARDED_HOST'];
}
Here the idea is to set the $_SERVER['HTTP_HOST'] with the value of $_SERVER['HTTP_X_FORWARDED_HOST'], as the HTTP_X_FORWARDED_HOST header contains the original host requested by the user.
Another implementation could be to set the HTTP_HOST in raw :
if ( ! empty( $_SERVER['HTTP_X_FORWARDED_HOST'] ) ) {
       $_SERVER['HTTP_HOST'] = 'domain.com';
}
The WordPress code responsible of the redirect
In the WordPress code in the file : /wp-includes/canonical.php WordPress tries to redirect the client to the canonical home page by using the HTTP_HOST
if ( ! $requested_url && isset( $_SERVER['HTTP_HOST'] ) ) {
  // Build the URL in the address bar.
  $requested_url  = is_ssl() ? 'https://' : 'http://';
  $requested_url .= $_SERVER['HTTP_HOST'];
  $requested_url .= $_SERVER['REQUEST_URI'];
}
But when we work with a reverse proxy the HTTP_X_FORWARDED_HOST should be used instead.
In this project, I will deploy a static website on Minio, an Amazon S3 alternative. My goal is to use this S3-compatible storage as the backend for my website. To ensure the app can scale globally and handle high traffic, I will use Fastly Compute to distribute and cache the content.
Upload Files to Minio S3
This will provide a public URL for accessing the stored content. However, since Minio is self-hosted, it may not handle a high volume of traffic efficiently on its own.
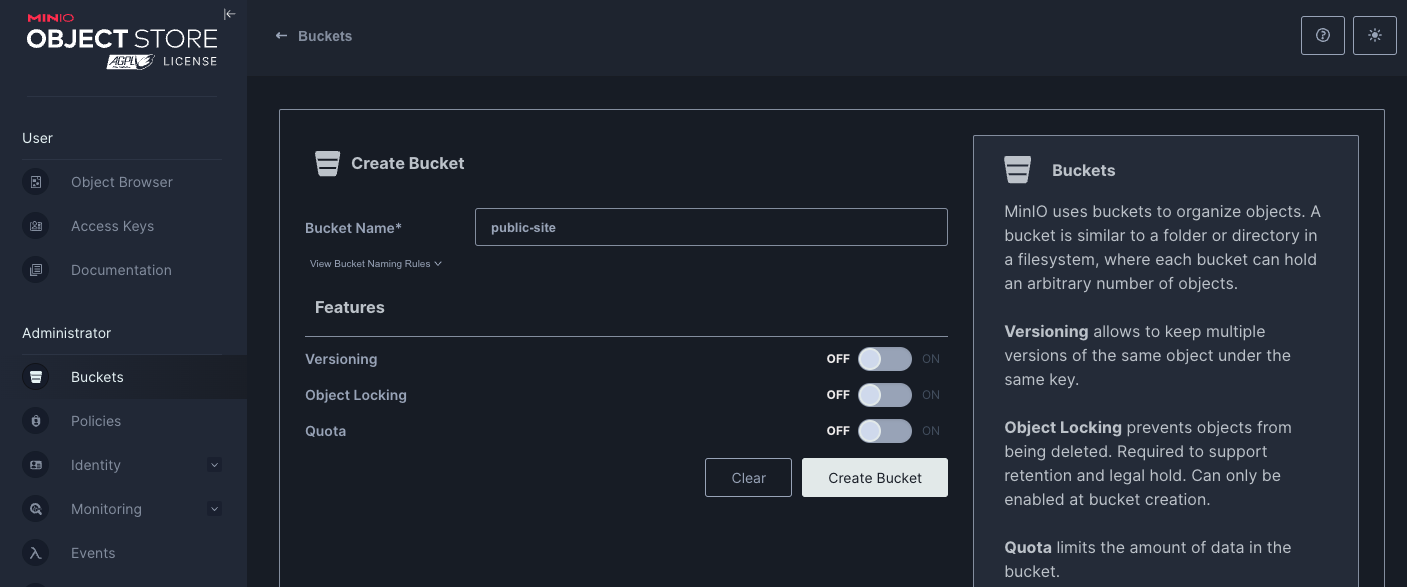
First, create a bucket in Minio and configure it to be publicly accessible for read-only operations.
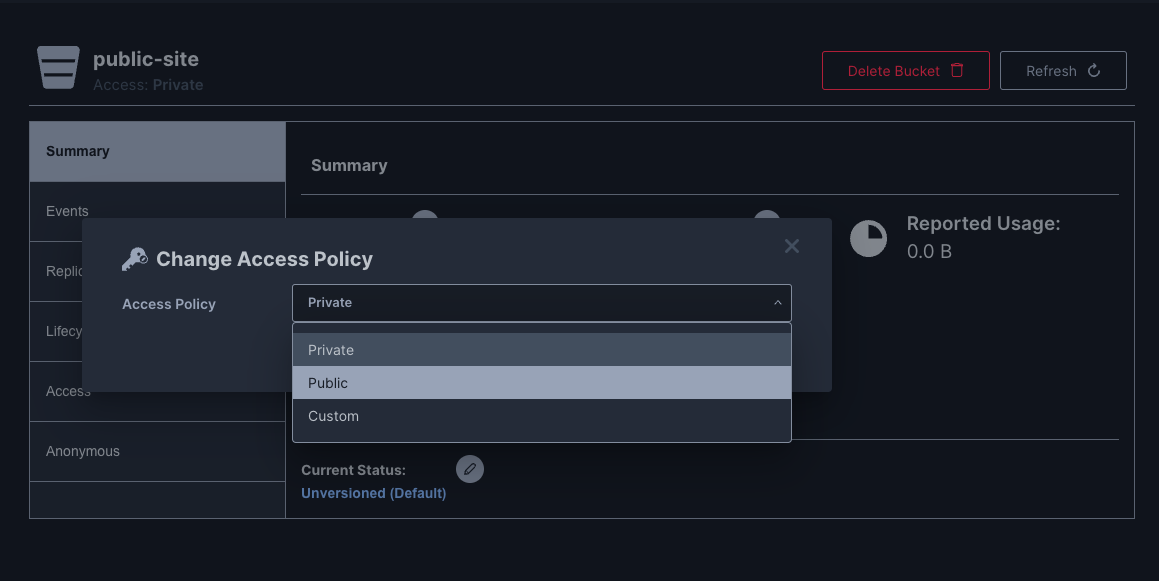
Then I change the Access Policy to be public.
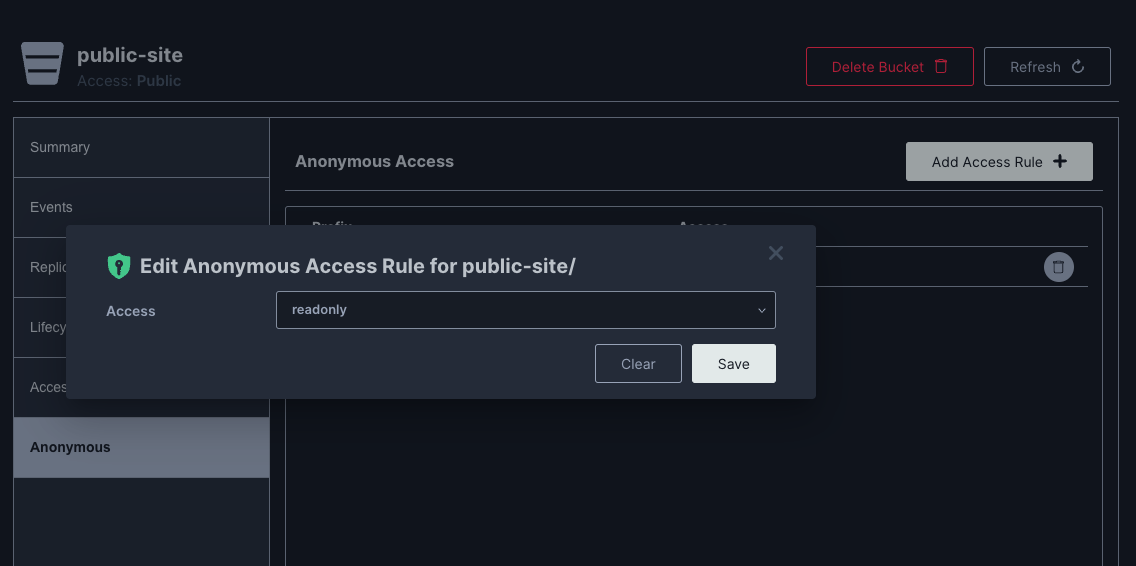
Then I set the anonymous Access Rule to readonly
Then I upload the files :
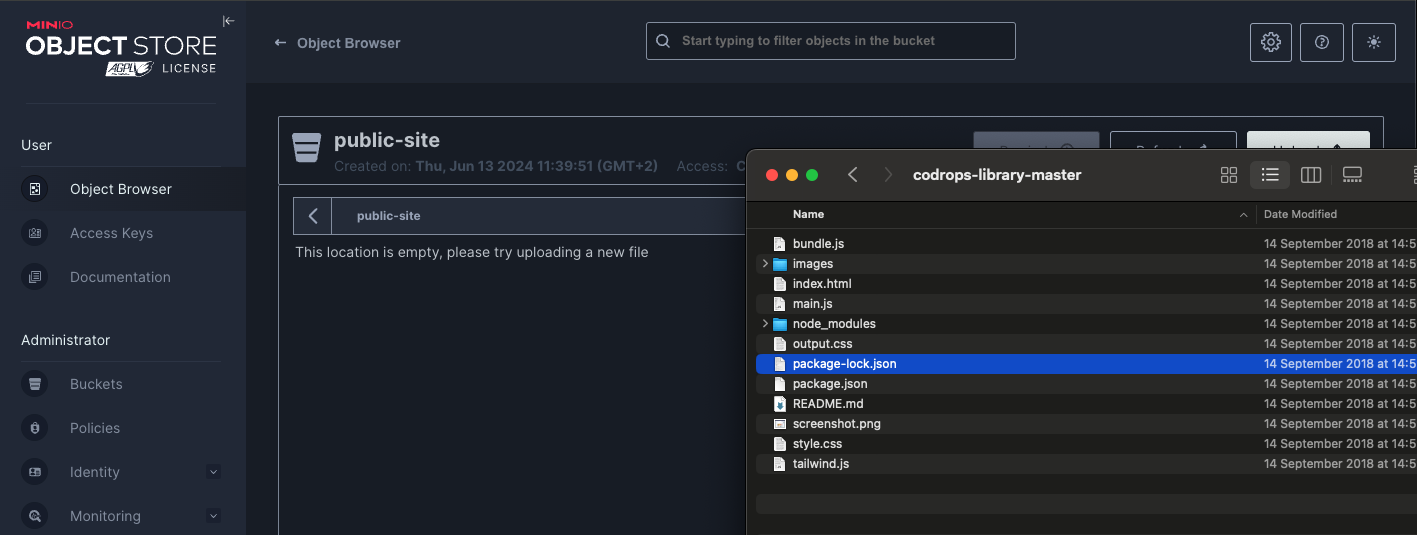
I can now access my site on my S3 bucket
http://s3.faast.life:32771/public-site/index.html

Use Fastly Compute to Serve the App Globally
The advantage of using Fastly Compute is that it enables global distribution and caching of the site hosted on Minio. By leveraging Fastly’s network, we can ensure that the content is served quickly to users around the world, effectively handling high traffic volumes and improving the site’s performance.
Init the compute project
In the folder of your choice :
fastly compute init
Then for the options
Language:
[2] JavaScript

...

Starter kit:
[2] Empty starter for JavaScript


...

Do you want to run this now?
Yes
Adjustment to our setup
In your package.json add this line in the scripts section :
"dev": "fastly compute serve --watch",
Run the project locally
run the following command to start the local server.
npm run dev
Now if you navigate to :
http://localhost:7676/
You should see something like this :
Handle requests
To handle requests, the best way is to use the @fastly/expressly that will give us a router similar to express to manage our routes.
npm install @fastly/expressly
Then use the following code
import { Router } from "@fastly/expressly";

const router = new Router();


router.get("/", async (req, res) => {


  res.send("Hello 👋");

});

router.listen();
This should return « Hello 👋 » when you visit http://localhost:7676/
Connect our S3 backend
Now I want our compute function to query our S3 bucket on this url http://s3.faast.life:32771/public-site/index.html when we go to http://localhost:7676/
Add the backend to the fastly.toml file :
[local_server]
  [local_server.backends]
    [local_server.backends.s3_faast_life]
      override_host = "s3.faast.life"
      url = "http://s3.faast.life:32771"
Call your backend
router.get("/", async (req, res) => {
let beResp = await fetch(
"http://s3.faast.life:32771/public-site/index.html",
{
backend: "s3_faast_life"
}
);
res.send(beResp);
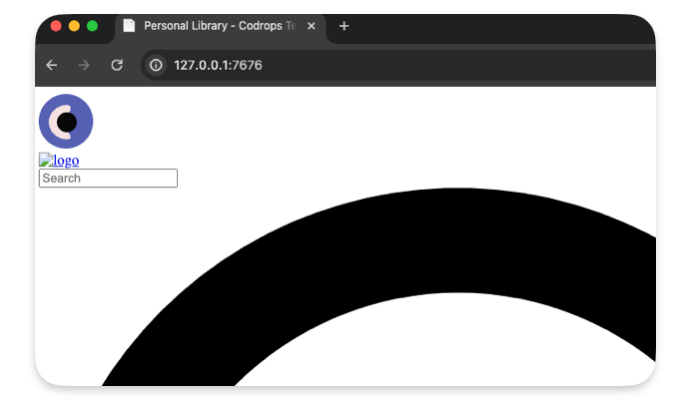
});
It should display a page with broken CSS /JavaScript… That’s normal, as we don’t handle the css,JavaScript files requests yet.
Handle the JavaScript / CSS / images requests
To make our site work we need to point the asset to the right location.
This following code gets the pathname and match it to our S3 bucket
router.get(/\.(jpe?g|png|gif|jpg|css|js|svg)$/, async (req, res) => {

  const pathname = new URL(req.url).pathname;

  if(!pathname) res.withStatus(500).json({error : "no pathname"});

  let beResp = await fetch(
      `http://s3.faast.life:32771/public-site${pathname}`, {
      backend: "s3_faast_life"
    }
  );

  res.send(beResp);

});
Deploy the project
It’s now time to deploy the project to the Fastly Network, to do so run the following command :
npm run deploy
❯ npm run deploy

> deploy
> fastly compute publish

✓ Verifying fastly.toml
✓ Identifying package name
✓ Identifying toolchain
✓ Running [scripts.build]
✓ Creating package archive

SUCCESS: Built package (pkg/fastly-public-demo-site.tar.gz)

✓ Verifying fastly.toml


INFO: Processing of the fastly.toml [setup] configuration happens only for a new service. Once a service is
created, any further changes to the service or its resources must be made manually.
Select a domain name
Domain: [inherently-elegant-eft.edgecompute.app] publicSiteDemo.edgecompute.app


✓ Creating domain 'publicSiteDemo.edgecompute.app'
✓ Uploading package
✓ Activating service (version 1)
✓ Creating domain 'publicSiteDemo.edgecompute.app'
✓ Uploading package
✓ Activating service (version 1)

Manage this service at:
        https://manage.fastly.com/configure/services/6lyvl2bwrC9smHn3coFbv3

View this service at:
        https://publicSiteDemo.edgecompute.app

SUCCESS: Deployed package (service 6lyvl2bwrC9smHn3coFbv3, version 1)
Edit the backend
We need to create a backend that will reflect the options we used with our local configuration.
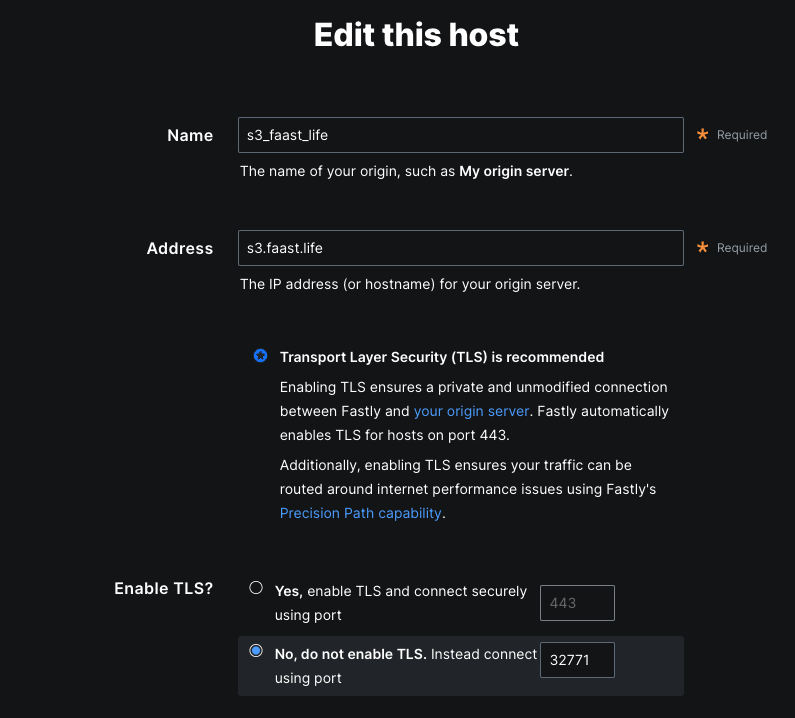
Save the configuration
Test the deployment
Now we can visit our website to check the deployement
https://publicsitedemo.edgecompute.app/
If everything worked as expected, we should see our site :

Use Fastly core cache to scale
So far we only forward the requests to our S3 bucket, but this doesn’t really help to scale, that’s why we need to add some caching by using the Fastly core cache
Add caching
import { CacheOverride } from "fastly:cache-override";
Update our backend calls
Now let’s add caching with the CacheOverride object.
Keep the index.html in cache for 10min :
router.get("/", async (req, res) => {
  let beResp = await fetch(
    "http://s3.faast.life:32771/public-site/index.html",
    {
      backend: "s3_faast_life",
      cacheOverride: new CacheOverride("override", {
          ttl: 60 * 10 // cache this request for 10min
      })
    },
  );

  res.send(beResp);

});
And we do the same thing for the assets :
router.get(/\.(jpe?g|png|gif|jpg|css|js|svg)$/, async (req, res) => {

  const pathname = new URL(req.url).pathname;

  if(!pathname) res.withStatus(500).json({error : "no pathname"});

  let beResp = await fetch(
      `http://s3.faast.life:32771/public-site${pathname}`, {
      backend: "s3_faast_life",
      cacheOverride: new CacheOverride("override", {
        ttl: 60 * 10 // cache this request for 10min
      })
    }
  );

  res.send(beResp);

});
Check if our content is cached :
curl -sSL -D - "https://publicsitedemo.edgecompute.app/" -o /dev/null
This should return
HTTP/2 200
accept-ranges: bytes
x-served-by: cache-par-lfpg1960086-PAR
content-type: text/html
etag: "47b56ea2f1770dc224f2047b30c57d15"
last-modified: Thu, 13 Jun 2024 09:44:52 GMT
server: MinIO
strict-transport-security: max-age=31536000; includeSubDomains
vary: Origin, Accept-Encoding
x-amz-id-2: dd9025bab4ad464b049177c95eb6ebf374d3b3fd1af9251148b658df7ac2e3e8
x-amz-request-id: 17D899918B3C2797
x-content-type-options: nosniff
x-xss-protection: 1; mode=block
date: Thu, 13 Jun 2024 15:21:48 GMT
age: 3098
x-cache: HIT
x-cache-hits: 4
content-length: 26217
The content is served from the Paris’ POP :
x-served-by: cache-par-lfpg1960086-PAR
x-cache: HIT
x-cache-hits: 4
Add compression to our static files
By default our text based files, HTML, CSS, JavaScript… are not compressed by our S3 bucket. We can activate compression at our compute level by simple adding a x-compress-hint header. This will speed up our website.
router.use((req, res) => {
  // Activate compression on all requests
  res.headers.set("x-compress-hint", "on");
});
On my VPS I set up Minio an alternative to Amazon S3, I set up Minio trough Docker and Portainer. Everything worked great but some part of the Minio Interface. That interface relies on Websocket, and as I serve the minio UI through an Apache revere proxy, I had to forward those Websocket to the right direction.
The Websocket issue :
Error in websocket connection. Attempting reconnection...
objectBrowserWSMiddleware.ts:79 WebSocket connection to 'wss://s3.faast.life/ws/objectManager' failed:
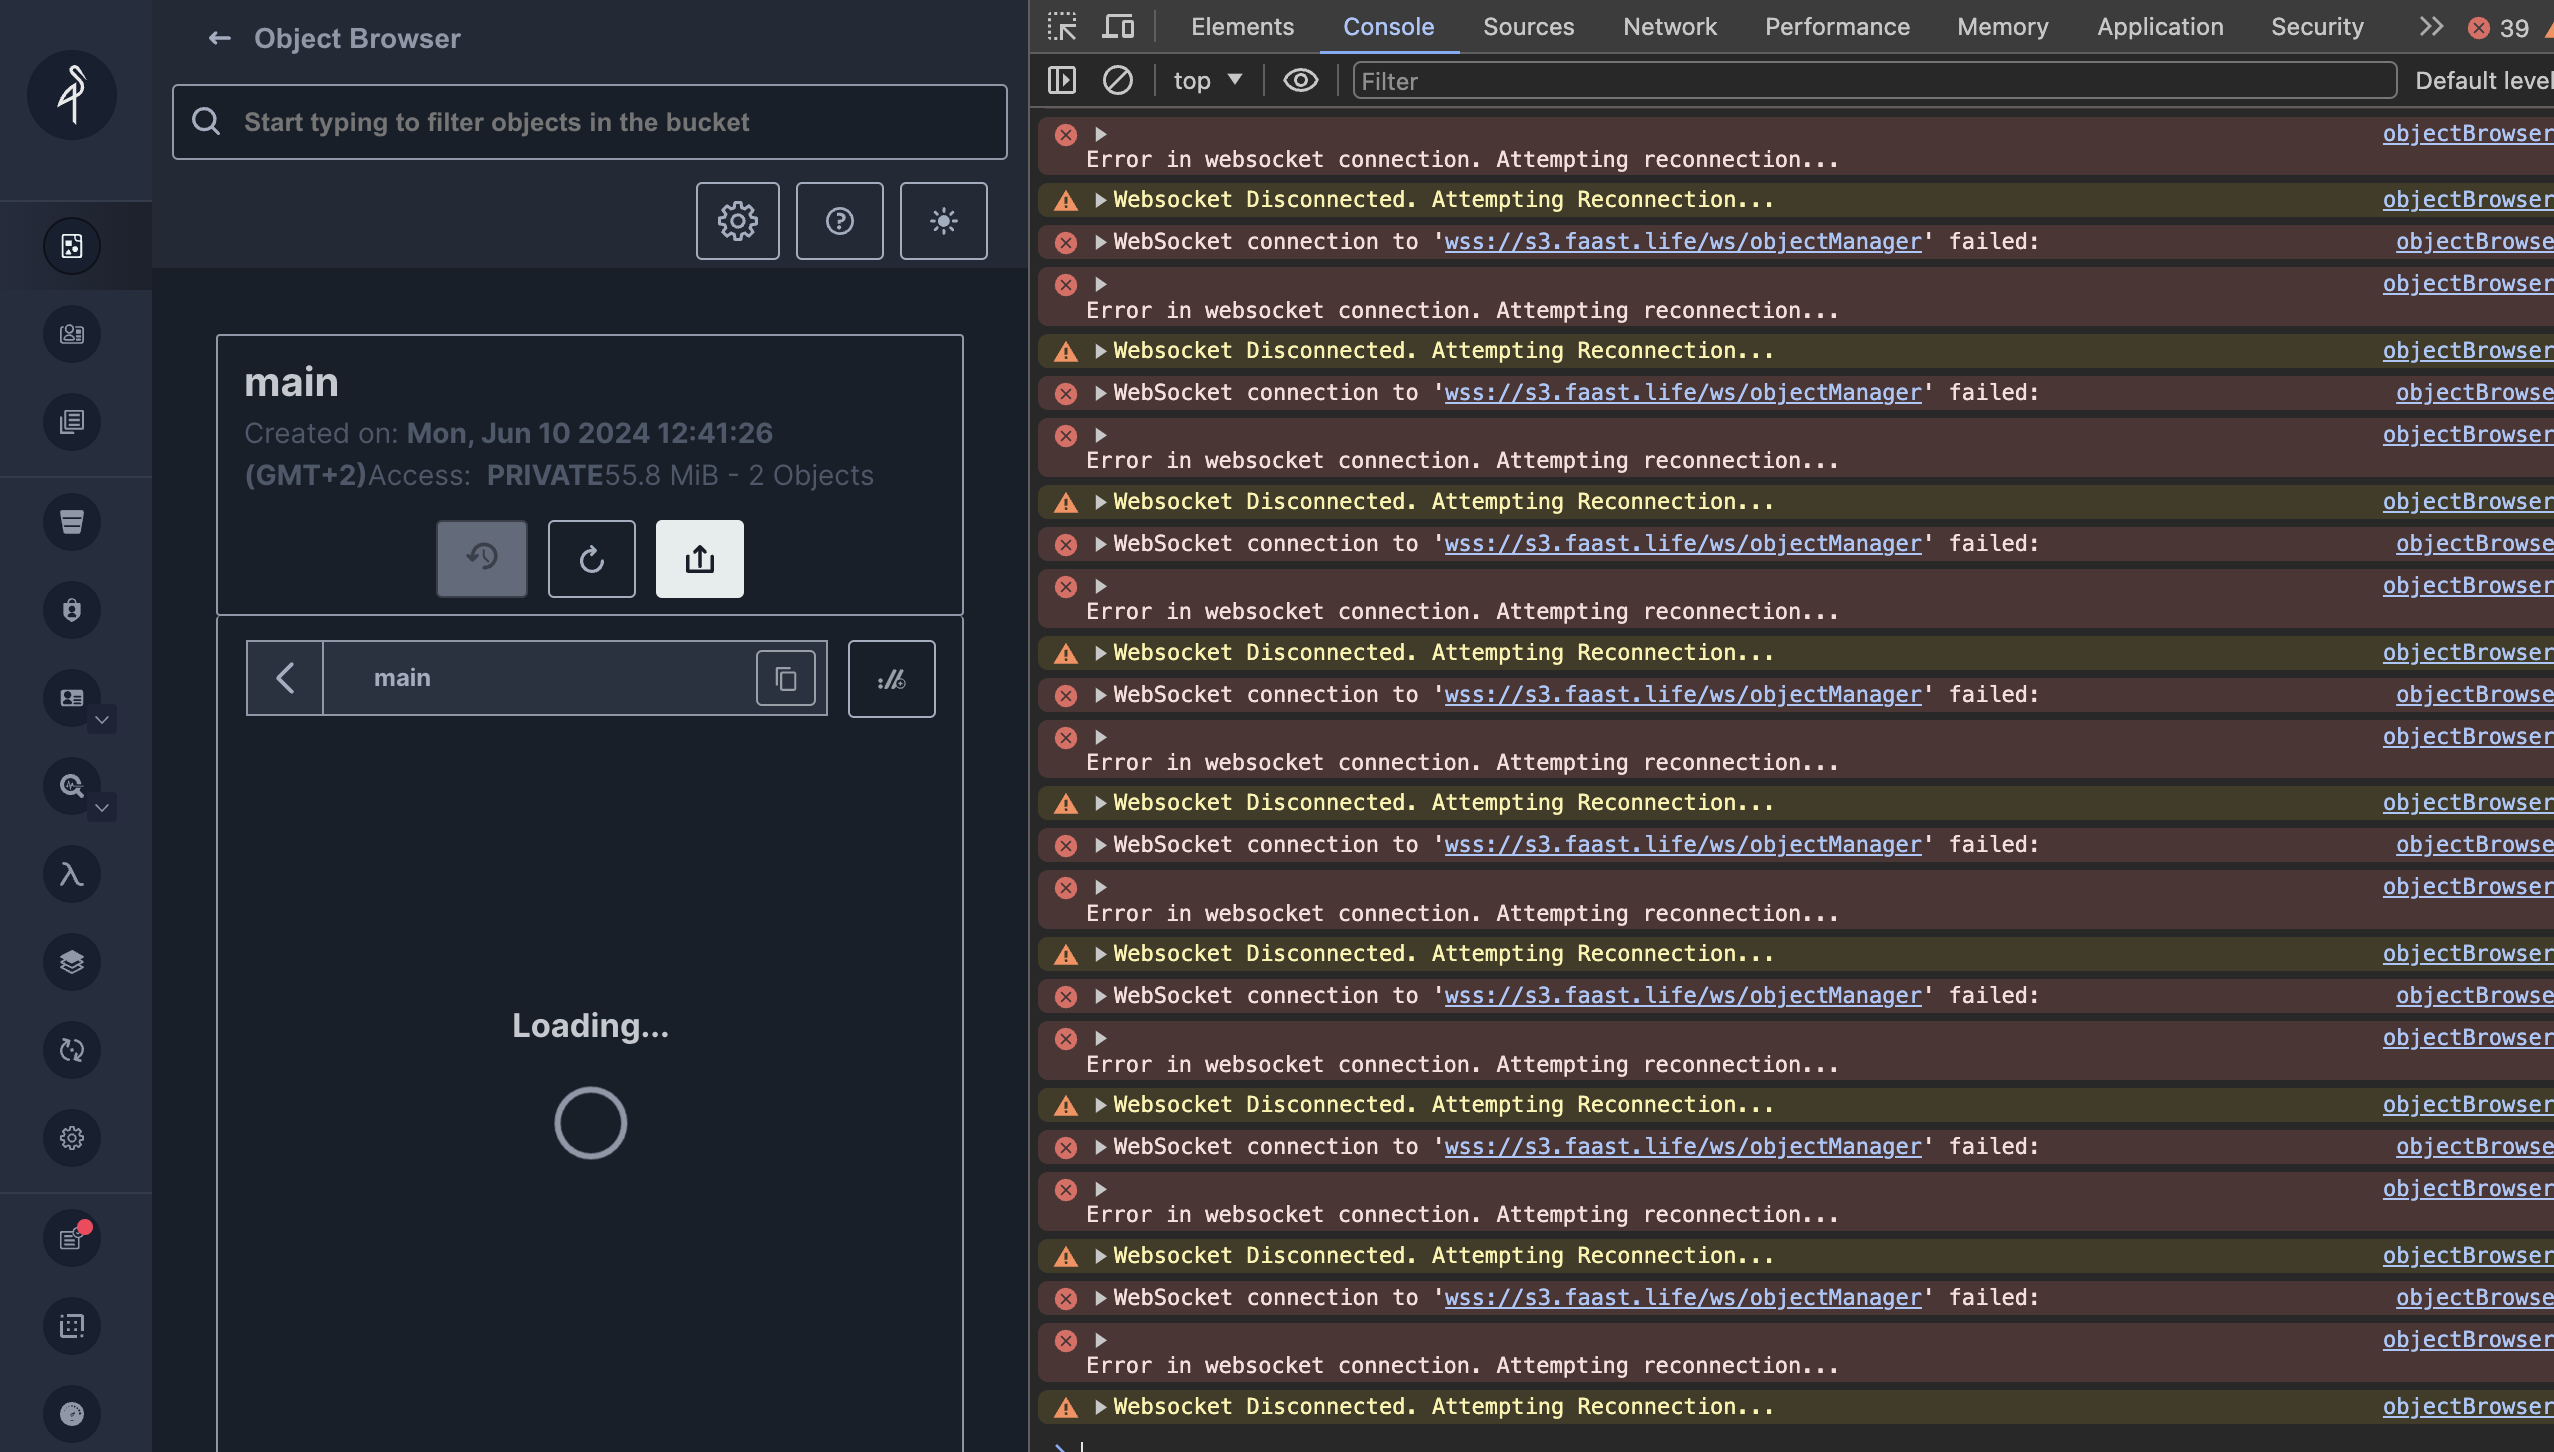
This is how I managed to fix it :
Install apache2 module
sudo a2enmod proxy_wstunnel
Edit the virtual host
Add this rewrite to point the websocket requests to the right direction :
   RewriteEngine on
    RewriteCond %{HTTP:UPGRADE} ^WebSocket$ [NC]
    RewriteCond %{HTTP:CONNECTION} ^Upgrade$ [NC]
    RewriteRule .* ws://127.0.0.1:32768%{REQUEST_URI} [P]
The final virtual host should look like this: ( Here I have an Let’s Encrypt certificate added )
<IfModule mod_ssl.c>
<VirtualHost *:443>
    ServerAdmin [email protected]
    ServerName s3.yourDomain.xyz

    ProxyPreserveHost On


    # ProxyPass for Node.js application
    ProxyPass / http://127.0.0.1:32768/
    ProxyPassReverse / http://127.0.0.1:32768/

    RewriteEngine on
    RewriteCond %{HTTP:UPGRADE} ^WebSocket$ [NC]
    RewriteCond %{HTTP:CONNECTION} ^Upgrade$ [NC]
    RewriteRule .* ws://127.0.0.1:32768%{REQUEST_URI} [P]

    DocumentRoot /home/antoine/apps/s3.yourDomain.xyz
    ErrorLog /var/log/apache2/.log
    CustomLog /var/log/apache2/.log combined

    <Directory /home/antoine/apps/s3.yourDomain.xyz>
        Options Indexes FollowSymLinks
        AllowOverride All
        Require all granted
    </Directory>


SSLCertificateFile /etc/letsencrypt/live/s3.yourDomain.xyz/fullchain.pem
SSLCertificateKeyFile /etc/letsencrypt/live/s3.yourDomain.xyz/privkey.pem
Include /etc/letsencrypt/options-ssl-apache.conf
</VirtualHost>
</IfModule>
Reload Apache2
Note : You don’t need to disable and enable the site to apply the config. A reload is enough.
systemctl reload apache2
Imagine a mailman delivering packages in a large city. In a typical scenario, the mailman delivers a package to a specific house based on the address. Simple, right? Now, let’s make it a bit more complex. Instead of delivering to houses, the mailman is delivering to a huge apartment building with multiple apartments inside. The address of the building is like a web server hosting multiple websites. Each apartment inside represents a different website hosted on that same server.
The Mailman’s Challenge
For the mailman to successfully deliver the package to the correct apartment, he needs more than just the building’s address; he needs the specific apartment number. This is where Server Name Indication (SNI) comes in.
SNI is like a tag on the package that tells the mailman exactly which apartment (or website) to deliver to. Without this tag, the mailman would be left standing in front of the building, unsure of which apartment to go to. Similarly, without SNI, the server wouldn’t know which website the client is trying to reach, leading to confusion and potential errors.
Why SNI is Crucial
When a web browser tries to connect to a website, it first establishes a secure connection using HTTPS. This process involves a conversation between the browser (client) and the web server, where they agree on how to encrypt the data to keep it secure. This conversation happens before any actual web content is exchanged.
Here’s where SNI plays a vital role:
- Initial Connection: When the browser reaches out to the server, it includes the name of the website it wants to connect to in the initial handshake process. This is the SNI.
- Server’s Response: The server uses this information to present the correct SSL/TLS certificate, which is essentially the building’s nameplate that confirms the server’s identity.
- Secure Communication: With the correct certificate in place, the secure communication channel is established, and the browser can now access the specific website it requested.
Without SNI, the server wouldn’t know which certificate to present, as it hosts multiple websites (apartments) on the same IP address (building). This would be like the mailman knowing only the building’s address but not the specific apartment number, leading to confusion and failed deliveries.
The Technical Flow

- Client Hello: The client’s browser sends a « Client Hello » message to the server, including the SNI, which specifies the desired hostname.
- Server Hello: The server receives this message and looks at the SNI to determine which SSL/TLS certificate to use.
- Certificate Exchange: The server sends back the appropriate certificate for the requested hostname.
- Secure Connection Established: Both the client and server agree on encryption methods, and a secure session is established.
The Importance of SNI
SNI is crucial because it allows multiple SSL/TLS certificates to be hosted on the same IP address. This is especially important for shared hosting environments, where multiple websites are hosted on a single server. By using SNI, servers can ensure that the correct certificate is used for each website, providing secure connections and a seamless user experience.
In summary, SNI acts as the key identifier that helps the mailman (server) deliver the package (website data) to the correct apartment (website) in a large building (server with multiple websites). It ensures that the right doors are opened, allowing secure and efficient communication between the client and server.
Debugging SNI Using Wireshark
Wireshark
Wireshark is a powerful, open-source network protocol analyzer that allows users to capture and interactively browse the traffic running on a computer network. It provides detailed visibility into network activity, making it an essential tool for network troubleshooting, analysis, and security monitoring.
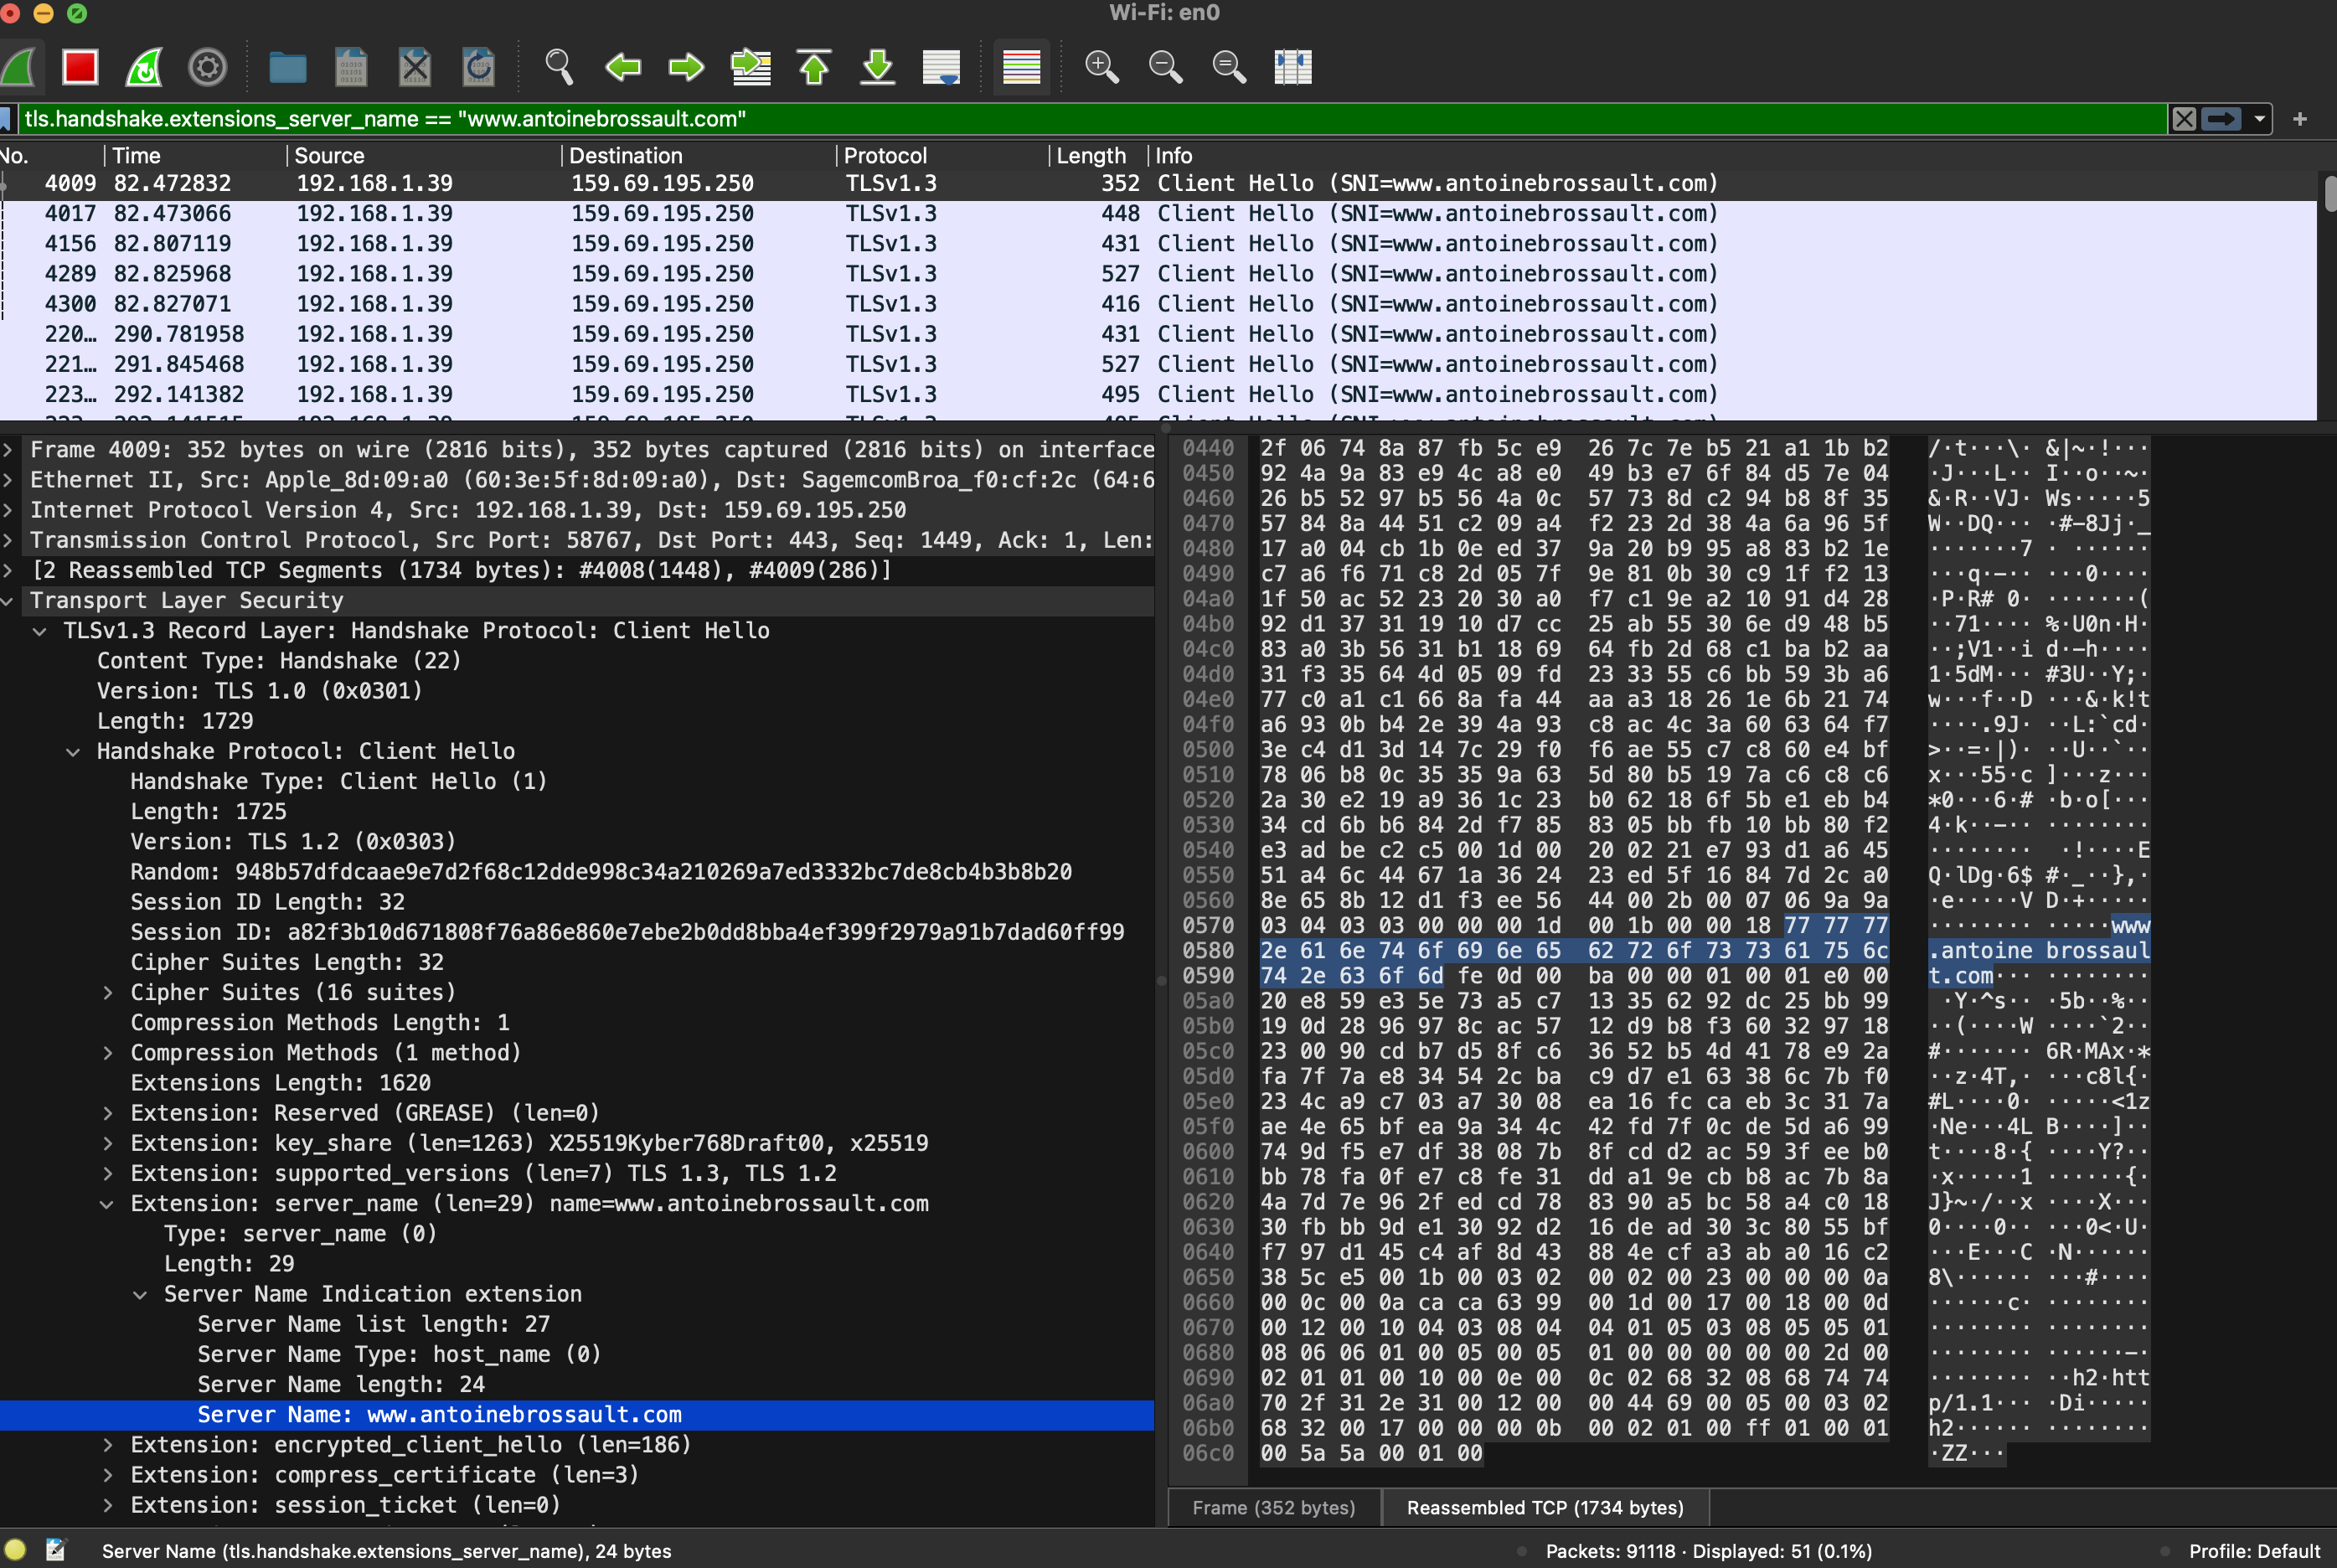
With Wireshark, use the following filter; obviously replace the domain name with the one you are currently debugging.
tls.handshake.extensions_server_name == "www.antoinebrossault.com"
Then visit the site you are debugging, then you should get something like this:
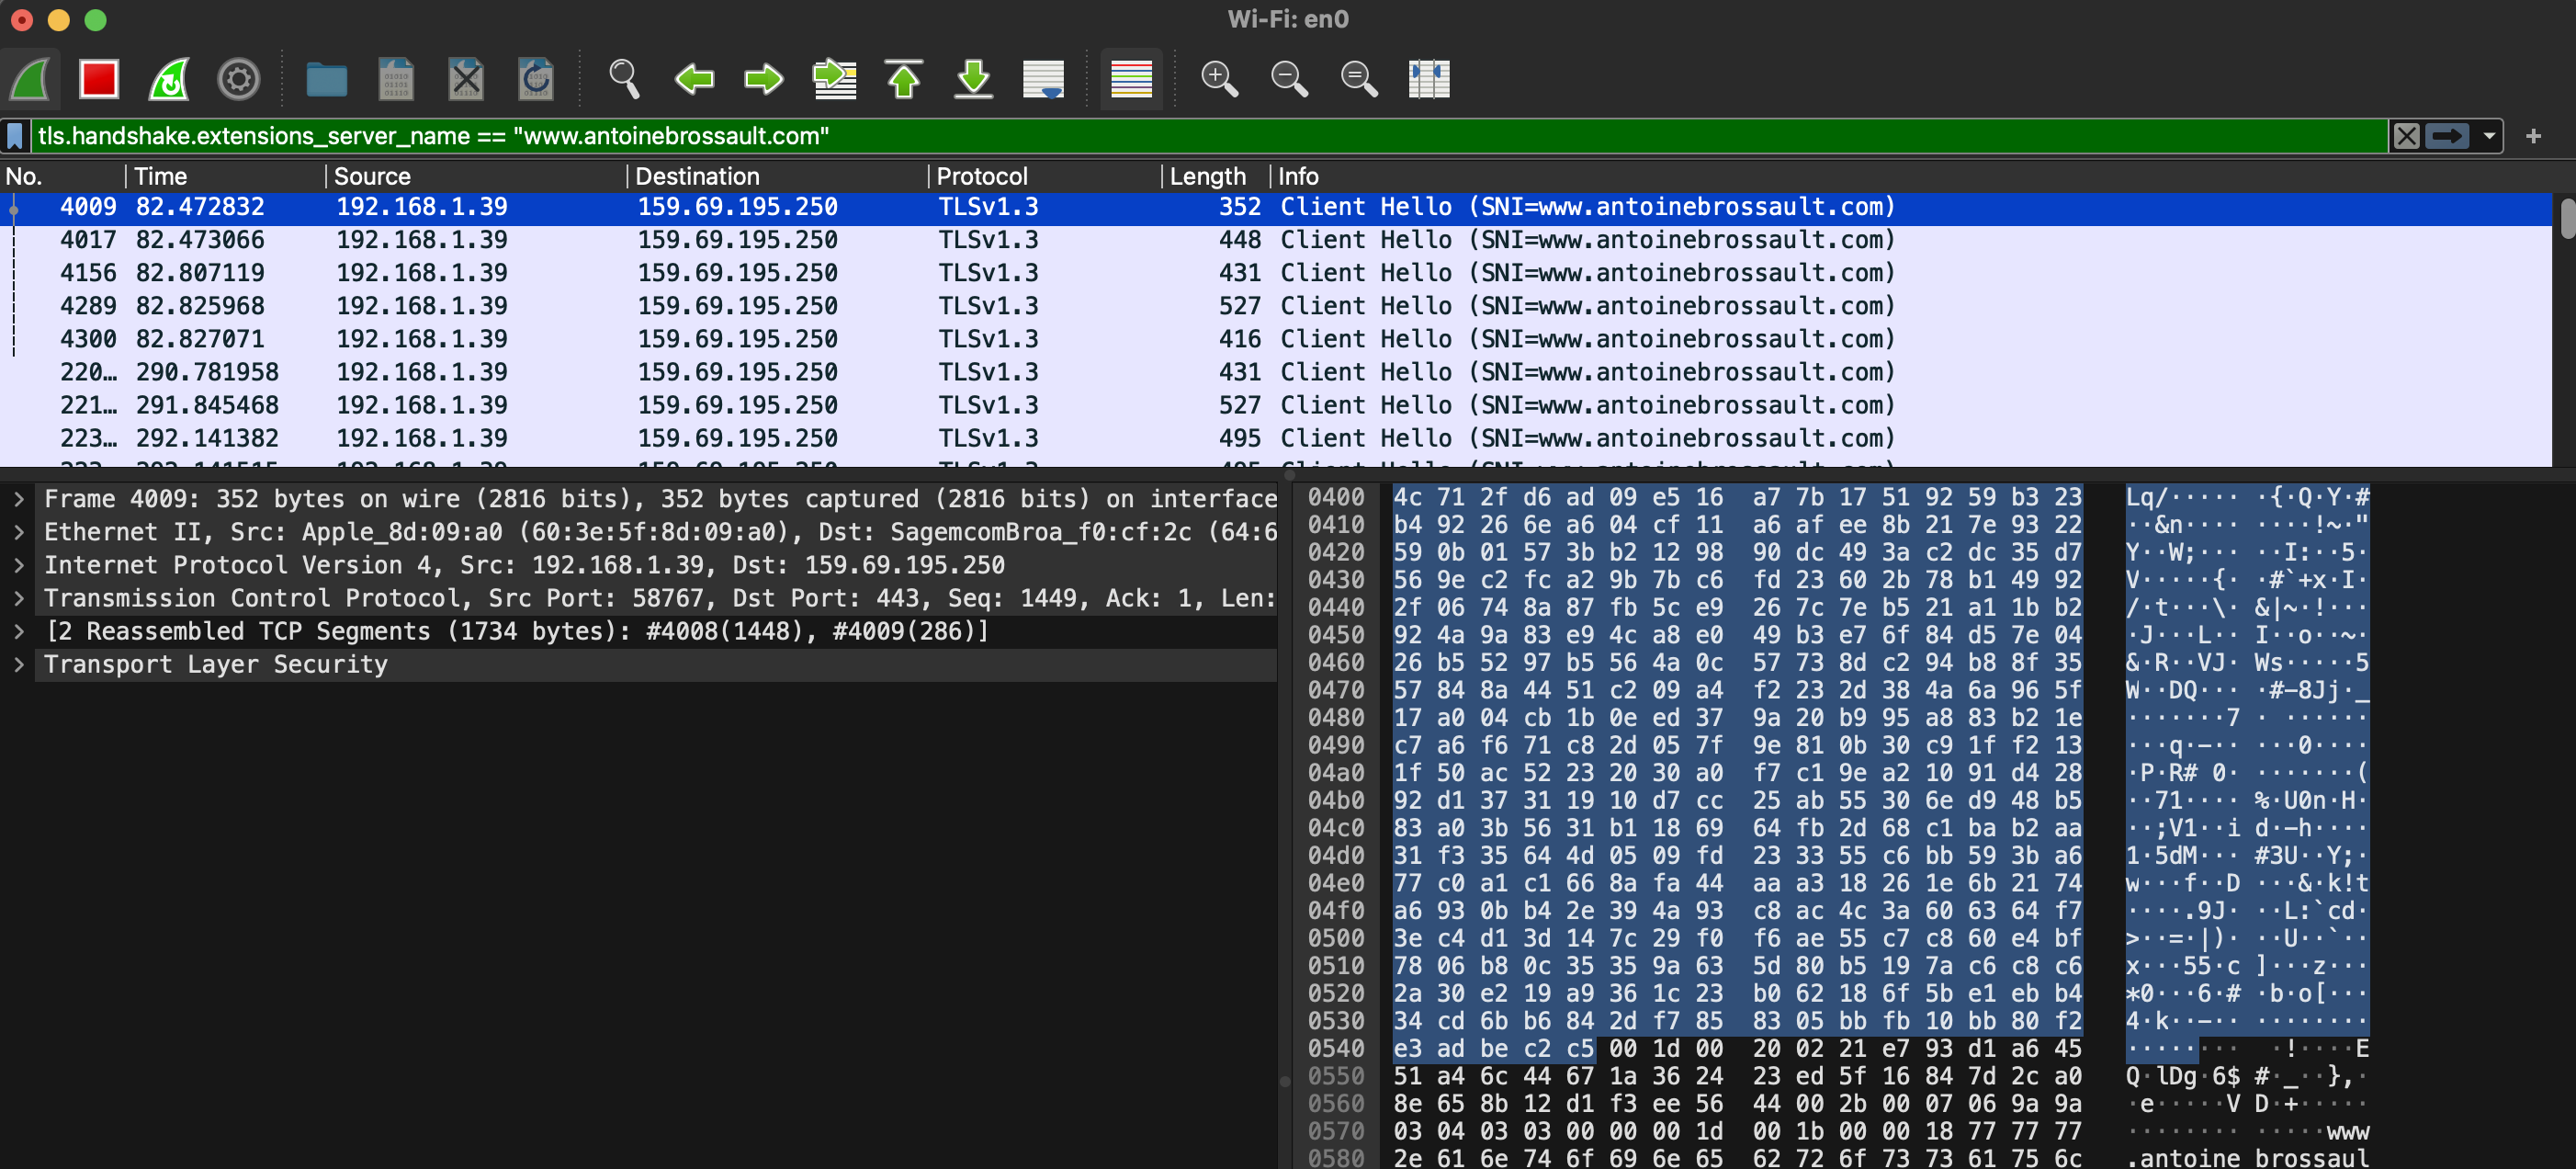
Then unfold the Transport Layer Security section, then TLS; then, navigate to the Handshake Protocol, followed by Extension, and finally, the Server Name.
Debugging SNI Using CLI Tools
To ensure that SNI is working correctly on your server, you can use command-line tools like openssl and curl for debugging. Here’s how you can do it:
Using OpenSSL
OpenSSL is a powerful toolkit for the Transport Layer Security (TLS) and Secure Sockets Layer (SSL) protocols. To check the SNI configuration using OpenSSL, follow these steps:
- Open a terminal.
- Run the OpenSSL command with the
s_clientoption, specifying the server’s hostname and port. Replaceexample.comwith the domain you want to test and443with the appropriate port if different.
openssl s_client -connect fastly.antoinebrossault.com:443 -servername fastly.antoinebrossault.com
Here’s what each part of the command does:
– s_client: Initiates a TLS/SSL client connection.
– -connect fastly.antoinebrossault.com:443: Connects to the server at fastly.antoinebrossault.com on port 443.
– -servername fastly.antoinebrossault.com: Sets the SNI field to fastly.antoinebrossault.com.
- Examine the output: Look for the server’s certificate information in the output. You should see details that match the expected certificate for the hostname you specified.
OpenSSL Example Output:
CONNECTED(00000006)
---
Certificate chain
 0 s:CN=fastly.antoinebrossault.com
   i:C=US, O=Let's Encrypt, CN=R3
   a:PKEY: rsaEncryption, 2048 (bit); sigalg: RSA-SHA256
   v:NotBefore: Apr 21 10:21:53 2024 GMT; NotAfter: Jul 20 10:21:52 2024 GMT
 1 s:C=US, O=Let's Encrypt, CN=R3
   i:C=US, O=Internet Security Research Group, CN=ISRG Root X1
   a:PKEY: rsaEncryption, 2048 (bit); sigalg: RSA-SHA256
   v:NotBefore: Sep  4 00:00:00 2020 GMT; NotAfter: Sep 15 16:00:00 2025 GMT
 2 s:C=US, O=Internet Security Research Group, CN=ISRG Root X1
   i:O=Digital Signature Trust Co., CN=DST Root CA X3
   a:PKEY: rsaEncryption, 4096 (bit); sigalg: RSA-SHA256
   v:NotBefore: Jan 20 19:14:03 2021 GMT; NotAfter: Sep 30 18:14:03 2024 GMT
---
Server certificate
-----BEGIN CERTIFICATE-----
MIIFAzCCA+ugAwIBAgISBMUlsp2NY0QD0dyi1uUZB8vQMA0GCSqGSIb3DQEBCwUA
MDIxCzAJBgNVBAYTAlVTMRYwFAYDVQQKEw1MZXQncyBFbmNyeXB0MQswCQYDVQQD
EwJSMzAeFw0yNDA0MjExMDIxNTNaFw0yNDA3MjAxMDIxNTJaMCYxJDAiBgNVBAMT
G2Zhc3RseS5hbnRvaW5lYnJvc3NhdWx0LmNvbTCCASIwDQYJKoZIhvcNAQEBBQAD
ggEPADCCAQoCggEBAKUvv7yBbdGbuSkRqk9DIr5+6PixAy8v+BrHs/peAke2eynx
PuyB7DphtXYA6Te7m9h8k2wgSnSM1aptQXb12GF7h8y+OKyjrkuP4ndkoA12Qsn9
8+yFhISrat46eyouZnr3rTNcjZiMBJWp750OMv058P03Uxfj+NENt9pdmSZG0+ad
SpoHX5jeU8qKnfOSbIYatRUo5WHVjwpoVHS2yu0Xp5HnaFdlhJiarssF6GLJtQHm
vOVgs0kXaZwlP870Im18FGfbNrfxqW34kZWM8VEMSOk0yFh1+8mba3yEhBdp/QT4
wHc+Q4lnnfYSeg3o6I7ve5Y5AkAb1JYVaNBoRb0CAwEAAaOCAh0wggIZMA4GA1Ud
DwEB/wQEAwIFoDAdBgNVHSUEFjAUBggrBgEFBQcDAQYIKwYBBQUHAwIwDAYDVR0T
AQH/BAIwADAdBgNVHQ4EFgQUiVZ3i4Whuk/cl9WqjxJzpFBJOPEwHwYDVR0jBBgw
FoAUFC6zF7dYVsuuUAlA5h+vnYsUwsYwVQYIKwYBBQUHAQEESTBHMCEGCCsGAQUF
BzABhhVodHRwOi8vcjMuby5sZW5jci5vcmcwIgYIKwYBBQUHMAKGFmh0dHA6Ly9y
My5pLmxlbmNyLm9yZy8wJgYDVR0RBB8wHYIbZmFzdGx5LmFudG9pbmVicm9zc2F1
bHQuY29tMBMGA1UdIAQMMAowCAYGZ4EMAQIBMIIBBAYKKwYBBAHWeQIEAgSB9QSB
8gDwAHcAPxdLT9ciR1iUHWUchL4NEu2QN38fhWrrwb8ohez4ZG4AAAGPAGQlVQAA
BAMASDBGAiEA2pFPY9Xkj+v3T1AztZrMk04KICg6BvuZVgy5ZZku4w0CIQCoNsss
9HUmz5/BQTS7Sx+vehZOYnTc5J81jZ2n2z2yiQB1AEiw42vapkc0D+VqAvqdMOsc
UgHLVt0sgdm7v6s52IRzAAABjwBkJVsAAAQDAEYwRAIgD/b65Dh6XTc19KBGqa1e
PBu5Iug4mRoP/krVXh9+yNUCIGtm7n6jjbUQd/uffeITCKowk548eHr6vNa+WI8i
wb58MA0GCSqGSIb3DQEBCwUAA4IBAQAMTalK6KRXtqmWZA8DGmevLlL15ao464II
S3HziUs9e22v6z2pQ4GkWicht3/V0LxgfUV0isJB7yCQqT2QRpqGaUQwYP1E0goS
JNAbd8rPPWTYCeN1lDF90S3GAfRclH4R92DzIFPuL31nRutzF2fRoHGVuYCXPfFl
SAS2mEW/Hwq5QcLzzMa04zQPzgnKRYpt81DZO3t1TvsfosuLTnESR1xfHnVv4ags
SJEowRK+W3Po8NZc/SYGqm4NibRQ29SFot9rkqhYK/Yl+Lv1TfMR3spa6KoUs4UW
eFjTEmsek39Ye1OytPKjulgt8qsXtI2cUM02+7g8Vz/rlM6jpOnO
-----END CERTIFICATE-----
subject=CN=fastly.antoinebrossault.com ⬅️⬅️⬅️⬅️
issuer=C=US, O=Let's Encrypt, CN=R3
---
No client certificate CA names sent
Peer signing digest: SHA256
Peer signature type: RSA-PSS
Server Temp Key: X25519, 253 bits
---
SSL handshake has read 4527 bytes and written 399 bytes
Verification: OK
---
New, TLSv1.3, Cipher is TLS_AES_128_GCM_SHA256
Server public key is 2048 bit
This TLS version forbids renegotiation.
Compression: NONE
Expansion: NONE
No ALPN negotiated
Early data was not sent
Verify return code: 0 (ok)
---
Using Curl
Curl is a command-line tool for transferring data with URLs, and it supports various protocols, including HTTP and HTTPS. To test SNI with Curl, follow these steps:
- Open a terminal.
- Run the Curl command with the
-v(verbose) option, specifying the URL of the site you want to test.
curl -v https://fastly.antoinebrossault.com
Here’s what each part of the command does:
– -v: Enables verbose mode, providing detailed information about the connection process.
– `https://fastly.antoinebrossault.com`: The URL of the site you want to test.
- Examine the output: Look for lines starting with
*, which contain information about the SSL handshake. Pay attention to theServer certificatesection to ensure that the correct certificate is being used for the hostname.
Curl Example Output:
❯ curl -v https://fastly.antoinebrossault.com
* Host fastly.antoinebrossault.com:443 was resolved.
* IPv6: (none)
* IPv4: 151.101.3.52, 151.101.67.52, 151.101.131.52, 151.101.195.52
*   Trying 151.101.3.52:443...
* Connected to fastly.antoinebrossault.com (151.101.3.52) port 443
* ALPN: curl offers h2,http/1.1
* (304) (OUT), TLS handshake, Client hello (1):
*  CAfile: /etc/ssl/cert.pem
*  CApath: none
* (304) (IN), TLS handshake, Server hello (2):
* (304) (IN), TLS handshake, Unknown (8):
* (304) (IN), TLS handshake, Certificate (11):
* (304) (IN), TLS handshake, CERT verify (15):
* (304) (IN), TLS handshake, Finished (20):
* (304) (OUT), TLS handshake, Finished (20):
* SSL connection using TLSv1.3 / AEAD-CHACHA20-POLY1305-SHA256 / [blank] / UNDEF
* ALPN: server accepted h2
* Server certificate:
*  subject: CN=fastly.antoinebrossault.com ⬅️⬅️⬅️⬅️
*  start date: Apr 21 10:21:53 2024 GMT
*  expire date: Jul 20 10:21:52 2024 GMT
*  subjectAltName: host "fastly.antoinebrossault.com" matched cert's "fastly.antoinebrossault.com" ⬅️⬅️⬅️⬅️
*  issuer: C=US; O=Let's Encrypt; CN=R3
*  SSL certificate verify ok.
* using HTTP/2
* [HTTP/2] [1] OPENED stream for https://fastly.antoinebrossault.com/
* [HTTP/2] [1] [:method: GET]
* [HTTP/2] [1] [:scheme: https]
* [HTTP/2] [1] [:authority: fastly.antoinebrossault.com]
* [HTTP/2] [1] [:path: /]
* [HTTP/2] [1] [user-agent: curl/8.6.0]
* [HTTP/2] [1] [accept: */*]
> GET / HTTP/2
> Host: fastly.antoinebrossault.com
> User-Agent: curl/8.6.0
> Accept: */*
In both cases, ensure that the subject or subjectAltName field matches the domain you are testing. This confirms that the correct certificate is being presented based on the SNI.
By following these steps, you can verify that SNI is configured correctly on your server and that the appropriate certificates are being used for secure connections.
Introduction
Nikto is a powerful, open-source web server scanner designed to identify potential security issues and vulnerabilities in web servers. It plays a crucial role in assessing the security posture of web applications by detecting outdated software versions, misconfigurations, and dangerous files. One of its valuable applications is in testing the implementation and effectiveness of Web Application Firewalls (WAFs), ensuring they provide the intended security protections.
Use Cases
Identifying Vulnerable Software Versions: Nikto scans for outdated versions of web servers and software that might be susceptible to known vulnerabilities.
Detecting Insecure Files and Scripts: It identifies default and potentially dangerous files/scripts that might be inadvertently left on the server.
Server Configuration Analysis: The tool checks for common misconfigurations that could lead to security issues.
Testing Web Application Firewalls: By simulating various attack patterns, Nikto can help assess the effectiveness of a WAF in blocking malicious traffic.
Security Audits and Compliance: Useful for conducting regular security audits and ensuring compliance with security standards.
Setting Up Nikto with Docker
Using Docker simplifies the setup and ensures a consistent environment for running Nikto. Here’s how to set it up:
Install Docker: Make sure Docker is installed on your system. You can download and install it from Docker’s official website.
Pull the Nikto Project : Open a terminal and pull the Nikto repo from GitHub with the following command:
git clone https://github.com/sullo/nikto.git
Go to the folder :
cd nikto
Build the image :
docker build -t sullo/nikto .
Run Nikto: You can run Nikto against a target web server using the pulled Docker image:
docker run --rm sullo/nikto -Display V -h [target_ip_or_domain]
Useful Options
Target Host (-h): Specify the target host to scan.
docker run --rm sullo/nikto -h example.com
Verbose (-Display V): Print each request on the screen.
docker run --rm sullo/nikto -Display V -h example.com
Port (-p): Define the port to scan (default is 80).
docker run --rm sullo/nikto -h example.com -p 8080
Output Format (-o and -Format): Save the scan results in various formats such as HTML, CSV, or XML.
docker run --rm sullo/nikto -h example.com -o results.html -Format html
Plugins (-Plugins): Run specific plugins for more targeted testing.
docker run --rm sullo/nikto -h example.com -Plugins outdated
Conclusion
Nikto is a versatile and essential tool for web server security assessments, particularly useful for verifying the implementation and effectiveness of Web Application Firewalls. Its comprehensive scanning capabilities and ease of use, especially when set up with Docker, make it a valuable asset for security professionals aiming to safeguard web applications. Whether for routine security audits or compliance checks, Nikto helps in identifying and mitigating potential vulnerabilities effectively.
Understanding Docker Entrypoints, Dockerfiles, and Environment Variables with Node.js
Docker has become an essential tool for developers looking to build, ship, and run applications consistently across different environments. In this article, we will explore how to use Dockerfiles, entrypoints, and environment variables in the context of a Node.js application. We’ll use a specific Dockerfile and entrypoint script as an example to illustrate these concepts.
1. What is a Dockerfile?
A Dockerfile is a script containing a series of instructions on how to build a Docker image. It specifies the base image, software dependencies, configuration settings, and commands to be run in the container.
Example Dockerfile
Here is an example Dockerfile for a Node.js application:
# Use an official Node runtime as a parent image
FROM arm64v8/node:14-alpine

# Set the working directory in the container
WORKDIR /app

# Copy the current directory contents into the container
COPY . .

# Update and upgrade apk package manager
RUN apk update && apk upgrade

# Install curl
RUN apk add curl

# Install ffmpeg
RUN apk add ffmpeg

# Install necessary npm packages
RUN npm install

# Install nodemon globally
RUN npm install -g nodemon

# Copy entrypoint script into the container
COPY entrypoint.sh /usr/local/bin/entrypoint.sh

# Make the entrypoint script executable
RUN chmod +x /usr/local/bin/entrypoint.sh

# Make port 3008 available to the world outside this container
EXPOSE 3008

# Define the entrypoint script to be executed
ENTRYPOINT ["entrypoint.sh"]
2. Entrypoints in Docker
The ENTRYPOINT instruction in a Dockerfile allows you to configure a container to run as an executable. Unlike the CMD instruction, which provides defaults that can be overridden, ENTRYPOINT instructions are always executed when the container starts.
In this example, we have defined an entrypoint script entrypoint.sh which will be executed every time the container starts.
Example Entrypoint Script
Here is an example of what the entrypoint.sh script might look like:
#!/bin/sh

# Check for environment variable and set command accordingly
if [ "$ENV" = "development" ]; then
  COMMAND="nodemon app.js"
elif [ "$ENV" = "production" ]; then
  COMMAND="npm run start"
fi

# Execute the command
exec $COMMAND
This script starts the Node.js application using nodemon, which is a tool that helps develop node.js based applications by automatically restarting the node application when file changes in the directory are detected if $ENV is equal to « development ».
3. Using Environment Variables
Environment variables are a way to pass configuration into your Docker containers. They can be defined in the Dockerfile using the ENV instruction or passed at runtime using the -e flag.
Defining Environment Variables in Dockerfile
In this example, environment variables are not defined in the Dockerfile, but you can easily add them using the ENV instruction, But the whole idea of the entry point is to do this dynamically based on the environment.
Passing Environment Variables at Runtime
You can also pass environment variables to your container at runtime:
docker run -e NODE_ENV=development -e PORT=3008 my-node-app
4. Practical Example: Node.js Application
Let’s put everything together in a more concrete example. We’ll create a simple Node.js application that uses environment variables and demonstrates the Dockerfile and entrypoint script provided.
Directory Structure
my-node-app/
│
├── Dockerfile
├── entrypoint.sh
├── app.js
├── package.json
└── package-lock.json
Dockerfile
# Use an official Node runtime as a parent image
FROM arm64v8/node:14-alpine

# Set the working directory in the container
WORKDIR /app

# Copy the current directory contents into the container
COPY . .

# Update and upgrade apk package manager
RUN apk update && apk upgrade

# Install curl
RUN apk add curl

# Install ffmpeg
RUN apk add ffmpeg

# Install necessary npm packages
RUN npm install

# Install nodemon globally
RUN npm install -g nodemon

# Copy entrypoint script into the container
COPY entrypoint.sh /usr/local/bin/entrypoint.sh

# Make the entrypoint script executable
RUN chmod +x /usr/local/bin/entrypoint.sh

# Make port 3008 available to the world outside this container
EXPOSE 3008

# Define the entrypoint script to be executed
ENTRYPOINT ["entrypoint.sh"]
entrypoint.sh
#!/bin/sh

# Check for environment variable and set command accordingly
if [ "$ENV" = "development" ]; then
  COMMAND="nodemon app.js"
elif [ "$ENV" = "production" ]; then
  COMMAND="npm run start"
fi

# Execute the command
exec $COMMAND
app.js
const http = require('http');
const port = process.env.PORT || 3000;
const environment = process.env.ENV || 'development';

const requestHandler = (request, response) => {
    response.end(`Hello, World! Running in ${environment} mode on port ${port}.`);
};

const server = http.createServer(requestHandler);

server.listen(port, (err) => {
    if (err) {
        return console.log('something bad happened', err);
    }
    console.log(`Server is listening on ${port}`);
});
package.json
{
  "name": "my-node-app",
  "version": "1.0.0",
  "description": "A simple Node.js application",
  "main": "app.js",
  "scripts": {
    "start": "node app.js"
  },
  "dependencies": {}
}
Building and Running the Docker Container
Build the Docker Image :
docker build -t my-node-app .
Run the Docker Container :
docker run -e ENV=development -e PORT=3008 -v $(shell pwd)/app.js:/app/app.js -d -p 3090:3008 my-node-app
Makefile :
build:
    docker build -t my-node-app . --force-rm

runprod:
    docker run -e ENV=production -e PORT=3008 -d -p 3090:3008 my-node-app

rundev:
    docker run -e ENV=development -e PORT=3008 -v $(shell pwd)/app.js:/app/app.js -d -p 3090:3008 my-node-app
Now, if you navigate to http://localhost:3008, you should see Hello, World! Running in development mode on port 3008.
Conclusion
Understanding Dockerfiles, entrypoints, and environment variables is crucial for building robust and flexible Docker containers. By leveraging these tools, you can create containers that are not only easy to configure and deploy but also capable of handling a wide variety of use cases.
With Docker, you can ensure your Node.js applications run consistently across different environments, making your development and deployment processes more efficient and reliable.
In this example, we used a Dockerfile to set up a Node.js environment, installed necessary dependencies, and defined an entrypoint script to manage the application startup process. By utilizing environment variables, we made the application configuration flexible and easy to manage.
A deployment with CLI
To deploy the WAF on the edge, you need to call the WAF API. The official Fastly documentation provides CURL commands that you can execute in your terminal. Instead of using CURL commands, I decided to create a small CLI program in Node.js.
By the way it’s worth noting you can also deploy the WAF with Terraform.
The CLI
The code for the CLI is available in this GitHub repository. If you look at the code, you’ll see it is straightforward and simply converts the CURL commands into JavaScript HTTP calls.
Prerequisites for the CLI:
- You need to have Node.js installed with npm.
- You need access to your Fastly API key and your Signal Science (WAF) API key.
- You should have a site created on the Signal Science dashboard.
- You need an existing Fastly service for delivery.
Install the CLI
git clone https://github.com/Antoinebr/Fastly-WAF-Edge-deployement.git
Go in the folder :
cd Fastly-WAF-Edge-deployement
Install the dependecies :
npm install
Fill the .env
Copy the .env.sample and rename it .env then fill the informations with your own credentials.
cp .env.sample .env
Replace those (dummy data) with your credentials :
SIGSCI_EMAIL="[email protected]"
SIGSCI_TOKEN="3dd2-b927-3fde-349dq-dss922d"
FASTLY_KEY="dsddIIOLddsdbndfqlqs-G92_221_K-o"


corpName = "antoine_lab"
siteName = "faslty.antoinebrossault.com"
fastlySID = "eGdsdddd20002FwuTfjn66"
Run the CLI
npm run cli
Create the security service
Set up a new edge security service by using the edge deployment API. This API call will create a new edge security service linked to your corp and site.
In the CLI choose option 1 :
    -----------------------------------------------------
    Menu
    -----------------------------------------------------

    🌎 : edgeSecurityServiceCreation - [1]

    🔒 : getGetSecurityService - [2]

    🔗 : mapEdgeSecurityServiceToFastly - [3]

    -----------------------------------------------------

Choose an option by inputing the number, then hit enter : 1
If everything went OK it should return the following message :
✅ edgeSecurityServiceCreation : Service created 🌎
Check the security service
To check if the creation worked, you can select the getGetSecurityService - [2] option.
    -----------------------------------------------------
    Menu
    -----------------------------------------------------

    🌎 : edgeSecurityServiceCreation - [1]

    🔒 : getGetSecurityService - [2]

    🔗 : mapEdgeSecurityServiceToFastly - [3]

    -----------------------------------------------------
Choose an option by inputing the number, then hit enter :2
Getting security service for antoine_lab and siteName faslty.antoinebrossault.com
If everything went OK it should return the following message :
{
  AgentHostName: 'se--antoine-lab--65df71.edgecompute.app',
  ServicesAttached: [
    {
      id: 'eGI13sdd922Tfjn66',
      accountID: '5FCbddssSuUxxSa4faLnP',
      created: '2024-05-27T05:22:20Z',
      createdBy: '[email protected]'
    }
  ]
}
Map the Security Service to your Fastly delivery service
    -----------------------------------------------------
    Menu
    -----------------------------------------------------

    🌎 : edgeSecurityServiceCreation - [1]

    🔒 : getGetSecurityService - [2]

    🔗 : mapEdgeSecurityServiceToFastly - [3]

    -----------------------------------------------------

Choose an option by inputing the number, then hit enter :3
You are about to mapEdgeSecurityServiceToFastly, for corpName : antoine_lab, siteName faslty.antoinebrossault.com and fastlySID eGI13FcVmYzg3FwuTfjn66 continue ? [Y/N]y
If everything went OK it should return the following message :
{
  fastlyServices: [
    {
      id: 'eGI13sdd922Tfjn66',
      accountID: '5FCbddssSuUxxSa4faLnP',
      created: '2024-05-27T05:22:20Z',
      createdBy: '[email protected]'
    }
  ]
}
Send the traffic to the WAF
By default, the service will be activated and set to 0% traffic ramping, you can add traffic by updating the Enabled value in a newly created dictionary called Edge_Security
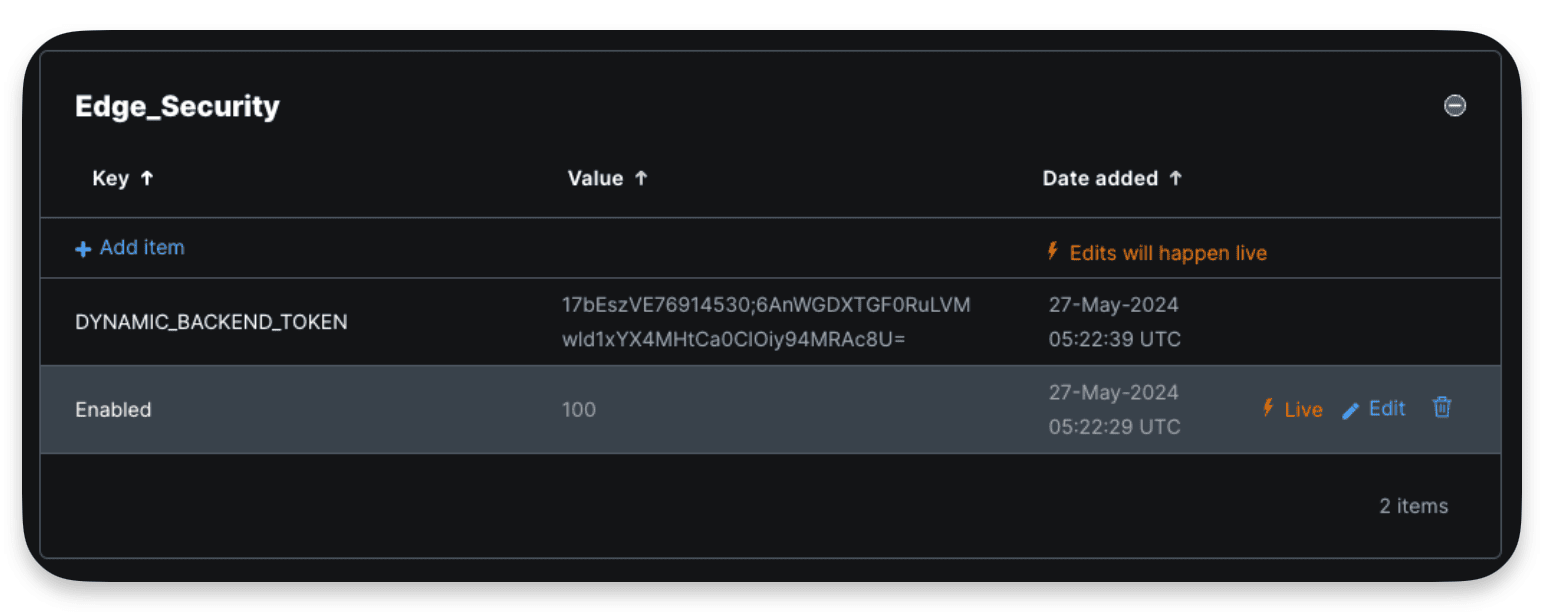
Here the 100% value means I send 100% of the traffic to the WAF, worth noting this modification to the dictionary doesn’t require an activation.
Test the deployment
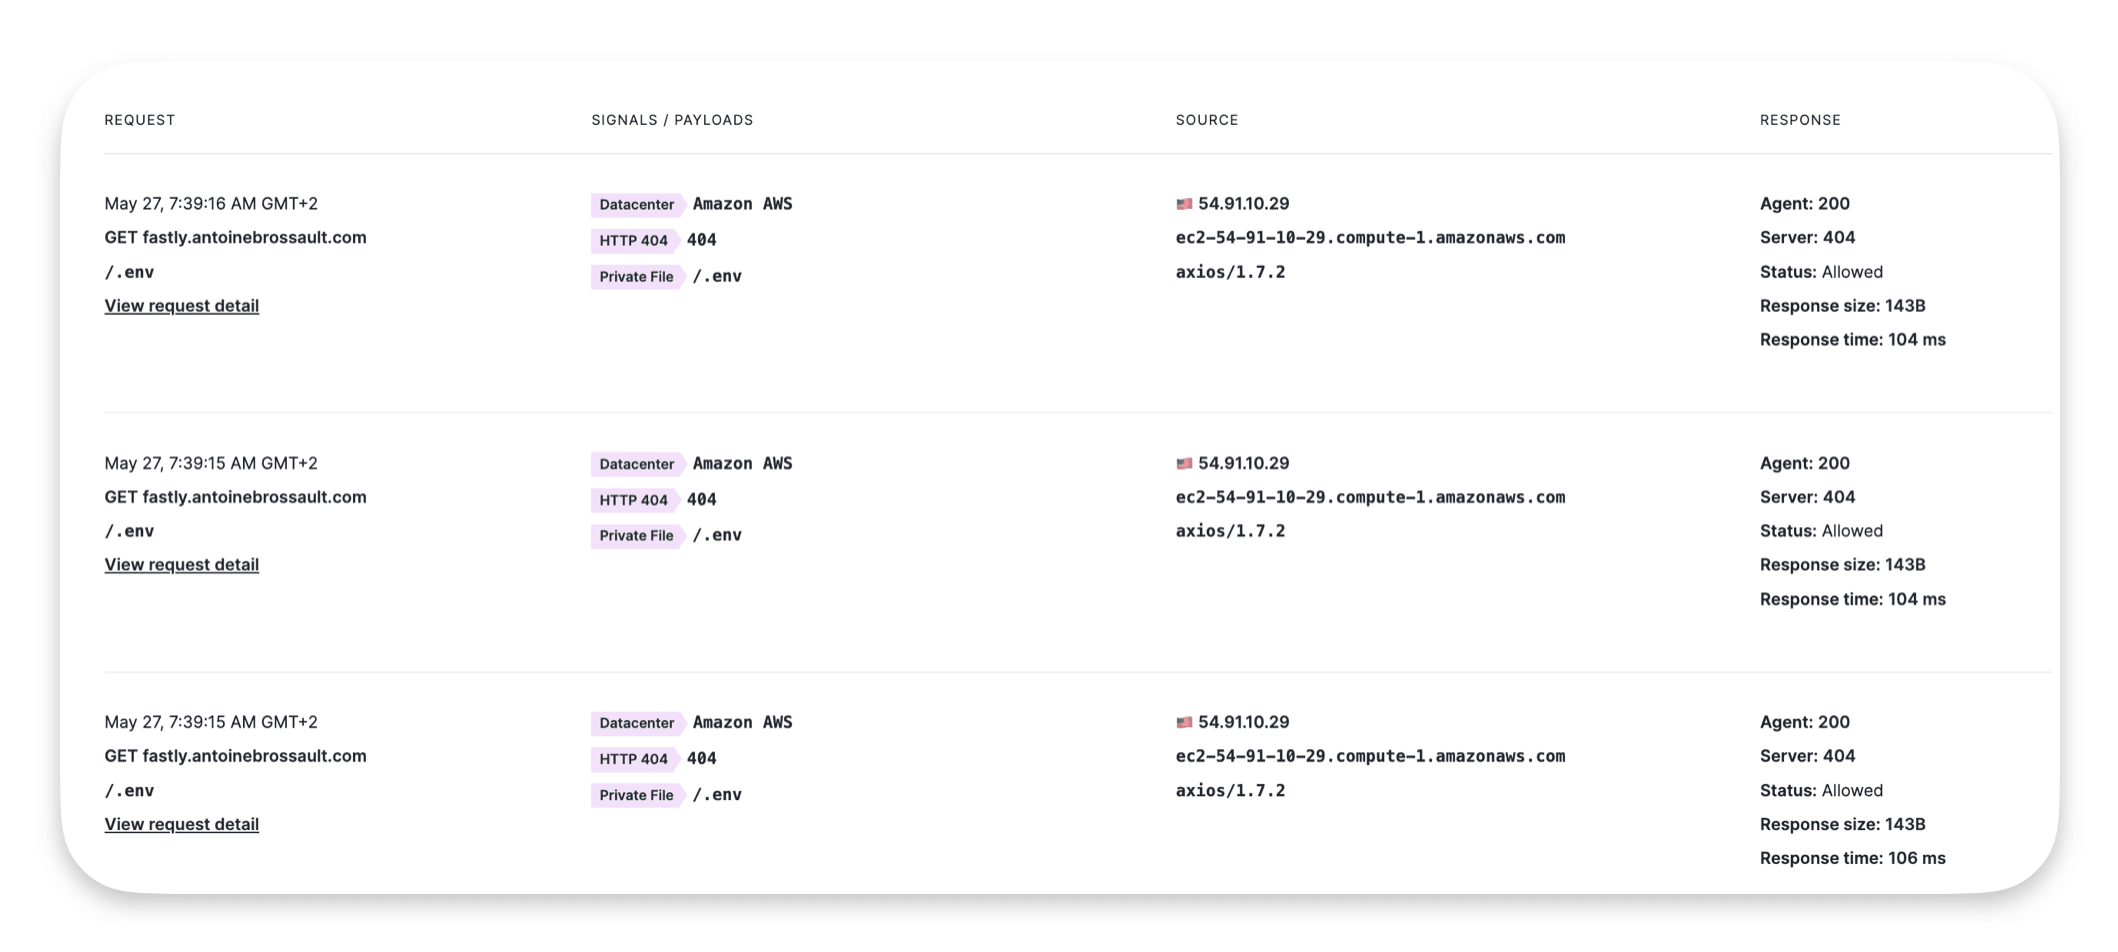
An easy way to test the deployment is to send malicious requests to your domain to see if the WAF is able to identify them.
An example of such request :
curl https://yourdomain.com/.env
If you run this request multiple time you should get something like this :
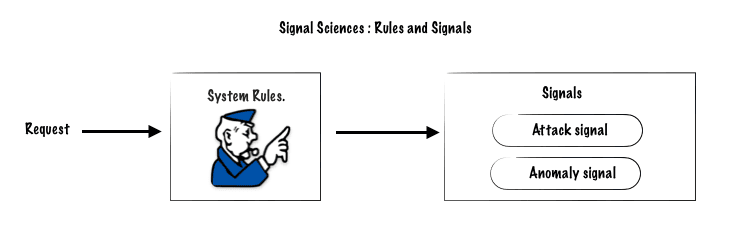
Signal Science Signal :
A Signal is a descriptive tag about a request, a request gets one or multiple tags based on rules a request triggers.
Defined Systems signals
Attack Signal
Triggered by malicious request attack payloads, to hack, destroy, disable, steal…
Here’s an example of such request with a URL with an attempt of SQL Injection :
https://www.example.com/search?q=SELECT+*+FROM+users+WHERE+username='$username'
Anomaly Signal
These signals indicate unusual or potentially malicious activities that don’t fit into specific attack categories, but are still suspicious.
Examples include:
- Failed attempts to access admin page :
like https://example.com/wp-admin
- Requests with Invalid encoding :
UTF-8: A common exploit vector involves sending invalid byte sequences that break UTF-8 encoding rules. For example, a lone byte %C3 which is not followed by a valid continuation byte.
Request example :
POST /login HTTP/1.1
Host: example.com
Content-Type: application/x-www-form-urlencoded
Content-Length: 40

username=%27%20OR%201=1;%20--%20&password=test
Here, %27 represents an apostrophe, which could be part of a SQL injection payload.
Exploit: The application might concatenate the injected payload directly into a SQL query, leading to SQL injection.
- Malformed data in the request body, which might indicate a malicious request
Like incorrect JSON data send to an API in order to cause the server to throw an error, potentially leading to a denial of service if the server does not handle such errors gracefully. In some cases, improperly handled parsing errors could be exploited to reveal internal server information or cause unexpected behavior.
Both Attack Signals and Anomaly Signals are referred to as System Signals, as they are built into the system.
SigSci Custom Signals
Defined by users, are tagged to requests that match user-defined conditions.
Custom signals are created at either the corporation level (Corp Signals) or the site level (Site Signals). They can be used to tag specific requests based on custom rules. This tagging helps in identifying and managing unusual or malicious traffic more effectively.
Examples :
Blocking Web Crawlers:
- Scenario : If a site owner notices vulnerability scans from requests that do not use the proper hostname, they can create a custom signal to tag valid hostname requests.
-
Rule : Tag traffic that includes the domain acmecorp.com with a signal like Organization Domains.
-
Blocking Rule : Any request without the Organization Domains signal is blocked, effectively filtering out suspicious traffic that targets the IP directly.
Tagging Anonymous Email Domains :
- Scenario : To reduce fraudulent account registrations, a rule can be created to tag sign-ups using disposable email domains.
-
Rule : Tag requests with emails from known disposable domains with a signal like Disposable Email.
-
Action : Block or further inspect these requests, preventing the creation of fake accounts.
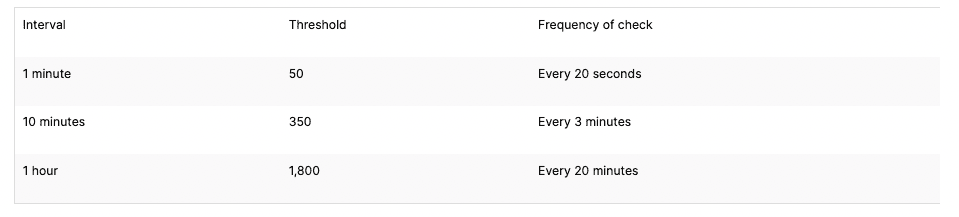
Thresholds
Thresholds determine when to trigger an action. For example, a threshold could be « 10 or more requests within 60 seconds. » Default attack thresholds are provided but can be customized. The default thresholds are:
Signal Science Rules :
Rules are settings that define conditions to block, allow, or tag requests either permanently or for a certain period.
System Rules
System rules are predefined in the tool, when applied they can generate System Signals for an Attac or Anomaly.
Request Rules
These rules let you set specific conditions to block, allow, or tag requests either permanently or for a certain time. In the UI, these rules are grouped together.
Type :
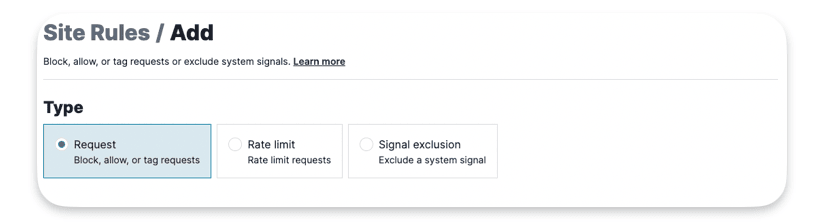
Conditions :
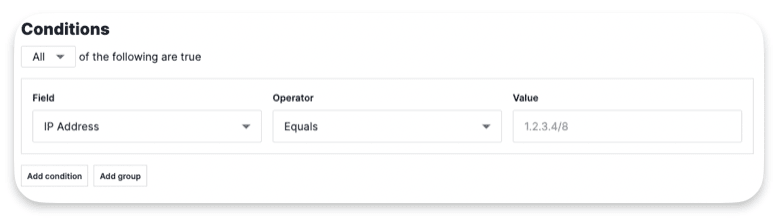
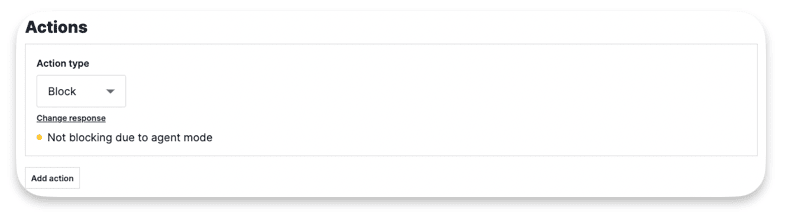
Actions :
Select the Action(s) that will happen when the conditions are met
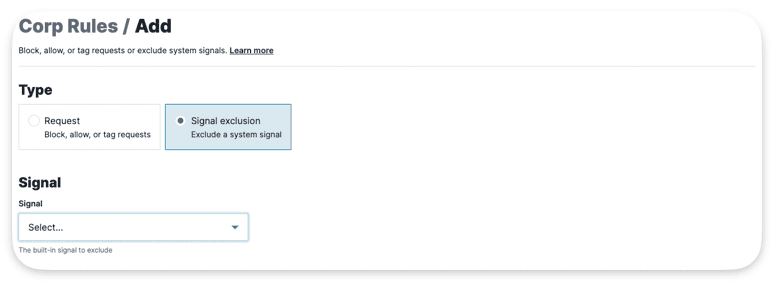
Exclusion Rules
Signal Exclusion Rules let users specify which requests should have System Signals tags removed from them. This helps reduce false positives. For instance, you can remove the XSS Attack Signal from endpoints where users are expected to submit valid scripts.
Rate Limit Rules
Rate Limit Rules allow users to set conditions to either block requests or log them with a rate-limit signal if they exceed a specified threshold within a certain time window. For instance, a threshold could be « 10 or more requests within 60 seconds. » If any IP sends 10 or more requests within the last 60 seconds, it triggers related rules, such as Custom Signals or blocking requests from that IP. Many of our rules rely on thresholds like this for their logic.
Rate Limit applies at the Site Level

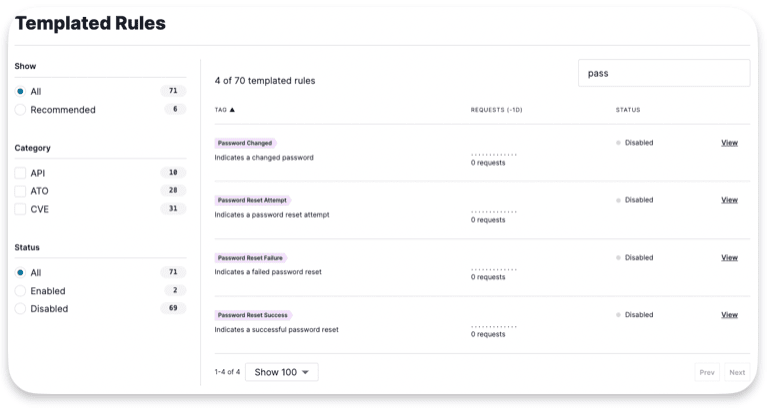
Templated Rules
Partially pre-made rules. When you fill them out, they let you block requests, flag IPs for blocking or logging, or tag specific types of requests. These rules are useful for managing registrations, logins, and virtual patches in customer applications by setting up simple rules. There are three types of templates: API, ATO (Account Take Over), & CVE (Common Vulnerabilities and Exposures).
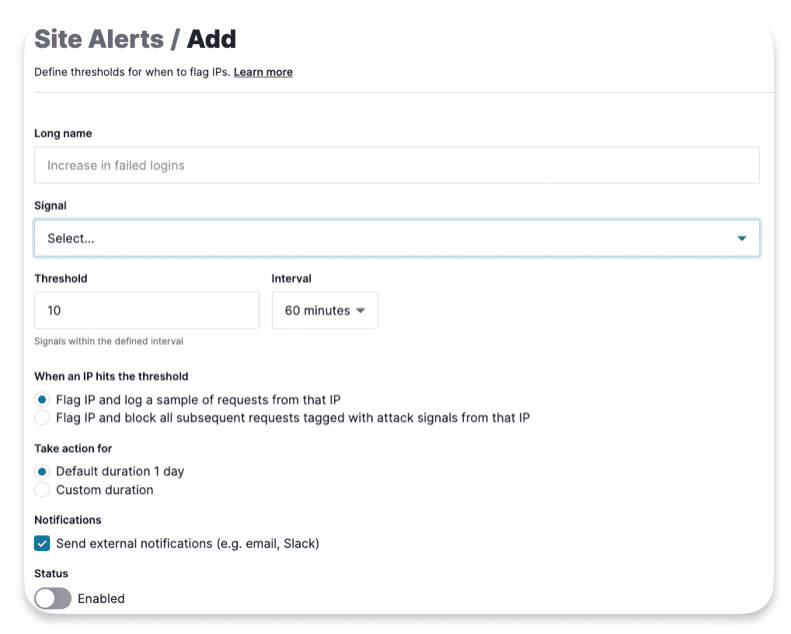
Systems Alters and Site Alerts
System Alerts are preset thresholds for the number of requests with attack signals over time. You can adjust these thresholds in your Site Settings under Attack Thresholds. This rule lets users pick any attack, anomaly, or custom signal and set a threshold and interval for when to flag and alert, and optionally block subsequent attacks from an IP.
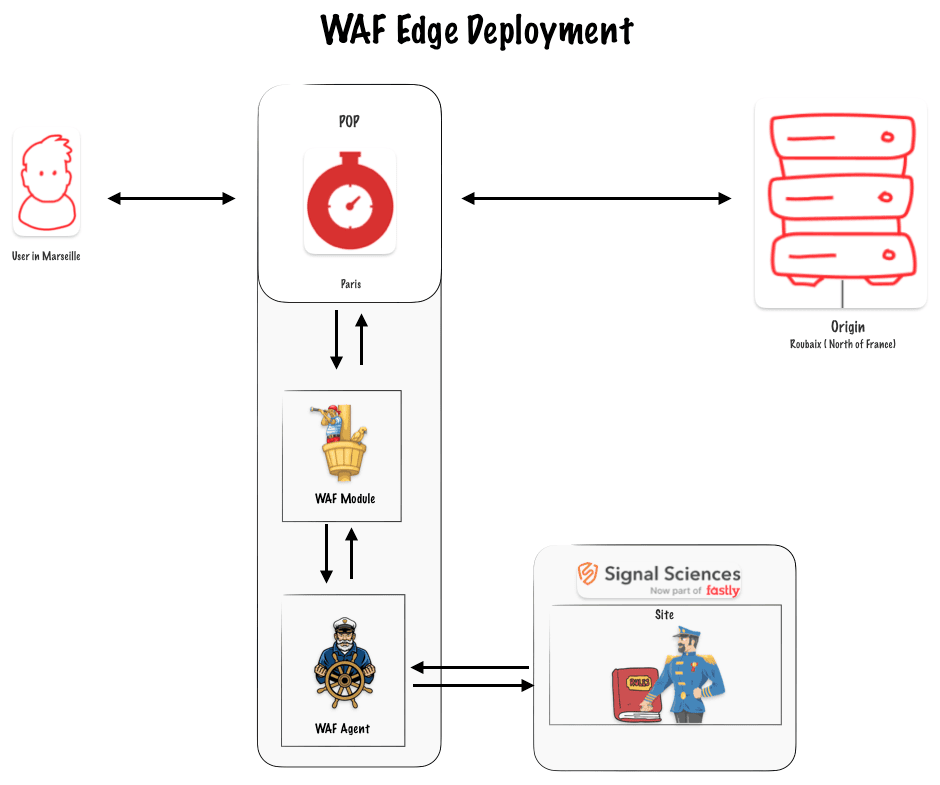
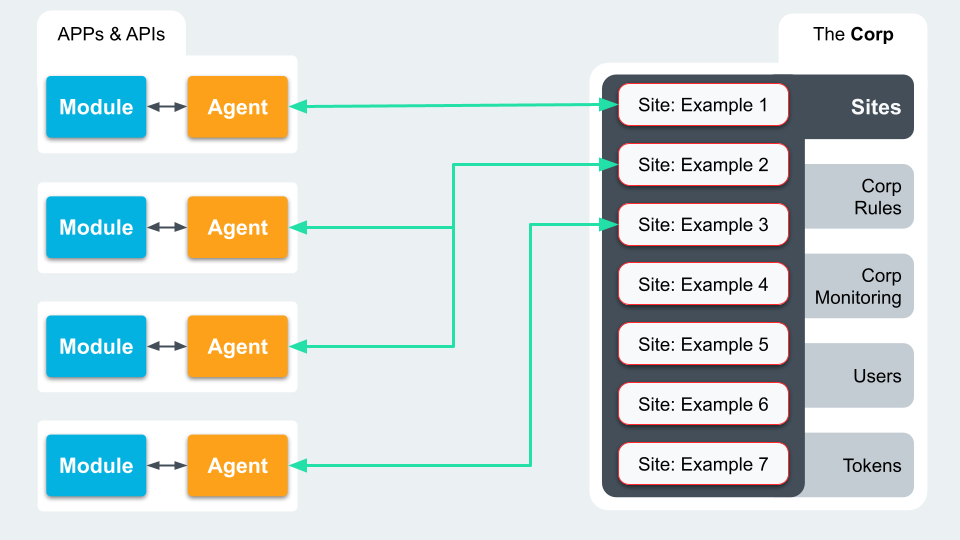
SigSci’s architecture
SigSci is built to be flexible. This means you can choose where to put the software that deals with incoming requests. This software comes in two parts: Modules and Agents. They work together to sort through requests and block bad ones.
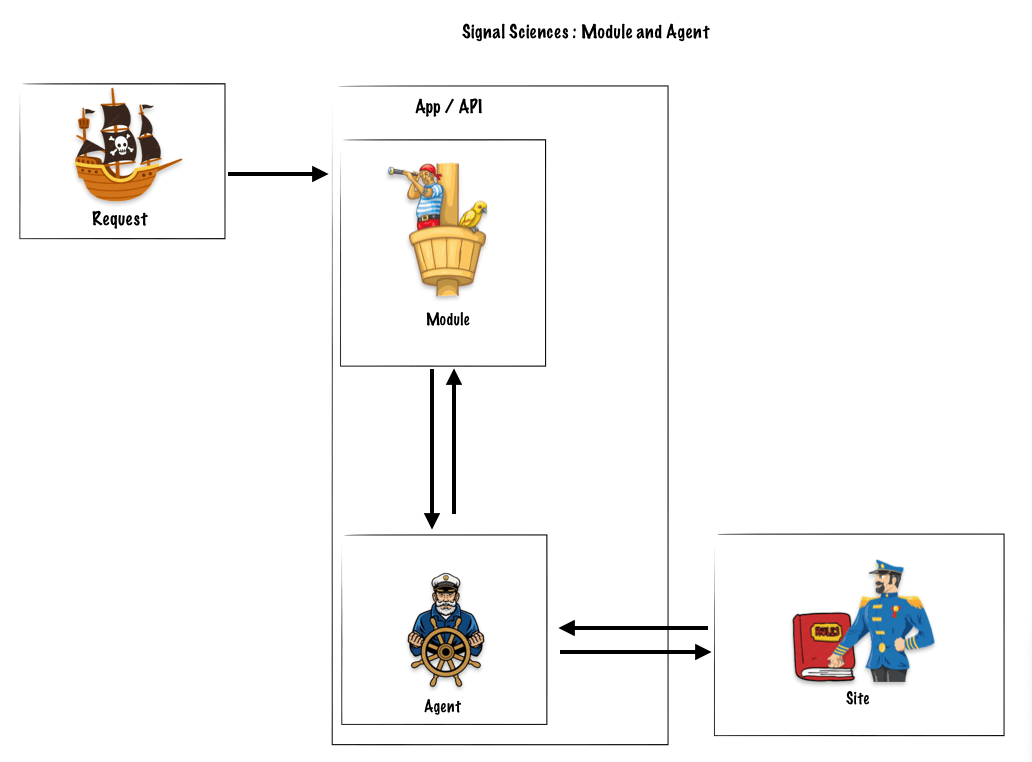
Step 1
A request arrives, then the barrel man (module) detects the request and informs the captain (agent) about the request.
The module (barrel man) : Receives the Request, Sends Req to Agent and Enforces Agent Decision
Step 2
The captain (agent) asks the Admiralty (sites) what should be done with that request, intercept it, let it though.
The agent (Captain) : Applies Rules, Generates Signals, Decide Allow/Block
The sites (Admiralty) : Those Signals and a host of other data will migrate up to the Site level and the Corp level.
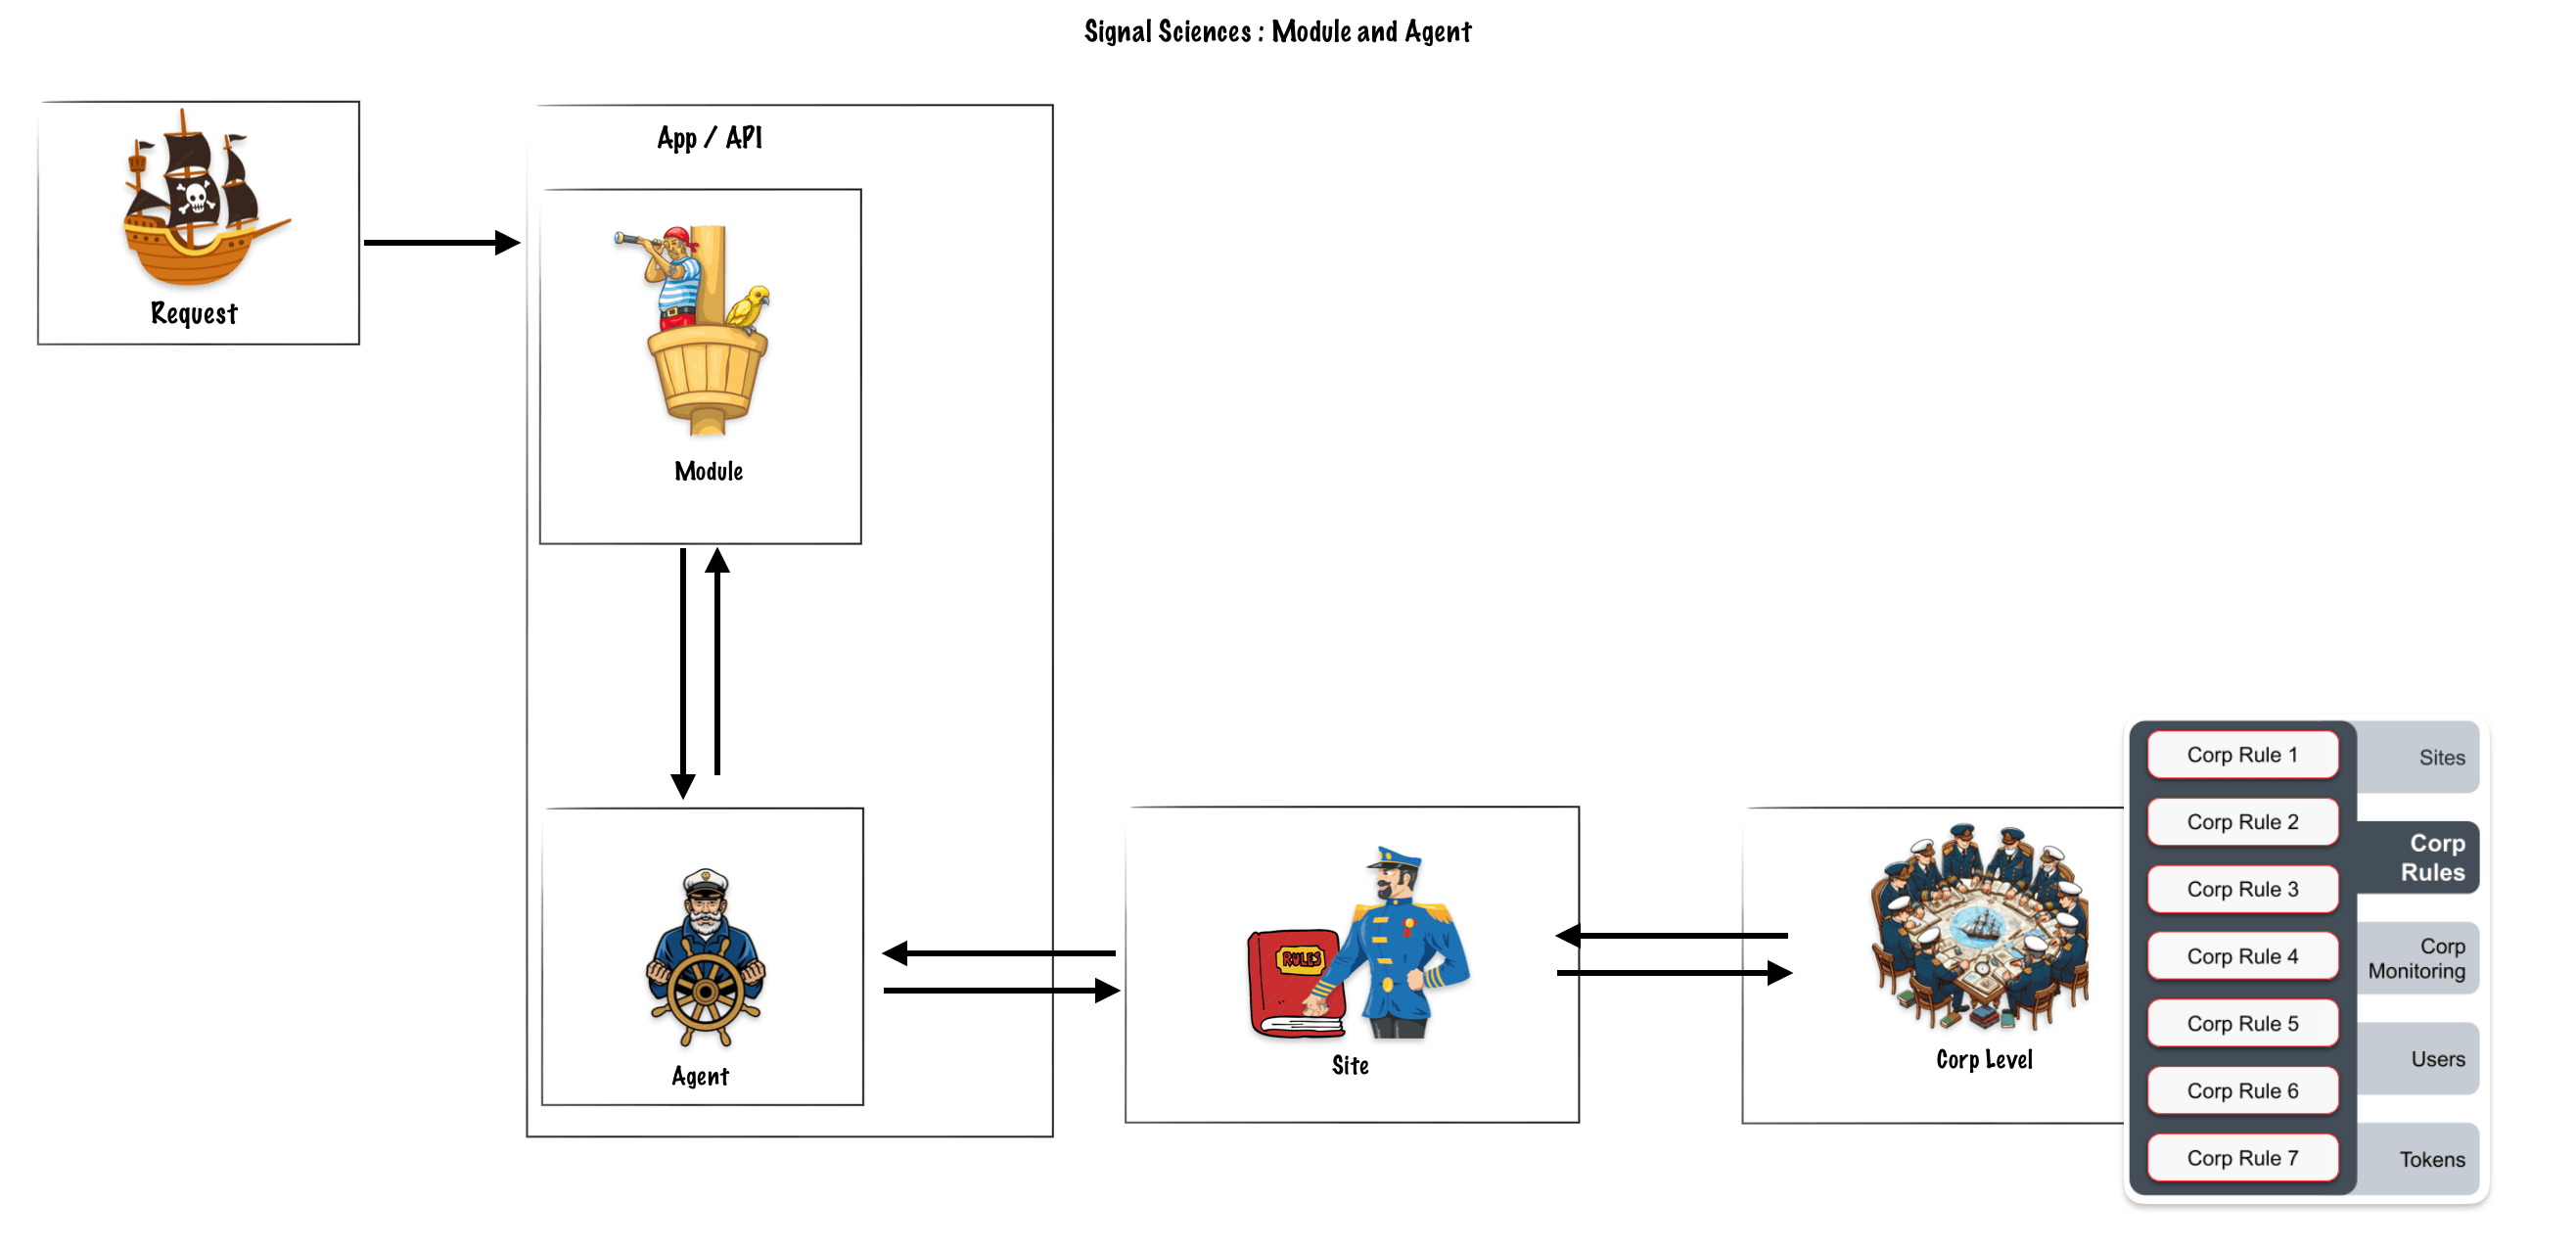
Corp level
Starting with the Corp, this is the customer account. Collected here are settings for common account elements like Access Tokens and User Management, along with Signal Sciences specifics like Corp Monitoring, Corp Rules, and Sites. Corp Monitoring allows users to see metrics at an account level.
The Corp Rules are all the user-defined rules, as discussed earlier, that will be applied across the Corp via each Site
Within each Corp, users can set up multiple Sites. A Site, aka workspace, can be for a single web application, a bundle of web applications, API, or microservice that Signal Sciences can protect from attacks.
Corp – Sites
Like with Corps, Sites can have their own level of Rules that can be configured. The Site’s Rules are bundled with the Corp’s Rules and passed to the linked Agents. Agents send back data to pass through the Site for Site level monitoring, which could then be rolled up into Corp level Monitoring too.
Agent Mode
Blocking Mode : Applying rules to : Block request yes – Log request yes
Logging Mode : Applying rules to : Block request no – Log request yes
Off Mode : Applying rules to : Block request no – Log request no
All agents under a site can be set to one of these modes. When an Agent is set to Off Mode, the linked Module will fail-open ensuring traffic is not blocked.
Monitor attacks
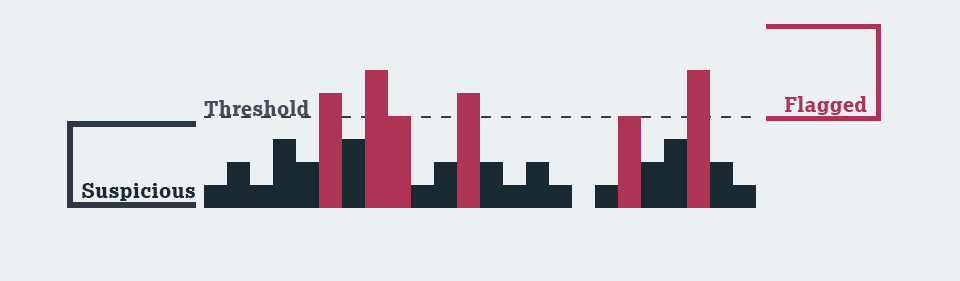
- Suspicious IPs are IPs with requests, containing signals, numbering below the configured Attack Thresholds.
- Flagged IPs are IPs with requests, containing signals, numbering at or above the configured Attack Thresholds.
Flagged IPs will stay flagged for 24 hours, unless configured otherwise. Even if the number of requests with attack signals falls below the threshold, the IP will stay Flagged until the configure duration finishe
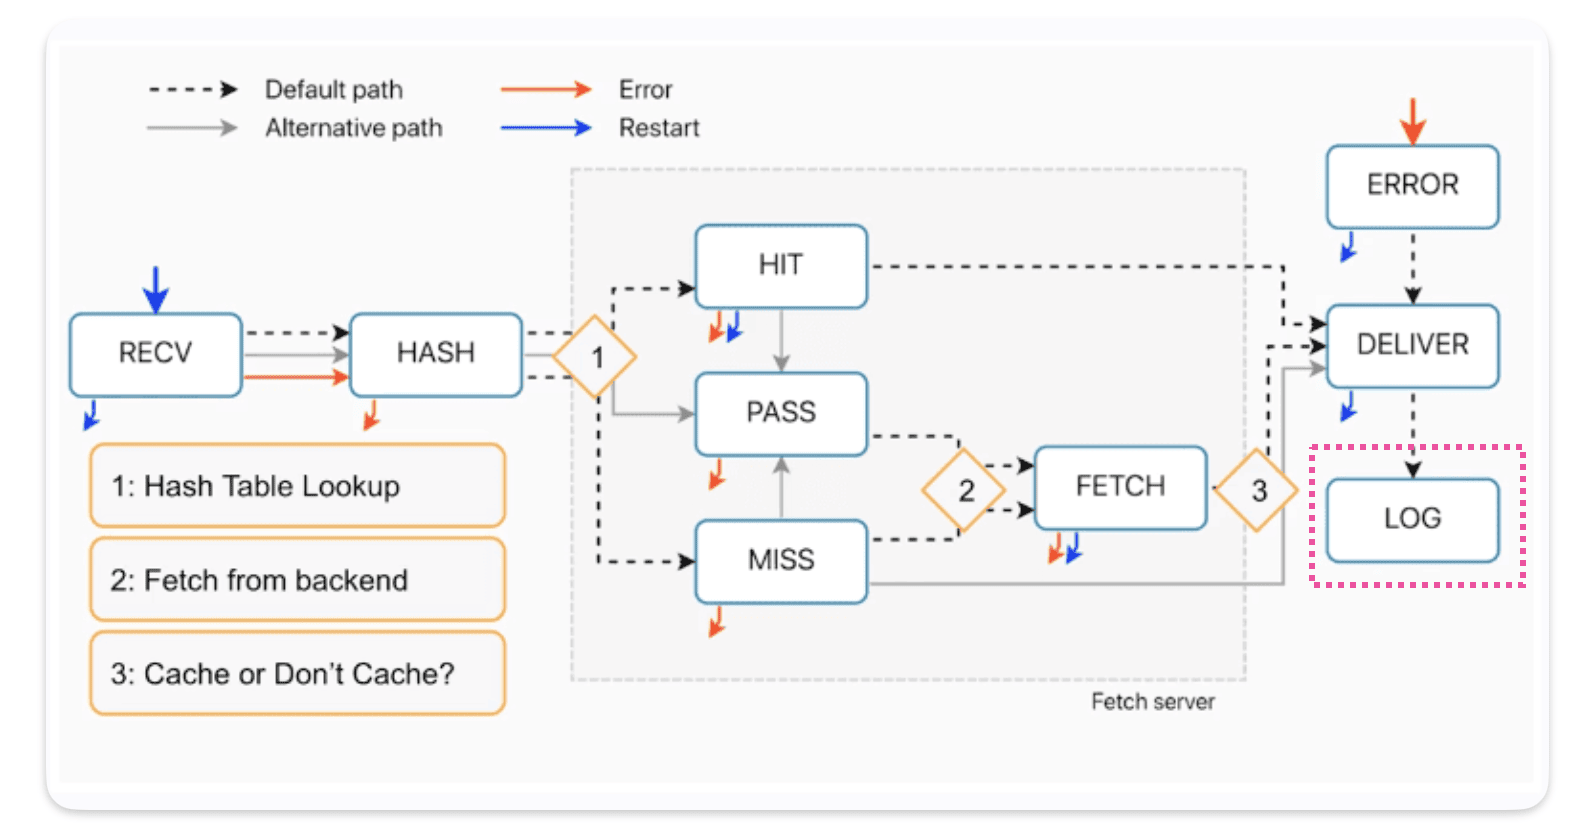
We’re exploring the Error, Restart, and Log subroutines, but a heads-up: Restart isn’t technically a subroutine in the usual sense.
For our learning objectives, let’s focus on understanding these elements:
Where they fit into the overall process
What they’re supposed to do
How they interact with each other and other parts of the system.
VCL_error
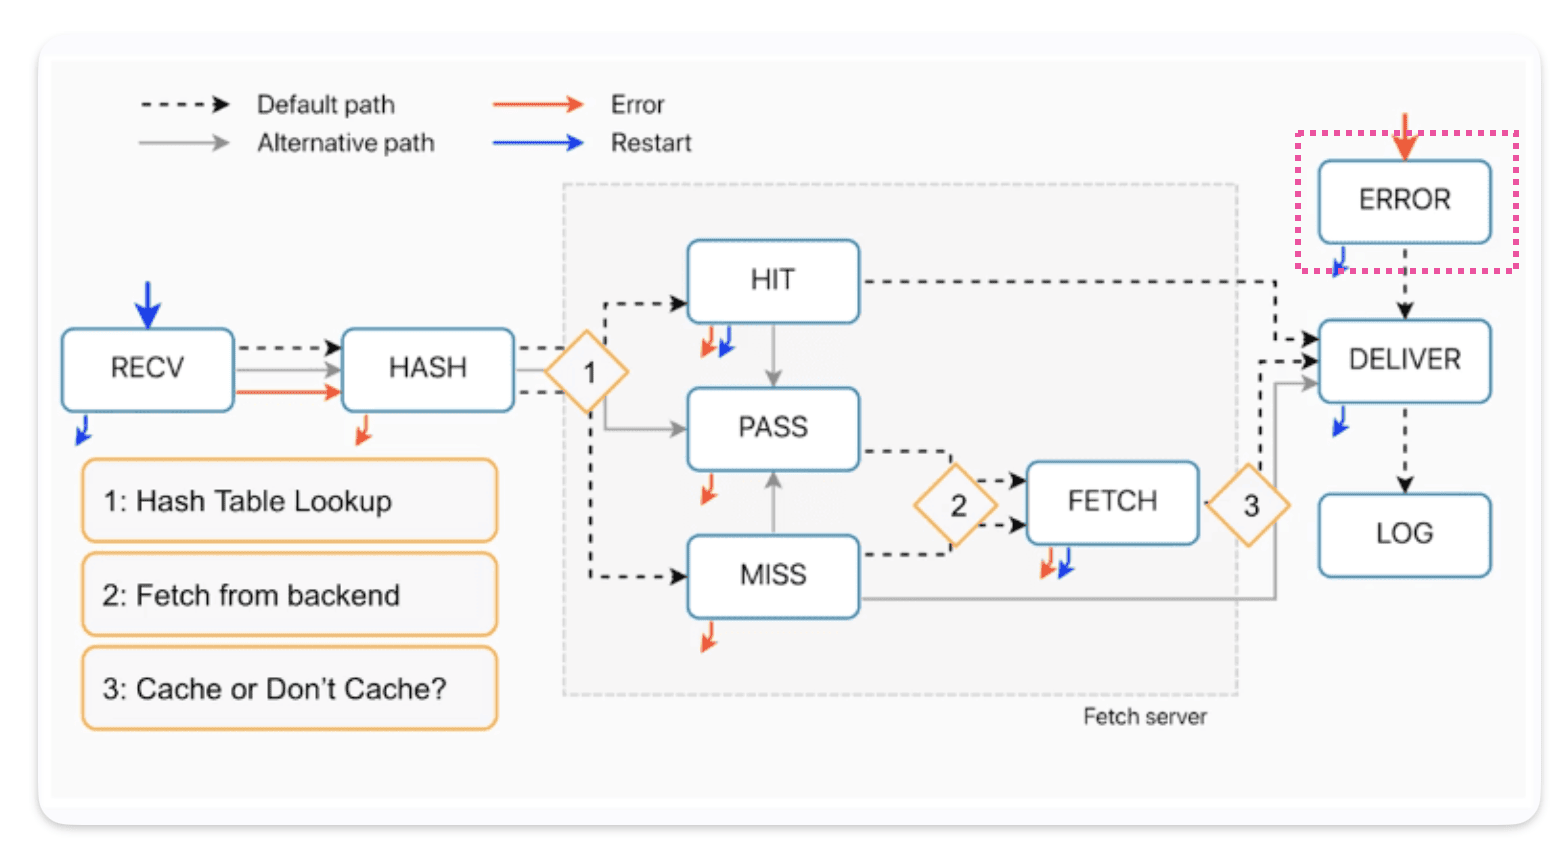
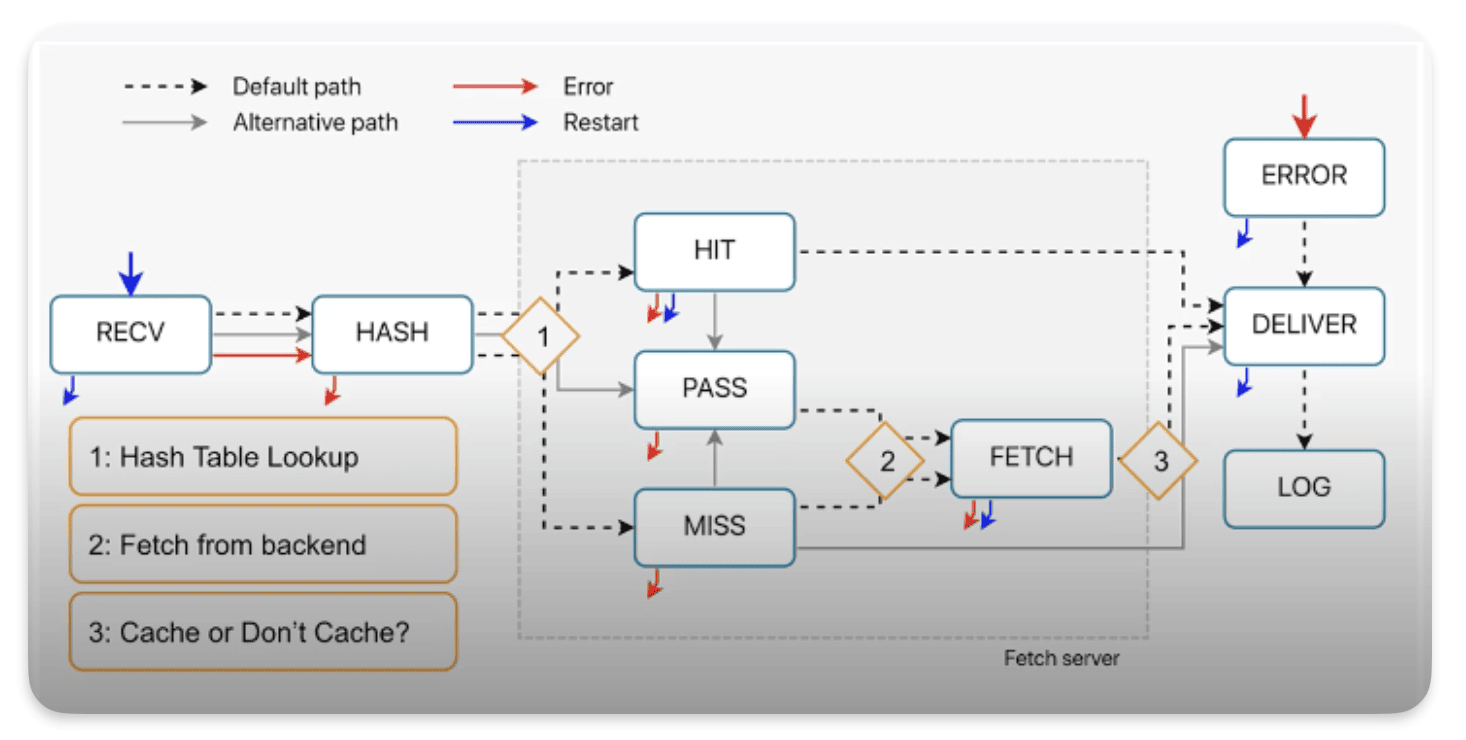
How requests come in VCL_error ?
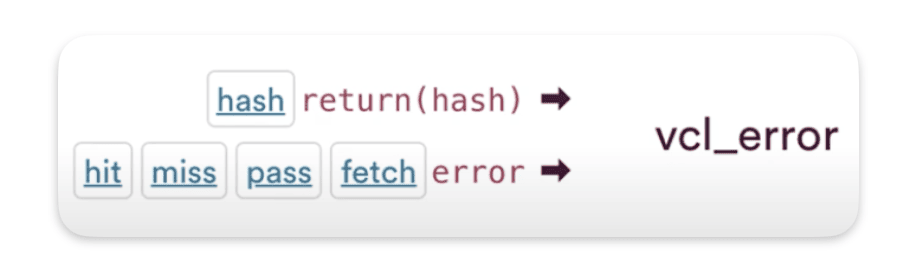
As you can see from the diagram, we can call vcl_error from almost everywhere, except for the deliver and log processes.You can spot this on the diagram by looking for the red arrows.
How requests come out of VCL_error ?
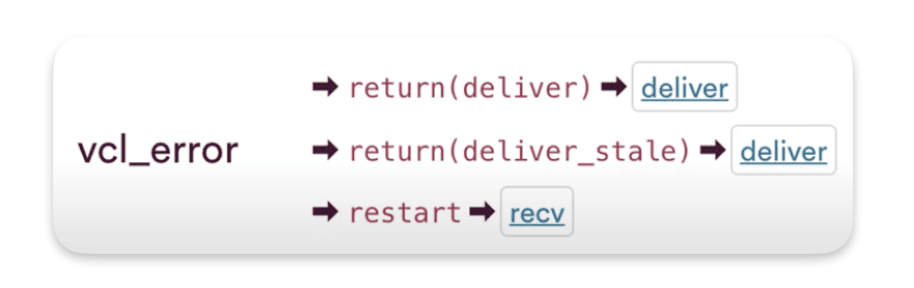
The default exit for vcl_erorr is return(deliver), or it can also be return(deliver_stale) if there’s stale content. And restart to return back to recv
VCL_error use cases
Here’s some uses cases for VCL_error :
Synthetic responses
A synthetic response is one that Varnish can generate without needing to connect to your origin server. For example, it can create error responses like 404, 500, or redirects like 301. Typically, with synthetic responses, we create a custom HTML page that gets stored in our VCL file.
Here’s an example, in vcl_recv I trigger an error 600 if req.url.path == "/anything/404"
sub vcl_recv {
  #FASTLY recv

  if(req.url.path == "/anything/404"){
    error 600;
  }


  return(lookup);
}
🔍 Maybe you are wondering where this 600 code comes from…
The status codes used for Error handling in Fastly typically fall into specific ranges. Fastly reserves the 800 range for internal codes, which is why the pre-built « Force TLS Error » uses code 801. Developers should use codes in the 600 to 700 range when triggering Error from other subroutines.
Then we end up in the error subroutine, where I can build my synthetic response :
sub vcl_error {
#FASTLY error
if(obj.status == 600){
set obj.status = 404;
set obj.http.Content-Type = "text/html";
synthetic {"
<html>
<head>
<meta charset="UTF-8">
</head>
<body>
<h1>Not Found 🤷♂️ </h1>
</body>
</html>
"};
}
return(deliver);
}
VCL_error recap :
- Error responses go directly to the delivery stage, skipping any caching processes.
Restart
Firstly Restart is not a subroutine, it’s not on list. Restart it’s its own transition call
How restart works :
• Restart goes back to the start of vcl_recv.
• Restart goes back to the Delivery Node.
• Limited to THREE restarts per POP.
• Restart disables : Clustering and Shielding
• Benefits of Disabling Clustering and Shielding.
Restart goes back to the Delivery Node
As you can see here, when a restart occurs, we go back to the delivery node :

Limited to THREE restarts per POP
With shielding ON you can restart up to 6 time, 3 time on one edge pop and 3 time on the shielding one.
Clustering and shielding with restart
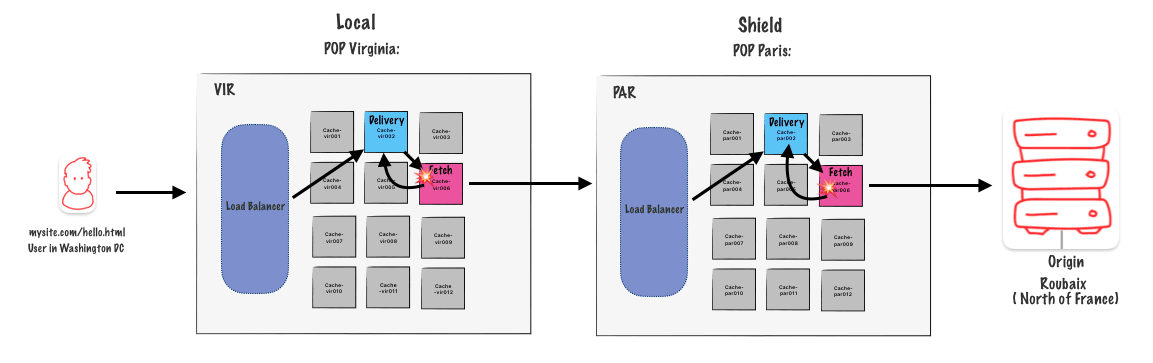
We get a request, it hits one ofour Edge POPs, it gets assigned to a Delivery Node, Delivery Node goes through a
whole process of finding the Fetch Node on the Edge POP, Edge POP doesn’thave it, goes to the Shield POP, rinse and repeat for Delivery and Fetch.
Step 1
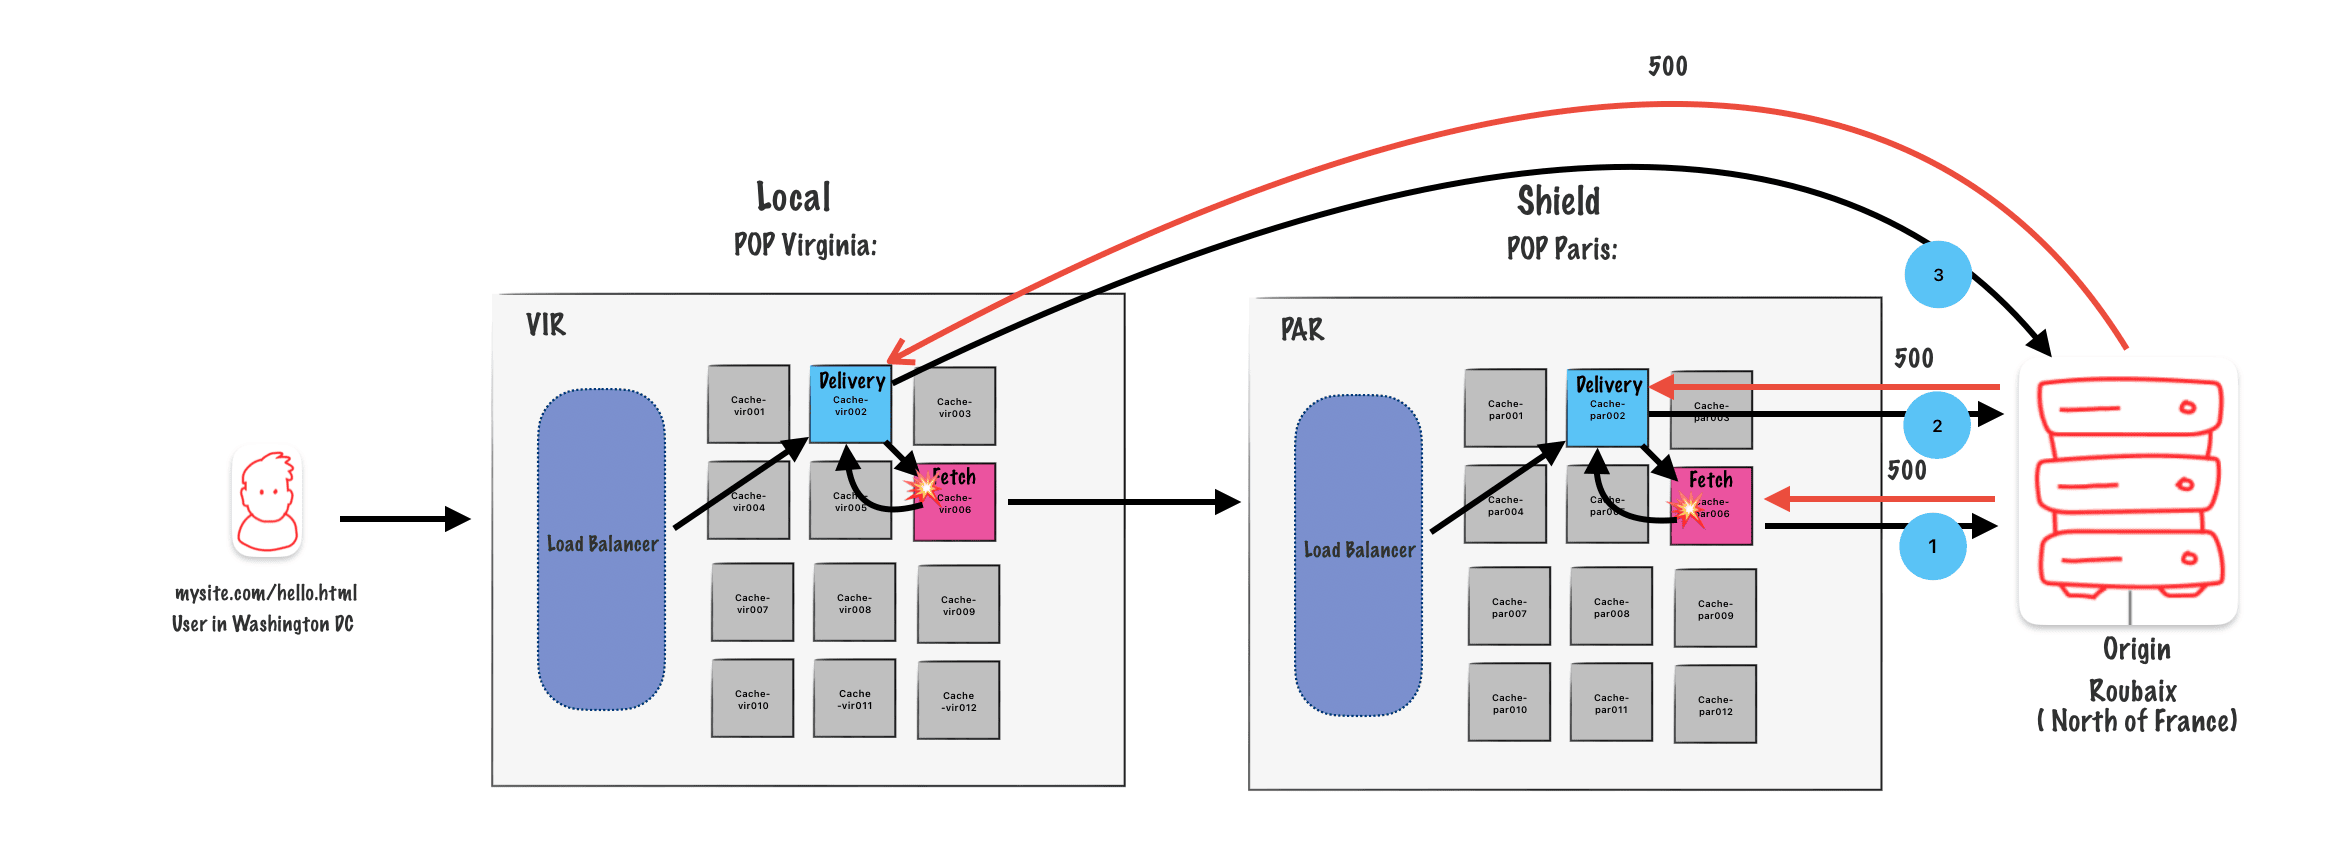
So our Fetch Node on the Shield POP makes the request, the origin gets back a 5xx error,either a 500 or a 503. (We are then a step one (1) in the diagram)
Step 2
You can see that logic there in vcl_fetch. We see the 5xx, and the Fetch Nodes says, « Ah, we got to restart. » So now it’s headed back to theDelivery Node on the Shield POP.
The Delivery Node then runs through VCL and makes its own attempt to reach the origin so it’s a fallback. We get the same 5xx error, and the Delivery Node goes, « All right. Well, I can’t restart anymore. »
Step 3
It passes it back to the Edge POP, the Fetch Node runs vcl_fetch on the response, sees again the 503 that was handed back, restarts, Delivery Node now attempts to make its own connection and gets back the last 503 or 500 error. You then, if there’s any logic to rewrite it or anything else, clean it up with a synthetic response, you hand off the eventual response to the end user
NB : in this step (3) the delivery nod eon the edge pop goes directly to the origin because we now already that the path though the shield node already failed.
Use cases for Restart
- Retry an unsuccessful request to the same or an alternative
- Perform authentication at the edge. See https://www.fastly.com/blog/patterns-for-authentication-at-the-edge
- Follow redirects when the origin returns a 301/302.
- Ignore a previously cached object and go to the origin even for a hit, without purging the object.
VCL_log
« `vcl_log« is a function used to log messages for debugging, monitoring, or auditing purposes. It allows Varnish administrators and developers to track the behavior of the Cache by recording specific events, actions, or errors.
vcl_log is a function used in Varnish Cache’s configuration language (VCL) to log messages for debugging, monitoring, or auditing purposes. It allows Varnish administrators and developers to track the behavior of Varnish Cache by recording specific events, actions, or errors.
Here are some situations where vcl_log can be useful:
- Debugging: When troubleshooting issues with Varnish Cache,
vcl_logcan be used to output relevant information to the log files. This can help in diagnosing problems such as cache misses, backend connection issues, or incorrect VCL configurations. -
Monitoring: By strategically placing
vcl_logstatements in the VCL code, administrators can monitor the flow of requests through Varnish Cache. This can provide insights into traffic patterns, request handling times, and cache hit rates, aiding in performance optimization and capacity planning. -
Auditing:
vcl_logcan also be used to log specific events or actions for auditing purposes. For example, logging requests that match certain criteria, recording cache invalidations, or tracking user sessions can help maintain accountability and ensure compliance with security or regulatory requirements. -
Custom Logging: VCL allows for flexible customization of logging based on specific requirements. With
vcl_log, administrators can define their own log formats and selectively log relevant information, tailoring the logging behavior to suit the needs of their infrastructure and applications.
How requests come in VCL_log ?
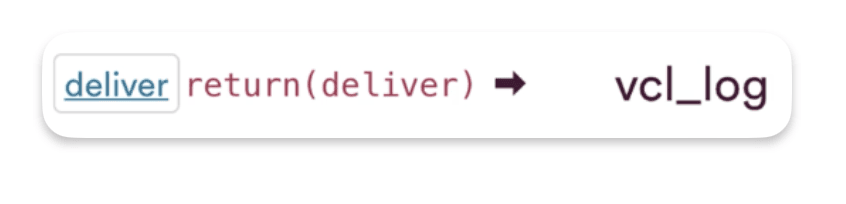
The transition call from deliver into log is return(deliver)
How requests come out of VCL_log ?

The transition call to end vcl_log is also return(deliver)
Conclusion
Okay, let’s go over what we’ve learned. First, Error lets us use fake responses on the Edge POPs. When we Restart, it sends the request back to Recv on the Delivery Node and turns off Clustering and Shielding. Each POP can only Restart three times (three on the Edge, three on the Shield). Finally, Log runs at the end, so you can set up and gather logging information.
How to install Terraform
On a Mac :
brew install hashicorp/tap/terraform
Verify Terraform is set up :
terraform -help
Create a the main terraform file
Let’s create our terraform project in his own folder :
mkdir terraform-tutorial && cd terraform-tutorial
Then let’s create our main.tf
touch main.tf
Add Fastly as a provider :
terraform {
  required_providers {
    fastly = {
      source  = "fastly/fastly"
      version = ">= 5.7.3"
    }
  }
}
Add a resource :
In the following code you can personalize the demo_tutorialpart the name and the domain name.
domain
For the domain name you can pick what ever you want if you want Fastly to create a temp domain name for you, but you have to follow the format : <name>.global.ssl.fastly.net
force_destroy = true
In Terraform, the force_destroy argument is used in conjunction with certain resources, typically those that manage persistent storage or long-lived infrastructure components. When force_destroy is set to true, it instructs Terraform to destroy the resource even if it has non-Terraform-managed changes or it’s not empty.
For example, if you have an AWS S3 bucket managed by Terraform and you want to delete it, but it still contains objects, Terraform will refuse to delete it by default because it wants to prevent accidental data loss. However, if you set force_destroy to true, Terraform will proceed with the deletion, permanently removing all data from the bucket and then destroying the bucket itself.
The backend block is for the address of your origin :
resource "fastly_service_vcl" "demo_tutorial" {
  name = "Super tutorial"

  domain {
    name    = "antoine-super-tutorial.global.ssl.fastly.net"
  }

  backend {
    address = "httpbin.org"
    name    = "Httbin dummy server"
  }


  force_destroy = true


}
Add an output
In Terraform, the output block is used to define values that should be exposed to the user after Terraform has executed its operations. These values can be useful for displaying important information or passing data between Terraform configurations.
output "active" {
  value = fastly_service_vcl.demo_tutorial.active_version
}
Add the Fastly API Key
provider "fastly" {
  api_key = "NyVYPuAb2Jb3nu_tsQblrMtmk-gw-oBd"
}
The complete main.tf
terraform {
  required_providers {
    fastly = {
      source  = "fastly/fastly"
      version = ">= 5.7.3"
    }
  }
}


# Configure the Fastly Provider
provider "fastly" {
  api_key = "NyVYPuAb2Jb3nu_tsQblrMtmk-gw-oBd"
}


resource "fastly_service_vcl" "demo_tutorial" {
  name = "Super tutorial"

  domain {
    name    = "antoine-super-tutorial.global.ssl.fastly.net"
  }

  backend {
    address = "httpbin.org"
    name    = "Httbin dummy server"
  }


  force_destroy = true


}

output "active" {
  value = fastly_service_vcl.demo_tutorial.active_version
}
Deploy the project on Fastly
terraform init
Terraform relies on plugins called providers to interact with various cloud platforms, APIs, and services. When you run terraform init, it downloads the necessary provider plugins specified in your configuration files and installs them locally. This ensures that Terraform has the required tools to manage your infrastructure.
Run :
terraform init
tarraform plan
The terraform plan command is used in Terraform to create an execution plan. It essentially simulates the execution of the configuration and displays what actions Terraform will take to achieve the desired state defined in the configuration files
terraform plan
tarraform apply
terraform apply is a command used in Terraform to apply the changes specified in your Terraform configuration to your infrastructure.Terraform executes the actions outlined in the execution plan. This may involve creating new resources, updating existing ones, or destroying resources that are no longer needed.
terraform apply
Add a custom VCL
In the resource fastly_service_vcl we can specify a vcl block to add a custom vcl as specified in the doc
    vcl {
        name    = "my_custom_main_vcl"
        content = file("${path.module}/vcl/main.vcl")
        main    = true
    }
name : the name of your VCL
content : The path to your vcl code. In my case my vcl is stored in a vcl folder and in a main.vcl file.
main : is it the main vcl ?
The complete resource block :
resource "fastly_service_vcl" "test_service" {
    name = "An Example Service"

    domain {
    name = "hello-antoine.global.ssl.fastly.net"
    }

    backend {
    address = "httpbin.org"
    name= "My Test Backend"
    }

    vcl {
        name    = "my_custom_main_vcl"
        content = file("${path.module}/vcl/main.vcl")
        main    = true
    }

    force_destroy = true

}
The custom vcl
the vcl_recv subroutine. This subroutine is executed whenever Varnish receives an incoming HTTP request.
  if (req.url.path == "/anything/here") {
    set req.http.X-CustomHeader = "example";
  }
This if block checks if the request URL path is exactly /anything/here. If it is, then it sets a custom HTTP header named « X-CustomHeader » with the value « example » in the request. This header modification allows for customization of the request handling based on the requested URL.
if (req.url.path == "/anything/not/found") {
    error 600;
}
This if block checks if the request URL path is exactly « /anything/not/found ». If it is, then it generates a synthetic error with status code 600
sub vcl_error { }
This VCL (Varnish Configuration Language) code snippet defines a subroutine vcl_error, which is executed when an error occurs during the processing of a request
if (obj.status == 600) {

}
This block of code generates a synthetic response body using the synthetic keyword. It returns a simple HTML document containing an UTF-8 charset meta tag and a « Not Found » message in an <h1> element. This synthetic response is sent to the client when the error condition specified in the if block is met.
Our complete VCL
// vcl/main.vcl
sub vcl_recv {
#FASTLY recv
if (req.url.path == "/anything/here") {
set req.http.X-CustomHeader = "example";
}
if (req.url.path == "/anything/not/found") {
error 600;
}
return(lookup);
}
sub vcl_error {
#FASTLY error
if (obj.status == 600) {
set obj.status = 404;
set obj.http.Content-Type = "text/html";
synthetic {"
<html>
<head>
<meta charset="UTF-8">
</head>
<body>
<h1>Not Found 🤷♂️ </h1>
</body>
</html>
"};
return(deliver);
}
}
To deploy as said before :
terraform plan
And then
terraform apply
Add a VCL snippet
Instead of writing and importing a full VCL configuration in a separate file, it could make sense to split your logic, or parts of your logic, into multiple VCL snippets. Here’s how to proceed with Terraform:
  snippet {
    name     = "custom-snippet" # Name of the snippet
    type     = "recv" # In which subroutine should the snippet reside
    content  = <<EOT
    # Custom VCL logic
    if (req.http.X-Custom-Header) {
      set req.http.X-Response-Header = "Custom response";
    }
    EOT
    priority = 10
  }
Following our previous example the full Terraform file should look like this :
resource "fastly_service_vcl" "demo_tutorial" {
  name = "Super tutorial"

  domain {
    name    = "antoine-super-tutorial.global.ssl.fastly.net"
  }

  backend {
    address = "httpbin.org"
    name    = "Httbin dummy server"
  }


  vcl {
    name    = "my_custom_main_vcl"
    content = file("${path.module}/vcl/main.vcl")
    main    = true
  }

   # snippet START
   snippet {
    name     = "custom-snippet"
    type     = "recv" # Indique où le snippet sera appliqué (recv, deliver, etc.)
    content  = <<EOT
    # Custom VCL logic
    if (req.http.X-Custom-Header) {
      set req.http.X-Response-Header = "Custom response";
    }
    EOT
    priority = 10
  }
  # snippet END


  force_destroy = true


}
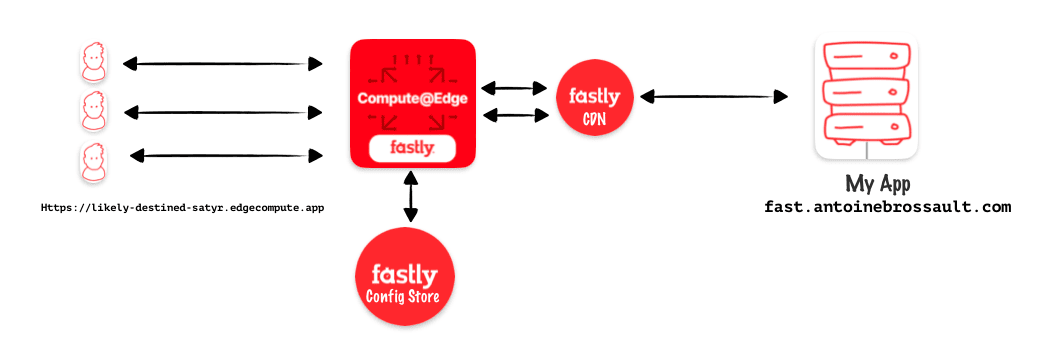
Diagram and project goal

In this article, my goal is to use compute at edge from Faslty to protect my origin and cache my content. Instead of using Varnish Configuration Language (VCL) to set my caching rules I will use JavaScript with compute.
Start a new compute / project
To start a new compute project, you have two options.
You can use :
npm init @fastly/compute
Or you can kickstart your project with the Faslty CLI, that you need to install.
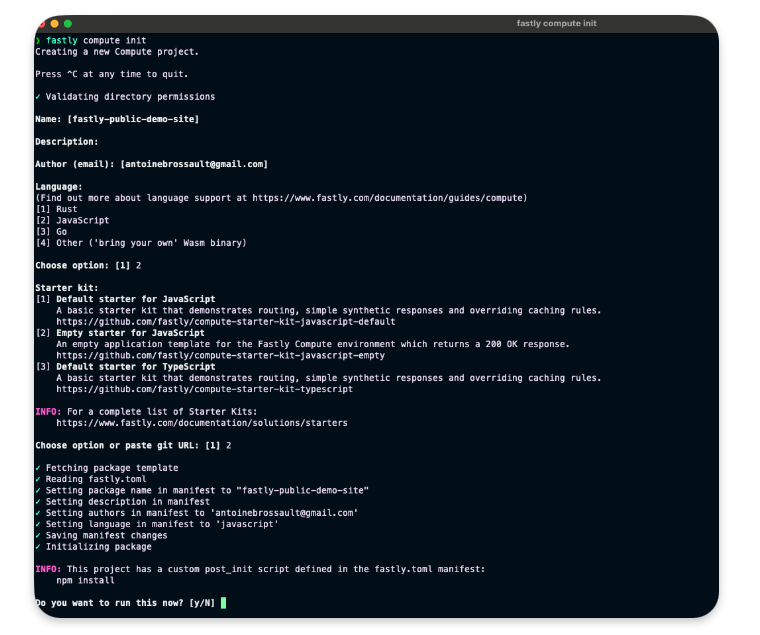
fastly compute init
After hitting the above command, you will get prompted few questions
Author (email): [[email protected]]

Language:
(Find out more about language support at https://www.fastly.com/documentation/guides/compute)
[1] Rust
[2] JavaScript
[3] Go
[4] Other ('bring your own' Wasm binary)
👉 option: 2
The started kit :
Starter kit:
[1] Default starter for JavaScript
    A basic starter kit that demonstrates routing, simple synthetic responses and overriding caching rules.
    https://github.com/fastly/compute-starter-kit-javascript-default
👉 Default starter for JavaScript
Post init :
INFO: This project has a custom post_init script defined in the fastly.toml manifest:
    npm install

Do you want to run this now? [y/N]
👉 yes
JavaScript project / setup
npm install @fastly/expressly
Add a dev command in the npm scripts :
To add the « dev » script to your package.json file, simply insert the following line within the « scripts » object:
  "scripts": {
    "dev": "fastly compute serve --watch"
  }
💡 By default the port used is 7676 if you want to use an other one use the addr flag like so :
fastly compute serve --watch --addr=127.0.0.1:7777
This will allow you to run the command npm run dev to start your JavaScript projector using Fastly Compute.
Import Expressly / to manage the routes
Expressly is a router similar to Express in Node.js, If you ever used express Expressly will feel very confortable to use. You can check the documentation here
In /src/index.js add :
import { Router } from "@fastly/expressly";
const router = new Router();
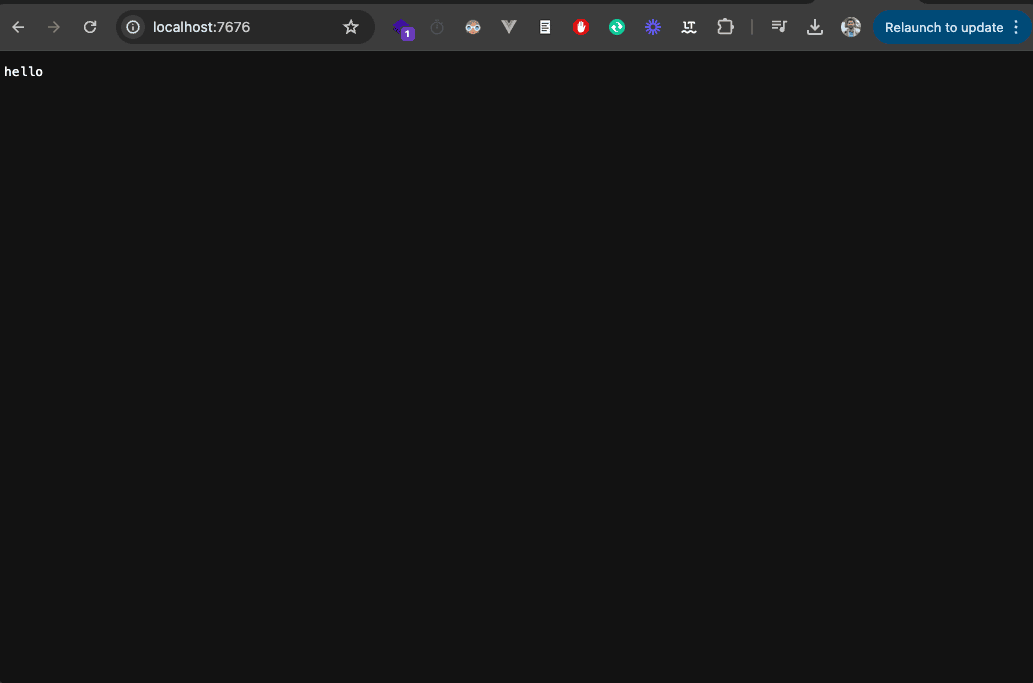
router.get("/", async (req, res) => {
res.send("hello");
});
router.listen();
Start the project by typing :
npm run dev
Or
fastly compute serve --watch
This should return hello when you visit : http://localhost:7676
Publish on Faslty / and connect your backend
npm run deploy
Or
fastly compute publish
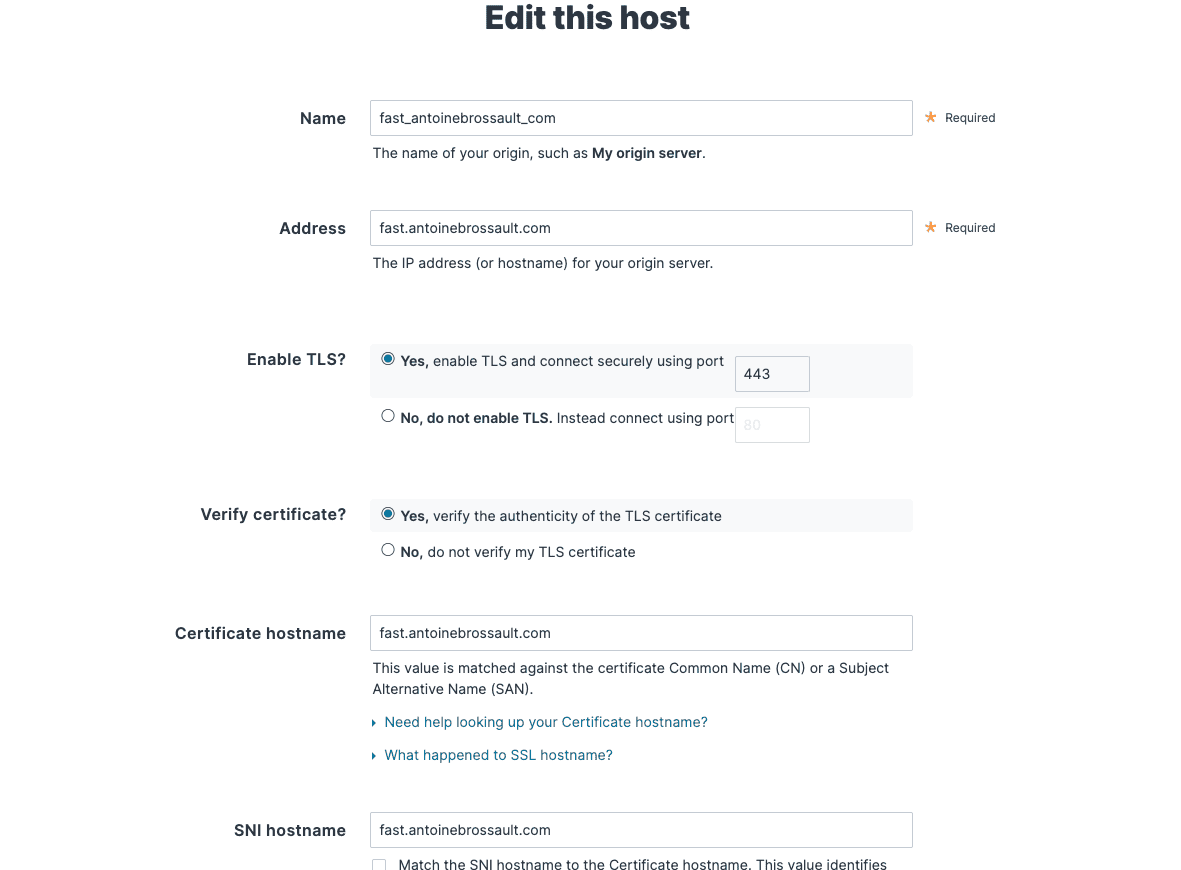
Accept and add a backend in my case I added :
fast.antoinebrossault.com
With the name :
fast_antoinebrossault_com
Add the backends in the .toml file
At the root of your project, you should have a fastly.tom file. In this file, add your backends if it’s not already the case.
Here I have my local backend and my production one
[local_server]
  [local_server.backends]
    [local_server.backends.fast_antoinebrossault_com]
      override_host = "fast.antoinebrossault.com"
      url = "https://fast.antoinebrossault.com"

[setup]
  [setup.backends]
    [setup.backends.fast_antoinebrossault_com]
      address = "fast.antoinebrossault.com"
      port = 443
Check your host config in the UI
Mine looks like this, If you get 421 Misdirected Request Error with Fastly compute, double-check the SNI hostname and certificate hostname configuration part.

Visit the url to check your deployment
If everything worked, you can visit the URL you got in the CLI to see the same result we had locally but this time on Fastly.
https://likely-destined-satyr.edgecompute.app/
Query / your backend
Modify the route we created earlier with :
router.get("/", async (req, res) => {

    const beResp = await fetch(req, {
        backend: "fast_antoinebrossault_com"
    });

    res.send(beResp);

});
Here this code query our backend and send back the result.
I your backend sends back an HTML page, the page will be broken as all the CSS and JavaScript files are not intercepted by our routes.
Let’s add routes to handle CSS and JavaScript files
This code defines a route in a router that handles requests for specific file types (JPEG, PNG, GIF, JPG, CSS, JS) and responds with the fetched content from a specified backend server (« fast_antoinebrossault_com »).
Let’s add this to our code :
router.get(/\.(jpe?g|png|gif|jpg|css|js)$/, async (req, res) => {
  res.send(await fetch(req, {
      backend: "fast_antoinebrossault_com"
  }));
});
Now our images, CSS and JavaScript files work, and all others files matching our regex will work too :
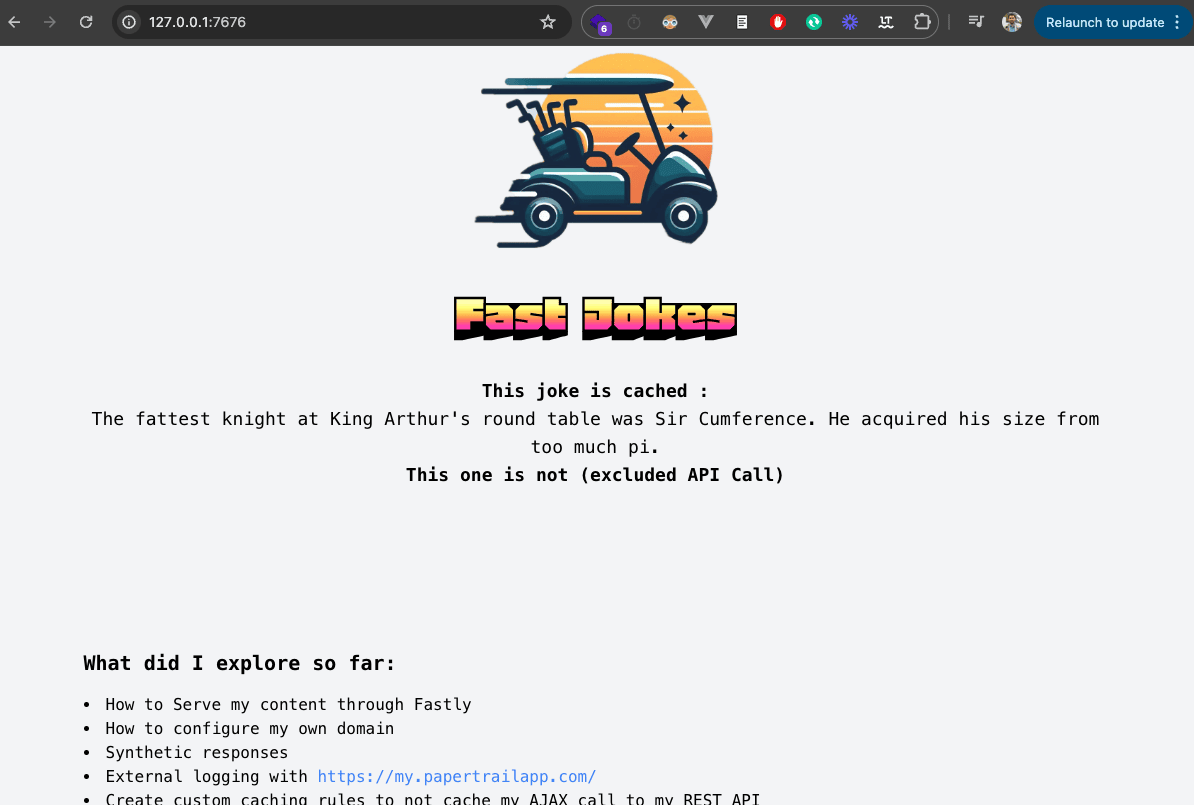
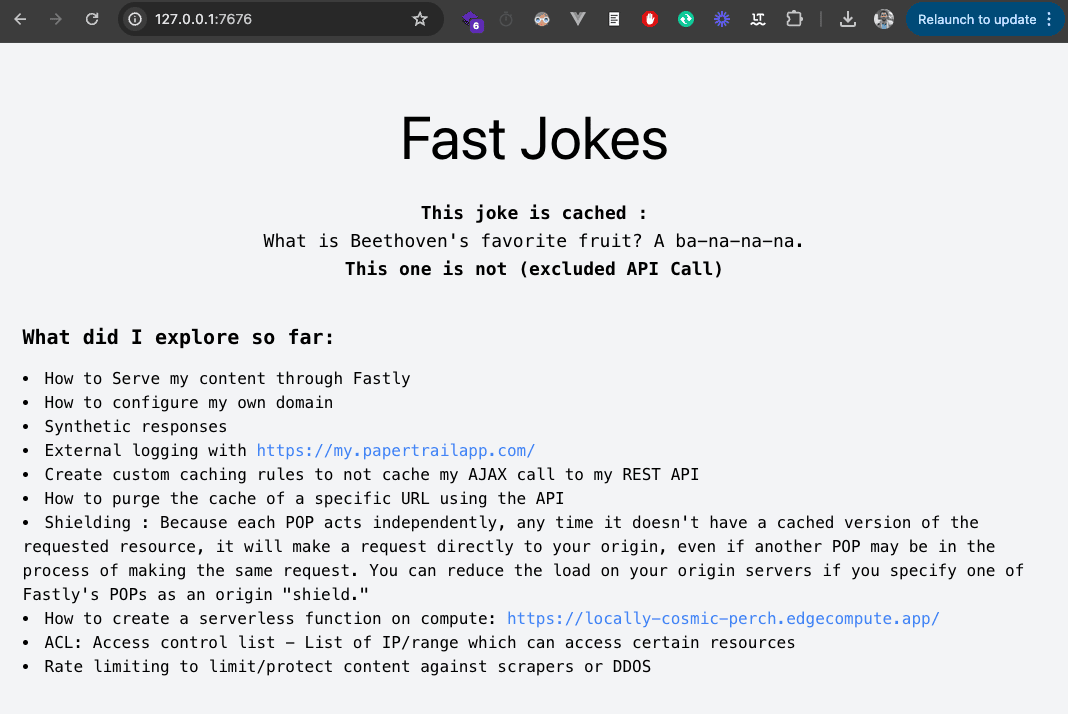
Another feature is broken on our site, this page fetches a Joke with an AJAX request to the API and insert it into the page.
Let’s handle front-end API calls
Let’s add another route to manage our API calls :
Let’s use this new route to handle the requests to the API, I created a tour to manage all the request which go to the API .
This regular expression (/^.*\/api\/.*$/ matches any string containing « /api/ » within it, regardless of what comes before or after « /api/ ».
router.get(/^.*\/api\/.*$/, async (req, res) => {
    res.send(await fetch(req, {
        backend: "fast_antoinebrossault_com"
    }));
});
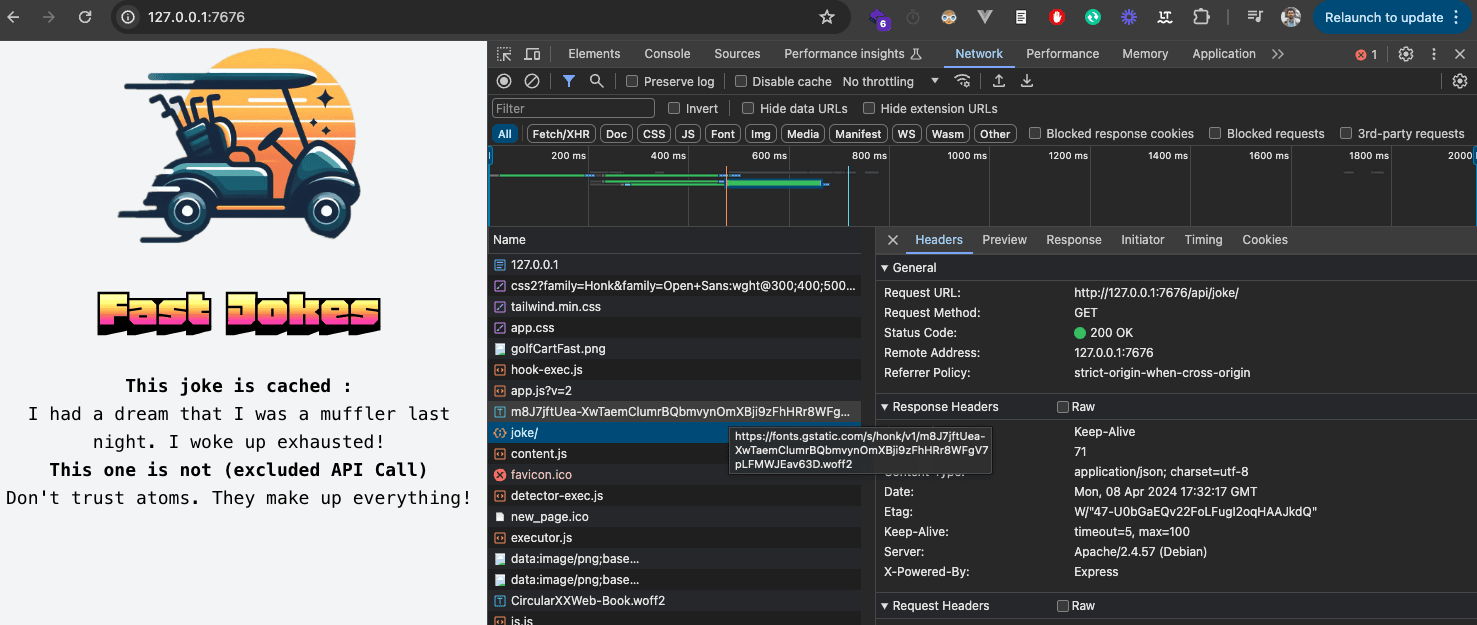
Our API call now works :
We can now publish our changes with :
npm run deploy
As we can see, everything now works like a charm :
Add caching
We want Fastly to cache our content for a specific amount of time, let’s do this in our compute project.
To cache our URLs we can use CacheOverride
First import it :
import { CacheOverride } from "fastly:cache-override";
No need to install anything with npm install as cache-override exists in the fastly library we already have in our project.
We want to cache our home page for 50sec to do so we adapt the code inside our route :
router.get("/", async (req, res) => {
    const beResp = await fetch(req, {
        backend: "fast_antoinebrossault_com",

        // cache this request for 50 sec
        cacheOverride: new CacheOverride("override", {
            ttl: 50
        })
    });

    res.send(beResp);

});
Now we re-deploy with npm deploy to see if it worked
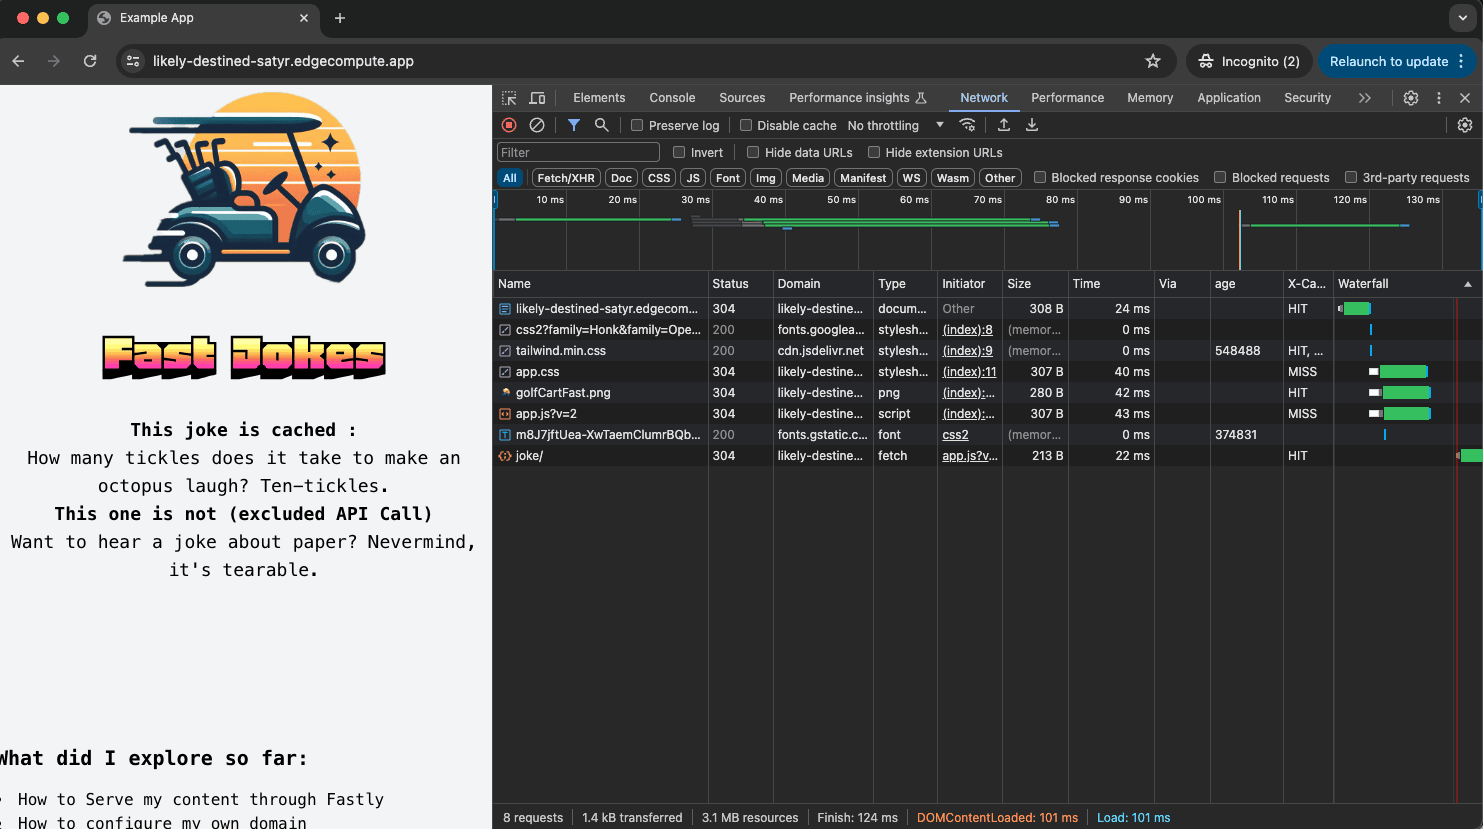
It worked 🎉 ! As you can see, this request is now cached :
antoine@macbook / % curlHeaders https://likely-destined-satyr.edgecompute.app/
HTTP/2 200
date: Mon, 08 Apr 2024 18:16:41 GMT
server: Apache/2.4.57 (Debian)
x-powered-by: Express
content-type: text/html; charset=utf-8
x-served-by: cache-mrs10549-MRS
etag: W/"b1e-A4dLyj+Lkq4bnJSZB7a7fCcwunw"
vary: Accept-Encoding
age: 1 👈👈
accept-ranges: bytes
x-cache: MISS 👈👈
x-cache-hits: 0 👈👈
content-length: 2846

antoine@macbook / % curlHeaders https://likely-destined-satyr.edgecompute.app/
HTTP/2 200
date: Mon, 08 Apr 2024 18:16:41 GMT
server: Apache/2.4.57 (Debian)
x-powered-by: Express
content-type: text/html; charset=utf-8
x-served-by: cache-mrs1050108-MRS
etag: W/"b1e-A4dLyj+Lkq4bnJSZB7a7fCcwunw"
vary: Accept-Encoding
age: 9 👈👈
accept-ranges: bytes
x-cache: HIT 👈👈
x-cache-hits: 1 👈👈
content-length: 2846
We can see the first request is a x-cache: MISS and the second is a x-cache: HIT. It will remain in the cache until the age reaches 50, which is the TTL we put in the code.
If you are wondering what command I use to only get the headers with curl, I use this in my bash profile :
# curl-headers
#
# will return the headers only
# @example : curl-headers <url>
curl-headers() {
    curl -sSL -D - $1 -o /dev/null
}

alias curlHeaders="curl-headers";
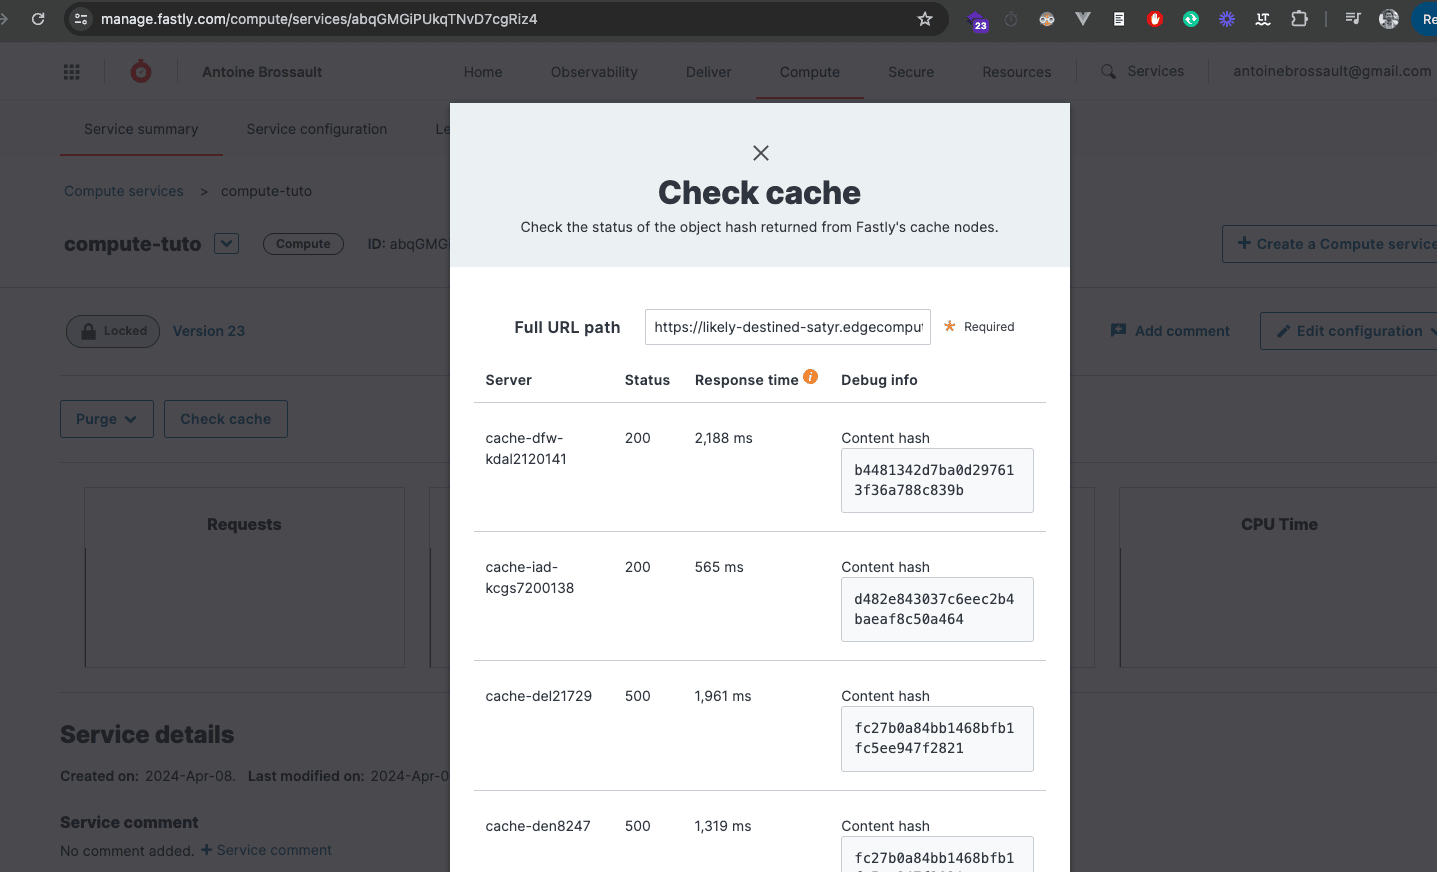
Using this method to put something in cache is no different from using VCL, just nicer and more elegant. To prove it, you can go to the Faslty UI and check if the URL is in the cache :
How to add custom headers ?
To add custom headers, it’s dead simple, let’s add headers to the response we get from the home page.
To do so simply use the headers.set() method on a backend response like so :
router.get("/", async (req, res) => {
    // Forward the request to a backend.
    const beResp = await fetch(req, {
        backend: "fast_antoinebrossault_com",
        cacheOverride: new CacheOverride("override", {
            ttl: 50
        })
    });

    beResp.headers.set('Hello', "Is it me you are loooking for ?");

    res.send(beResp);

});
And it works ! 🎉
antoine@macbook / % curlHeaders curlHeaders https://likely-destined-satyr.edgecompute.app/
HTTP/2 200
date: Mon, 08 Apr 2024 18:36:04 GMT
server: Apache/2.4.57 (Debian)
x-powered-by: Express
content-type: text/html; charset=utf-8
hello: Is it me you are loooking for ? 👈👈👈
etag: W/"b34-1zh57py/zCElqztfbzqM3oXO/A4"
vary: Accept-Encoding
age: 6
accept-ranges: bytes
x-cache: HIT
x-cache-hits: 1
x-served-by: cache-mrs1050097-MRS
content-length: 2868
As you can see we have a new header in the response : hello: Is it me you are loooking for ?
Rewrite the content of a backend reponse / edit the HTML or JSON...
Rewriting the response from the backend can be very useful in various scenarios. For example:
- Injecting Scripts: If you need to add a script (like a tracking code) but don’t have direct access to your backend code, you can use an edge function to inject the script into the HTML response.
-
Modifying API Responses: If you want to change the structure of a JSON response from an API to match the format your frontend expects, you can rewrite the response.
-
Adding Custom Headers: You might want to add custom headers to the response for security or analytics purposes, such as adding a Content Security Policy (CSP) header.
-
Personalizing Content: Based on user data, you can rewrite the HTML response to deliver personalized content without changing the backend code.
-
A/B Testing: For A/B testing, you can modify the HTML response to show different versions of the content to different users.
-
Localization: If your site serves multiple regions, you can rewrite the response to include region-specific content or translations.
-
Feature Flags: You can use edge functions to enable or disable features in the response based on feature flags, allowing for easier feature rollouts and testing.
By using edge functions to rewrite responses, you can gain more flexibility and control over the content delivered to the user without needing to modify the backend directly.
Modifying the body is a unique feature in Fastly compute
Parsing and modifying the body of a backend response before sending it to the client is a unique feature of Compute. This isn’t possible with VCL, making it a major advantage of Compute over VCL.
Inject a script tag
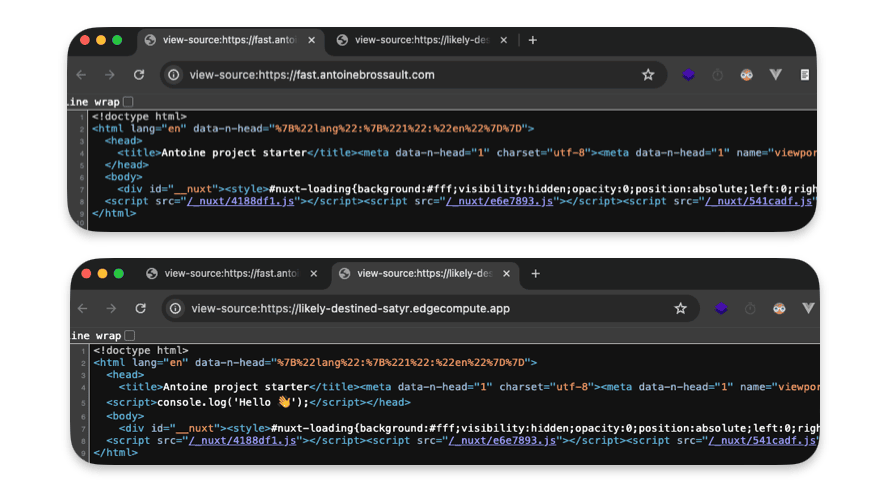
In my example I would like to inject a script tag right after the closing <head> tag.
To do so, I write my logic in the route I targeted :
router.get("/", async (req, res) => {


});
Now I have to query my backend :
router.get("/", async (req, res) => {

    // Forward the request to a backend.
    let beResp = await fetch(
        "https://fast.antoinebrossault.com", {
            backend: "fast_antoinebrossault_com",
            cacheOverride: new CacheOverride("override", {
                ttl: 50
            })
        }
    );


});
Then read the backend response and if our backend send back a text reponse we replace the closing head tag with our script.
Then we create a new reponse and we send back the result
if( beResp.headers.get("Content-Type").startsWith('text/') ){

    let body = await beResp.text();

    let newBody = body.replace("</head>","<script>console.log('Hello 👋');</script></head>");

    beResp = new Response(newBody, beResp);

}

res.send(beResp);
The final code looks like this :
router.get("/", async (req, res) => {
    // Forward the request to a backend.
    let beResp = await fetch(
        "https://fast.antoinebrossault.com", {
            backend: "fast_antoinebrossault_com",
            cacheOverride: new CacheOverride("override", {
                ttl: 50
            })
        }
    );

    if( beResp.headers.get("Content-Type").startsWith('text/') ){

        let body = await beResp.text();

        let newBody = body.replace("</head>","<script>console.log('Hello 👋');</script></head>");

        beResp = new Response(newBody, beResp);

    }

    res.send(beResp);

});
Troubleshooting : If you get this error "malformed UTF-8 character sequence at offset 1"
✅ Be sure your request to your backend looks like this :
 await fetch(req.url,{
            backend: "fast_antoinebrossault_com",
            cacheOverride: new CacheOverride("override", {
                ttl: 50
            })
        }
    );
Or like so
 await fetch(
        "https://fast.antoinebrossault.com", {
            backend: "fast_antoinebrossault_com",
            cacheOverride: new CacheOverride("override", {
                ttl: 50
            })
        }
    );
❌ As not specifying the full URL for the backend and passing the req object doesn’t work
const beResp = await fetch(req, {
        backend: "fast_antoinebrossault_com",
        cacheOverride: new CacheOverride("override", {
            ttl: 50
        })
    });
Improve performance by using streams
Instead of loading the full response in memory before performing the replacement Andrew Bets (Developer Advocate @ Fastly ) suggest to use a function he wrote.
First add the function to your code :
const streamReplace = (inputStream, targetStr, replacementStr) => {
    let buffer = ""
    const decoder = new TextDecoder()
    const encoder = new TextEncoder()
    const inputReader = inputStream.getReader()
    const outputStream = new ReadableStream({
      start() {
        buffer = ""
      },
      pull(controller) {
        return inputReader.read().then(({ value: chunk, done: readerDone }) => {
          buffer += decoder.decode(chunk)

          if (buffer.length > targetStr.length) {
            buffer = buffer.replaceAll(targetStr, replacementStr)
            controller.enqueue(encoder.encode(buffer.slice(0, buffer.length - targetStr.length)))
            buffer = buffer.slice(0 - targetStr.length)
          }

          // Flush the queue, and close the stream if we're done
          if (readerDone) {
            controller.enqueue(encoder.encode(buffer))
            controller.close()
          } else {
            controller.enqueue(encoder.encode(""))
          }
        })
      },
    })
    return outputStream
  }
Then use it like so :
router.get("/", async (req, res) => {
    // Forward the request to a backend.
    let beResp = await fetch(
        "https://fast.antoinebrossault.com", {
            backend: "fast_antoinebrossault_com",
            cacheOverride: new CacheOverride("override", {
                ttl: 50
            })
        }
    );


    // rewrite the response
    if( beResp.headers.get("Content-Type").startsWith('text/') ){

        const newRespStream = streamReplace( beResp.body ,"</head>","<script>console.log('Hello 👋');</script></head>")

        beResp = new Response(newRespStream, beResp);

    }

    res.send(beResp);

});
Use Config stores / a key value pair storage
Fastly Config stores act like mini-databases at the edge of their network. They store frequently used configuration settings (like feature flags or A/B testing values) that your edge applications can access quickly and easily. This allows you to manage configurations centrally and deliver them to your services with minimal delay.
Create a config store
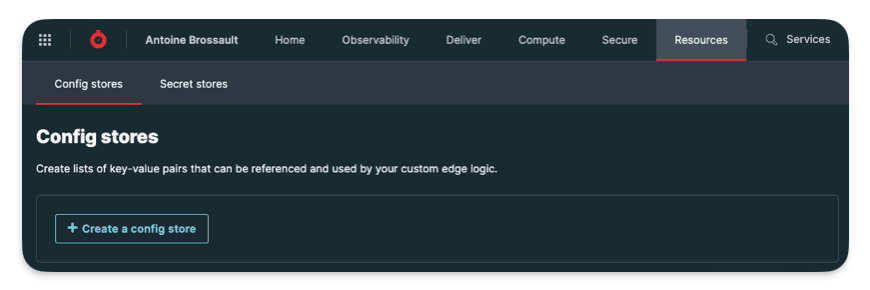
Here I created a config store named Features
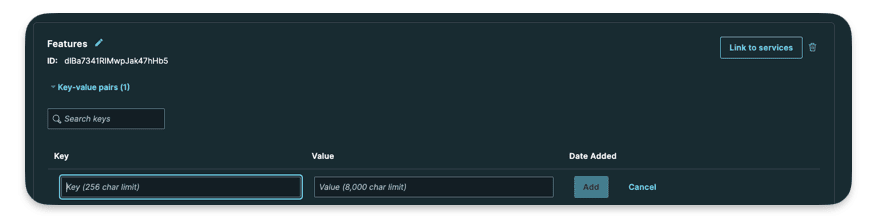
Here you can add your key value data.

I createad a key html_404 with as a value a bit of HTML representig a 404 page. My goal is to use this HTML code asa synthetic response.
Use the Config Store
It’s important to kepp in mind the local code we run with npm run dev doesn’t have access to our backend in the same way our deployed code does. That’s why for the backend end we have a local one specified
Local
[local_server]
  [local_server.backends]
    [local_server.backends.fast_antoinebrossault_com]
      override_host = "fast.antoinebrossault.com"
      url = "https://fast.antoinebrossault.com"

[setup]
  [setup.backends]
    [setup.backends.fast_antoinebrossault_com]
      address = "fast.antoinebrossault.com"
      port = 443
It’s the same idea for config store, here’s the same data used in my config store but stored locally in my fastly.toml file :
  [local_server.config_stores.Features]
      format = "inline-toml"
    [local_server.config_stores.Features.contents]
      "html_404" = '<!DOCTYPE html><html lang="en"><head><meta charset="UTF-8"><meta name="viewport" content="width=device-width, initial-scale=1.0"><title>404 Not Found</title><link href="https://cdn.jsdelivr.net/npm/[email protected]/dist/tailwind.min.css" rel="stylesheet"></head><body class="bg-gray-100"><div class="flex items-center justify-center h-screen"><div class="text-center"><h1 class="text-4xl font-bold text-gray-800">404</h1><p class="text-lg text-gray-600">Page Not Found</p></div></div></body></html>'
Query the config store from our code :
First thing first import the module for Config Store :
import { ConfigStore } from 'fastly:config-store';
Then Initialize the config store and get the value :
  const config = new ConfigStore('Features');
  const value = config.get('html_404')
I created a /404route to demonstrate this :
router.get('/404', async (req,res) => {

  const config = new ConfigStore('Features');

  res.withStatus(404).html(config.get('html_404'));

});
It worth noting I send a 404 status code with https://expressly.edgecompute.app/docs/handling-data/response#reswithstatus And instead of setting the headers for HTML myself I used .html()
You can now deploy it to see the result live.
Use KV store / a key-value store
Fastly KV store is a service that allows you to store data persistently at the edge of Fastly’s network, making it geographically closer to users and resulting in faster data access. This key-value store offers both speed and durability, enabling quick reads and writes while ensuring data survives system restarts. By storing data at the edge, KV store reduces the load on your origin server, improving performance and scalability of your applications. This makes it a valuable tool for caching frequently accessed data, storing configuration settings, or even implementing authorization logic at the edge.
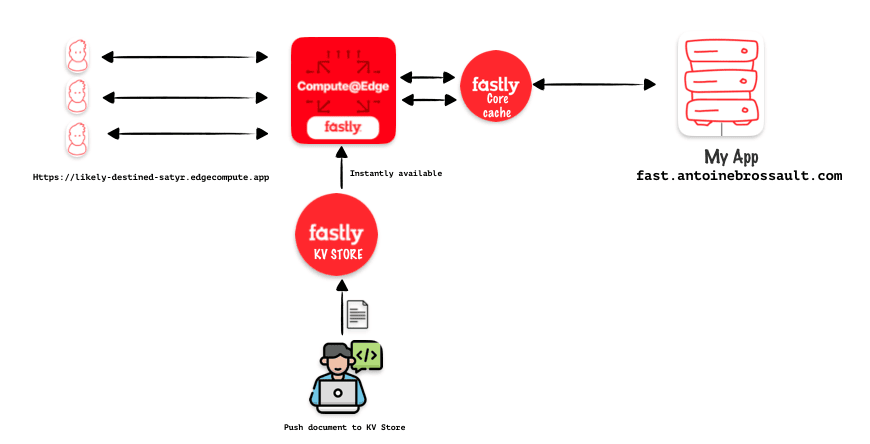
Local setup
As I said before for config store : the local code we run with npm run dev doesn’t have access to our KV Store, so we have to represent our KV store in our fastly.toml file.
[local_server]
  [local_server.kv_stores]
      [[local_server.kv_stores.main]]
        data = "✅"
        key = "mood"

  [[local_server.kv_stores.main]]
      key = "readme"
      path = "./README.md"
For the second key, the readme one, the goal is tu return the content of the README.md file stored at the root of our project.
Live setup
We can create a KV-store from the UI, API, CLI… in the following lines I decided to go with the CLI.
Create the KV Store :
Here I’m creating a store called main :
fastly kv-store create --name=main
This should reuturn the ID of the nes KV-store
SUCCESS: Created KV Store 'main' (tff04ymfrdkgvvqi00yq0g)
Insert data in the KV Store :
Here I’m adding a key value pair : mood: ✅ to my KV Store
fastly kv-store-entry create --store-id=tff04ymfrdkgvvqi00yq0g --key="mood" --value="✅"
Here I’m adding the content of a document (readme) in the KV Store
fastly kv-store-entry create --store-id=tff04ymfrdkgvvqi00yq0g --key="readme" --value="$(cat ./readme.md)"
Link the KV Store to a compute service :
I didn’t find how it’s possible to link the newly created KV-store with a compute service with the CLI. But in the UI it’s very straitforward.
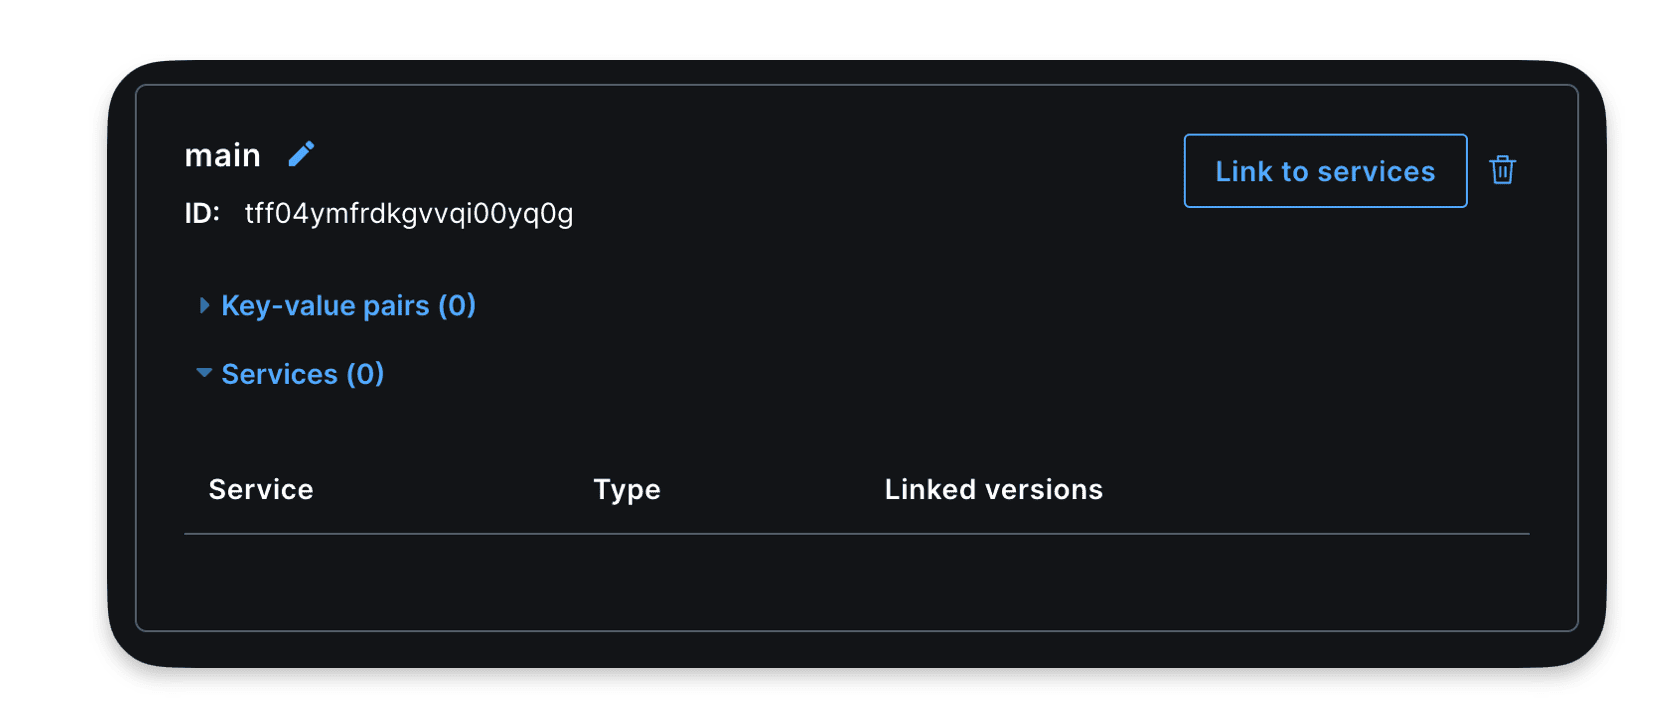
Interact wih KV store with the API :
If you want to insert an item using the API, there’s something important to keep in mind: the data you send should be encoded in base64. See the following example for clarification:
Buffer.from(`Hello World !`).toString('base64')
Here is a full example and API call:
   const response = await axios.put(
            `https://api.fastly.com/resources/stores/kv/${storeId}/batch`,
            {
                    "key": city,
                    "value": Buffer.from(`Hello World !`).toString('base64')
            }
            , {
                headers: {
                    'Content-Type': 'application/x-ndjson',
                    'Accept': 'application/json',
                    'Fastly-Key': process.env.FASTLY_KEY
                },
            }
        );
Use the KV Store in the code
Import KVStore :
import { KVStore } from "fastly:kv-store";
router.get('/kvstore', async (req, res) => {

   const files = new KVStore('main');

   const entry = await files.get('mood');

   const entryText = await entry.text();

       res.html(`
        <!DOCTYPE html>
        <html class="no-js">

            <head>
                <meta charset="utf-8">
                <meta http-equiv="X-UA-Compatible" content="IE=edge">
                <title></title>
                <meta name="description" content="">
                <meta name="viewport" content="width=device-width, initial-scale=1">
                <!-- <link href=" " rel='"stylesheet" type='"text/css"> -->
                <style>
                    * {
                        font-family: sans-serif
                    }

                    main {
                        max-width: 38rem;
                        padding: 2rem;
                        margin: auto;
                    }

                    h1{
                        text-align: center;
                    }

                    pre{
                        text-align:center;
                        font-size: 3rem;
                    }
                </style>
            </head>

            <body>
                <main>

                    <h1> KVstore </h1>

                    <pre>${entryText}</pre>

                </main>
            </body>

        </html>
    `);


});
This should display the value of our mood key we previously set :
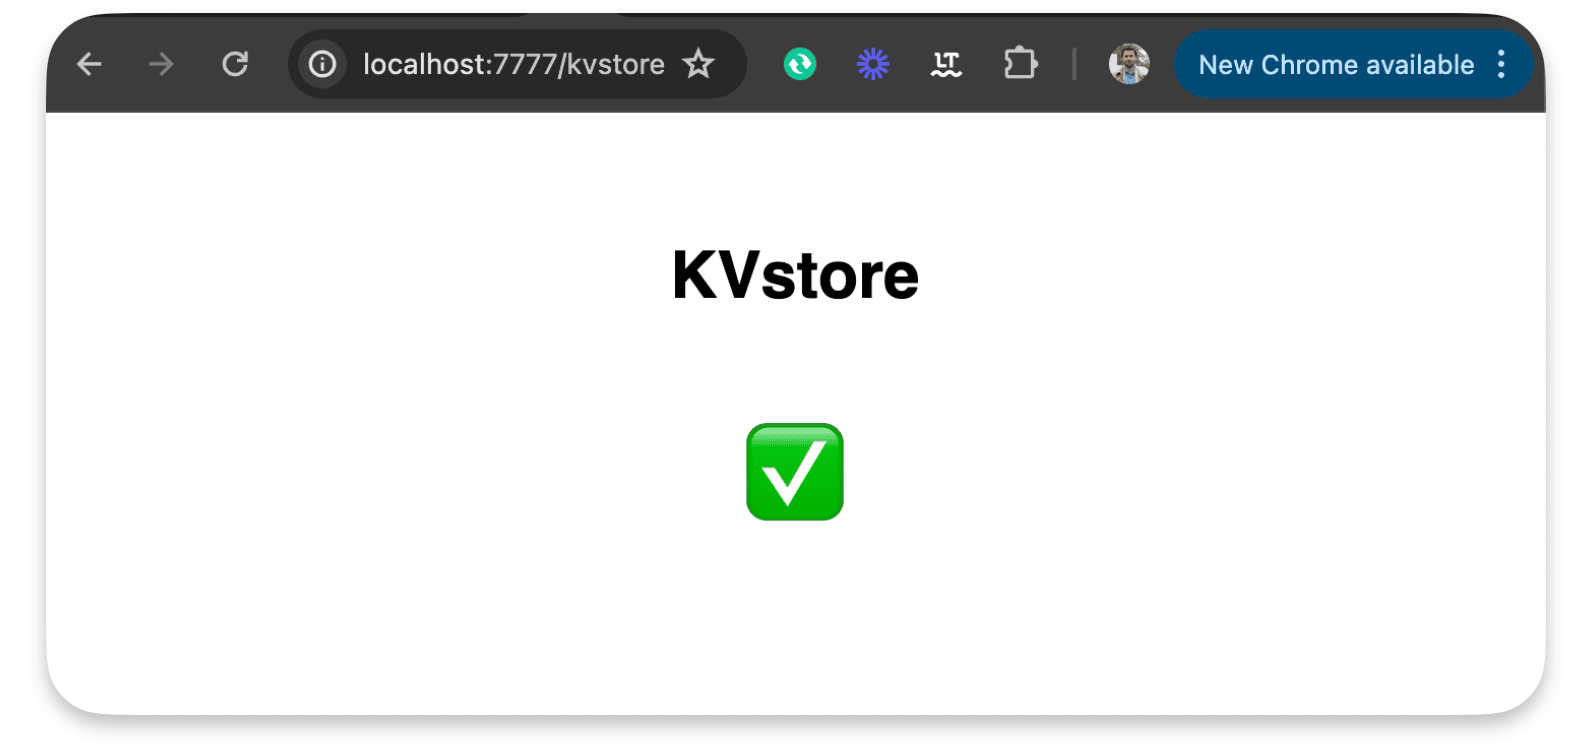
An other example :
router.get('/kvstore/readme', async(req,res) => {

    const store = new KVStore('main');
    const entry = await store.get('readme');

    if (!entry) {
        res.withStatus(404).json( { status: 404 } );
    }

    res.send(entry.body);

});
This returns the content of our readme file :
Add geolocation / personalize the content based on location
Identifying user location through IP can enhance website experience by offering localized content, relevant services, and targeted ads. It enables personalized recommendations based on regional preferences, language, and cultural nuances, fostering user engagement and satisfaction. Additionally, it aids in fraud prevention and compliance with geo-specific regulations.
Import our getGeolocationForIpAddress function from the package :
import { getGeolocationForIpAddress } from "fastly:geolocation"
Add a new route :
router.get("/geo", async (req, res) => {
  if(!req.ip) res.withStatus(403).json({error: "No ip set"});
  res.json(getGeolocationForIpAddress(req.ip));
});
Here’s the available data returned by getGeolocationForIpAddress()
{
"as_name": "netskope inc",
"as_number": 55256,
"area_code": 0,
"city": "paris",
"conn_speed": "broadband",
"conn_type": "wired",
"continent": "EU",
"country_code": "FR",
"country_code3": "FRA",
"country_name": "france",
"gmt_offset": 200,
"latitude": 48.86,
"longitude": 2.34,
"metro_code": 250075,
"postal_code": "75001",
"proxy_description": "cloud-security",
"proxy_type": "hosting",
"region": "IDF",
"utc_offset": 200
}
Detect the device / personalize the content based device type
Dynamic serving or content negotiation is crucial for delivering a tailored user experience across various devices and platforms. By detecting characteristics like user agent or device type, websites can serve different content optimized for each, enhancing usability and performance. For instance, a website might offer a mobile-friendly layout for smartphones, a desktop version for computers, and even an alternative format for accessibility purposes
Import the device lib
import {Device} from "fastly:device"
Use the Device class :
router.get("/device", async (req, res) => {

  const ua = req.headers.get('user-agent')

  const machine = Device.lookup(ua)

  res.json({
    ua,
    machine
  });

});
The route will send back those data when connecting with a Google Pixel 7 user-agent :
{
"ua": "Mozilla/5.0 (Linux; Android 13; Pixel 7) AppleWebKit/537.36 (KHTML, like Gecko) Chrome/116.0.0.0 Mobile Safari/537.36",
"machine": {
"name": "Google Pixel 7",
"brand": "Google",
"model": "Pixel 7",
"hardwareType": null,
"isDesktop": null,
"isGameConsole": null,
"isMediaPlayer": null,
"isMobile": null,
"isSmartTV": null,
"isTablet": null,
"isTouchscreen": null
}
Read environement variables / set by Fastly
You can access those env variables within your compute code :
FASTLY_CACHE_GENERATION
FASTLY_CUSTOMER_ID
FASTLY_HOSTNAME
FASTLY_POP
FASTLY_REGION
FASTLY_SERVICE_ID
FASTLY_SERVICE_VERSION
FASTLY_TRACE_ID
To so so import :
import { env } from "fastly:env";
Then use is like so :
router.get("/env", async (req, res) => {

    const hostname = env("FASTLY_HOSTNAME");
    const serviceId = env('FASTLY_SERVICE_ID');
    const cacheGeneration = env('FASTLY_CACHE_GENERATION');
    const pop = env('FASTLY_POP');
    const region = env('FASTLY_REGION');
    const serviceVersion = env('FASTLY_SERVICE_VERSION');

    res.json({
        hostname,
        serviceId,
        cacheGeneration,
        region,
        pop,
        serviceVersion
    });

});
This code returns :
{
"hostname": "cache-par-lfpg1960091",
"serviceId": "abqGMGiPUkqTNvD7cgRiz4",
"cacheGeneration": "0",
"region": "EU-West",
"pop": "PAR",
"serviceVersion": "37"
}
Edge Rate limiter / set rate limit at the edge
A rate limiter is like a gatekeeper that controls how often people or programs can access your app or website. It helps keep out bad behavior like too many requests from hackers or automated tools trying to grab all your data or slow down your site. By limiting requests, you protect your server, ensure everyone gets a fair chance to use your service, and keep your app or website running smoothly without overloads.
Import the device lib :
import { RateCounter, PenaltyBox, EdgeRateLimiter } from 'fastly:edge-rate-limiter';
Then use is like so :
router.get('/rateLimit', async (req, res) => {

    const rc = new RateCounter('rc')
    const pb = new PenaltyBox('pb')
    const limiter = new EdgeRateLimiter(rc, pb);

    if (!req.ip) res.withStatus(403).json({ error: "No ip set" });

    const shouldBeBlocked = limiter.checkRate(
        req.ip, // The client to rate limit.
        1, // The number of requests this execution counts as.
        10, // The time window to count requests within.
        100, // The maximum average number of requests per second calculated over the rate window.
        1 // The duration in minutes to block the client if the rate limit is exceeded.
    );

    if(shouldBeBlocked) res.withStatus(403).json({ shouldBeBlocked, error: "Number of requests exceeded" });

    res.json({
        shouldBeBlocked
    })

});
See it in action
To test the rate limiter I used Siege to make hundreds of HTTP calls with the following command :
siege "https://likely-destined-satyr.edgecompute.app/rateLimit"
As you can see in the video underneath we get some 200 and then quicly we get only 403 :
How to use a Rate Limit to protect your origin ?
The idea of rate limiting is to protect your origin; a high number of requests against a specific resource could cause service disruption. Not necessarily by taking down a server but most often by degrading performance. We all know how important web performance is in the goal of delivering a high-end experience to all our users.
Here’s a piece of code that rate limits the requester when too many requests are performed in a short amount of time.
There’s something important to understand with rate limiting: the primary goal is to protect your production traffic. In other words, when you get a cache MISS. So when you test an edge rate limit rule, be sure not to hit the cache.
The following code has the sole objective of proxying the origin and adding a rate limit rule.
import { Router } from "@fastly/expressly";
import { RateCounter, PenaltyBox, EdgeRateLimiter } from 'fastly:edge-rate-limiter';
import { CacheOverride } from "fastly:cache-override";

const router = new Router();


router.all("(.*)", async (req, res) => {

  const rc = new RateCounter('rc')
  const pb = new PenaltyBox('pb')
  const limiter = new EdgeRateLimiter(rc, pb);

  if (!req.ip) res.withStatus(403).json({ error: "No ip set" });

  const shouldBeBlocked = limiter.checkRate(
      req.ip, // The client to rate limit.
      3, // The number of requests this execution counts as.
      10, // The time window to count requests within.
      12, // The maximum average number of requests per second calculated over the rate window.
      10 // The duration in minutes to block the client if the rate limit is exceeded.
  );

  if(shouldBeBlocked) res.withStatus(403).json({ shouldBeBlocked, error: "Number of requests exceeded" });

  res.headers.set('reqip', req.ip);

  res.send(await fetch(req, {
    backend: "fast_antoinebrossault_com",
    cacheOverride: new CacheOverride("pass", {})

  }));

});


router.listen();
If you need a tool to test an edge rate limit rule, I previously used Siege in this article, but I discovered another tool that is performant and easy to use. It’s called autocannon. Here’s a command you can use to run a lot of requests and analyze the results of those requests:
npx autocannon --renderStatusCodes --duration 30 "https://faaaaast-erl.global.ssl.fastly.net/_nuxt/1dfb24c.js"
How to use modules ?
Import your own code
Because it’s always a good idea to split your code into different files for better readability, I’m going to show you how you can do it with Fastly Compute and JavaScript.
You have to use the ESM syntax like this:
In the « /src/« ` folder
export const hello = () => {
    console.log('👋 Hello, world!');
};
import { hello } from './myModule.js';

hello();
How to use third parties libraries ?
As of today (16-03-2025), only a selection of libraries are available with Fastly Compute in JavaScript. The reason is that the SDK differs from what you have in Node.js. So, if you try to install a package, there’s a high chance that some methods will be undefined and the code will not work.
Here are the available libraries.
exif-js (2.3.0)
@borderless/base64 (1.0.1)
jose (5.6.3)
mustache (4.2.0)
minimatch (10.0.1)
crypto (1.0.1)
openapi-backend (5.10.6)
seedrandom (3.0.5)
js-cookie (3.0.5)
jsonwebtoken (9.0.2)
cookie (0.6.0)
@fastly/expressly (2.3.0)
ipaddr.js (2.2.0)
utf8 (3.0.0)
crypto-js (4.2.0)
nunjucks (3.2.4)
base-64 (1.0.0)
hono (4.4.12)
@upstash/redis (1.32.0)
@tusbar/cache-control (1.0.2)
uuid (10.0.0)
intl (1.2.5)
flight-path (1.0.13)
kewarr (1.2.1)
qrcode-svg (1.1.0)
qrcode-generator (1.4.4)
consistent-hash (1.2.2)
@fastly/esi (0.1.4)
@fastly/js-compute (3.27.2)
unix-checksum (4.4.0)
date-fns (3.6.0)
You can refer to the official documentation for more information here.
Conclusion
With Fastly Compute, JavaScript, and Expressly, we can handle our requests and rules at the edge. I find this method efficient and sleek compared to using VCL. As a JavaScript developer, it feels natural and easy to use. If you’re familiar with PWAs and Service Workers, you’ll notice that Fastly’s approach to handling requests is similar to the Service Worker API they aim to implement.
The idea behind autocomplete
The main goal of this application was to help HubSpot users easily create companies in their CRM with auto-completion features. Currently, when you create a company in HubSpot or any other object like a contact, there’s no auto-completion available. For instance, you can’t use the Google Maps API to auto-complete an address. Moreover, there’s no direct connection to the official company registry of your country to retrieve the correct tax number, etc. So, my idea was straightforward: create a website, app, or page with a form that incorporates auto-completion.
I approached this in a more sophisticated manner. To link the form to the HubSpot portal, you typically need to send the data through an API call. However, to make this app accessible to the general public, including those who may not be comfortable with coding or manipulating API keys, integrating with the HubSpot OAuth flow was the solution
Demo
Diagram

The stack and strategy
The most challenging aspect of this project was creating the public app with the OAuth flow. Managing the various tokens and refreshing them required a bit of effort.
The oAuth flow
To create a public app in HubSpot using OAuth, first register your app in the HubSpot Developer Portal. Then, implement the OAuth 2.0 authorization code grant flow. This involves redirecting users to the HubSpot authorization URL, where they’ll authenticate and authorize your app’s access to their HubSpot data. Upon authorization, HubSpot will redirect users back to your app with an authorization code that you’ll exchange for an access token, enabling your app to make authenticated requests to the HubSpot API on behalf of the user.
Firebase
I started by using the demo OAuth flow in Node.js provided by HubSpot as a foundation. Then, I re-implemented the functions in my own coding style, making the code clearer and cleaner.
For storing the tokens, I chose to use Firebase Firestore, which is a NoSQL database provided by Google.
To handle account creation and sign-in with Google, I chose to rely on Firebase’s functions to save time.
Frontend
For the front end, instead of hosting it on Firebase, I decided to host it on my own server.
The front-end is a Single Page Application (SPA) made with Nuxt. I used Vuex to manage my states, and for styling, I relied on Tailwind CSS.
Backends
I created a Node application using Express to manage the OAuth flow and my backend API. The REST API I built is consumed by a Nuxt.js frontend.
For the data, I created a service with an API which consumes another API with the tax information data.
Docker and deployment
Each backend is containerized with Docker. I encountered an interesting challenge related to the OAuth flow. Since all the OAuth logic is handled by my main backend, but it’s completely detached from my front end, the callback URL required didn’t match.
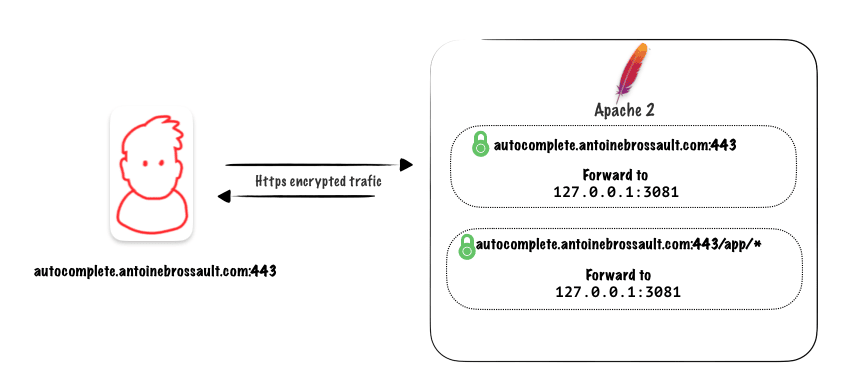
To address this, I utilized a reverse proxy with Apache. All requests coming from https://autocomplete.antoinebrossault.com/app are forwarded to the main backend, while requests for https://autocomplete.antoinebrossault.com/ are handled outside of the container by the Apache Server installed on the VPS.
<IfModule mod_ssl.c>
<VirtualHost *:443>
    ServerAdmin [email protected]
    ServerName autocomplete.antoinebrossault.com
    DocumentRoot "/home/where/apps/autocomplete.antoinebrossault.com"
    ErrorLog ${APACHE_LOG_DIR}/.log
    CustomLog ${APACHE_LOG_DIR}/.log combined

    <Directory /home/where/apps/autocomplete.antoinebrossault.com >
        Options Indexes FollowSymLinks
        AllowOverride All
        Require all granted
    </Directory>


     ProxyPass /app http://localhost:3012
     ProxyPassReverse /app http://localhost:3012


SSLCertificateFile /etc/letsencrypt/live/autocomplete.antoinebrossault.com/fullchain.pem
SSLCertificateKeyFile /etc/letsencrypt/live/autocomplete.antoinebrossault.com/privkey.pem
Include /etc/letsencrypt/options-ssl-apache.conf
</VirtualHost>
</IfModule>
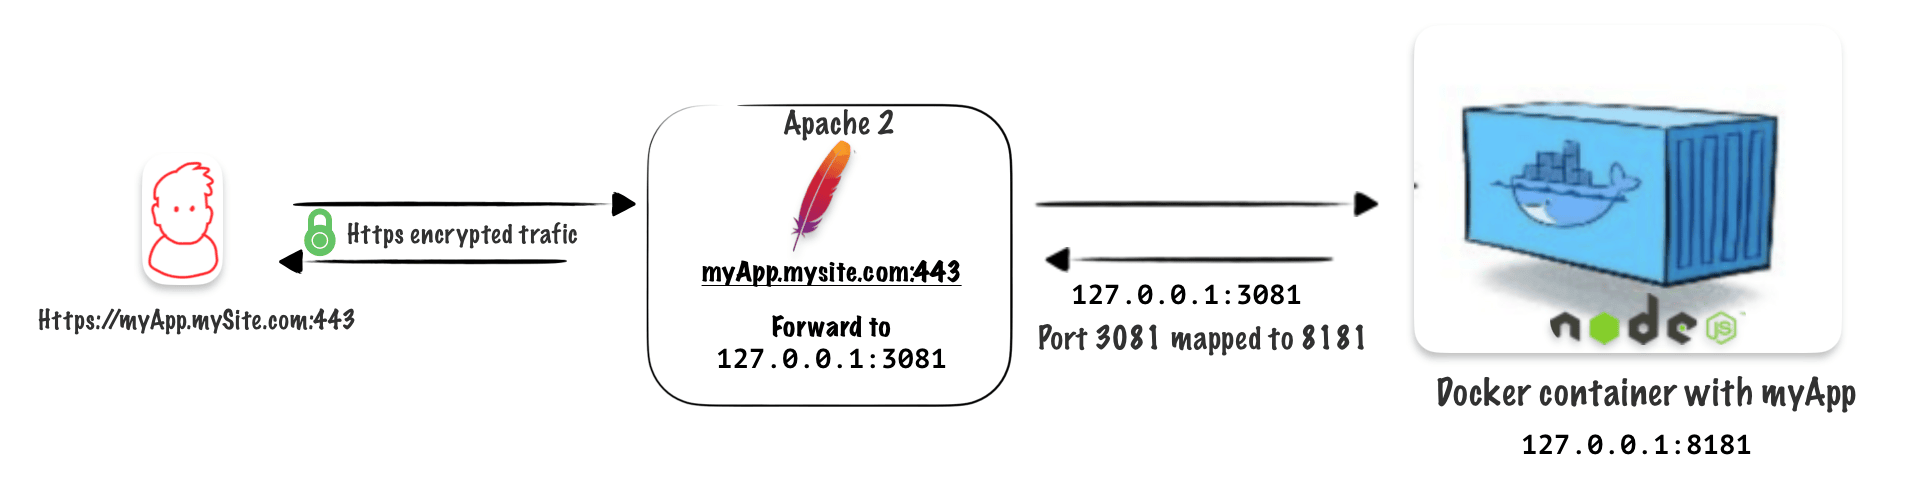
Create a Dockerfile
Create a Dockerfile in your project :
FROM arm64v8/node:14-alpine


WORKDIR /app
COPY . .

# If you have native dependencies, you'll need extra tools
# RUN apk add --no-cache make gcc g++ python

RUN apk update && apk upgrade

RUN apk add curl

RUN npm install

EXPOSE 8181

CMD [ "node", "/app/server.js" ]
This Dockerfile is used to create a Docker image for running a Node.js application on ARM64 architecture using Alpine Linux as the base image.
FROM arm64v8/node:14-alpine This line specifies the base image for the Dockerfile. It pulls the image tagged 14-alpine from the Docker Hub repository arm64v8/node, which is a Node.js image specifically built for ARM64 architecture
This Dockerfile is used to create a Docker image for running a Node.js application on ARM64 architecture using Alpine Linux as the base image. Let’s break down each instruction:
WORKDIR /app: This sets the working directory inside the container to /app. Any subsequent commands will be executed relative to this directory.
COPY . .: This copies all the files from the host machine’s current directory (where the Dockerfile resides) to the /app directory inside the container.
RUN apk update && apk upgrade: This updates the package index and upgrades installed packages in the Alpine Linux system.
RUN apk add curl: This installs the curl command-line tool on the Alpine Linux system.
RUN npm install: This installs Node.js dependencies specified in the package.json file in the /app directory. It assumes there’s a package.json file in the root directory of the copied files.
EXPOSE 8181: This exposes port 8181 on the container. It doesn’t actually publish the port to the host machine, but it serves as documentation for users of the image to know which port to map when running a container based on this image.
CMD [ "node", "/app/server.js" ]: This specifies the command to run when a container is started from this image. It runs the Node.js application, assuming that the entry point of the application is located at /app/server.js inside the container.
Build the image
docker build -t antoine/shortgame-api . --force-rm;
docker build: This is the Docker command used to build Docker images.-
-t antoine/shortgame-api: This part of the command tags the image with a specific name and optionally a tag. In this case, the image is tagged asantoine/shortgame-api. Tags are useful for identifying and managing different versions of images. The-toption is short for--tag. -
.: This specifies the build context. The.indicates that the build context is the current directory where the Dockerfile is located. This means that Docker will look for a Dockerfile in the current directory and use it to build the image. -
--force-rm: This is an option that tells Docker to remove intermediate containers after a successful build. Intermediate containers are created during the build process and are removed by default after the build is completed. Using--force-rmensures that even if the build fails, any intermediate containers are removed. This can help save disk space. -
;: This is a command separator used to run multiple commands in a single line in a Unix-like shell. In this case, it allows you to run multiple Docker commands sequentially in a single line.
In summary, the docker build command builds a Docker image based on the Dockerfile in the current directory, tags the image with antoine/shortgame-api, and removes intermediate containers after a successful build.
Run the image
docker run: This is the command that tells Docker to run a container based on a Docker image.-
-d: This option tells Docker to run the container in detached mode. It means the container runs in the background, and you can still use your terminal after starting it. -
-p 3081:8181: This option is for port mapping. It tells Docker to map port 3081 on your local machine to port 8181 inside the container. So, any traffic coming to your machine on port 3081 will be forwarded to port 8181 inside the container. -
-it: This option combines two flags:-iand-t. The-iflag allows you to interact with the container’s stdin (standard input), and the-tflag allocates a pseudo-TTY, which basically means you get a terminal-like interface to interact with the container. -
--name shortgame-api: This option assigns a name to the container. In this case, the name is set toshortgame-api. -
antoine/shortgame-api: This is the name of the Docker image that the container is based on. It’s like the blueprint for the container.
Use a Makefile to save time
A Makefile is a simple text file used to define a set of tasks or instructions for building, compiling, and managing software projects. It’s commonly used in software development to automate repetitive tasks such as compiling code, running tests, and deploying applications
Here’s mine for managing my simple Docker steps :
build:
    docker build -t antoine/shortgame-api . --force-rm;

run:
    docker run -d -p 3081:8181 -it --name shortgame-api antoine/shortgame-api
Serve the App through HTTPS
To do so you need to have apache2 setup and certbot
Install Apache2
apt-get install apache2
Install the proxy mods
These Apache2 mods enable the server to act as a proxy, facilitating routing and forwarding of HTTP requests to other servers.
a2enmod proxy proxy_http
Restart Apache2
systemctl restart apache2
Install Certbot
Certbot is a free, open-source tool designed to automate the process of obtaining and renewing SSL/TLS certificates, which are essential for securing websites and enabling HTTPS encryption. It simplifies the management of SSL certificates by handling the configuration.
Install cert-bot to get let’s encrypt certificates, follow the instructions
Install snap
sudo apt update
sudo apt install snapd
Install certbot :
snap install --classic certbot
ln -s /snap/bin/certbot /usr/bin/certbot
sudo snap install --classic certbot
Use this Bash script to automate the Apache config and certification
#!/bin/bash

# Check if the script is run as root
if [ "$EUID" -ne 0 ]; then
  echo "Please run this script as root."
  exit 1
fi

# Prompt for the domain name and directory
read -p "Enter the domain name for your website (e.g., example.com): " domain
read -p "Enter the path to the application directory (e.g., /var/www/nodeapp): " app_dir
read -p "Enter the application port (e.g., 3000): " app_port

# Create the Node.js application directory
mkdir -p $app_dir
chown -R www-data:www-data $app_dir
chmod -R 755 $app_dir

# Create a new Apache configuration file
config_file="/etc/apache2/sites-available/$domain.conf"
touch $config_file

# Define the Apache VirtualHost configuration with reverse proxy
cat > $config_file <<EOL
<VirtualHost *:80>
    ServerAdmin webmaster@$domain
    ServerName $domain

    # ProxyPass for Node.js application
    ProxyPass / http://127.0.0.1:$app_port/
    ProxyPassReverse / http://127.0.0.1:$app_port/

    DocumentRoot $app_dir
    ErrorLog \${APACHE_LOG_DIR}/$domain_error.log
    CustomLog \${APACHE_LOG_DIR}/$domain_access.log combined

    <Directory $app_dir>
        Options Indexes FollowSymLinks
        AllowOverride All
        Require all granted
    </Directory>
</VirtualHost>
EOL

# Enable the site configuration
a2ensite $domain

# Reload Apache to apply the changes
systemctl reload apache2

# Obtain SSL certificate and update Apache configuration with Certbot
certbot --apache --agree-tos --redirect --non-interactive --domain $domain

# Provide instructions to the user
echo "Node.js application configuration for $domain has been created and enabled."
echo "You can now start your application and configure it to listen on port $app_port."
echo "Don't forget to update your DNS records to point to this server."
Docker-compose is a powerful tool for managing multi-container Docker applications. In this article, we’ll explore how to set up a MySQL database using Docker-compose and tackle common issues that may arise during setup. We’ll cover troubleshooting steps for errors such as « not allowed to connect to this MySQL server » and dealing with authentication plugin loading problems. By following these steps, you can ensure smooth deployment and management of your MySQL containers.
Docker-compose
version: '3.8'

services:
  mysqldb:
    image: mysql:latest
    container_name: mysql-db
    restart: unless-stopped
    env_file: ./.env
    command: mysqld --default-authentication-plugin=mysql_native_password
    environment:
      - MYSQL_ROOT_PASSWORD=$MYSQLDB_ROOT_PASSWORD
      - MYSQL_DATABASE=$MYSQLDB_DATABASE
    ports:
      - $MYSQLDB_LOCAL_PORT:$MYSQLDB_DOCKER_PORT
    volumes:
      - /home/antoine/databases/mysql/data:/var/lib/mysql
Set .env
.env is at the root of my project
MYSQLDB_USER=root
MYSQLDB_ROOT_PASSWORD=qqddqsqddqqdqdsqds
MYSQLDB_LOCAL_PORT=3306
MYSQLDB_DOCKER_PORT=3306
Troubleshooting
not allowed to connect to this MySQL server
Host '172.18.0.1' is not allowed to connect to this MySQL server
If you get this error when trying to connect to your fresh MySQL container
Enter on the container :
docker exec -it mysql-db bash
Login to mysql
mysql -u root -p
Query the myql.user database
SELECT host, user FROM mysql.user;
You will get this
+------------+------------------+
| host       | user             |
+------------+------------------+
| %          | root             |
| 127.0.0.1  | root             |
| ::1        | root             |
| localhost  | mysql.sys        |
| localhost  | root             |
| localhost  | sonar            |
+------------+------------------+
Create a new user
CREATE USER 'antoine'@'%' IDENTIFIED WITH mysql_native_password BY '<thePassword>';
grant all on *.* to 'antoine'@'%';
Alternatively :
ALTER USER 'antoine'@'%' IDENTIFIED WITH mysql_native_password BY '<thePassword>';
mysql docker uthentication plugin ‘caching_sha2_password’ cannot be loaded:
If you get an erorr which says :
mysql docker uthentication plugin 'caching_sha2_password' cannot be loaded: dlopen(/usr/local/lib/plugin/caching_sha2_password.s
Add this command to the docker-compose
command: mysqld --default-authentication-plugin=mysql_native_password
Issue with Sequel Pro
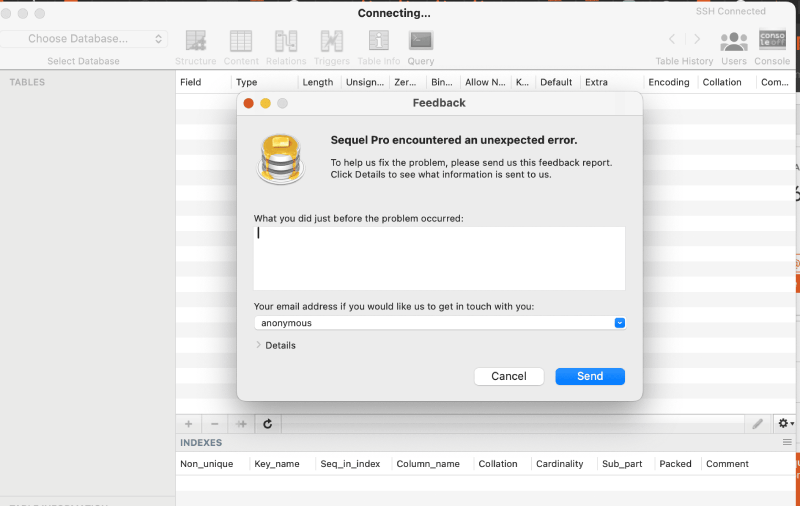
If you encounter issues when trying to connect to your database with Sequel Pro, it’s likely a bug from sequel pro with the latest MySQL version.
Instead uses Sequel Ace
What’s docker-compose ?
Docker Compose is a tool that simplifies the management of multi-container Docker applications. It allows users to define and run multiple Docker containers as a single application, making it easier to orchestrate and manage complex deployments. With Docker Compose, users can describe their application’s services, networks, and volumes in a single file, making it straightforward to replicate environments across different systems.
Find the right binary
Identify your distribution and architecture :
uname -s
Returns :
Linux
Identify architecture :
uname -m
Returns :
aarch64
Now we know our systems is Linux aarch64
Go on the docker-compose release page on github :
https://github.com/docker/compose/releases
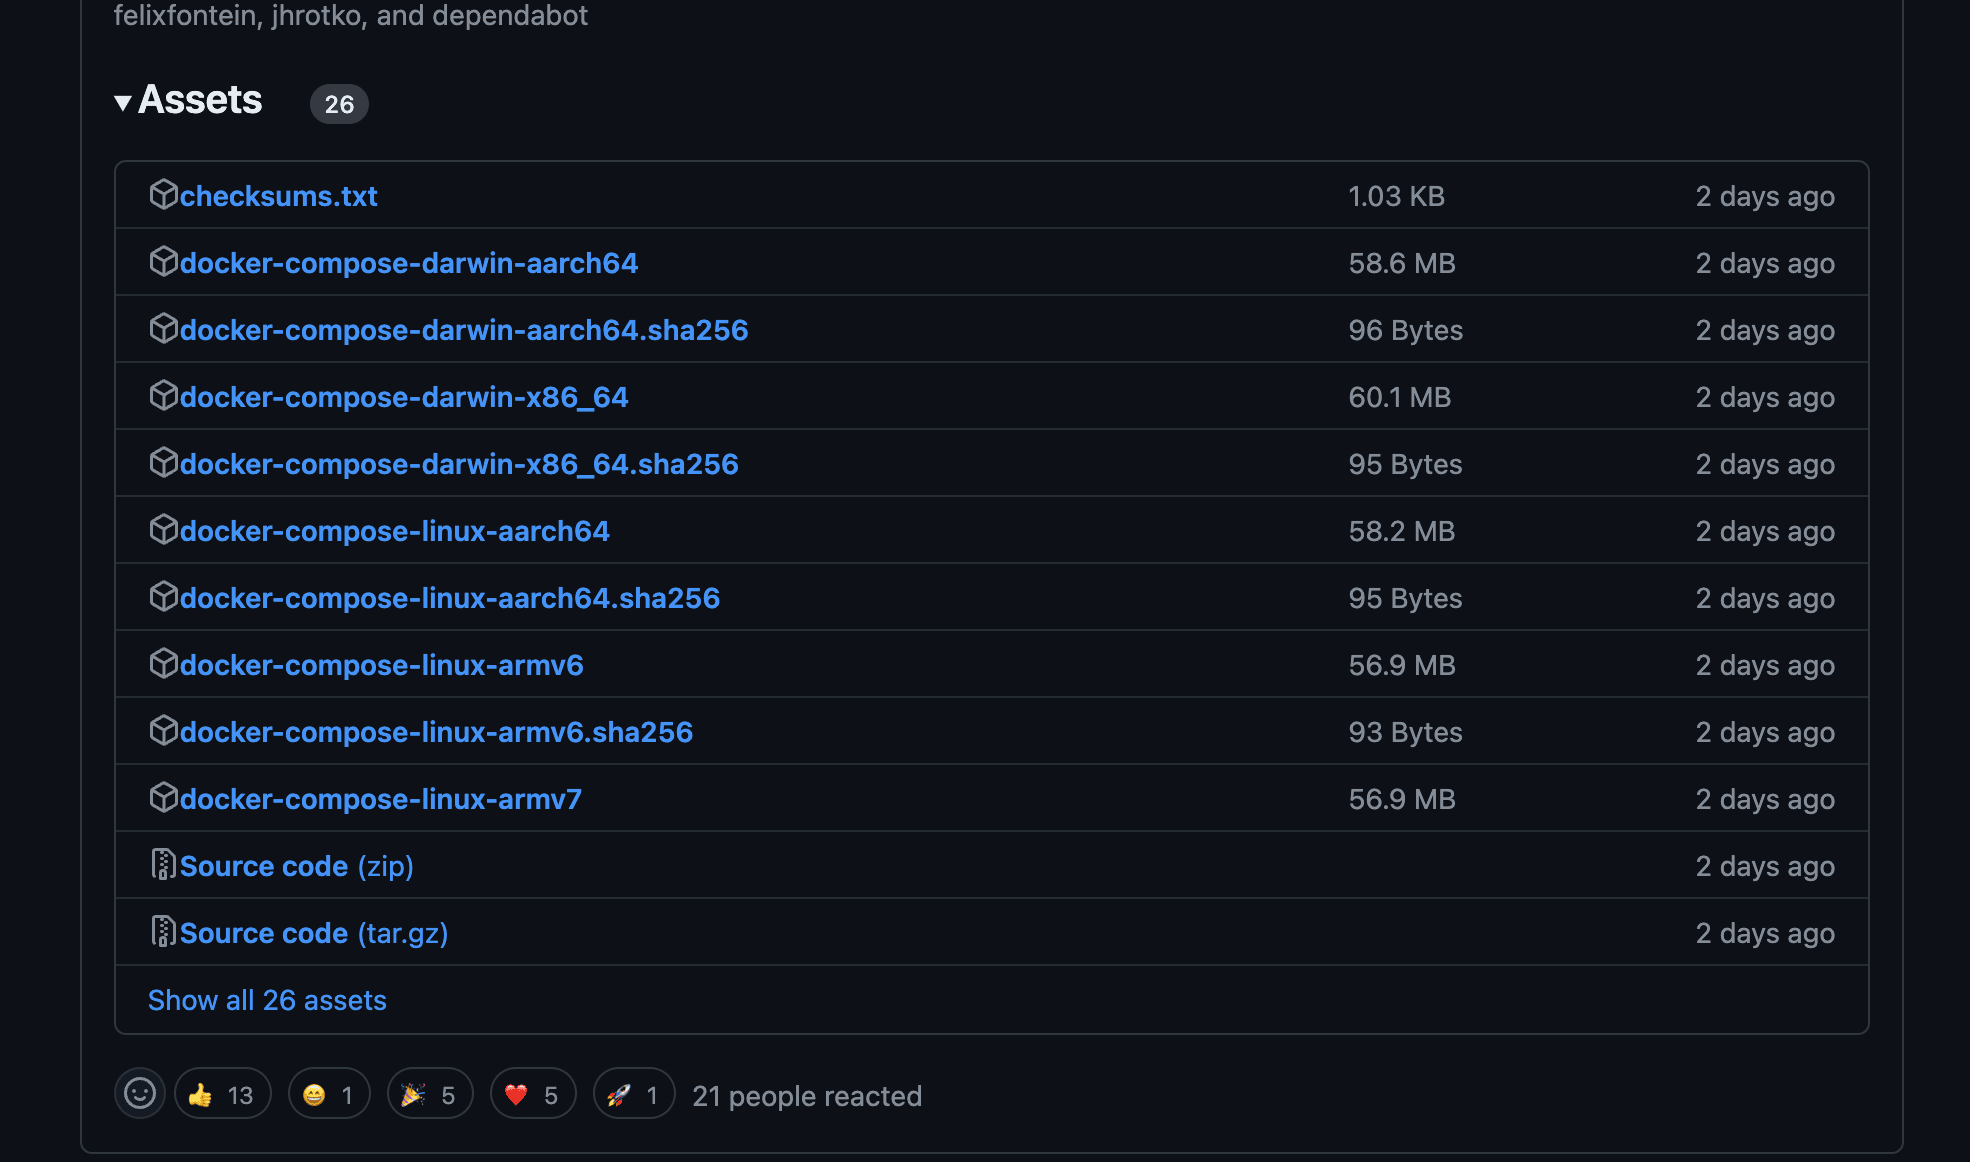
Identify the right release in my case :
docker-compose-linux-aarch64
Copy the download link :
https://github.com/docker/compose/releases/download/v2.26.1/docker-compose-linux-aarch64
Download it and place it to the right place :
curl -L "https://github.com/docker/compose/releases/download/v2.26.1/docker-compose-linux-aarch64" -o /usr/local/bin/docker-compose
Make it executable :
chmod +x /usr/local/bin/docker-compose
Test the installation :
docker-compose -v