18/08/2023
A simple approach to the custom coded action for non developers.
Write your first Custom Coded Action
In this article I’m will guide you and how to create your first Custom Coded Action. If you are not a developer this article is for you. I will explain without too much sideways how to create your first Custom Coded Action.
Let’s get started
Anatomy of a Custom Coded Action
First create a Workflow in my example I created one based on contact.
Then click on the plus sign to add a new block.
![]()
Select the Custom Code block
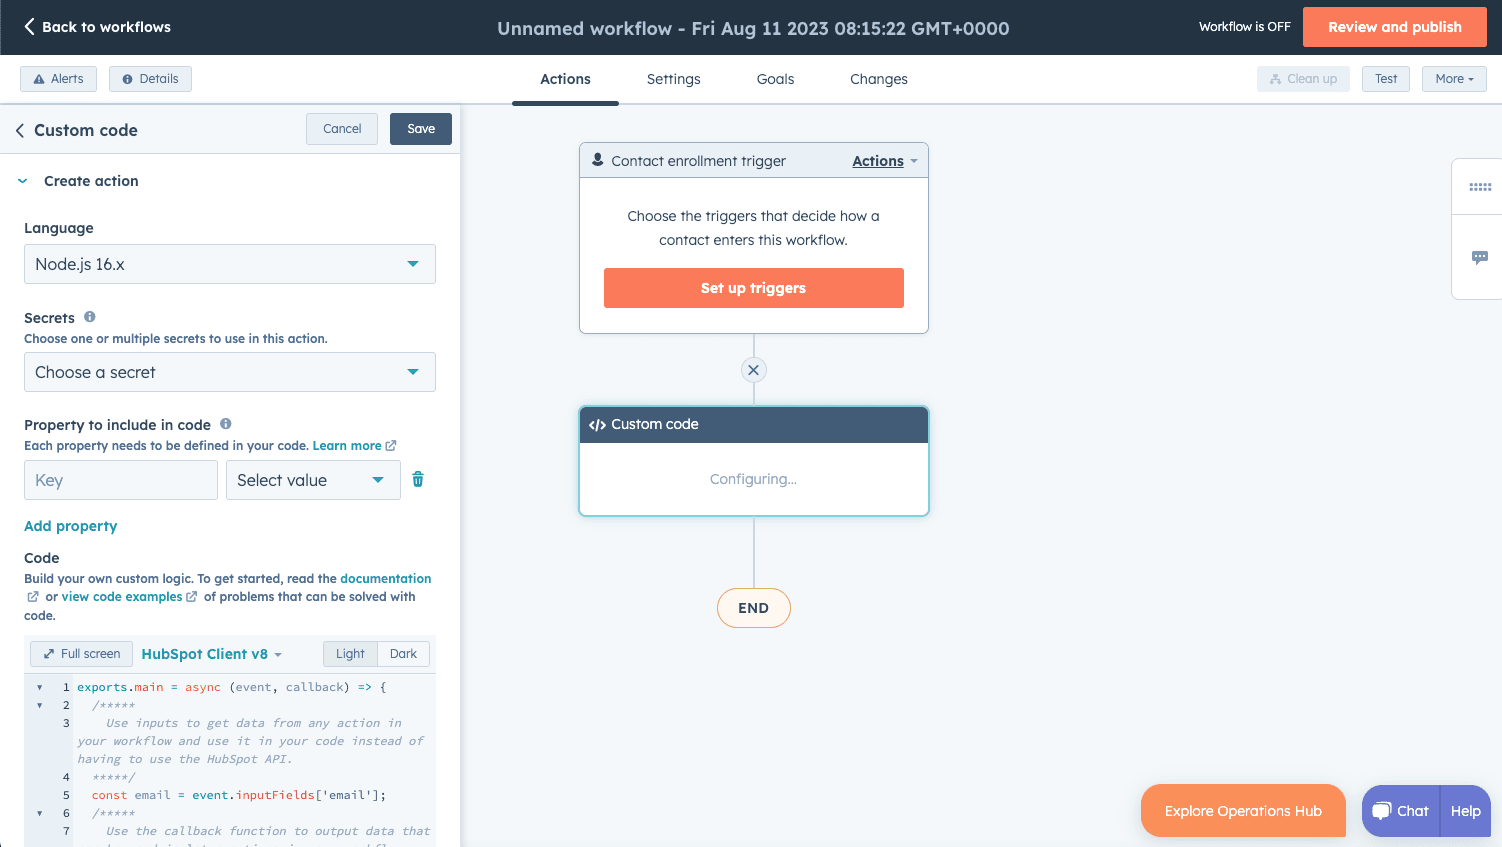
The code
Let’s take a look at the default code provided by HubSpot :
Variables
To use a custom property in your code, you have to select it in the « property to include in code » section.
Here I selected two contact properties : Email and carPlate to select the properties you want to use in your code click on the dropdown.
Then on the fields on the left you can set the variable name you want. Here I ketp the default names.
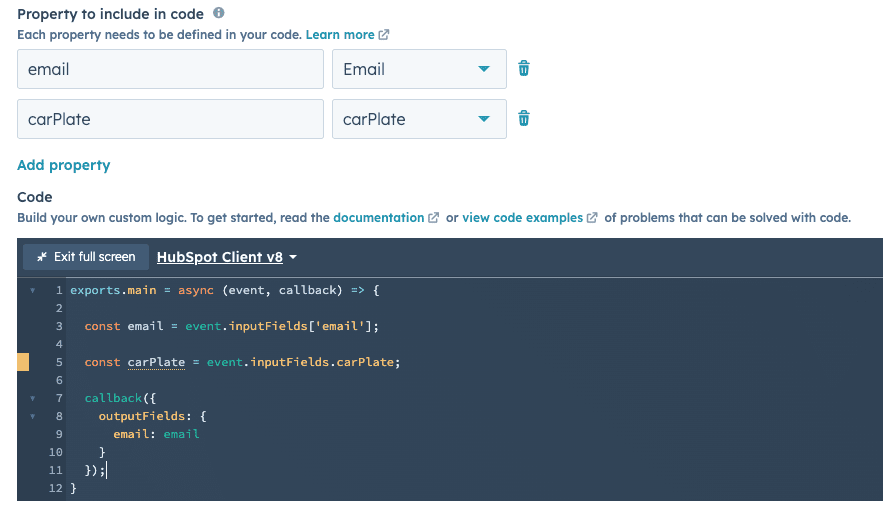
Then to use it in your code you have to use the following notation :
To access the email address in your code use :
const email = event.inputFields['email'];
Now, the contact’s email address will be set in the email variable.
The const email =parts means we store the email address in the email variable
Alternatively, you can use the dot notation like so :
const email = event.inputFields.email;
The keyword const is used most of the time to declare a variable, but you can also use the let keyword.
Like so :
let email = event.inputFields.email
The difference between const and let is : const cannot be reassigned, but let can.
Example :
This doesn’t work :
const email = event.inputFields.email:
email = "antoine@gmail.com";
But if you use let instead it will work
let email = event.inputFields.email:
email = "antoine@gmail.com";
In a nutshell:
« const » is for things that won’t change – once you put something in that box, it stays that way. « let » is for things that might change – you can put something in the box and later replace it with something else.
So, when you’re picking between « const » and « let, » think about whether you want a locked box that won’t change or a flexible box that you can update whenever you need to.
Display / return value from our code
To display something from our code you can use console.log() which is a function.
Think of console.log like a talking mirror that helps you understand what’s happening inside your program:
- Talking Mirror (console.log): Imagine you have a magical mirror that can talk. Whenever you want to know what’s going on inside a room, you ask the mirror to tell you. It gives you information about what’s happening without affecting the room itself.
-
Your Message (Value to Log): To understand what’s happening, you tell the mirror something specific. It could be anything – a thought, a question, or just a random observation.
-
Mirror’s Response (Output): The mirror takes your message and speaks it out loud. It tells you exactly what you asked for. This doesn’t change anything inside the room; it just gives you information.
// The talking mirror (console.log)
let message = "Hello, magical mirror!";
console.log(message); // The mirror responds by showing the message

let number = 42;
console.log("The answer to everything is:", number); // The mirror responds again
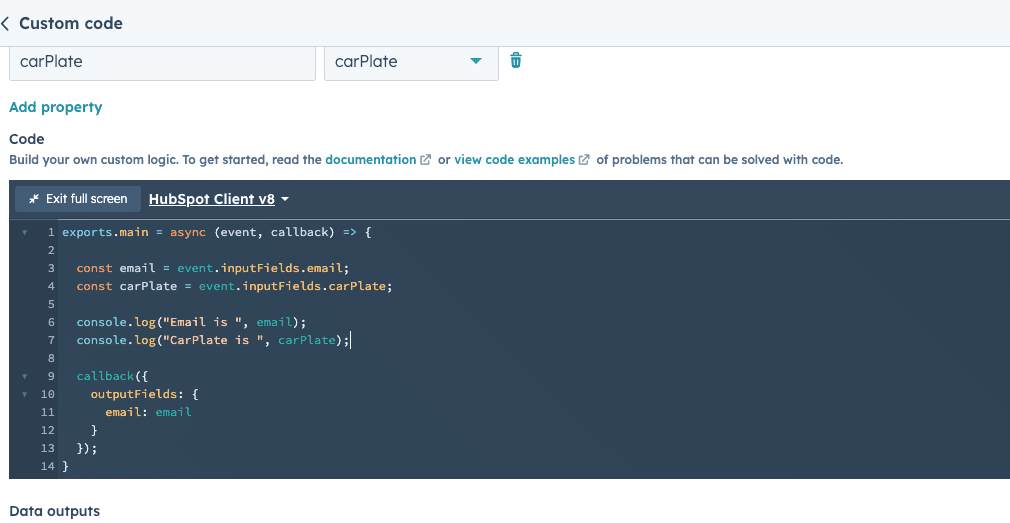
So in our Custom Coded Action if I want to display the email address or / and the car plate my code will look like this :
Then if I click Test
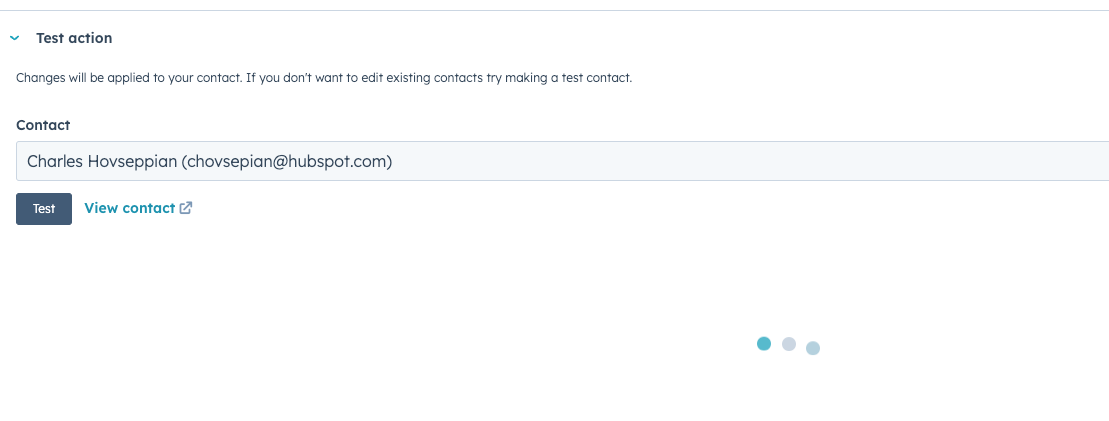
The result will look like this :
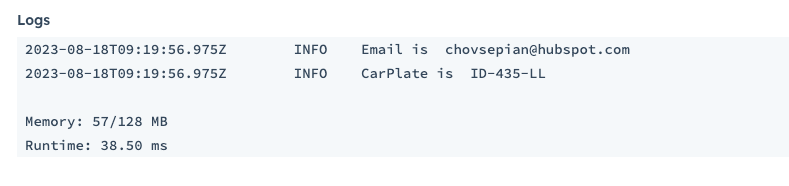
Here’s the code you can use to test this
exports.main = async (event, callback) => {

  const email = event.inputFields.email;

  console.log("Email is ", email);

  callback({
    outputFields: {
      email: email
    }
  });
}
Return data to the workflow
But this only display the value in the Logs section, if you want to return the data to the WorkFlow and use that date in an other block. You have to use the callBack function.
This is useful if for example to save the result of the Custom Coded Action in the contact
To return the data in the WorkFlow you have to use the callback
  callback({
    outputFields: {
      email: email
    }
  });
This part of the code will return the email value to the WorkFlow, then it will be accessible to other blocks.
- 1 – Write
email : emailinside the{ }of the outputfields - 2 – Add the value in the data outputs section
Like so :
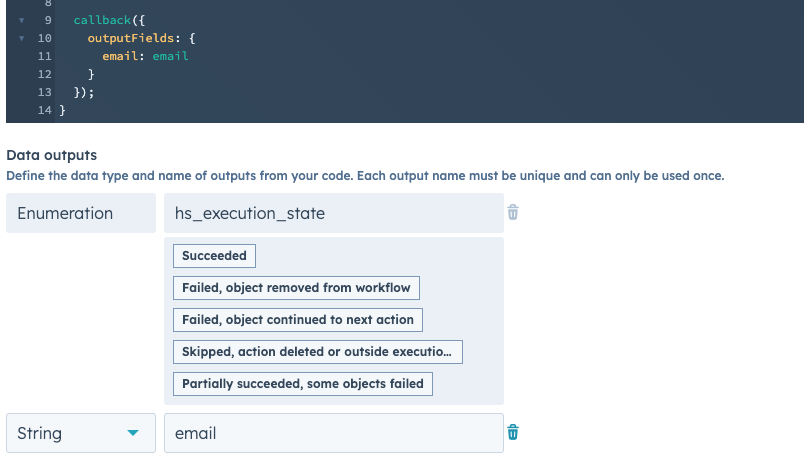
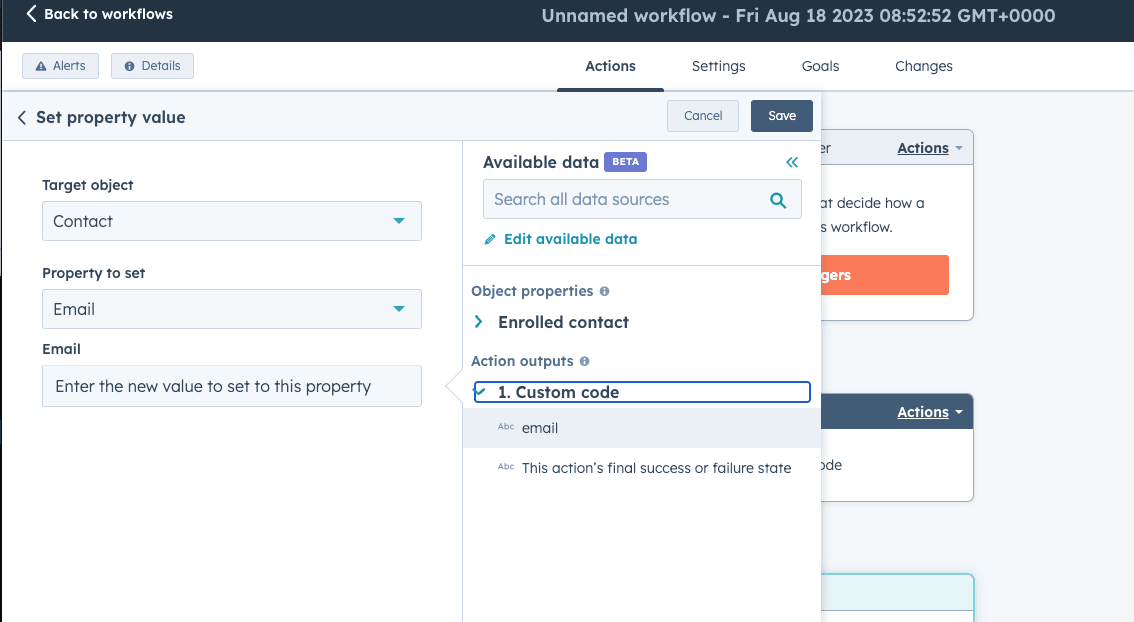
If you click save in the top right corner, now the email variable will be accessible to other blocks.
I use the set property value block and can select the email from the Custom Coded Action.
IF statements
An « if statement » in JavaScript is like a decision-making tool in your everyday life. Imagine you’re deciding whether to go outside or stay indoors based on the weather. The « if statement » in JavaScript helps your program make similar decisions based on certain conditions.
Here’s a simple way to understand it:
Imagine you’re a robot programmed to make decisions based on weather conditions:
If it’s sunny: You’ll decide to go for a walk outside.
If it’s rainy: You’ll decide to stay indoors and read a book
In JavaScript, an « if statement » works similarly:
let weather = "sunny"; // You can change this value to "rainy" or something else

let activity;

if (weather === "sunny") {
    activity = "go for a walk";
} else if (weather === "rainy") {
    activity = "stay indoors and read a book";
} else {
    activity = "not sure what to do";
}

console.log("Today's weather is " + weather + ". I will " + activity + ".");
Functions
A function in JavaScript is similar to the functions you use in Excel or Google spreadsheet.
As an example, imagine you have a « Greet » machine that takes a name as input and gives you a greeting as output:
- Greet Machine (Function): You have a machine with a big button labeled « Greet. » When you press the button, it asks for a name, and then it prints out a greeting.
-
Your Friend’s Name (Parameter): Before you press the button, you know your friend’s name. You’ll tell the machine this name so it can use it to greet your friend properly.
-
Greeting Message (Function Body): When you press the button, the machine uses the name you gave it to create a greeting message like « Hello, [Friend’s Name]! »
-
Greeting (Return Value): After pressing the button, the machine shows you the greeting message it created.
In JavaScript code, it might look like this:
// This is the "Greet" machine (function)
function greetFriend(name) {
    let greeting = "Hello, " + name + "!";
    return greeting;
}

// You press the button (call the function) and provide your friend's name
let friendName = "Alice";
let greetingMessage = greetFriend(friendName); // The machine gives you a greeting

console.log(greetingMessage); // You see the greeting: "Hello, Alice!"
Let’s use this function in a Custom Code :
exports.main = async (event, callback) => {

  const email = event.inputFields['email'];

  const firstName = event.inputFields.firstname;

  function greetFriend(name){

    const greeting = "Hello, "+name+" !"; // Hello, Antoine !

    return greeting;
  }

  const functionResult = greetFriend(firstName);

  console.log(functionResult);

  callback({
    outputFields: {
      email: email
    }
  });


}
Create and use a JavaScript function with ChatGPT
It can be faster and easier to create a fuction with chatGPT here’s how I created a function to test if a car is a preimum one or not.
The function :
function isPremiumCar(carBrand) {
    const premiumCarBrands = [
        'Audi', 'BMW', 'Bentley', 'Jaguar', 'Land Rover', 'Lexus', 'Maserati', 'Mercedes', 'Porsche', 'Rolls-Royce', 'Tesla', // Add more premium brands here
    ];

    return premiumCarBrands.includes(carBrand);
}
The complete Operations Hub custom code :
exports.main = async (event, callback) => {


  const carManufacturer = event.inputFields.carmanufacturer;

  function isPremiumCar(carBrand) {
    const premiumCarBrands = [
        'Audi', 'BMW', 'Bentley', 'Jaguar', 'Land Rover', 'Lexus', 'Maserati', 'Mercedes', 'Porsche', 'Rolls-Royce', 'Tesla', // Add more premium brands here
    ];

    return premiumCarBrands.includes(carBrand);
}


  const isCarPremium = isPremiumCar(carManufacturer);

  callback({
    outputFields: {
     isCarPremium
    }
  });


}
A chat GPT prompt you can use :
Context : serverless function developement
Help Needed : I want you to help me to write a logic with JavaScript
Constrains : the code should we written in this format :

exports.main = async (event, callback) => {

     // code here


    callback({
        outputFields: {

        }
    });

}


The logic should be written inside the main function.
If the logic returns data the data should be returned by the callback function inside the outputFields object.

When you get external data input as parameters. The data comes from event.inputFields object. E.g : you get the contact email adress then the email variable should be set like :

const email = event.inputFields.email;


logic to implement :
Conclusion
In this article I gave you dome basic knowledge to get started with Custom Coded Action in HubSpot. However to use the Custom Coded Action at their full potential you need solid JavaScript fudenmental. If you are interested I definitely recomend this training :