08/06/2024
Imagine a mailman delivering packages in a large city. In a typical scenario, the mailman delivers a package to a specific house based on the address. Simple, right? Now, let’s make it a bit more complex. Instead of delivering to houses, the mailman is delivering to a huge apartment building with multiple apartments inside. The address of the building is like a web server hosting multiple websites. Each apartment inside represents a different website hosted on that same server.
The Mailman’s Challenge
For the mailman to successfully deliver the package to the correct apartment, he needs more than just the building’s address; he needs the specific apartment number. This is where Server Name Indication (SNI) comes in.
SNI is like a tag on the package that tells the mailman exactly which apartment (or website) to deliver to. Without this tag, the mailman would be left standing in front of the building, unsure of which apartment to go to. Similarly, without SNI, the server wouldn’t know which website the client is trying to reach, leading to confusion and potential errors.
Why SNI is Crucial
When a web browser tries to connect to a website, it first establishes a secure connection using HTTPS. This process involves a conversation between the browser (client) and the web server, where they agree on how to encrypt the data to keep it secure. This conversation happens before any actual web content is exchanged.
Here’s where SNI plays a vital role:
- Initial Connection: When the browser reaches out to the server, it includes the name of the website it wants to connect to in the initial handshake process. This is the SNI.
- Server’s Response: The server uses this information to present the correct SSL/TLS certificate, which is essentially the building’s nameplate that confirms the server’s identity.
- Secure Communication: With the correct certificate in place, the secure communication channel is established, and the browser can now access the specific website it requested.
Without SNI, the server wouldn’t know which certificate to present, as it hosts multiple websites (apartments) on the same IP address (building). This would be like the mailman knowing only the building’s address but not the specific apartment number, leading to confusion and failed deliveries.
The Technical Flow

- Client Hello: The client’s browser sends a « Client Hello » message to the server, including the SNI, which specifies the desired hostname.
- Server Hello: The server receives this message and looks at the SNI to determine which SSL/TLS certificate to use.
- Certificate Exchange: The server sends back the appropriate certificate for the requested hostname.
- Secure Connection Established: Both the client and server agree on encryption methods, and a secure session is established.
The Importance of SNI
SNI is crucial because it allows multiple SSL/TLS certificates to be hosted on the same IP address. This is especially important for shared hosting environments, where multiple websites are hosted on a single server. By using SNI, servers can ensure that the correct certificate is used for each website, providing secure connections and a seamless user experience.
In summary, SNI acts as the key identifier that helps the mailman (server) deliver the package (website data) to the correct apartment (website) in a large building (server with multiple websites). It ensures that the right doors are opened, allowing secure and efficient communication between the client and server.
Debugging SNI Using Wireshark
Wireshark
Wireshark is a powerful, open-source network protocol analyzer that allows users to capture and interactively browse the traffic running on a computer network. It provides detailed visibility into network activity, making it an essential tool for network troubleshooting, analysis, and security monitoring.
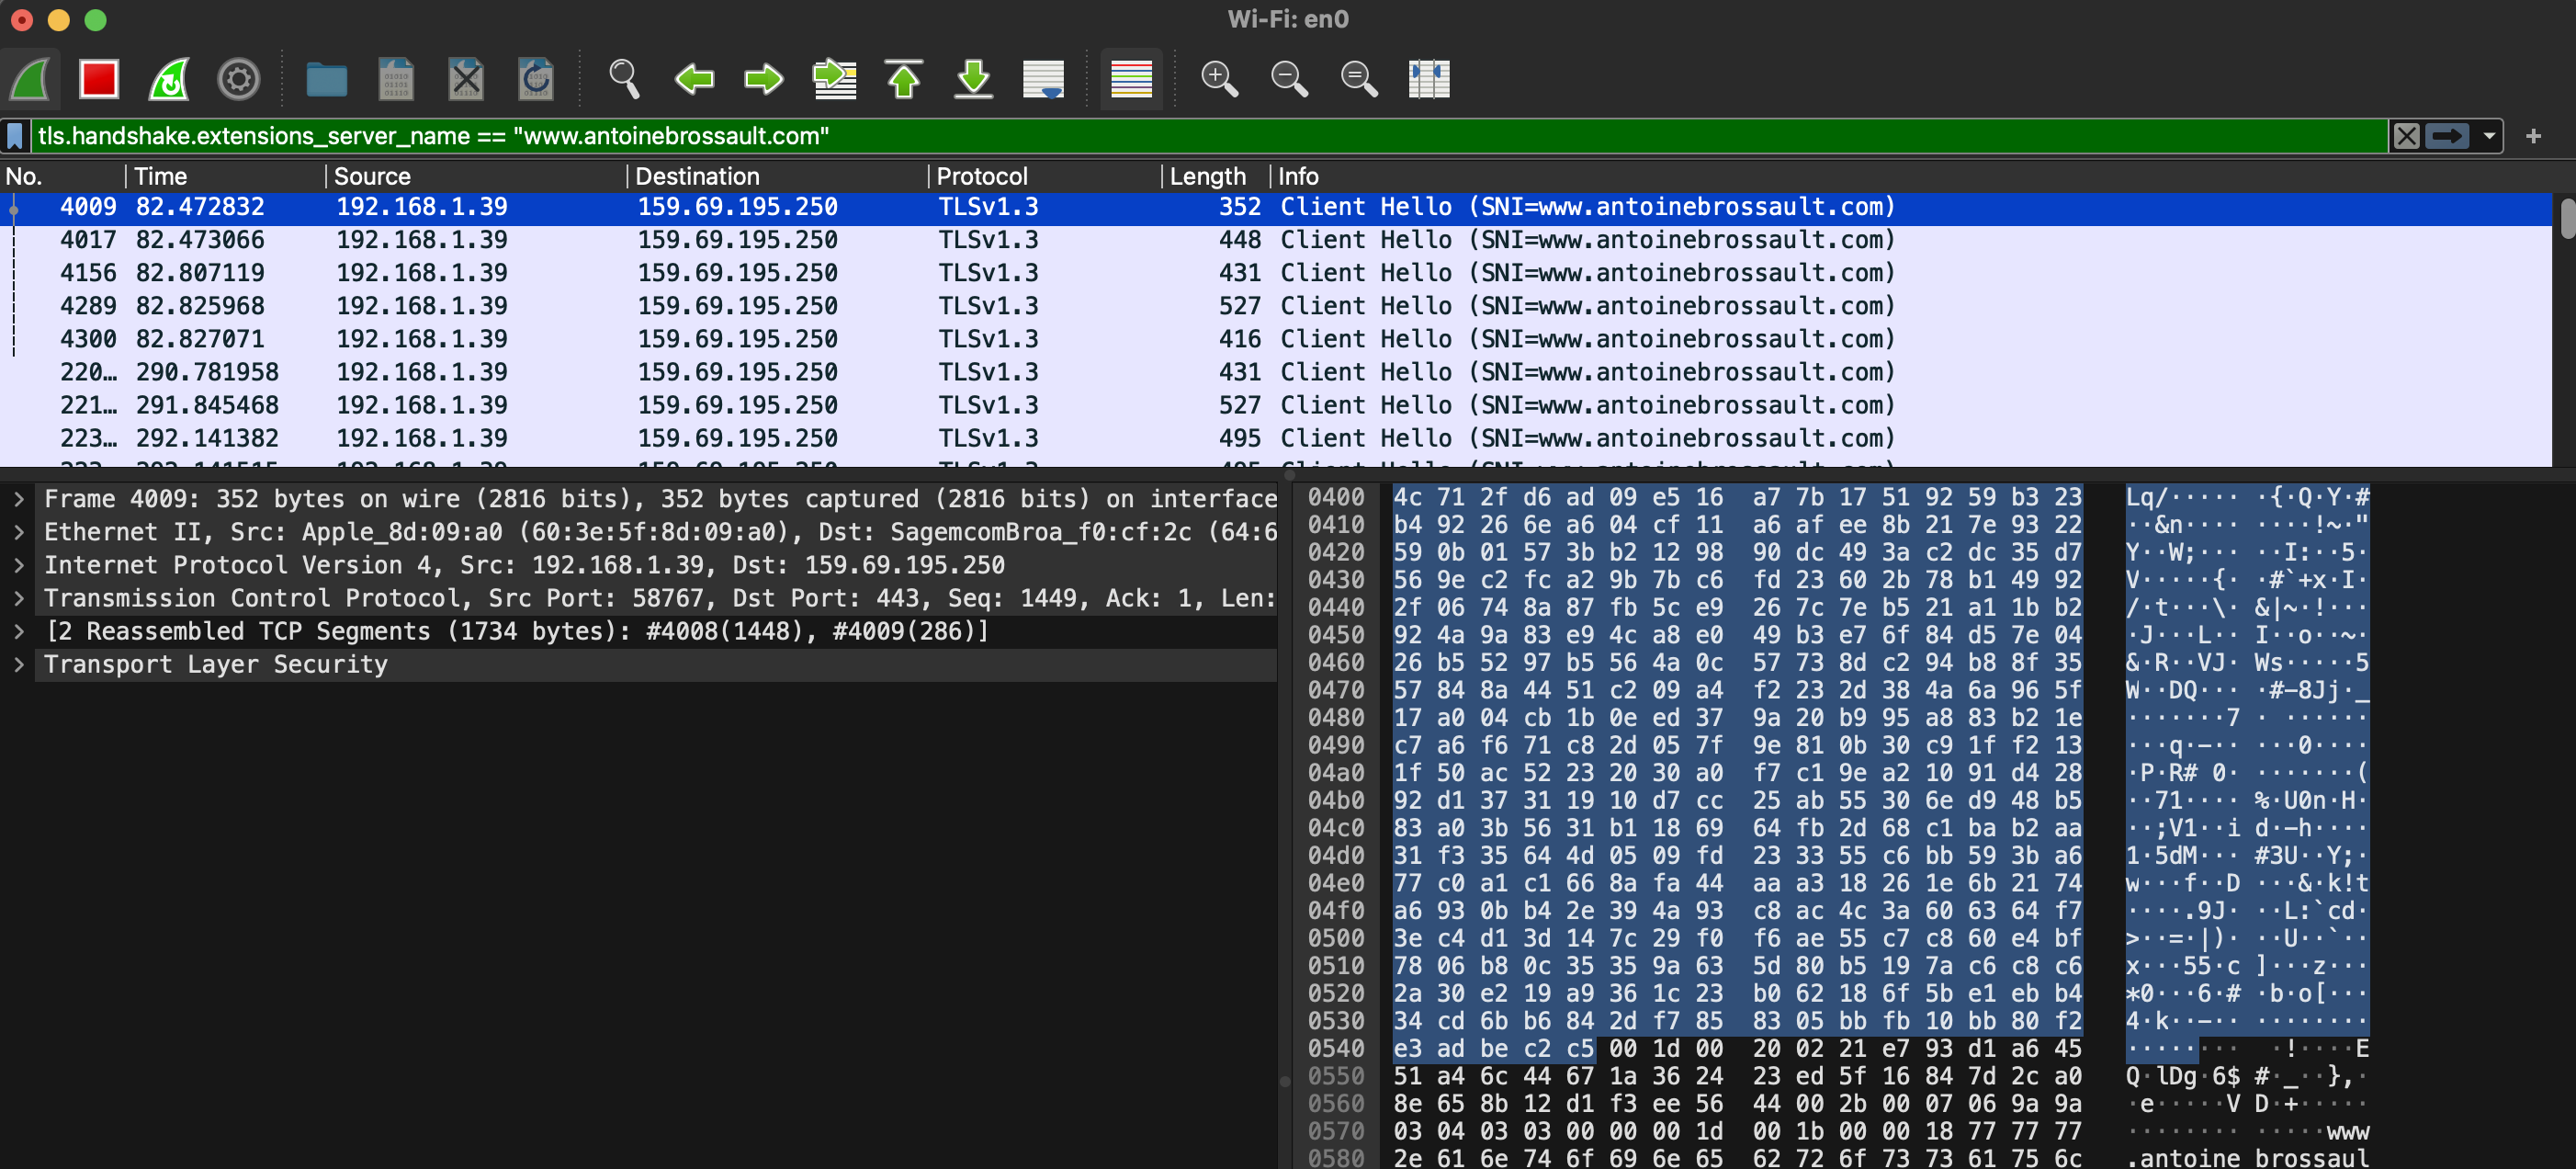
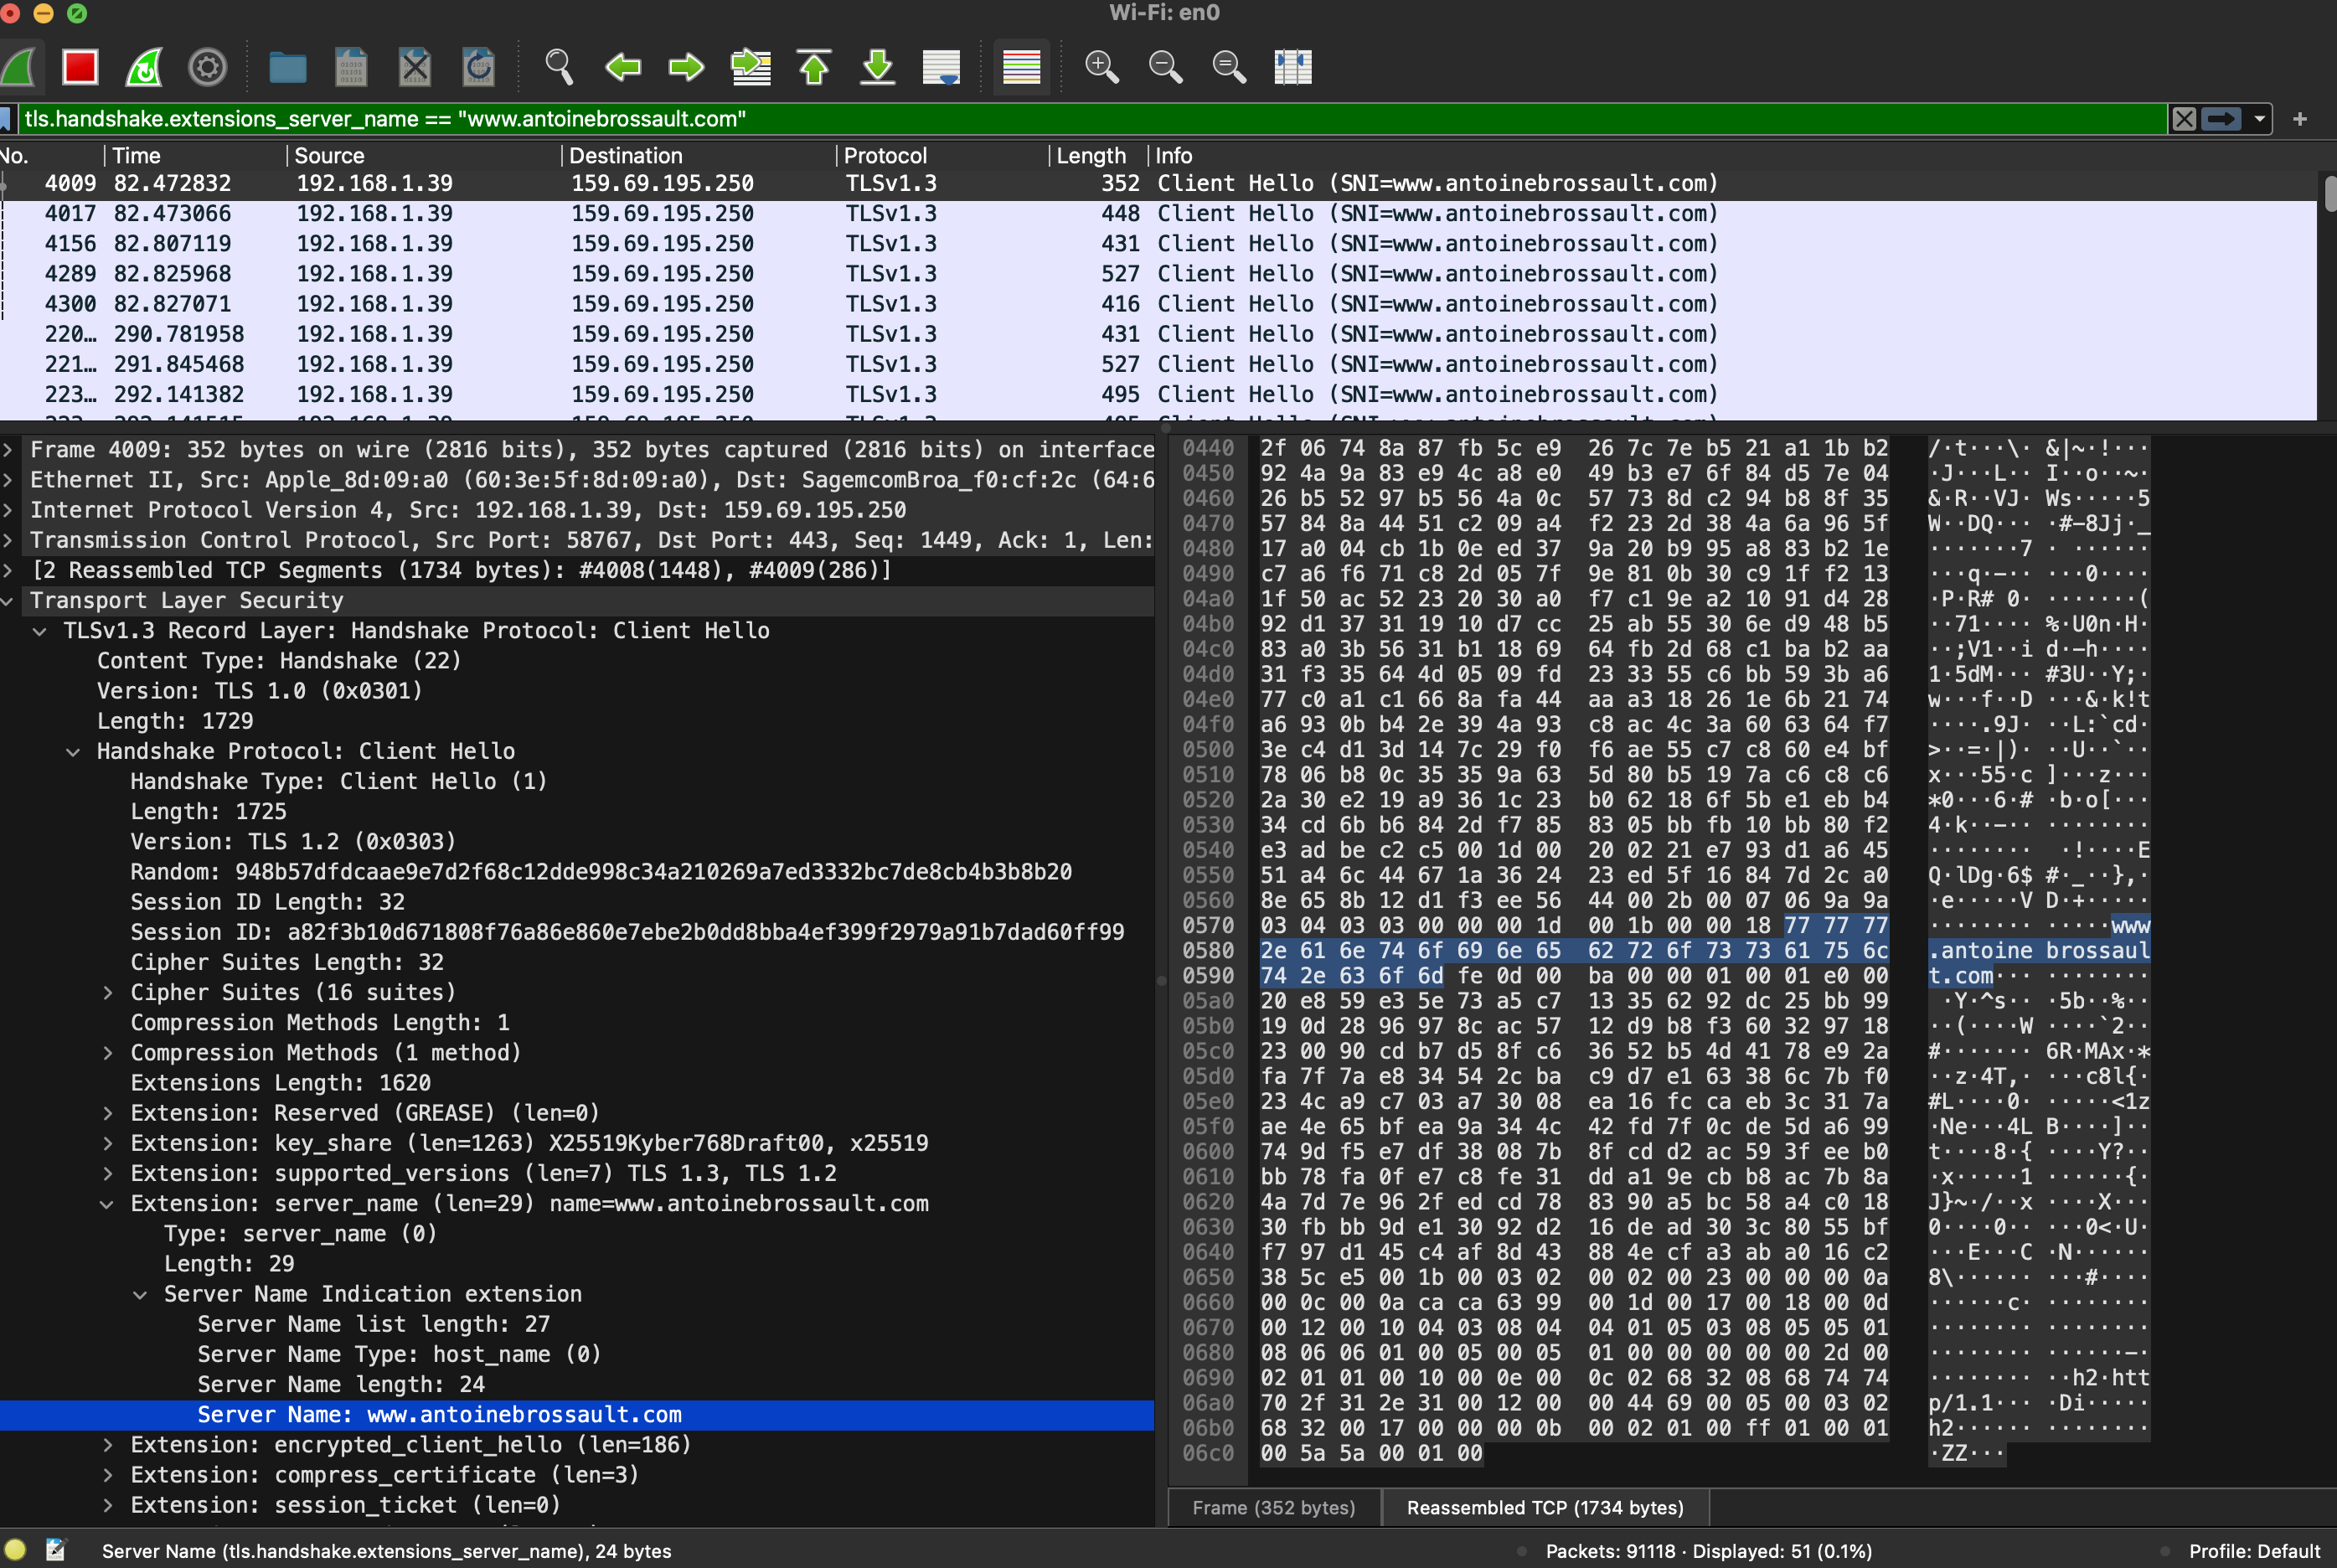
With Wireshark, use the following filter; obviously replace the domain name with the one you are currently debugging.
tls.handshake.extensions_server_name == "www.antoinebrossault.com"
Then visit the site you are debugging, then you should get something like this:
Then unfold the Transport Layer Security section, then TLS; then, navigate to the Handshake Protocol, followed by Extension, and finally, the Server Name.
Debugging SNI Using CLI Tools
To ensure that SNI is working correctly on your server, you can use command-line tools like openssl and curl for debugging. Here’s how you can do it:
Using OpenSSL
OpenSSL is a powerful toolkit for the Transport Layer Security (TLS) and Secure Sockets Layer (SSL) protocols. To check the SNI configuration using OpenSSL, follow these steps:
- Open a terminal.
- Run the OpenSSL command with the
s_clientoption, specifying the server’s hostname and port. Replaceexample.comwith the domain you want to test and443with the appropriate port if different.
openssl s_client -connect fastly.antoinebrossault.com:443 -servername fastly.antoinebrossault.com
Here’s what each part of the command does:
– s_client: Initiates a TLS/SSL client connection.
– -connect fastly.antoinebrossault.com:443: Connects to the server at fastly.antoinebrossault.com on port 443.
– -servername fastly.antoinebrossault.com: Sets the SNI field to fastly.antoinebrossault.com.
- Examine the output: Look for the server’s certificate information in the output. You should see details that match the expected certificate for the hostname you specified.
OpenSSL Example Output:
CONNECTED(00000006)
---
Certificate chain
 0 s:CN=fastly.antoinebrossault.com
   i:C=US, O=Let's Encrypt, CN=R3
   a:PKEY: rsaEncryption, 2048 (bit); sigalg: RSA-SHA256
   v:NotBefore: Apr 21 10:21:53 2024 GMT; NotAfter: Jul 20 10:21:52 2024 GMT
 1 s:C=US, O=Let's Encrypt, CN=R3
   i:C=US, O=Internet Security Research Group, CN=ISRG Root X1
   a:PKEY: rsaEncryption, 2048 (bit); sigalg: RSA-SHA256
   v:NotBefore: Sep  4 00:00:00 2020 GMT; NotAfter: Sep 15 16:00:00 2025 GMT
 2 s:C=US, O=Internet Security Research Group, CN=ISRG Root X1
   i:O=Digital Signature Trust Co., CN=DST Root CA X3
   a:PKEY: rsaEncryption, 4096 (bit); sigalg: RSA-SHA256
   v:NotBefore: Jan 20 19:14:03 2021 GMT; NotAfter: Sep 30 18:14:03 2024 GMT
---
Server certificate
-----BEGIN CERTIFICATE-----
MIIFAzCCA+ugAwIBAgISBMUlsp2NY0QD0dyi1uUZB8vQMA0GCSqGSIb3DQEBCwUA
MDIxCzAJBgNVBAYTAlVTMRYwFAYDVQQKEw1MZXQncyBFbmNyeXB0MQswCQYDVQQD
EwJSMzAeFw0yNDA0MjExMDIxNTNaFw0yNDA3MjAxMDIxNTJaMCYxJDAiBgNVBAMT
G2Zhc3RseS5hbnRvaW5lYnJvc3NhdWx0LmNvbTCCASIwDQYJKoZIhvcNAQEBBQAD
ggEPADCCAQoCggEBAKUvv7yBbdGbuSkRqk9DIr5+6PixAy8v+BrHs/peAke2eynx
PuyB7DphtXYA6Te7m9h8k2wgSnSM1aptQXb12GF7h8y+OKyjrkuP4ndkoA12Qsn9
8+yFhISrat46eyouZnr3rTNcjZiMBJWp750OMv058P03Uxfj+NENt9pdmSZG0+ad
SpoHX5jeU8qKnfOSbIYatRUo5WHVjwpoVHS2yu0Xp5HnaFdlhJiarssF6GLJtQHm
vOVgs0kXaZwlP870Im18FGfbNrfxqW34kZWM8VEMSOk0yFh1+8mba3yEhBdp/QT4
wHc+Q4lnnfYSeg3o6I7ve5Y5AkAb1JYVaNBoRb0CAwEAAaOCAh0wggIZMA4GA1Ud
DwEB/wQEAwIFoDAdBgNVHSUEFjAUBggrBgEFBQcDAQYIKwYBBQUHAwIwDAYDVR0T
AQH/BAIwADAdBgNVHQ4EFgQUiVZ3i4Whuk/cl9WqjxJzpFBJOPEwHwYDVR0jBBgw
FoAUFC6zF7dYVsuuUAlA5h+vnYsUwsYwVQYIKwYBBQUHAQEESTBHMCEGCCsGAQUF
BzABhhVodHRwOi8vcjMuby5sZW5jci5vcmcwIgYIKwYBBQUHMAKGFmh0dHA6Ly9y
My5pLmxlbmNyLm9yZy8wJgYDVR0RBB8wHYIbZmFzdGx5LmFudG9pbmVicm9zc2F1
bHQuY29tMBMGA1UdIAQMMAowCAYGZ4EMAQIBMIIBBAYKKwYBBAHWeQIEAgSB9QSB
8gDwAHcAPxdLT9ciR1iUHWUchL4NEu2QN38fhWrrwb8ohez4ZG4AAAGPAGQlVQAA
BAMASDBGAiEA2pFPY9Xkj+v3T1AztZrMk04KICg6BvuZVgy5ZZku4w0CIQCoNsss
9HUmz5/BQTS7Sx+vehZOYnTc5J81jZ2n2z2yiQB1AEiw42vapkc0D+VqAvqdMOsc
UgHLVt0sgdm7v6s52IRzAAABjwBkJVsAAAQDAEYwRAIgD/b65Dh6XTc19KBGqa1e
PBu5Iug4mRoP/krVXh9+yNUCIGtm7n6jjbUQd/uffeITCKowk548eHr6vNa+WI8i
wb58MA0GCSqGSIb3DQEBCwUAA4IBAQAMTalK6KRXtqmWZA8DGmevLlL15ao464II
S3HziUs9e22v6z2pQ4GkWicht3/V0LxgfUV0isJB7yCQqT2QRpqGaUQwYP1E0goS
JNAbd8rPPWTYCeN1lDF90S3GAfRclH4R92DzIFPuL31nRutzF2fRoHGVuYCXPfFl
SAS2mEW/Hwq5QcLzzMa04zQPzgnKRYpt81DZO3t1TvsfosuLTnESR1xfHnVv4ags
SJEowRK+W3Po8NZc/SYGqm4NibRQ29SFot9rkqhYK/Yl+Lv1TfMR3spa6KoUs4UW
eFjTEmsek39Ye1OytPKjulgt8qsXtI2cUM02+7g8Vz/rlM6jpOnO
-----END CERTIFICATE-----
subject=CN=fastly.antoinebrossault.com ⬅️⬅️⬅️⬅️
issuer=C=US, O=Let's Encrypt, CN=R3
---
No client certificate CA names sent
Peer signing digest: SHA256
Peer signature type: RSA-PSS
Server Temp Key: X25519, 253 bits
---
SSL handshake has read 4527 bytes and written 399 bytes
Verification: OK
---
New, TLSv1.3, Cipher is TLS_AES_128_GCM_SHA256
Server public key is 2048 bit
This TLS version forbids renegotiation.
Compression: NONE
Expansion: NONE
No ALPN negotiated
Early data was not sent
Verify return code: 0 (ok)
---
Using Curl
Curl is a command-line tool for transferring data with URLs, and it supports various protocols, including HTTP and HTTPS. To test SNI with Curl, follow these steps:
- Open a terminal.
- Run the Curl command with the
-v(verbose) option, specifying the URL of the site you want to test.
curl -v https://fastly.antoinebrossault.com
Here’s what each part of the command does:
– -v: Enables verbose mode, providing detailed information about the connection process.
– `https://fastly.antoinebrossault.com`: The URL of the site you want to test.
- Examine the output: Look for lines starting with
*, which contain information about the SSL handshake. Pay attention to theServer certificatesection to ensure that the correct certificate is being used for the hostname.
Curl Example Output:
❯ curl -v https://fastly.antoinebrossault.com
* Host fastly.antoinebrossault.com:443 was resolved.
* IPv6: (none)
* IPv4: 151.101.3.52, 151.101.67.52, 151.101.131.52, 151.101.195.52
*   Trying 151.101.3.52:443...
* Connected to fastly.antoinebrossault.com (151.101.3.52) port 443
* ALPN: curl offers h2,http/1.1
* (304) (OUT), TLS handshake, Client hello (1):
*  CAfile: /etc/ssl/cert.pem
*  CApath: none
* (304) (IN), TLS handshake, Server hello (2):
* (304) (IN), TLS handshake, Unknown (8):
* (304) (IN), TLS handshake, Certificate (11):
* (304) (IN), TLS handshake, CERT verify (15):
* (304) (IN), TLS handshake, Finished (20):
* (304) (OUT), TLS handshake, Finished (20):
* SSL connection using TLSv1.3 / AEAD-CHACHA20-POLY1305-SHA256 / [blank] / UNDEF
* ALPN: server accepted h2
* Server certificate:
*  subject: CN=fastly.antoinebrossault.com ⬅️⬅️⬅️⬅️
*  start date: Apr 21 10:21:53 2024 GMT
*  expire date: Jul 20 10:21:52 2024 GMT
*  subjectAltName: host "fastly.antoinebrossault.com" matched cert's "fastly.antoinebrossault.com" ⬅️⬅️⬅️⬅️
*  issuer: C=US; O=Let's Encrypt; CN=R3
*  SSL certificate verify ok.
* using HTTP/2
* [HTTP/2] [1] OPENED stream for https://fastly.antoinebrossault.com/
* [HTTP/2] [1] [:method: GET]
* [HTTP/2] [1] [:scheme: https]
* [HTTP/2] [1] [:authority: fastly.antoinebrossault.com]
* [HTTP/2] [1] [:path: /]
* [HTTP/2] [1] [user-agent: curl/8.6.0]
* [HTTP/2] [1] [accept: */*]
> GET / HTTP/2
> Host: fastly.antoinebrossault.com
> User-Agent: curl/8.6.0
> Accept: */*
In both cases, ensure that the subject or subjectAltName field matches the domain you are testing. This confirms that the correct certificate is being presented based on the SNI.
By following these steps, you can verify that SNI is configured correctly on your server and that the appropriate certificates are being used for secure connections.