17/12/2024
This article organizes step-by-step instructions for deploying, exposing, and managing Kubernetes workloads, handling connectivity issues, and ensuring self-healing deployments with K3s. These notes represent the of my personal experiments with K3s.

Install K3s
To install K3S, you need at least 2 VMs. In my case, I decided to use Debian VMs on Proxmox. The first VM will be the master node, and the second will be the worker node. The master node orchestrates the cluster and distributes the load across one or more worker nodes. As your application grows and requires more machines, you can simply add more worker nodes to the cluster.

Install the master node
curl -sfL https://get.k3s.io | sh -
Get the token
cat /var/lib/rancher/k3s/server/token
It will return something like
root@k8masterNode:~# cat /var/lib/rancher/k3s/server/token
K10ee9c18dac933cab0bdbd1c64ebece61a4fa7ad60fce2515a5fcfe19032edd707::server:64ee8a3fec9c3d1db6c2ab0fc40f8996
Get the IP of the machine
root@k8masterNode:~# ip addr show | grep 192
inet 192.168.1.68/24 brd 192.168.1.255 scope global dynamic ens18
Join the cluster from the worker node
NB : Be sure the worker node has a different hostname otherwise it will not work
If the VM has been cloned then run : sudo hostnamectl set-hostname <new-hostname>
curl -sfL https://get.k3s.io | K3S_URL=https://<server-ip>:6443 K3S_TOKEN=<token> sh -
curl -sfL https://get.k3s.io | K3S_URL=https://192.168.1.68:6443 K3S_TOKEN="K10ee9c18dac933cab0bdbd1c64ebece61a4fa7ad60fce2515a5fcfe19032edd707::server:64ee8a3fec9c3d1db6c2ab0fc40f8996" sh -
Check if the worker node joined the cluster
Use the command below on the master node :
kubectl get nodes
It should show the worker node along the master node like so :
root@k3sMasterNode:/home/antoine# kubectl get nodes
NAME            STATUS   ROLES                  AGE     VERSION
k3smasternode   Ready    control-plane,master   8m14s   v1.33.5+k3s1
k3sworkernode   Ready    <none>                 2m3s    v1.33.5+k3s1
Creating and Exposing Deployments
Now let’s test our cluster by doing a basic deployment, we will deploy a simplistic webserver with Nginx.
Create a Deployment
kubectl create deployment nginx --image=nginx
It should return something like :
root@k3sMasterNode:/home/antoine# kubectl create deployment nginx --image=nginx
deployment.apps/nginx created
Expose the Deployment
kubectl expose deployment nginx --type=NodePort --port=80
It should return :
service/nginx exposed
Verify the service:
kubectl get svc
Expected output:
NAME         TYPE        CLUSTER-IP   EXTERNAL-IP   PORT(S)        AGE
kubernetes   ClusterIP   10.43.0.1    <none>        443/TCP        26m
nginx        NodePort    10.43.51.9   <none>        80:31193/TCP   6m50s
Verify the pods:
kubectl get pods -o wide
Example:
NAME                    READY   STATUS    IP          NODE
nginx-bf5d5cf98-knd5t   1/1     Running   10.42.1.3   workernode
Note that the Nginx service has two ports: 80 and 31193. The first one will be used to access the service from inside the cluster, while the other one is for access from outside.
Access the Nginx App:
From the cluster ( From the master node )
curl http://<SERVICE-IP>
Like so :
curl 10.43.51.9
From a machine outside of the cluster
curl http://<MASTER-IP>:<NODEPORT>
Like so :
curl http://192.168.1.68:31193

So here we used two Kubernetes objects :
The Deployment : my app logic
That created a Deployment object, which in turn manages Pods.
Those pods are running the NGINX container image.
The Service : The network access
It acts as a stable network entry point for your pods:
• Internally (via ClusterIP): 10.43.51.9:80
• Externally (via NodePort): <any-node-ip>:31193
It automatically load-balances traffic across all pods in the deployment.
To see everything we launched so far you can type :
kubectl get all
That will show what’s running :
NAME                         READY   STATUS    RESTARTS   AGE
pod/nginx-5869d7778c-jwl6j   1/1     Running   0          33m

NAME                 TYPE        CLUSTER-IP   EXTERNAL-IP   PORT(S)        AGE
service/kubernetes   ClusterIP   10.43.0.1    <none>        443/TCP        50m
service/nginx        NodePort    10.43.51.9   <none>        80:31193/TCP   30m

NAME                    READY   UP-TO-DATE   AVAILABLE   AGE
deployment.apps/nginx   1/1     1            1           33m

NAME                               DESIRED   CURRENT   READY   AGE
replicaset.apps/nginx-5869d7778c   1         1         1       33m
Managing a Deployment
Ok now let’s remove this basic deployment which was just here to confirm everything was working. We will remove what we just done to get a clean base to deploy our own application to the cluster ! Exciting !
Remove a Deployment
Delete the service:
kubectl delete service nginx
It should return :
service "nginx" deleted
Delete the deployment :
kubectl delete deployment nginx
It should return :
deployment.apps "nginx" deleted
Confirm deletion:
kubectl get deployments
It should show :
No resources found in default namespace.
To check if our service is now gone :
kubectl get svc
Here we can see our nginx service is no longer present :
NAME         TYPE        CLUSTER-IP   EXTERNAL-IP   PORT(S)   AGE
kubernetes   ClusterIP   10.43.0.1    <none>        443/TCP   54m
Building and Pushing Custom Docker Images
Deploying that Nginx image was just the beginning; let’s deploy our own image to our cluster.
If you don’t have an image you want to deploy yet, you can create one and upload it to an image repository like Docker Hub.
Build the Docker Image
Ensure your app is ready for deployment:
docker build -t node-express-app .
Login to DockerHub
docker login
Tag and Push the Image
docker tag node-express-app antoinebr/node-express-app:v1
docker push antoinebr/node-express-app:v1
Deploying Custom Applications
Now that we have our Docker image ready let’s deploy it to our cluster. But this time we want to be more precise and you a file that will represent our deployement.
Create a Deployment YAML
Save as node-express-deployment.yaml:
apiVersion: apps/v1
kind: Deployment
metadata:
  name: node-express-app
spec:
  replicas: 6
  selector:
    matchLabels:
      app: node-express-app
  template:
    metadata:
      labels:
        app: node-express-app
    spec:
      containers:
      - name: node-express-app
        image: antoinebr/node-express-app:v10
        ports:
        - containerPort: 3000
Apply the Deployment
kubectl apply -f node-express-deployment.yaml
If that worked you should see :
deployment.apps/node-express-app created
And you can check if you see the deployment we created by running:
kubectl get deployments
This should show
root@k3sMasterNode:/home/antoine/node-express-app# kubectl get deployments
NAME               READY   UP-TO-DATE   AVAILABLE   AGE
node-express-app   3/6     6            3           58s
We can see all our pods that contain an instance of our container. We chose to have six of them, and we can observe this by using:
kubectl get pods
That will return
root@k3sMasterNode:/home/antoine/node-express-app# kubectl get pods
NAME                               READY   STATUS    RESTARTS   AGE
node-express-app-d58f5fb9b-d47nm   1/1     Running   0          7m25s
node-express-app-d58f5fb9b-kl9nj   1/1     Running   0          7m25s
node-express-app-d58f5fb9b-plrkd   1/1     Running   0          7m25s
node-express-app-d58f5fb9b-stb87   1/1     Running   0          7m25s
node-express-app-d58f5fb9b-trj9j   1/1     Running   0          7m25s
node-express-app-d58f5fb9b-zjt6b   1/1     Running   0          7m25s
Expose the Deployment
In order to access the app we just launched, we need to expose our app to the network. To do so, we will use the following command.
kubectl expose deployment node-express-app --port=80 --target-port=3000 --type=NodePort
It should return :
service/node-express-app exposed
Let’s break it down ;
--port=80 --target-port=3000
That command says something like : « When someone sends a request to port 80 on the Service, forward it to port 3000 on the pod.”
--type=NodePort
Exposes the service externally on each node’s IP at a static port
So with NodePort, Kubernetes assigns a random port between 30000–32767 (unless you specify one with –node-port=).
That’s how you can access it from outside, like:
curl http://192.168.1.68:31193
So in plain language it says something like :
Create a Service that makes my Deployment node-express-app reachable on port 80,and forward that traffic to port 3000 inside the app’s container, and expose it externally via a NodePort.
Get App IP
kubectl get svc node-express-app
You will get something like :
root@k3sMasterNode:/home/antoine/node-express-app# kubectl get svc node-express-app
NAME               TYPE       CLUSTER-IP     EXTERNAL-IP   PORT(S)        AGE
node-express-app   NodePort   10.43.220.17   <none>        80:31581/TCP   24s
Access the App:
curl http://<MASTER-IP>:<NODEPORT>
In my case :
curl http://192.168.1.68:31581
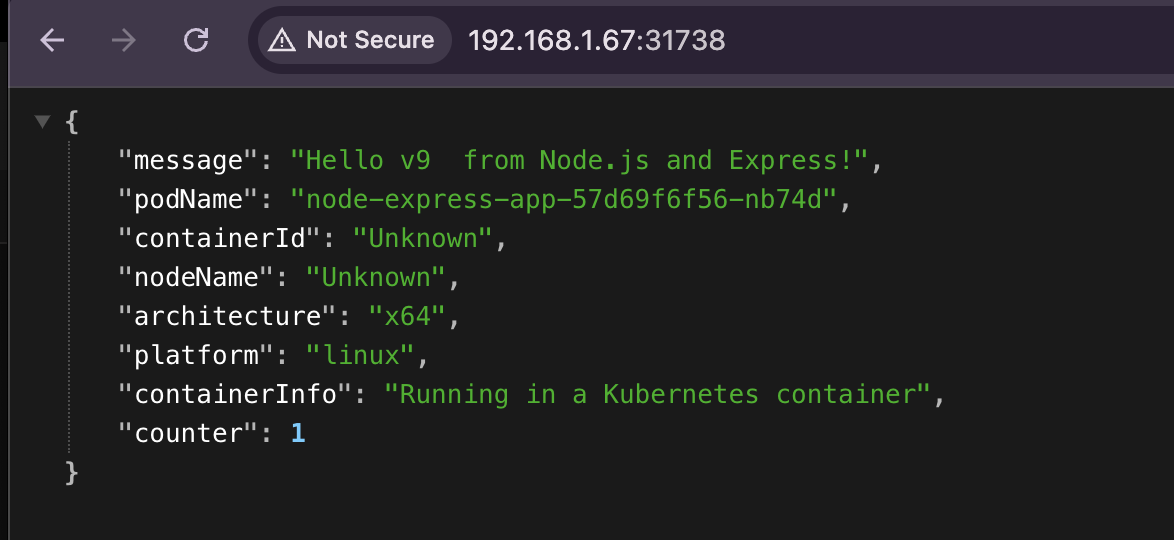
If you deploy my image, you will see that the counter increases by one after each reload. And subtly, we go from 10 to 2. It’s because the site shows the state of the container after our request has been load balanced.
Make it more production ready
So it works ! But it’s a bit hacky with the use of NodePort, so to access our app from outisde of the cluster we have to specify a port…
http://192.168.1.68:31581/
We could keep it this way and add a reverse proxy in front of it that will forward our users’ requests to the right port…
But guess what that exists in K3s It’s built in, and it’s called an ingress controller.
Let’s setup this.
Before we continue, let’s remove the deployment we created previously. To remove that deployment, use the command:
kubectl delete deployment node-express-app
It should return :
deployment.apps "node-express-app" deleted
Right after running the command you can check the pod states by running :
kubectl get pods
It should show something like thsis where the pors chnaged status to « Terminating »
NAME                               READY   STATUS        RESTARTS   AGE
node-express-app-d58f5fb9b-d47nm   1/1     Terminating   0          22m
node-express-app-d58f5fb9b-kl9nj   1/1     Terminating   0          22m
node-express-app-d58f5fb9b-plrkd   1/1     Terminating   0          22m
node-express-app-d58f5fb9b-stb87   1/1     Terminating   0          22m
node-express-app-d58f5fb9b-trj9j   1/1     Terminating   0          22m
node-express-app-d58f5fb9b-zjt6b   1/1     Terminating   0          22m
Before completely disappearing when we run :
kubectl get pods
Using an Ingress Controller
With the ingress controller, we want to get rid of the <ip>:<port> way to access our app. In other words, we want to set up a reverse proxy in our cluster.
Deployment and Service Configurations
Create deployment.yaml:
Our deployment is the same as before, but this time I have chosen to use only 3 replicas. So, I will have 3 instances of my container running the app, which will provide load balancing and self-healing (reconstruction) in case something goes wrong.
apiVersion: apps/v1
kind: Deployment
metadata:
  name: node-express-app
spec:
  replicas: 3
  selector:
    matchLabels:
      app: node-express-app
  template:
    metadata:
      labels:
        app: node-express-app
    spec:
      containers:
      - name: node-express-app
        image: antoinebr/node-express-app:v10
        ports:
        - containerPort: 3000
Create service.yaml:
Here, our service will indicate that when women request access to the app node-express-app, we expect the request on port 80, which we will forward to port 3000.
apiVersion: v1
kind: Service
metadata:
  name: node-express-app
spec:
  selector:
    app: node-express-app
  ports:
  - protocol: TCP
    port: 80
    targetPort: 3000
  type: ClusterIP
Create ingress.yaml:
Here is our ingress controller definition, which serves as our reverse proxy. We are expecting requests from the host node-express.home, which we will forward to our service (backup) node-express-app on port 80, as defined earlier.
apiVersion: networking.k8s.io/v1
kind: Ingress
metadata:
  name: node-express-ingress
  annotations:
    nginx.ingress.kubernetes.io/rewrite-target: /
spec:
  rules:
  - host: node-express.home
    http:
      paths:
      - path: /
        pathType: Prefix
        backend:
          service:
            name: node-express-app
            port:
              number: 80
Apply Configurations
kubectl apply -f deployment.yaml
kubectl apply -f service.yaml
kubectl apply -f ingress.yaml
Check our deployement
kubectl get pod
NAME                               READY   STATUS    RESTARTS   AGE
node-express-app-d58f5fb9b-tdxmn   1/1     Running   0          2m18s
node-express-app-d58f5fb9b-xjnkx   1/1     Running   0          2m18s
node-express-app-d58f5fb9b-zqmrv   1/1     Running   0          2m18s
All good we have our 3 replicas as requested.
Check our service
kubectl get svc
NAME               TYPE        CLUSTER-IP     EXTERNAL-IP   PORT(S)   AGE
kubernetes         ClusterIP   10.43.0.1      <none>        443/TCP   114m
node-express-app   ClusterIP   10.43.220.17   <none>        80/TCP    44m
All good we have our node-express-app service as requested.
Check our ingress
kubectl get ingress
NAME                   CLASS     HOSTS               ADDRESS                     PORTS   AGE
node-express-ingress   traefik   node-express.home   192.168.1.68,192.168.1.69   80      2m16s
All good for the ingress too
Set Hostname in Local System or DNS
Because we want to access our app via its domain name, we need to associate the IP address with the domain. The easiest way to do this is by editing your hosts file on your local machine like this:
Add to /etc/hosts:
192.168.1.68 node-express.home
Or with your local DNS server if you have on locally, iwhichs my case whith PiHole installed on my network.
Let’s ping our domain to confirm it point to our cluster :
ping  node-express.home

PING node-express.home (192.168.1.68): 56 data bytes
64 bytes from 192.168.1.68: icmp_seq=0 ttl=64 time=6.861 m
Ok all good now let’s test it from our browser :

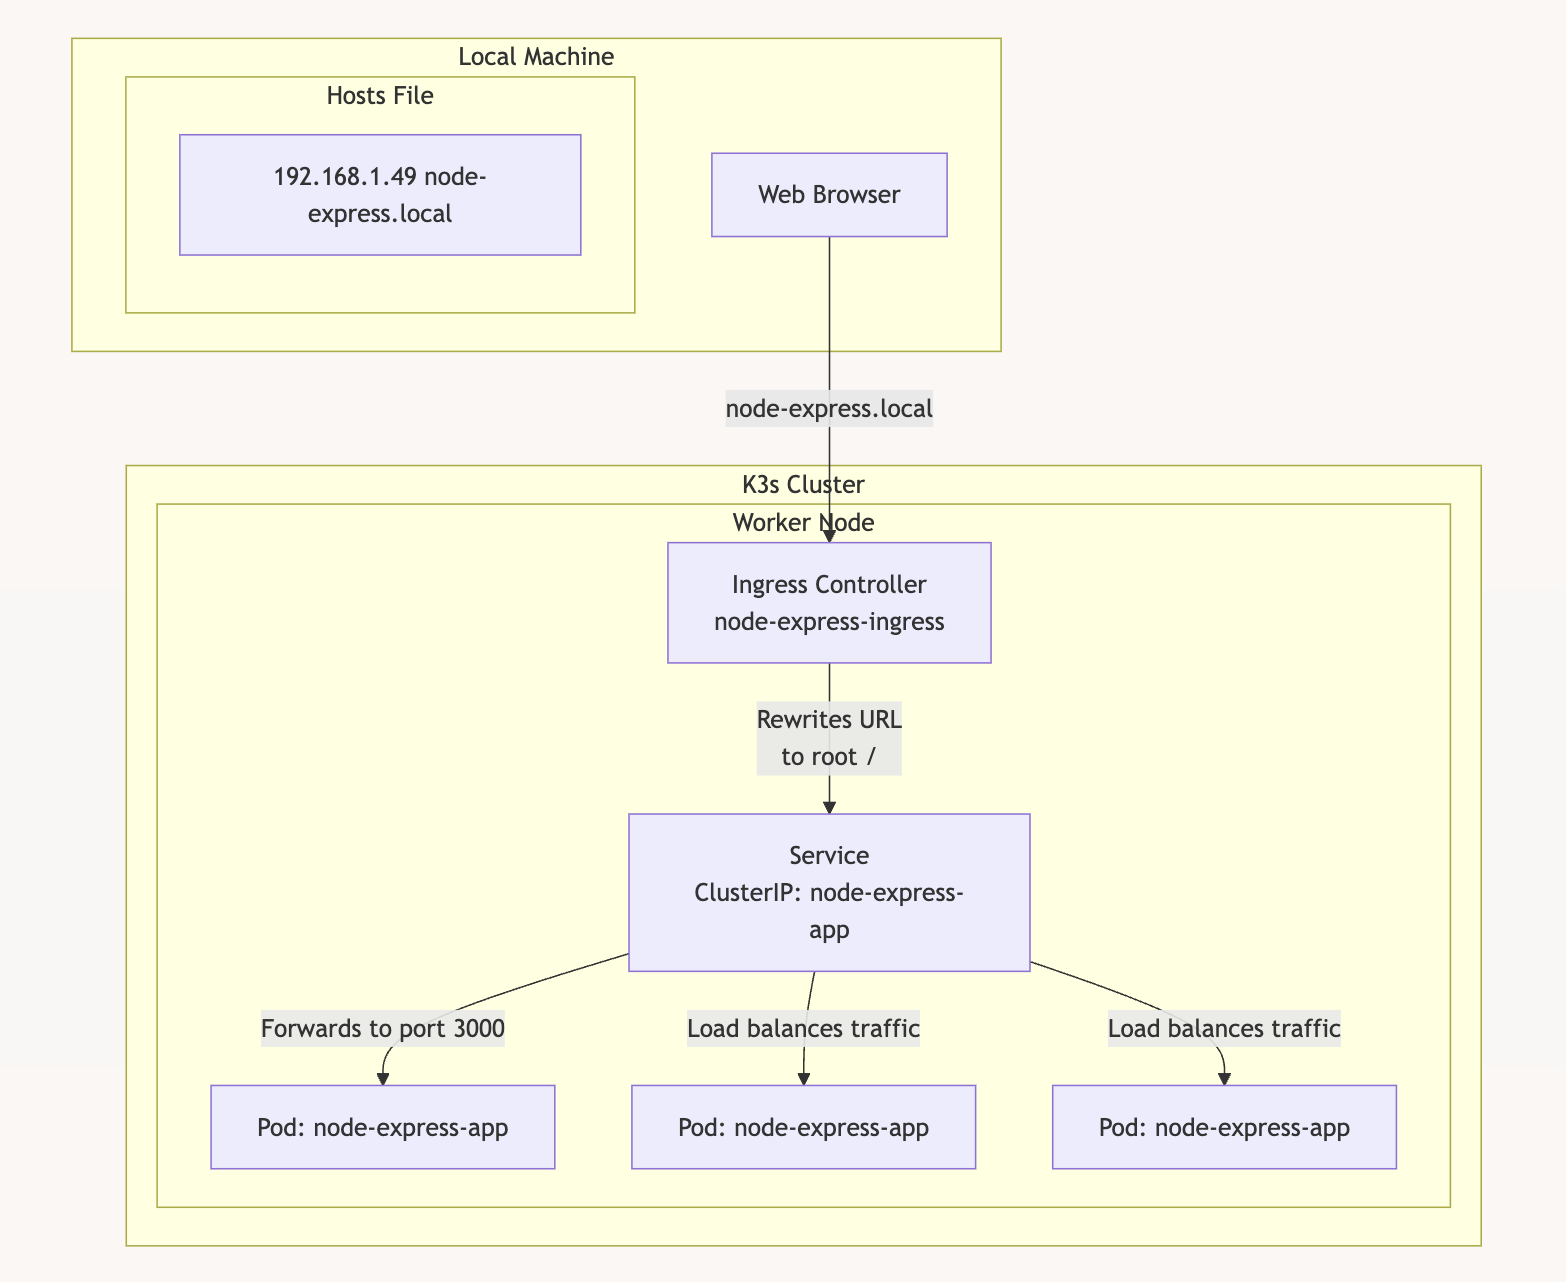
Here’s a diagram of the setup
Here’s a visual representation of what we created:
Setup K9s to manage our cluster
K9s is a CLI tool to manage your cluster it’s cool because you can :
• See everything easily: You can instantly see all your apps, pods, and services running in your cluster.
• Get logs fast: Press a key and you can read your app’s logs — no need to type long kubectl logs commands.
• Enter containers easily: You can jump inside a pod/container with just a few keystrokes to check or debug things.
• Do simple actions quickly: Scale apps, restart pods, or delete things directly from K9s — all in one screen.
Install
On a mac I installed K9s like so :
brew install k9s
Get the keys
To be able to controll our cluster from K9s we need to have the keys
So what I’m going to do it’s to copy my K3S keys to my machine using scp
scp [email protected]:/etc/rancher/k3s/k3s.yaml ~/.kube/config
An other way to proceed is to copy paste your key from the master node ot the worker node like so :
cat /etc/rancher/k3s/k3s.yaml
And copy paste the content in :
~/.kube/config
Adapt the keys
By default, the kubeconfig file from K3s refers to the cluster as 127.0.0.1, which only works on the node itself.
In ~/.kube/config
Find the line that looks like this:
server: https://127.0.0.1:6443
Replace 127.0.0.1 with your master node’s IP:
server: https://192.168.1.68:6443
Launch K9s
k9s
Now you should be connected to your cluster with K9s :

Handling Worker Node Connectivity Issues
Verify Node Status
kubectl get nodes
If workernode shows NotReady, check connectivity:
curl -k https://<MASTER-IP>:6443
Expected output:
{
  "status": "Failure",
  "message": "Unauthorized",
  "reason": "Unauthorized",
  "code": 401
}
Troubleshoot Worker Token
Verify the token:
cat /var/lib/rancher/k3s/server/token
Re-set the token:
echo "THE_TOKEN" | tee /var/lib/rancher/k3s/agent/token
Restart K3s Agent
sudo systemctl daemon-reload
sudo systemctl restart k3s-agent.service
Check Nodes
kubectl get nodes
Restarting K3s Service
Common Errors
- Port 6444 already in use:
sudo lsof -i :6444 kill -9 <PID> - Invalid server token:
Ensure the correct token is in:
/var/lib/rancher/k3s/server/token
Restart K3s
sudo systemctl restart k3s
Kubernetes Crash Handling
Kubernetes automatically restarts failed pods.
Check Pod Status:
kubectl get pods
Example output:
NAME                                READY   STATUS    RESTARTS   AGE
node-express-app-8477686cf7-6fmvz   1/1     Running   0          30m
If a pod crashes, Kubernetes will reschedule it to maintain the desired replica count.