How to deploy a Node app in a Docker container over Https
Build and serve a containerised app
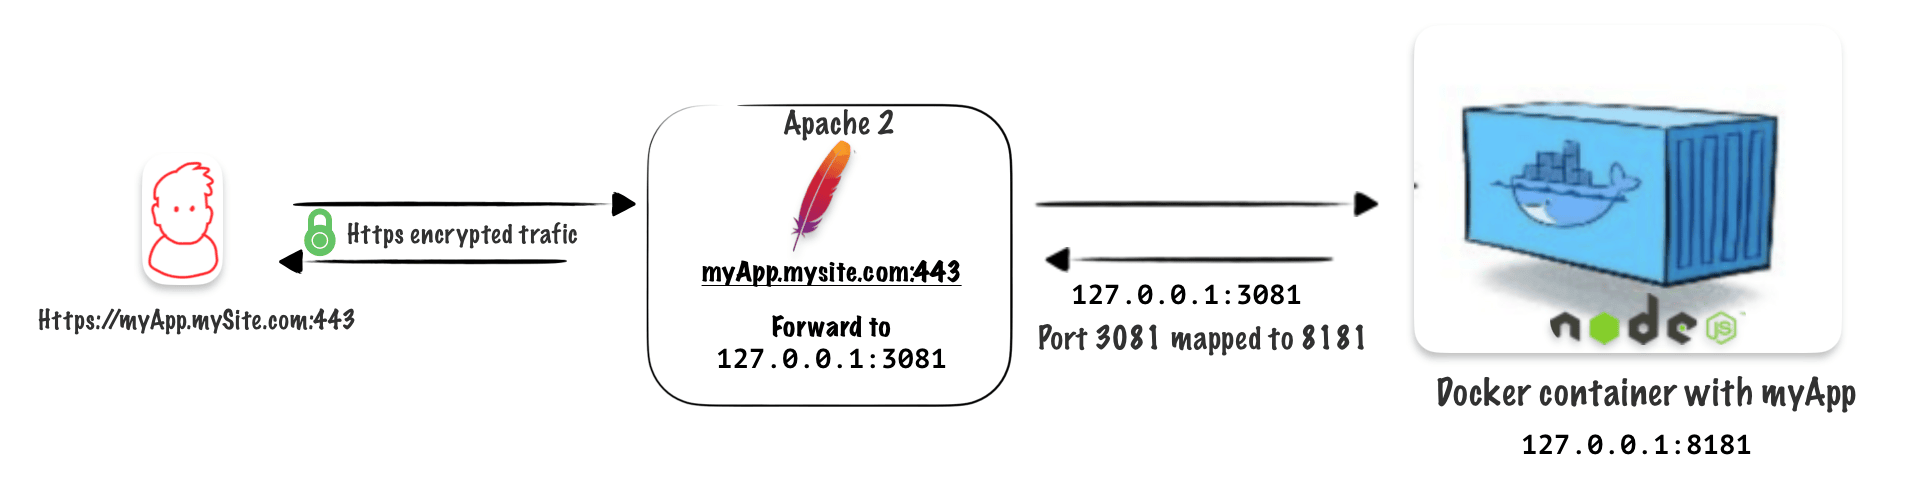
If you want to make your app work on different systems easily, Docker is the solution. In this quick guide, I'll show you how to create and run a basic image, and then make it accessible via HTTPS using Apache2.

Create a Dockerfile
Create a Dockerfile in your project :
FROM arm64v8/node:14-alpine


WORKDIR /app
COPY . .

# If you have native dependencies, you'll need extra tools
# RUN apk add --no-cache make gcc g++ python

RUN apk update && apk upgrade

RUN apk add curl

RUN npm install

EXPOSE 8181

CMD [ "node", "/app/server.js" ]
This Dockerfile is used to create a Docker image for running a Node.js application on ARM64 architecture using Alpine Linux as the base image.
FROM arm64v8/node:14-alpine This line specifies the base image for the Dockerfile. It pulls the image tagged 14-alpine from the Docker Hub repository arm64v8/node, which is a Node.js image specifically built for ARM64 architecture
This Dockerfile is used to create a Docker image for running a Node.js application on ARM64 architecture using Alpine Linux as the base image. Let’s break down each instruction:
WORKDIR /app: This sets the working directory inside the container to /app. Any subsequent commands will be executed relative to this directory.
COPY . .: This copies all the files from the host machine’s current directory (where the Dockerfile resides) to the /app directory inside the container.
RUN apk update && apk upgrade: This updates the package index and upgrades installed packages in the Alpine Linux system.
RUN apk add curl: This installs the curl command-line tool on the Alpine Linux system.
RUN npm install: This installs Node.js dependencies specified in the package.json file in the /app directory. It assumes there’s a package.json file in the root directory of the copied files.
EXPOSE 8181: This exposes port 8181 on the container. It doesn’t actually publish the port to the host machine, but it serves as documentation for users of the image to know which port to map when running a container based on this image.
CMD [ "node", "/app/server.js" ]: This specifies the command to run when a container is started from this image. It runs the Node.js application, assuming that the entry point of the application is located at /app/server.js inside the container.
Build the image
docker build -t antoine/shortgame-api . --force-rm;
docker build: This is the Docker command used to build Docker images.-
-t antoine/shortgame-api: This part of the command tags the image with a specific name and optionally a tag. In this case, the image is tagged asantoine/shortgame-api. Tags are useful for identifying and managing different versions of images. The-toption is short for--tag. -
.: This specifies the build context. The.indicates that the build context is the current directory where the Dockerfile is located. This means that Docker will look for a Dockerfile in the current directory and use it to build the image. -
--force-rm: This is an option that tells Docker to remove intermediate containers after a successful build. Intermediate containers are created during the build process and are removed by default after the build is completed. Using--force-rmensures that even if the build fails, any intermediate containers are removed. This can help save disk space. -
;: This is a command separator used to run multiple commands in a single line in a Unix-like shell. In this case, it allows you to run multiple Docker commands sequentially in a single line.
In summary, the docker build command builds a Docker image based on the Dockerfile in the current directory, tags the image with antoine/shortgame-api, and removes intermediate containers after a successful build.
Run the image
docker run: This is the command that tells Docker to run a container based on a Docker image.-
-d: This option tells Docker to run the container in detached mode. It means the container runs in the background, and you can still use your terminal after starting it. -
-p 3081:8181: This option is for port mapping. It tells Docker to map port 3081 on your local machine to port 8181 inside the container. So, any traffic coming to your machine on port 3081 will be forwarded to port 8181 inside the container. -
-it: This option combines two flags:-iand-t. The-iflag allows you to interact with the container’s stdin (standard input), and the-tflag allocates a pseudo-TTY, which basically means you get a terminal-like interface to interact with the container. -
--name shortgame-api: This option assigns a name to the container. In this case, the name is set toshortgame-api. -
antoine/shortgame-api: This is the name of the Docker image that the container is based on. It’s like the blueprint for the container.
Use a Makefile to save time
A Makefile is a simple text file used to define a set of tasks or instructions for building, compiling, and managing software projects. It’s commonly used in software development to automate repetitive tasks such as compiling code, running tests, and deploying applications
Here’s mine for managing my simple Docker steps :
build:
    docker build -t antoine/shortgame-api . --force-rm;

run:
    docker run -d -p 3081:8181 -it --name shortgame-api antoine/shortgame-api
Serve the App through HTTPS
To do so you need to have apache2 setup and certbot
Install Apache2
apt-get install apache2
Install the proxy mods
These Apache2 mods enable the server to act as a proxy, facilitating routing and forwarding of HTTP requests to other servers.
a2enmod proxy proxy_http
Restart Apache2
systemctl restart apache2
Install Certbot
Certbot is a free, open-source tool designed to automate the process of obtaining and renewing SSL/TLS certificates, which are essential for securing websites and enabling HTTPS encryption. It simplifies the management of SSL certificates by handling the configuration.
Install cert-bot to get let’s encrypt certificates, follow the instructions
Install snap
sudo apt update
sudo apt install snapd
Install certbot :
snap install --classic certbot
ln -s /snap/bin/certbot /usr/bin/certbot
sudo snap install --classic certbot
Use this Bash script to automate the Apache config and certification
#!/bin/bash

# Check if the script is run as root
if [ "$EUID" -ne 0 ]; then
  echo "Please run this script as root."
  exit 1
fi

# Prompt for the domain name and directory
read -p "Enter the domain name for your website (e.g., example.com): " domain
read -p "Enter the path to the application directory (e.g., /var/www/nodeapp): " app_dir
read -p "Enter the application port (e.g., 3000): " app_port

# Create the Node.js application directory
mkdir -p $app_dir
chown -R www-data:www-data $app_dir
chmod -R 755 $app_dir

# Create a new Apache configuration file
config_file="/etc/apache2/sites-available/$domain.conf"
touch $config_file

# Define the Apache VirtualHost configuration with reverse proxy
cat > $config_file <<EOL
<VirtualHost *:80>
    ServerAdmin webmaster@$domain
    ServerName $domain

    # ProxyPass for Node.js application
    ProxyPass / http://127.0.0.1:$app_port/
    ProxyPassReverse / http://127.0.0.1:$app_port/

    DocumentRoot $app_dir
    ErrorLog \${APACHE_LOG_DIR}/$domain_error.log
    CustomLog \${APACHE_LOG_DIR}/$domain_access.log combined

    <Directory $app_dir>
        Options Indexes FollowSymLinks
        AllowOverride All
        Require all granted
    </Directory>
</VirtualHost>
EOL

# Enable the site configuration
a2ensite $domain

# Reload Apache to apply the changes
systemctl reload apache2

# Obtain SSL certificate and update Apache configuration with Certbot
certbot --apache --agree-tos --redirect --non-interactive --domain $domain

# Provide instructions to the user
echo "Node.js application configuration for $domain has been created and enabled."
echo "You can now start your application and configure it to listen on port $app_port."
echo "Don't forget to update your DNS records to point to this server."