16/10/2023
In today's data-driven landscape, the technical integration of HubSpot CRM with your applications is the linchpin for success. This connection ensures seamless data flow, offering a 360-degree view of contacts and customers. In this article, we'll unravel the technical aspects of this integration, equipping you with the tools and practices needed to leverage HubSpot CRM for maximum impact. Whether you're a developer or a business leader, discover the key to a more efficient and competitive operation.
Create a data flow, where the data comes and goes
I definitely recomend to create a data flow sketch or schema which is vital for maintaining a clear perspective on how data enters and exits your systems. It serves as a visual roadmap, offering a comprehensive understanding of the data’s journey. This clarity enables efficient error detection, ensures security and compliance,streamlines processes,and facilitates smooth change management when systems or processes evolve.
From HubSpot to your app
To achieve a connection bewtten HubSpot and your app we will the Workflows which serve as the automation powerhouse within the CRM. They allow you to set up a sequence of actions triggered by specific events or conditions. In essence, this proactive solution enables you to orchestrate actions based on predefined triggers, creating a seamless and efficient system of automated responses.
Create data in your app from HubSpot
Hover the video to play the animation
In the depicted schema, when a contact is added to HubSpot, it initiates a Workflow. Within this Workflow, a webhook block or a custom code block is executed. These blocks facilitate an API call to our application’s API, allowing for the seamless insertion of the contact’s information into our own system. This automated process ensures that data synchronization between HubSpot and our application is efficient and accurate.
Demo
1 – Create a WorkFlow
The WorkFlow you have to create should be based on the object you want to create in your app. E.g : if you want to send an HubSpot contact in your app create a WorkFlow based on contact.
2 – Create a filter
You may need to perform this action only for some of your contacts which match specific criteria. If it’s the case, then set the filters accordingly.
3 – Choose between a Custom Code block and a webhook
Webhook :
You can choose a webhook block to achieve this connection :
- If you have to execute a
POSTrequest ( a webhook can runPOSTorGETrequests only ) - If you don’t have to match a specific payload, then you can use a webhook. The payload HubSpot will send to your endpoint will look like this ( for contact). With a webhook, you will have to parse the request on the app.

Custom Code :
If you have to match a specific payload (aligned with the data your API expect) then a custom code is a better solution.
In this example, my API requires a POST
For this endpoint :
POST https://partner-app.antoinebrossault.com/api/user
With this JSON Body :
{
    "name": "John",
    "lastname": "Doe",
    "email": "johndoe@example.com",
    "tokensAvailable": 100,
    "carManufacturer": "Toyota",
    "carModel": "Camry"
}
And with an autorization header set
authorization: `Bearer <myAuthorizationToken>`
My code looks like this :
const axios = require('axios');

const axiosConfig = {
    headers: {
        authorization: `Bearer ${process.env.myAPIsecret}`
    }
};


exports.main = async (event, callback) => {

    const tokensAvailable = parseInt(event.inputFields['tokensAvailable']);

    const carManufacturer = event.inputFields['carManufacturer'];

    const carModel = event.inputFields['carModel'];

    const name = event.inputFields['name'];

    const lastname = event.inputFields['lastname'];

    const email = event.inputFields['email'];

    const dataToSend = {
        name,
        lastname,
        email,
        tokensAvailable,
        carManufacturer,
        carModel
    };


    let userToCreate = null;

    try {

        userToCreate = await axios.post(`https://partner-app.antoinebrossault.com/api/user`, dataToSend, axiosConfig).catch();

        if (!userToCreate.data) throw new Error(`We failed to create the user for ${event.inputFields['email']}... 😬`);

    } catch (error) {

        console.log(`error ${error}`)
    }


    callback({
        outputFields: {
            changes: userToCreate.data.changes,
            lastID: userToCreate.data.lastID
        }
    });

}
Read data in your app from HubSpot
Hover the video to play the animation
To read data in your app from HubSpot, you can create a WorkFlow, and in that WorkFlow run an API call to get the data. That API call can be done with a webhook block or a Custom Code block.
Demo
1 – Create a WorkFlow
The WorkFlow you have to create should be based on the object you want to enrich.
2 – Create a filter
You may need to perform this action only for some of your contacts which match specific criterias. If it’s the case, then set the filters accordingly.
3 – Choose between a Custom Code block and a webhook
Webhook :
If your API endpoint requires a GET or a POST and contains query parameters, then you can use a webhook.
https://partner-app.antoinebrossault.com/api/user/?email=carey85@gmail.com
✅ This endpoint can be used in a webhook as the email parameter is a query parameter email=carey85@gmail.com
https://partner-app.antoinebrossault.com/api/user/carey85@gmail.com
❌ At the opposite, this endpoint can’t be used in a webhook block, because the parameter email carey85@gmail.com is not passed as a query parameter
If your endpoint is not compatible with a webhook, don’t worry, just use a Custom Code block.
Custom code :
The pro of a Custom Code is it’s flexibility, there’s no API a Custom Code can’t call.
Here’s a Custom Code which calls the same endpoint used above.
// Import the Axios library for making HTTP requests
const axios = require('axios');

exports.main = async (event, callback) => {

  // Extract the 'email' field from the 'event' parameter
  const email = event.inputFields.email;

  // Use Axios to make an asynchronous HTTP GET request to retrieve contact information
  const contactInfos = await axios.get(`https://partner-app.antoinebrossault.com/api/user/${email}`);

  // Check if the 'contactInfos' response data is empty, and if so, throw an error
  if (!contactInfos.data) throw new Error(`We failed to get infos for ${email}... 😬`);

  // Log the retrieved 'contactInfos' data to the console
  console.log(contactInfos.data)

  // Call the 'callback' function to return the result of the API call to the  WorkFlow
  callback({
    outputFields: {
      // Map specific properties from 'contactInfos' data to output fields
      "tokensAvailable": contactInfos.data.tokensAvailable,
      "carManufacturer": contactInfos.data.carManufacturer,
      "carModel": contactInfos.data.carModel,
      "avatar": contactInfos.data.avatar
    }
  });
}
This code doesn’t use an endpoint with query parameters, as we call this endpoint :
const contactInfos = await axios.get(`https://partner-app.antoinebrossault.com/api/user/${email}`);
The endpoint in my code contains the variable email, ${email} then when the call is executed the URL is :
https://partner-app.antoinebrossault.com/api/user/carey85@gmail.com
Assuming carey85@gmail.com is the email address of the contact enrolled the Workflow.
Update data in your app from HubSpot
Hover the video to play the animation
If you want to update data in your app in reaction to an event in HubSpot, there’s high chances you will need to perform a PATCH request. To do so, your only option is to use a Custom Code block inside a Workflow.
In my own Application I need to perform a PATCH request like so :
PATCH https://partner-app.antoinebrossault.com/api/user
With this JSON Body :
{
    "name": "John",
    "lastname": "Doe",
    "email": "johndoe@example.com",
    "tokensAvailable": 100,
    "carManufacturer": "Toyota",
    "carModel": "Camry"
}
And with an autorization header set
authorization: `Bearer <myAuthorizationToken>`
Demo
1 – Create a WorkFlow
The WorkFlow you have to create should be based on the object you want to update, and the re-enrollement should be activated in the WorkFlow.
2 – Create a filter
You may need to perform this action only for some of your contacts which match specific criteria. If it’s the case, then set the filters accordingly.
3 – Add a custom code block
// Import the Axios library for making HTTP requests
const axios = require('axios');

// Configure the Axios request headers with an authorization token
const axiosConfig = {
    headers: {
        authorization: `Bearer ${process.env.myAPIsecret}`
    }
};

// Export an asynchronous function named 'main' that takes 'event' and 'callback' parameters
exports.main = async (event, callback) => {

    // Extract and parse specific input fields from the 'event' parameter
    const tokensAvailable = parseInt(event.inputFields['tokensAvailable']);
    const carManufacturer = event.inputFields['carManufacturer'];
    const carModel = event.inputFields['carModel'];
    const name = event.inputFields['name'];
    const lastname = event.inputFields['lastname'];
    const email = event.inputFields['email'];

    // Create an object 'dataToSend' with the extracted input fields and add a 'fromHs' property
    const dataToSend = {
        name,
        lastname,
        email,
        tokensAvailable,
        carManufacturer,
        carModel,
        fromHs: true
    };

    // Log a message indicating the intention to update user data and the content of 'dataToSend'
    console.log(`Let's update ${email} with ${JSON.stringify(dataToSend)}`);

    // Perform an HTTP PATCH request to update the user data
    const res = await axios.patch('https://partner-app.antoinebrossault.com/api/user', dataToSend, axiosConfig).catch(axiosErrorHandler);

    // Check if the 'res' response data is empty, and if so, throw an error
    if (!res.data) throw new Error(`We failed to update infos for ${event.inputFields['email']}... 😬`);

    // Call the 'callback' function with an object containing output fields
    callback({
        outputFields: {
            changes: res.data.changes
        }
    });
}

/**
 * Handles errors thrown by axios requests and logs relevant information.
 *
 * @param {Error} error - The error object thrown by axios.
 */
const axiosErrorHandler = error => {
    if (error.response) {
        // The request was made and the server responded with a status code
        // that falls out of the range of 2xx. Log response data, status, and headers.
        console.log(error.response.data);
        console.log(error.response.status);
        console.log(error.response.headers);
    } else if (error.request) {
        // The request was made but no response was received. Log the request object.
        console.log(error.request);
    } else {
        // Something happened in setting up the request that triggered an Error. Log the error message.
        console.log('Error', error.message);
    }
}
From your app to HubSpot
The first step in this process is defining the event that triggers the data transfer to HubSpot. In your case, you want to initiate this process when a contact is created in your application. This event could also be a user registration, a purchase, or any other activity that’s meaningful to your business.
Once the event is detected in your application, you need to collect the relevant data about the contact. This typically includes their name, email address, company information, and any other data that is important to you.
After collecting the necessary data, it’s time to send it to HubSpot. This is done by making an API call to HubSpot’s API. You’ll need to use the HubSpot API endpoint for creating or updating contacts. This typically involves sending a POST or a PATCH request to a specific URL with the contact data in a structured format (JSON).
Create data in HubSpot from your APP

In order to synchronize your App with HubSpot when data is created you need to call the HubSpot API and send the data to HubSpot.
Demo
Update data HubSpot from your APP
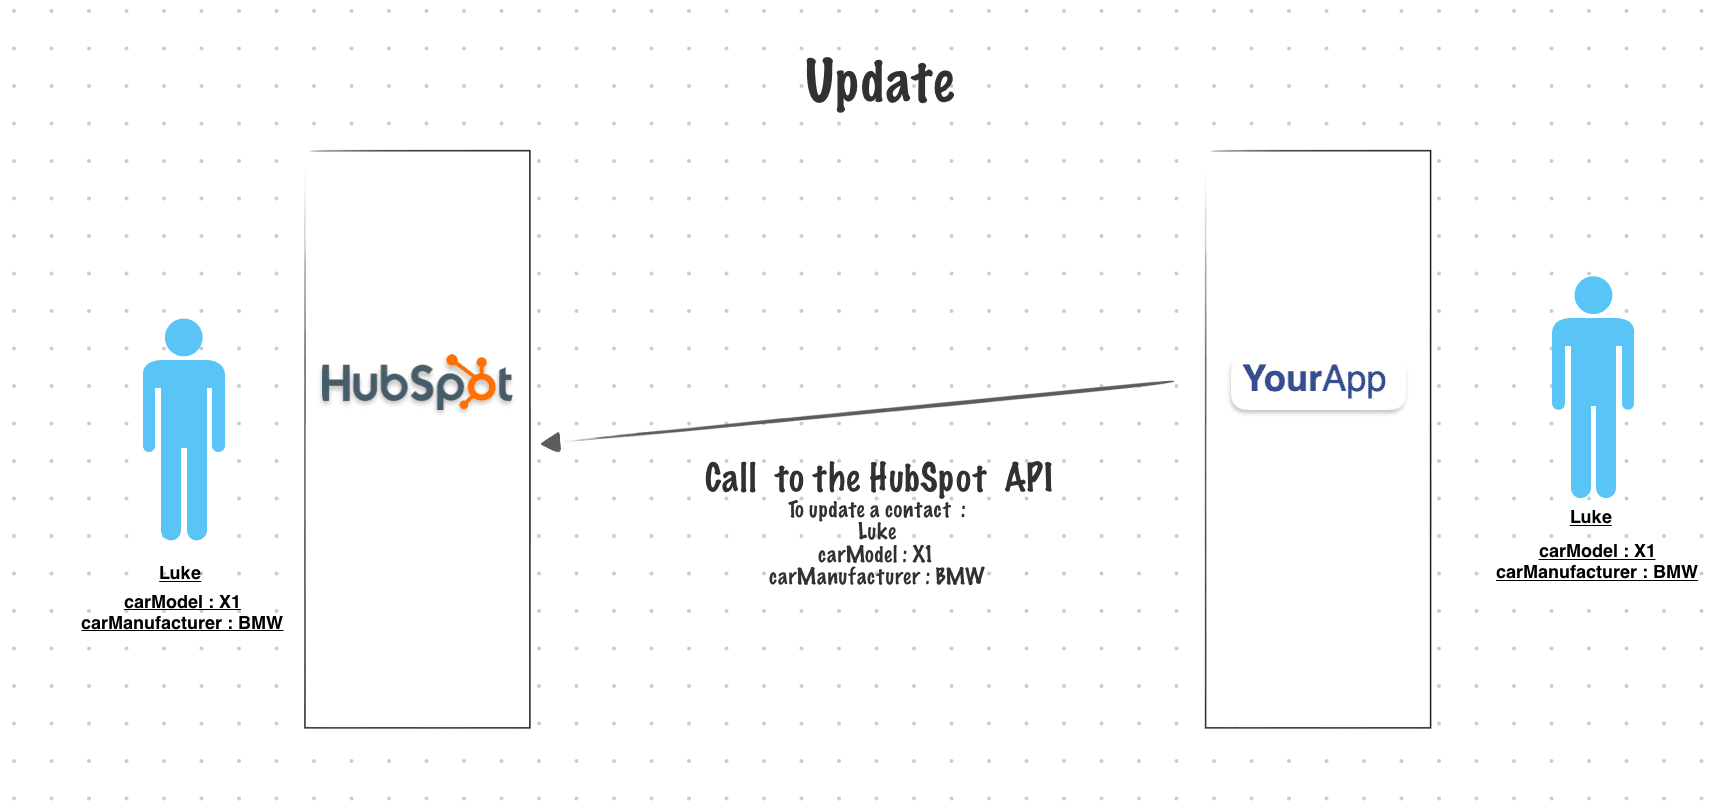
To run an update it’s the exact same concept, but instead of calling the API endpoint do create, we use the endpoint do update.
Demo
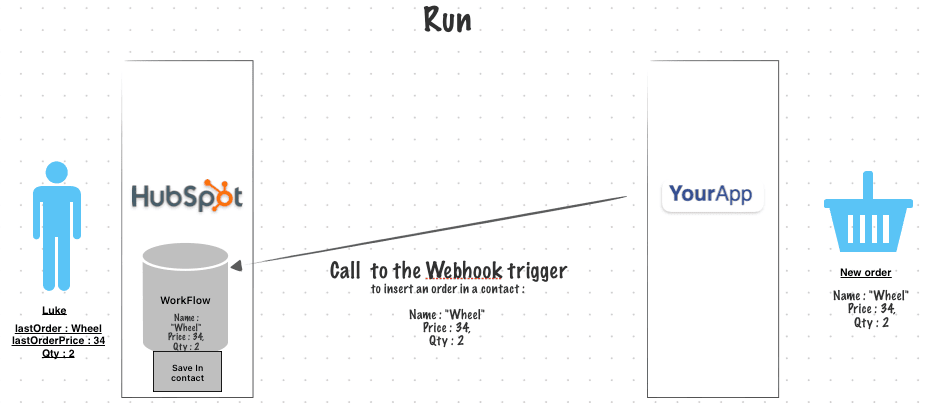
Use the new HubSpot WorkFlow triggers
There’s a new feature in HubSpot Workflows: « Trigger workflows from webhooks (Operations Hub Professional and Enterprise only). »
With this feature, you can initiate a workflow by making a call to a URL (webhook).
To activate the workflow, you need to execute a POST request to that URL and can include data in the body in JSON format.
This data can then be utilized within the workflow to perform various tasks, such as creating a record, updating an existing record, and more.
Code example used in the demo :
const axios = require('axios');


(async () => {


    const endpoint = "https://api-na1.hubapi.com/automation/v4/webhook-triggers/21169044/TXcgqlT"

    await axios.post(endpoint,{
        hello: true,
        orderNum : 32322,
        clientEmail : "antoinebrossault@gmail.com",
        items: [
            {
                name: 'Wheel',
                price : 34,
                qty : 2
            },
            {
                name: 'Engine',
                price : 8000,
                qty : 1
            }
        ]
    })


})();