05/04/2024
In this article, I'll explain how I set up my autocomplete app, the tools I used, and the method for deploying it. I want to keep a record of my work for future reference and possibly assist those of you thinking about creating similar apps.
The idea behind autocomplete
The main goal of this application was to help HubSpot users easily create companies in their CRM with auto-completion features. Currently, when you create a company in HubSpot or any other object like a contact, there’s no auto-completion available. For instance, you can’t use the Google Maps API to auto-complete an address. Moreover, there’s no direct connection to the official company registry of your country to retrieve the correct tax number, etc. So, my idea was straightforward: create a website, app, or page with a form that incorporates auto-completion.
I approached this in a more sophisticated manner. To link the form to the HubSpot portal, you typically need to send the data through an API call. However, to make this app accessible to the general public, including those who may not be comfortable with coding or manipulating API keys, integrating with the HubSpot OAuth flow was the solution
Demo
Diagram

The stack and strategy
The most challenging aspect of this project was creating the public app with the OAuth flow. Managing the various tokens and refreshing them required a bit of effort.
The oAuth flow
To create a public app in HubSpot using OAuth, first register your app in the HubSpot Developer Portal. Then, implement the OAuth 2.0 authorization code grant flow. This involves redirecting users to the HubSpot authorization URL, where they’ll authenticate and authorize your app’s access to their HubSpot data. Upon authorization, HubSpot will redirect users back to your app with an authorization code that you’ll exchange for an access token, enabling your app to make authenticated requests to the HubSpot API on behalf of the user.
Firebase
I started by using the demo OAuth flow in Node.js provided by HubSpot as a foundation. Then, I re-implemented the functions in my own coding style, making the code clearer and cleaner.
For storing the tokens, I chose to use Firebase Firestore, which is a NoSQL database provided by Google.
To handle account creation and sign-in with Google, I chose to rely on Firebase’s functions to save time.
Frontend
For the front end, instead of hosting it on Firebase, I decided to host it on my own server.
The front-end is a Single Page Application (SPA) made with Nuxt. I used Vuex to manage my states, and for styling, I relied on Tailwind CSS.
Backends
I created a Node application using Express to manage the OAuth flow and my backend API. The REST API I built is consumed by a Nuxt.js frontend.
For the data, I created a service with an API which consumes another API with the tax information data.
Docker and deployment
Each backend is containerized with Docker. I encountered an interesting challenge related to the OAuth flow. Since all the OAuth logic is handled by my main backend, but it’s completely detached from my front end, the callback URL required didn’t match.
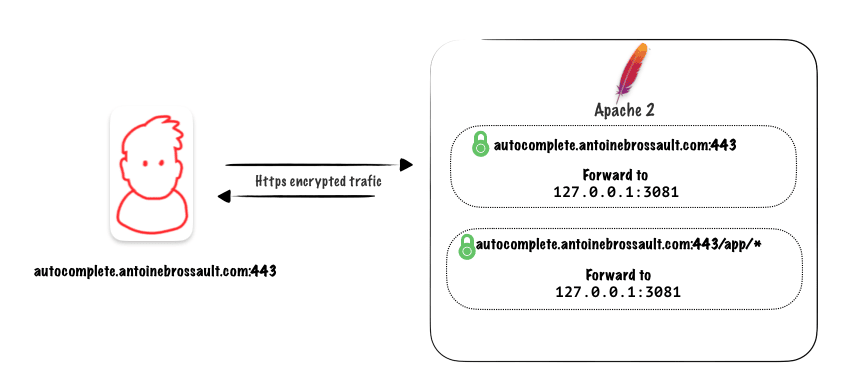
To address this, I utilized a reverse proxy with Apache. All requests coming from https://autocomplete.antoinebrossault.com/app are forwarded to the main backend, while requests for https://autocomplete.antoinebrossault.com/ are handled outside of the container by the Apache Server installed on the VPS.
<IfModule mod_ssl.c>
<VirtualHost *:443>
    ServerAdmin webmaster@autocomplete.antoinebrossault.com
    ServerName autocomplete.antoinebrossault.com
    DocumentRoot "/home/where/apps/autocomplete.antoinebrossault.com"
    ErrorLog ${APACHE_LOG_DIR}/.log
    CustomLog ${APACHE_LOG_DIR}/.log combined

    <Directory /home/where/apps/autocomplete.antoinebrossault.com >
        Options Indexes FollowSymLinks
        AllowOverride All
        Require all granted
    </Directory>


     ProxyPass /app http://localhost:3012
     ProxyPassReverse /app http://localhost:3012


SSLCertificateFile /etc/letsencrypt/live/autocomplete.antoinebrossault.com/fullchain.pem
SSLCertificateKeyFile /etc/letsencrypt/live/autocomplete.antoinebrossault.com/privkey.pem
Include /etc/letsencrypt/options-ssl-apache.conf
</VirtualHost>
</IfModule>