09/04/2024
In this article, I'll share how I set up a compute service on Fastly to cache my content without needing to write VCL code. I'll guide you through setting up compute using JavaScript runtime, deploying it, and linking your backend to cache your content on the Fastly CDN.
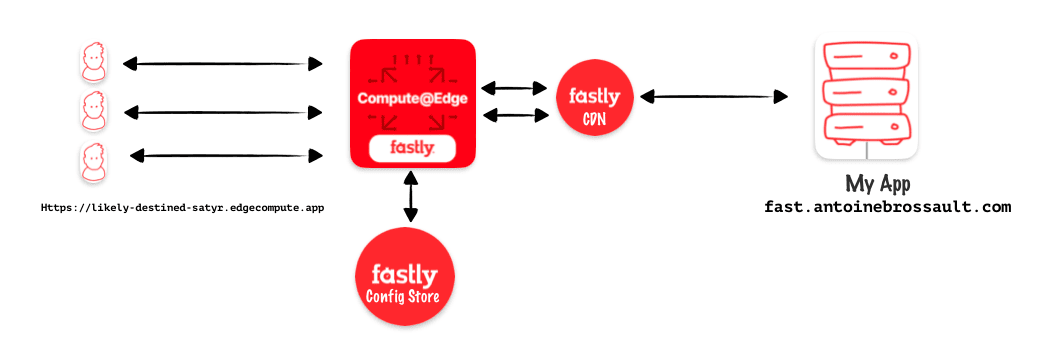
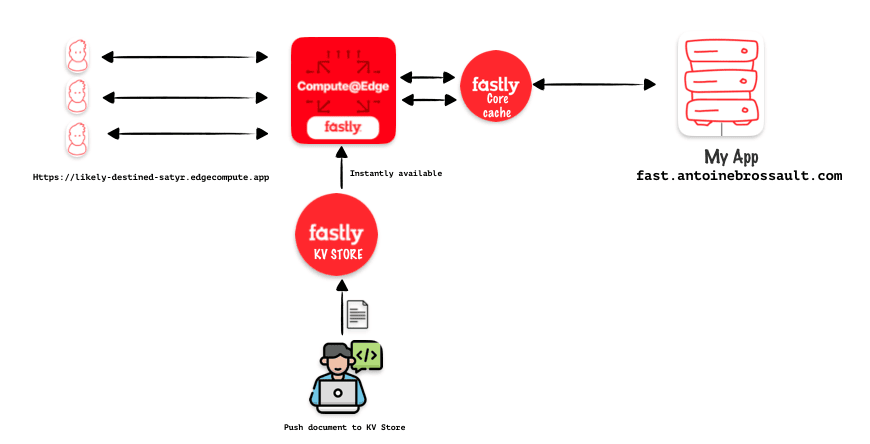
Diagram and project goal
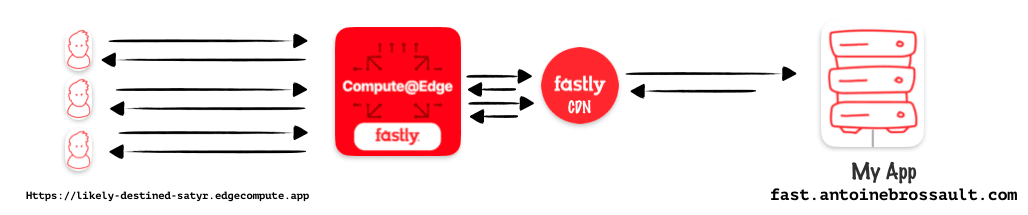
In this article, my goal is to use compute at edge from Faslty to protect my origin and cache my content. Instead of using Varnish Configuration Language (VCL) to set my caching rules I will use JavaScript with compute.
Start a new compute / project
To start a new compute project, you will need to have the Faslty CLI installed
fastly compute init
After hitting the above command, you will get prompted few questions
Author (email): [antoine@gmail.com]

Language:
(Find out more about language support at https://www.fastly.com/documentation/guides/compute)
[1] Rust
[2] JavaScript
[3] Go
[4] Other ('bring your own' Wasm binary)
👉 option: 2
The started kit :
Starter kit:
[1] Default starter for JavaScript
    A basic starter kit that demonstrates routing, simple synthetic responses and overriding caching rules.
    https://github.com/fastly/compute-starter-kit-javascript-default
👉 Default starter for JavaScript
Post init :
INFO: This project has a custom post_init script defined in the fastly.toml manifest:
    npm install

Do you want to run this now? [y/N]
👉 yes
JavaScript project / setup
npm install @fastly/expressly
Add a dev command in the npm scripts :
To add the « dev » script to your package.json file, simply insert the following line within the « scripts » object:
  "scripts": {
    "dev": "fastly compute serve --watch"
  }
💡 By default the port used is 7676 if you want to use an other one use the addr flag like so :
fastly compute serve --watch --addr=127.0.0.1:7777
This will allow you to run the command npm run dev to start your JavaScript projector using Fastly Compute.
Import Expressly / to manage the routes
Expressly is a router similar to Express in Node.js, If you ever used express Expressly will feel very confortable to use. You can check the documentation here
In /src/index.js add :
import { Router } from "@fastly/expressly";
const router = new Router();
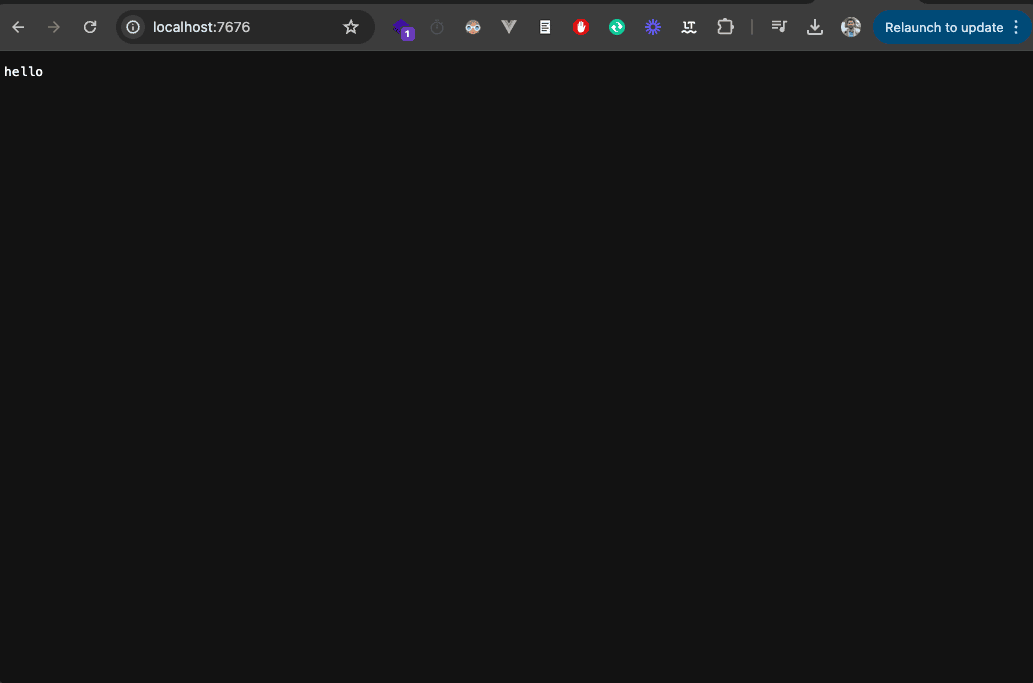
router.get("/", async (req, res) => {
res.send("hello");
});
router.listen();
Start the project by typing :
npm run dev
Or
fastly compute serve --watch
This should return hello when you visit : http://localhost:7676
Publish on Faslty / and connect your backend
npm run deploy
Or
fastly compute publish
Accept and add a backend in my case I added :
fast.antoinebrossault.com
With the name :
fast_antoinebrossault_com
Add the backends in the .toml file
At the root of your project, you should have a fastly.tom file. In this file, add your backends if it’s not already the case.
Here I have my local backend and my production one
[local_server]
  [local_server.backends]
    [local_server.backends.fast_antoinebrossault_com]
      override_host = "fast.antoinebrossault.com"
      url = "https://fast.antoinebrossault.com"

[setup]
  [setup.backends]
    [setup.backends.fast_antoinebrossault_com]
      address = "fast.antoinebrossault.com"
      port = 443
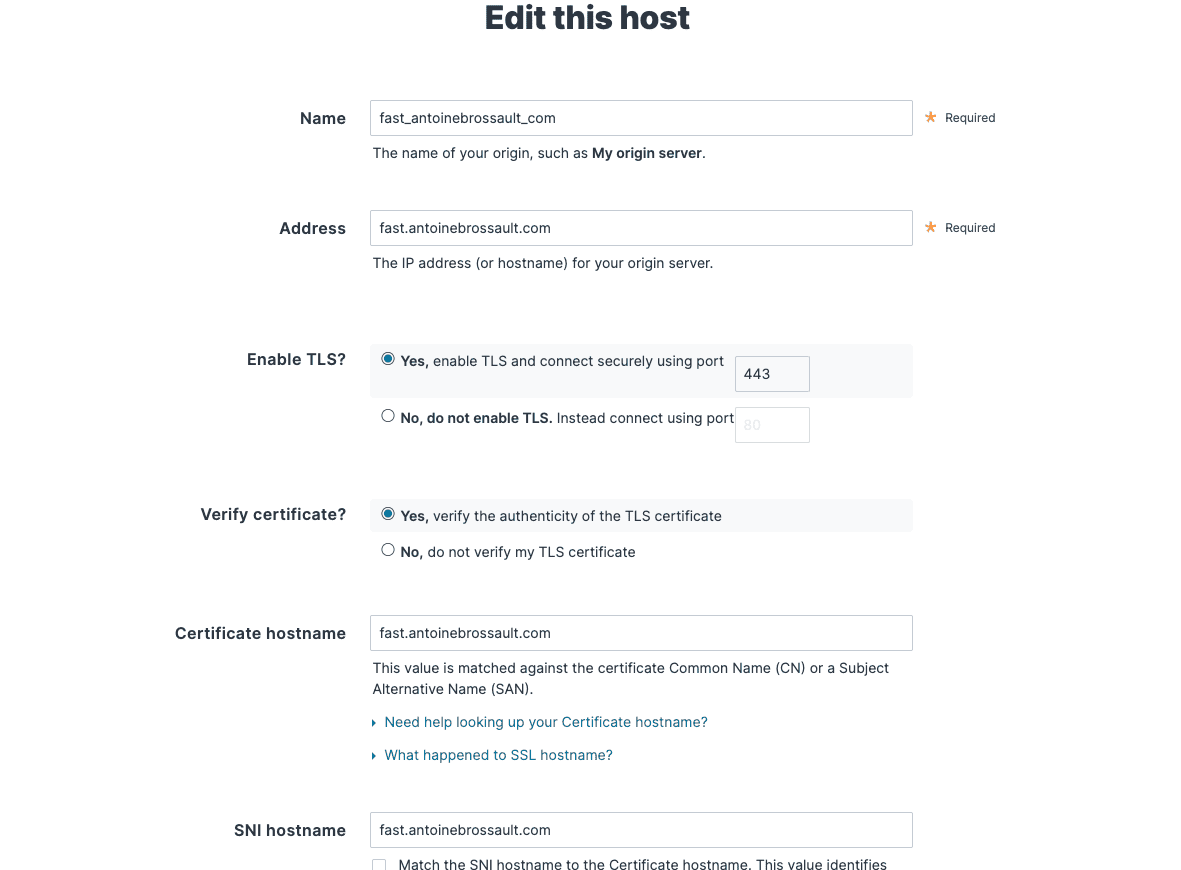
Check your host config in the UI
Mine looks like this, If you get 421 Misdirected Request Error with Fastly compute, double-check the SNI hostname and certificate hostname configuration part.

Visit the url to check your deployment
If everything worked, you can visit the URL you got in the CLI to see the same result we had locally but this time on Fastly.
https://likely-destined-satyr.edgecompute.app/
Query / your backend
Modify the route we created earlier with :
router.get("/", async (req, res) => {

    const beResp = await fetch(req, {
        backend: "fast_antoinebrossault_com"
    });

    res.send(beResp);

});
Here this code query our backend and send back the result.
I your backend sends back an HTML page, the page will be broken as all the CSS and JavaScript files are not intercepted by our routes.
Let’s add routes to handle CSS and JavaScript files
This code defines a route in a router that handles requests for specific file types (JPEG, PNG, GIF, JPG, CSS, JS) and responds with the fetched content from a specified backend server (« fast_antoinebrossault_com »).
Let’s add this to our code :
router.get(/\.(jpe?g|png|gif|jpg|css|js)$/, async (req, res) => {
  res.send(await fetch(req, {
      backend: "fast_antoinebrossault_com"
  }));
});
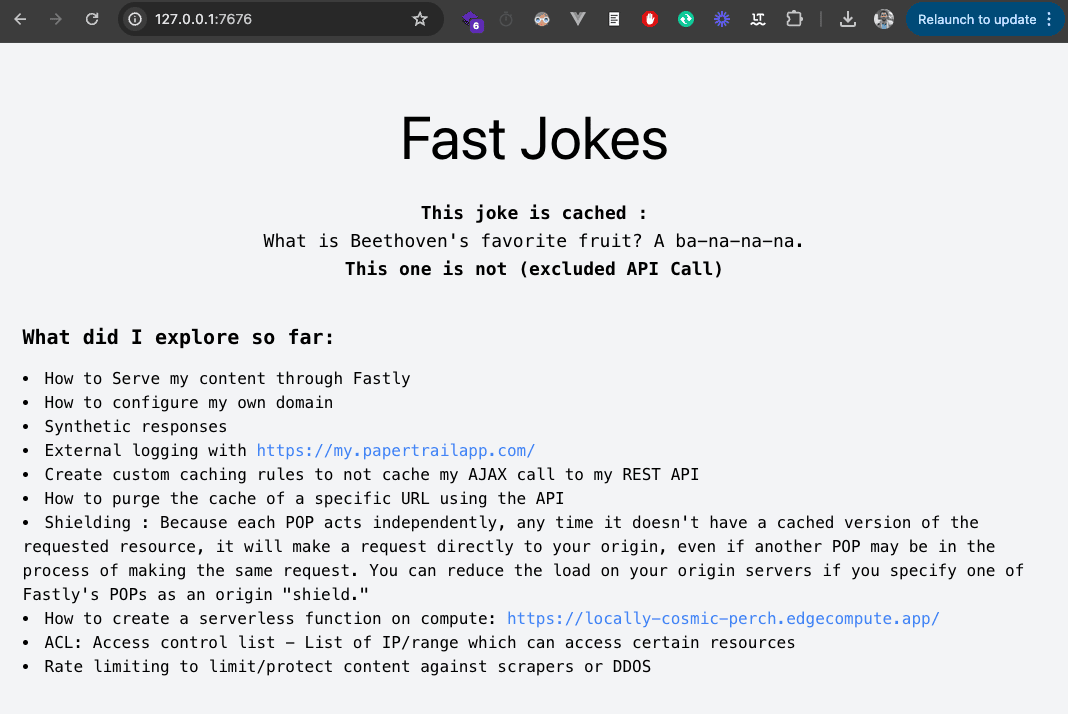
Now our images, CSS and JavaScript files work, and all others files matching our regex will work too :
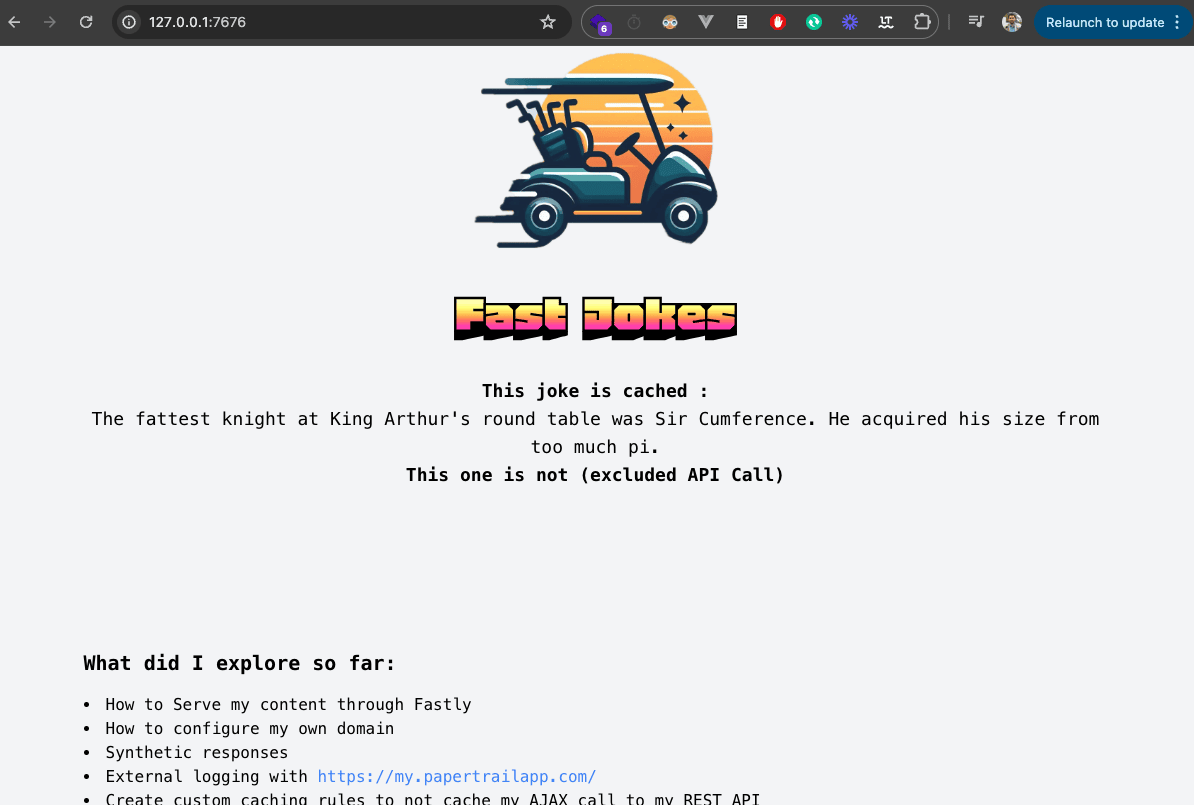
Another feature is broken on our site, this page fetches a Joke with an AJAX request to the API and insert it into the page.
Let’s handle front-end API calls
Let’s add another route to manage our API calls :
Let’s use this new route to handle the requests to the API, I created a tour to manage all the request which go to the API .
This regular expression (/^.*\/api\/.*$/ matches any string containing « /api/ » within it, regardless of what comes before or after « /api/ ».
router.get(/^.*\/api\/.*$/, async (req, res) => {
    res.send(await fetch(req, {
        backend: "fast_antoinebrossault_com"
    }));
});
Our API call now works :
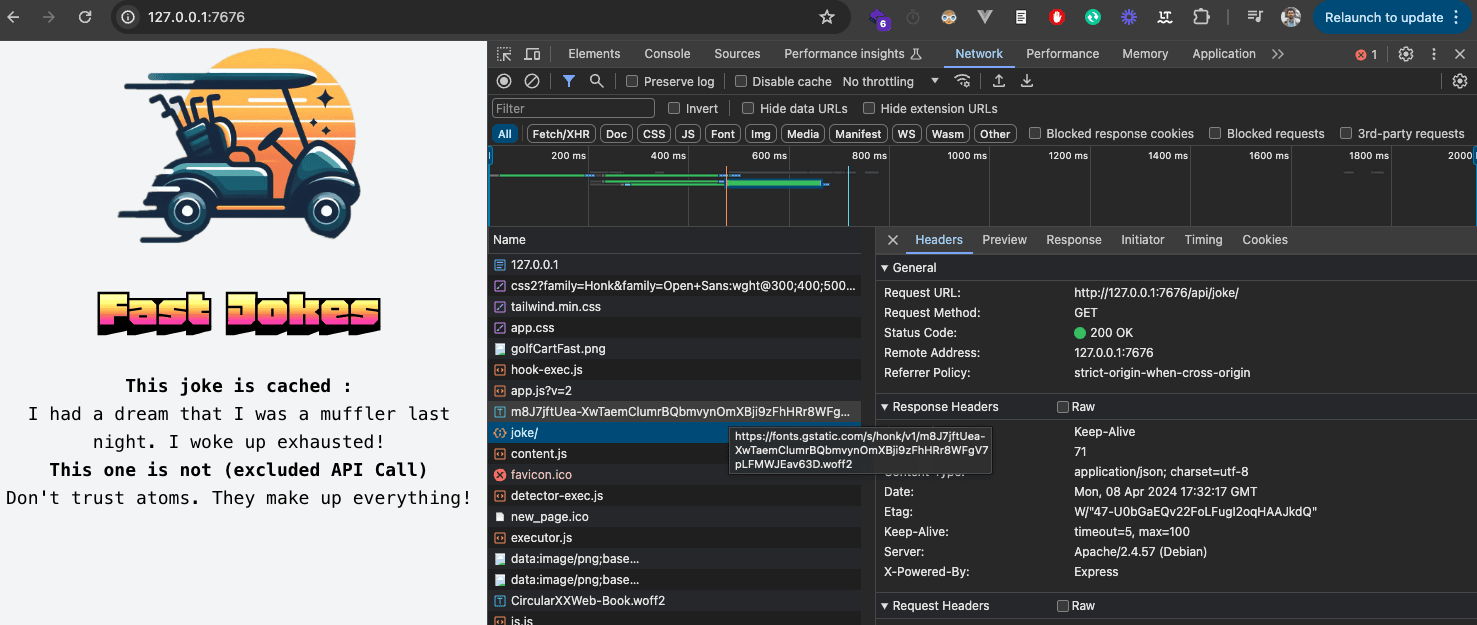
We can now publish our changes with :
npm run deploy
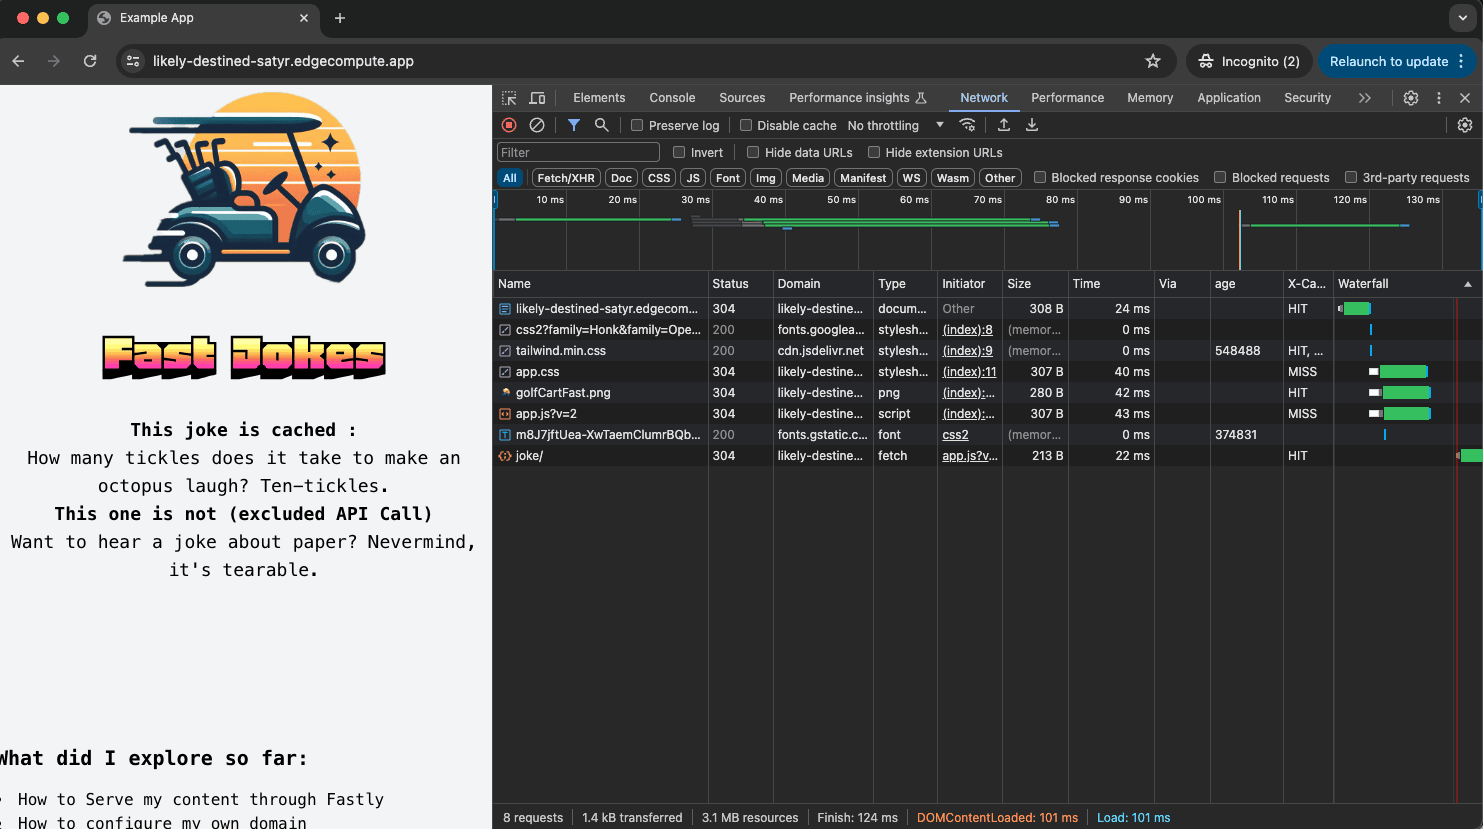
As we can see, everything now works like a charm :
Add caching
We want Fastly to cache our content for a specific amount of time, let’s do this in our compute project.
To cache our URLs we can use CacheOverride
First import it :
import { CacheOverride } from "fastly:cache-override";
No need to install anything with npm install as cache-override exists in the fastly library we already have in our project.
We want to cache our home page for 50sec to do so we adapt the code inside our route :
router.get("/", async (req, res) => {
    const beResp = await fetch(req, {
        backend: "fast_antoinebrossault_com",

        // cache this request for 50 sec
        cacheOverride: new CacheOverride("override", {
            ttl: 50
        })
    });

    res.send(beResp);

});
Now we re-deploy with npm deploy to see if it worked
It worked 🎉 ! As you can see, this request is now cached :
antoine@macbook / % curlHeaders https://likely-destined-satyr.edgecompute.app/
HTTP/2 200
date: Mon, 08 Apr 2024 18:16:41 GMT
server: Apache/2.4.57 (Debian)
x-powered-by: Express
content-type: text/html; charset=utf-8
x-served-by: cache-mrs10549-MRS
etag: W/"b1e-A4dLyj+Lkq4bnJSZB7a7fCcwunw"
vary: Accept-Encoding
age: 1 👈👈
accept-ranges: bytes
x-cache: MISS 👈👈
x-cache-hits: 0 👈👈
content-length: 2846

antoine@macbook / % curlHeaders https://likely-destined-satyr.edgecompute.app/
HTTP/2 200
date: Mon, 08 Apr 2024 18:16:41 GMT
server: Apache/2.4.57 (Debian)
x-powered-by: Express
content-type: text/html; charset=utf-8
x-served-by: cache-mrs1050108-MRS
etag: W/"b1e-A4dLyj+Lkq4bnJSZB7a7fCcwunw"
vary: Accept-Encoding
age: 9 👈👈
accept-ranges: bytes
x-cache: HIT 👈👈
x-cache-hits: 1 👈👈
content-length: 2846
We can see the first request is a x-cache: MISS and the second is a x-cache: HIT. It will remain in the cache until the age reaches 50, which is the TTL we put in the code.
If you are wondering what command I use to only get the headers with curl, I use this in my bash profile :
# curl-headers
#
# will return the headers only
# @example : curl-headers <url>
curl-headers() {
    curl -sSL -D - $1 -o /dev/null
}

alias curlHeaders="curl-headers";
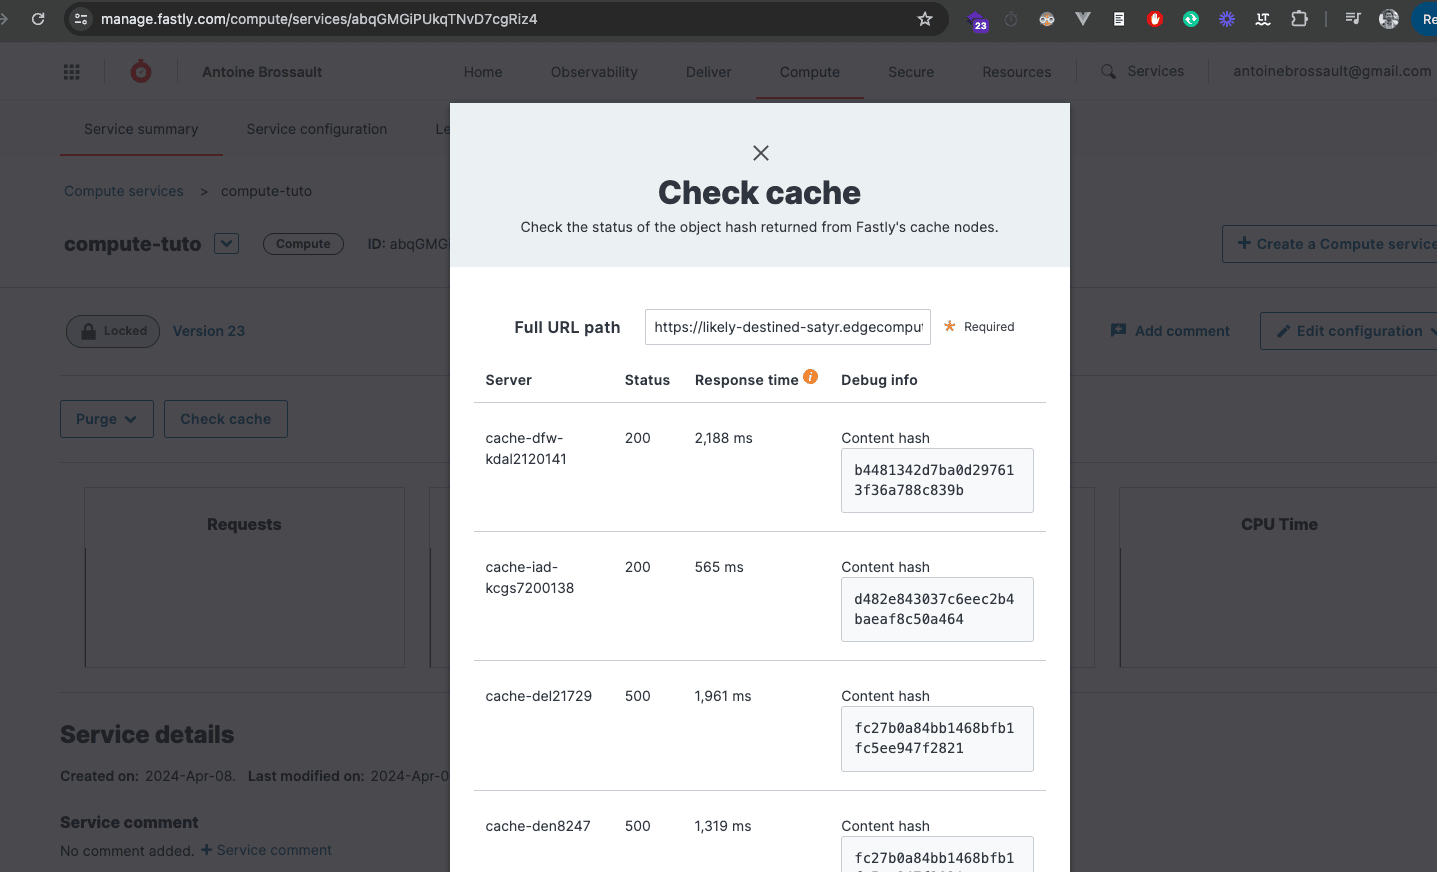
Using this method to put something in cache is no different from using VCL, just nicer and more elegant. To prove it, you can go to the Faslty UI and check if the URL is in the cache :
How to add custom headers ?
To add custom headers, it’s dead simple, let’s add headers to the response we get from the home page.
To do so simply use the headers.set() method on a backend response like so :
router.get("/", async (req, res) => {
    // Forward the request to a backend.
    const beResp = await fetch(req, {
        backend: "fast_antoinebrossault_com",
        cacheOverride: new CacheOverride("override", {
            ttl: 50
        })
    });

    beResp.headers.set('Hello', "Is it me you are loooking for ?");

    res.send(beResp);

});
And it works ! 🎉
antoine@macbook / % curlHeaders curlHeaders https://likely-destined-satyr.edgecompute.app/
HTTP/2 200
date: Mon, 08 Apr 2024 18:36:04 GMT
server: Apache/2.4.57 (Debian)
x-powered-by: Express
content-type: text/html; charset=utf-8
hello: Is it me you are loooking for ? 👈👈👈
etag: W/"b34-1zh57py/zCElqztfbzqM3oXO/A4"
vary: Accept-Encoding
age: 6
accept-ranges: bytes
x-cache: HIT
x-cache-hits: 1
x-served-by: cache-mrs1050097-MRS
content-length: 2868
As you can see we have a new header in the response : hello: Is it me you are loooking for ?
Rewrite the content of a backend reponse / edit the HTML or JSON...
Rewriting the response from the backend can be very useful in various scenarios. For example:
- Injecting Scripts: If you need to add a script (like a tracking code) but don’t have direct access to your backend code, you can use an edge function to inject the script into the HTML response.
-
Modifying API Responses: If you want to change the structure of a JSON response from an API to match the format your frontend expects, you can rewrite the response.
-
Adding Custom Headers: You might want to add custom headers to the response for security or analytics purposes, such as adding a Content Security Policy (CSP) header.
-
Personalizing Content: Based on user data, you can rewrite the HTML response to deliver personalized content without changing the backend code.
-
A/B Testing: For A/B testing, you can modify the HTML response to show different versions of the content to different users.
-
Localization: If your site serves multiple regions, you can rewrite the response to include region-specific content or translations.
-
Feature Flags: You can use edge functions to enable or disable features in the response based on feature flags, allowing for easier feature rollouts and testing.
By using edge functions to rewrite responses, you can gain more flexibility and control over the content delivered to the user without needing to modify the backend directly.
Modifying the body is a unique feature in Fastly compute
Parsing and modifying the body of a backend response before sending it to the client is a unique feature of Compute. This isn’t possible with VCL, making it a major advantage of Compute over VCL.
Inject a script tag
In my example I would like to inject a script tag right after the closing <head> tag.
To do so, I write my logic in the route I targeted :
router.get("/", async (req, res) => {


});
Now I have to query my backend :
router.get("/", async (req, res) => {

    // Forward the request to a backend.
    let beResp = await fetch(
        "https://fast.antoinebrossault.com", {
            backend: "fast_antoinebrossault_com",
            cacheOverride: new CacheOverride("override", {
                ttl: 50
            })
        }
    );


});
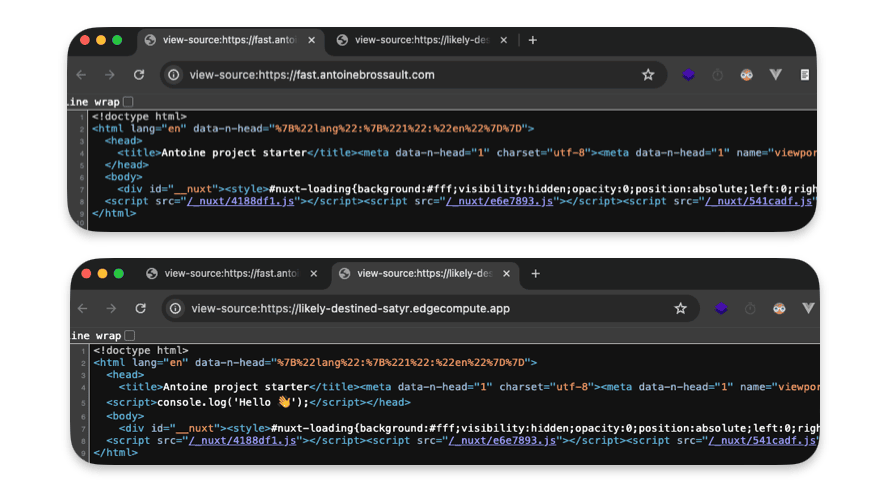
Then read the backend response and if our backend send back a text reponse we replace the closing head tag with our script.
Then we create a new reponse and we send back the result
if( beResp.headers.get("Content-Type").startsWith('text/') ){

    let body = await beResp.text();

    let newBody = body.replace("</head>","<script>console.log('Hello 👋');</script></head>");

    beResp = new Response(newBody, beResp);

}

res.send(beResp);
The final code looks like this :
router.get("/", async (req, res) => {
    // Forward the request to a backend.
    let beResp = await fetch(
        "https://fast.antoinebrossault.com", {
            backend: "fast_antoinebrossault_com",
            cacheOverride: new CacheOverride("override", {
                ttl: 50
            })
        }
    );

    if( beResp.headers.get("Content-Type").startsWith('text/') ){

        let body = await beResp.text();

        let newBody = body.replace("</head>","<script>console.log('Hello 👋');</script></head>");

        beResp = new Response(newBody, beResp);

    }

    res.send(beResp);

});
Troubleshooting : If you get this error "malformed UTF-8 character sequence at offset 1"
✅ Be sure your request to your backend looks like this :
 await fetch(
        "https://fast.antoinebrossault.com", {
            backend: "fast_antoinebrossault_com",
            cacheOverride: new CacheOverride("override", {
                ttl: 50
            })
        }
    );
❌ As not specifying the full URL for the backend and passing the req object doesn’t work
const beResp = await fetch(req, {
        backend: "fast_antoinebrossault_com",
        cacheOverride: new CacheOverride("override", {
            ttl: 50
        })
    });
Improve performance by using streams
Instead of loading the full response in memory before performing the replacement Andrew Bets (Developer Advocate @ Fastly ) suggest to use a function he wrote.
First add the function to your code :
const streamReplace = (inputStream, targetStr, replacementStr) => {
    let buffer = ""
    const decoder = new TextDecoder()
    const encoder = new TextEncoder()
    const inputReader = inputStream.getReader()
    const outputStream = new ReadableStream({
      start() {
        buffer = ""
      },
      pull(controller) {
        return inputReader.read().then(({ value: chunk, done: readerDone }) => {
          buffer += decoder.decode(chunk)

          if (buffer.length > targetStr.length) {
            buffer = buffer.replaceAll(targetStr, replacementStr)
            controller.enqueue(encoder.encode(buffer.slice(0, buffer.length - targetStr.length)))
            buffer = buffer.slice(0 - targetStr.length)
          }

          // Flush the queue, and close the stream if we're done
          if (readerDone) {
            controller.enqueue(encoder.encode(buffer))
            controller.close()
          } else {
            controller.enqueue(encoder.encode(""))
          }
        })
      },
    })
    return outputStream
  }
Then use it like so :
router.get("/", async (req, res) => {
    // Forward the request to a backend.
    let beResp = await fetch(
        "https://fast.antoinebrossault.com", {
            backend: "fast_antoinebrossault_com",
            cacheOverride: new CacheOverride("override", {
                ttl: 50
            })
        }
    );


    // rewrite the response
    if( beResp.headers.get("Content-Type").startsWith('text/') ){

        const newRespStream = streamReplace( beResp.body ,"</head>","<script>console.log('Hello 👋');</script></head>")

        beResp = new Response(newRespStream, beResp);

    }

    res.send(beResp);

});
Use Config stores / a key value pair storage
Fastly Config stores act like mini-databases at the edge of their network. They store frequently used configuration settings (like feature flags or A/B testing values) that your edge applications can access quickly and easily. This allows you to manage configurations centrally and deliver them to your services with minimal delay.
Create a config store
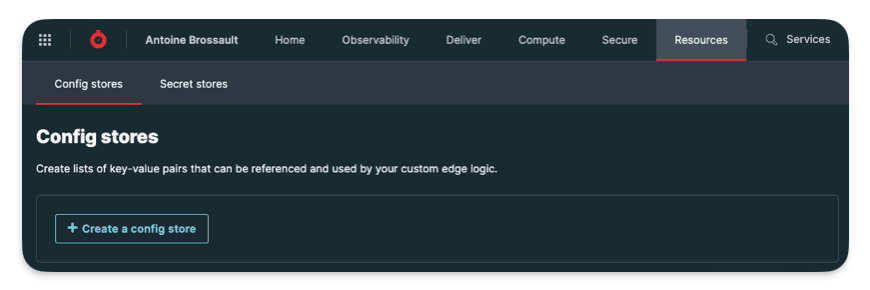
Here I created a config store named Features
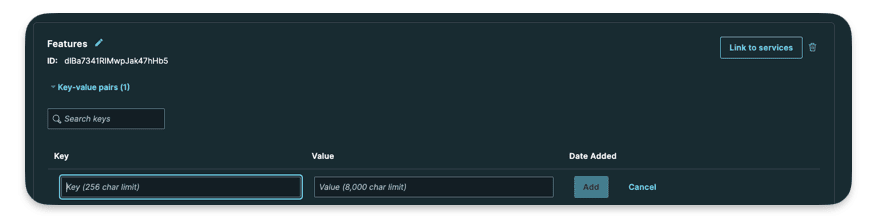
Here you can add your key value data.

I createad a key html_404 with as a value a bit of HTML representig a 404 page. My goal is to use this HTML code asa synthetic response.
Use the Config Store
It’s important to kepp in mind the local code we run with npm run dev doesn’t have access to our backend in the same way our deployed code does. That’s why for the backend end we have a local one specified
Local
[local_server]
  [local_server.backends]
    [local_server.backends.fast_antoinebrossault_com]
      override_host = "fast.antoinebrossault.com"
      url = "https://fast.antoinebrossault.com"

[setup]
  [setup.backends]
    [setup.backends.fast_antoinebrossault_com]
      address = "fast.antoinebrossault.com"
      port = 443
It’s the same idea for config store, here’s the same data used in my config store but stored locally in my fastly.toml file :
  [local_server.config_stores.Features]
      format = "inline-toml"
    [local_server.config_stores.Features.contents]
      "html_404" = '<!DOCTYPE html><html lang="en"><head><meta charset="UTF-8"><meta name="viewport" content="width=device-width, initial-scale=1.0"><title>404 Not Found</title><link href="https://cdn.jsdelivr.net/npm/tailwindcss@2.2.19/dist/tailwind.min.css" rel="stylesheet"></head><body class="bg-gray-100"><div class="flex items-center justify-center h-screen"><div class="text-center"><h1 class="text-4xl font-bold text-gray-800">404</h1><p class="text-lg text-gray-600">Page Not Found</p></div></div></body></html>'
Query the config store from our code :
First thing first import the module for Config Store :
import { ConfigStore } from 'fastly:config-store';
Then Initialize the config store and get the value :
  const config = new ConfigStore('Features');
  const value = config.get('html_404')
I created a /404route to demonstrate this :
router.get('/404', async (req,res) => {

  const config = new ConfigStore('Features');

  res.withStatus(404).html(config.get('html_404'));

});
It worth noting I send a 404 status code with https://expressly.edgecompute.app/docs/handling-data/response#reswithstatus And instead of setting the headers for HTML myself I used .html()
You can now deploy it to see the result live.
Use KV store / a key-value store
Fastly KV store is a service that allows you to store data persistently at the edge of Fastly’s network, making it geographically closer to users and resulting in faster data access. This key-value store offers both speed and durability, enabling quick reads and writes while ensuring data survives system restarts. By storing data at the edge, KV store reduces the load on your origin server, improving performance and scalability of your applications. This makes it a valuable tool for caching frequently accessed data, storing configuration settings, or even implementing authorization logic at the edge.
Local setup
As I said before for config store : the local code we run with npm run dev doesn’t have access to our KV Store, so we have to represent our KV store in our fastly.toml file.
[local_server]
  [local_server.kv_stores]
      [[local_server.kv_stores.main]]
        data = "✅"
        key = "mood"

  [[local_server.kv_stores.main]]
      key = "readme"
      path = "./README.md"
For the second key, the readme one, the goal is tu return the content of the README.md file stored at the root of our project.
Live setup
We can create a KV-store from the UI, API, CLI… in the following lines I decided to go with the CLI.
Create the KV Store :
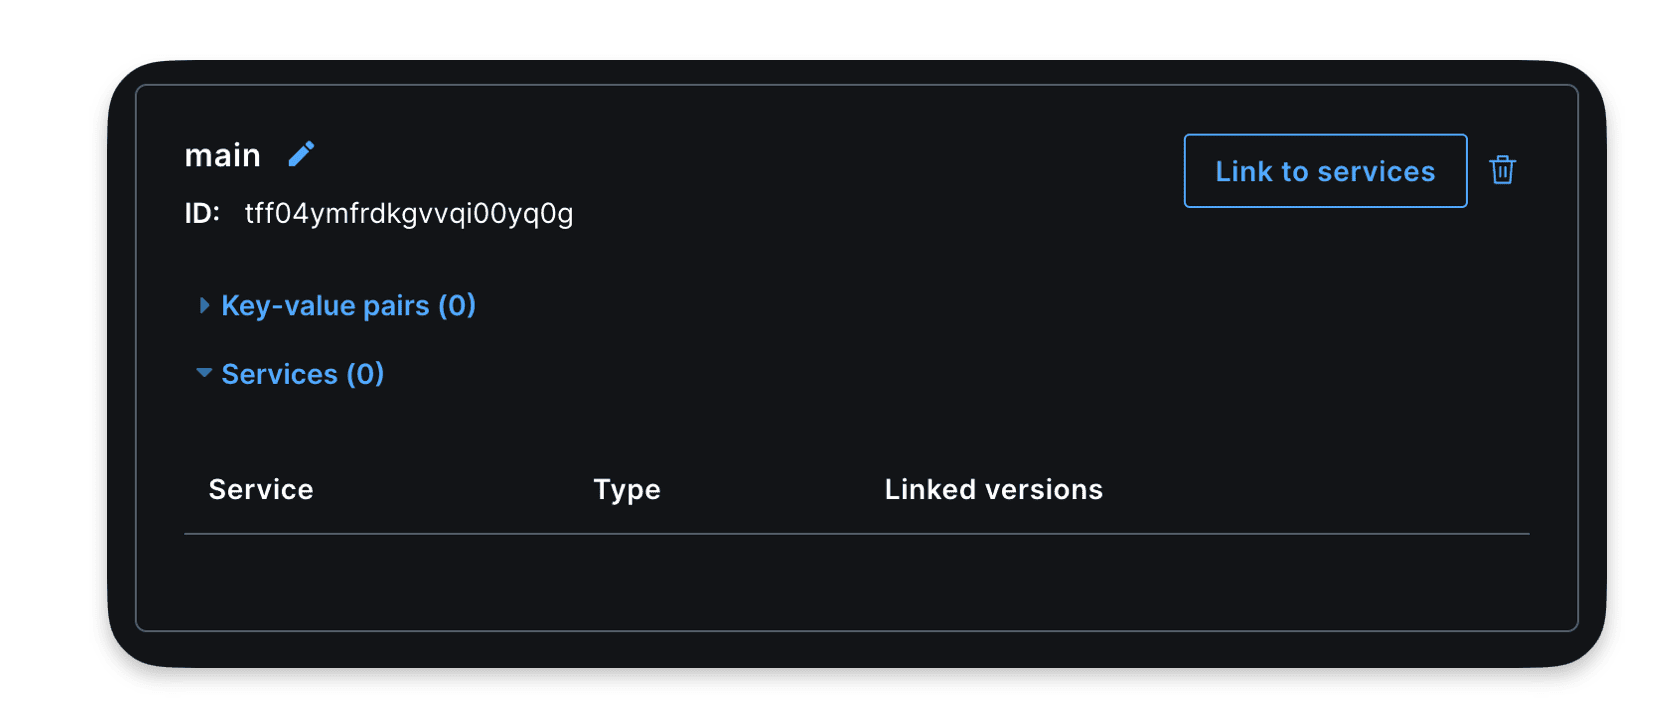
Here I’m creating a store called main :
fastly kv-store create --name=main
This should reuturn the ID of the nes KV-store
SUCCESS: Created KV Store 'main' (tff04ymfrdkgvvqi00yq0g)
Insert data in the KV Store :
Here I’m adding a key value pair : mood: ✅ to my KV Store
fastly kv-store-entry create --store-id=tff04ymfrdkgvvqi00yq0g --key="mood" --value="✅"
Here I’m adding the content of a document (readme) in the KV Store
fastly kv-store-entry create --store-id=tff04ymfrdkgvvqi00yq0g --key="readme" --value="$(cat ./readme.md)"
Link the KV Store to a compute service :
I didn’t find how it’s possible to link the newly created KV-store with a compute service with the CLI. But in the UI it’s very straitforward.
Interact wih KV store with the API :
If you want to insert a mini item using the API, there’s something important to keep in mind: the data you send should be encoded in base64. See the following example for clarification:
Buffer.from(`Hello World !`).toString('base64')
Here is a full example and API call:
   const response = await axios.put(
            `https://api.fastly.com/resources/stores/kv/${storeId}/batch`,
            {
                    "key": city,
                    "value": Buffer.from(`Hello World !`).toString('base64')
            }
            , {
                headers: {
                    'Content-Type': 'application/x-ndjson',
                    'Accept': 'application/json',
                    'Fastly-Key': process.env.FASTLY_KEY
                },
            }
        );
Use the KV Store in the code
Import KVStore :
import { KVStore } from "fastly:kv-store";
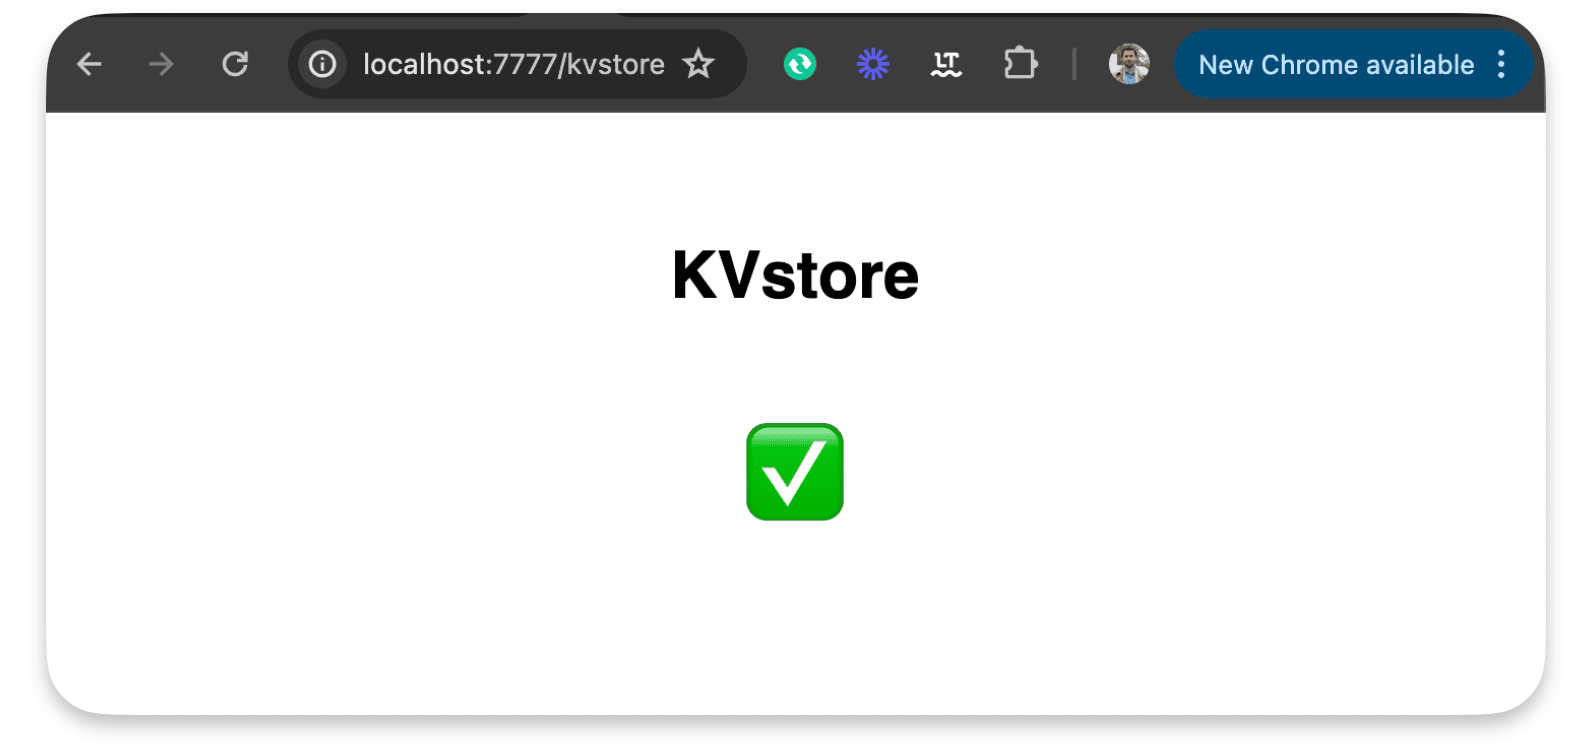
router.get('/kvstore', async (req, res) => {

   const files = new KVStore('main');

   const entry = await files.get('mood');

   const entryText = await entry.text();

       res.html(`
        <!DOCTYPE html>
        <html class="no-js">

            <head>
                <meta charset="utf-8">
                <meta http-equiv="X-UA-Compatible" content="IE=edge">
                <title></title>
                <meta name="description" content="">
                <meta name="viewport" content="width=device-width, initial-scale=1">
                <!-- <link href=" " rel='"stylesheet" type='"text/css"> -->
                <style>
                    * {
                        font-family: sans-serif
                    }

                    main {
                        max-width: 38rem;
                        padding: 2rem;
                        margin: auto;
                    }

                    h1{
                        text-align: center;
                    }

                    pre{
                        text-align:center;
                        font-size: 3rem;
                    }
                </style>
            </head>

            <body>
                <main>

                    <h1> KVstore </h1>

                    <pre>${entryText}</pre>

                </main>
            </body>

        </html>
    `);


});
This should display the value of our mood key we previously set :
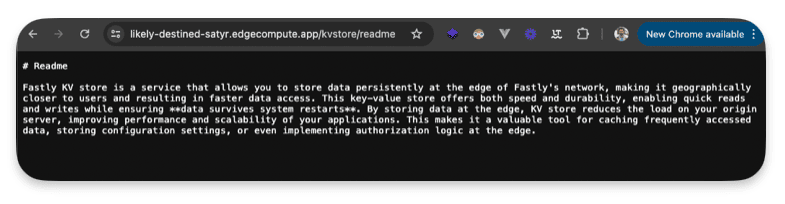
An other example :
router.get('/kvstore/readme', async(req,res) => {

    const store = new KVStore('main');
    const entry = await store.get('readme');

    if (!entry) {
        res.withStatus(404).json( { status: 404 } );
    }

    res.send(entry.body);

});
This returns the content of our readme file :
Add geolocation / personalize the content based on location
Identifying user location through IP can enhance website experience by offering localized content, relevant services, and targeted ads. It enables personalized recommendations based on regional preferences, language, and cultural nuances, fostering user engagement and satisfaction. Additionally, it aids in fraud prevention and compliance with geo-specific regulations.
Import our getGeolocationForIpAddress function from the package :
import { getGeolocationForIpAddress } from "fastly:geolocation"
Add a new route :
router.get("/geo", async (req, res) => {
  if(!req.ip) res.withStatus(403).json({error: "No ip set"});
  res.json(getGeolocationForIpAddress(req.ip));
});
Here’s the available data returned by getGeolocationForIpAddress()
{
"as_name": "netskope inc",
"as_number": 55256,
"area_code": 0,
"city": "paris",
"conn_speed": "broadband",
"conn_type": "wired",
"continent": "EU",
"country_code": "FR",
"country_code3": "FRA",
"country_name": "france",
"gmt_offset": 200,
"latitude": 48.86,
"longitude": 2.34,
"metro_code": 250075,
"postal_code": "75001",
"proxy_description": "cloud-security",
"proxy_type": "hosting",
"region": "IDF",
"utc_offset": 200
}
Detect the device / personalize the content based device type
Dynamic serving or content negotiation is crucial for delivering a tailored user experience across various devices and platforms. By detecting characteristics like user agent or device type, websites can serve different content optimized for each, enhancing usability and performance. For instance, a website might offer a mobile-friendly layout for smartphones, a desktop version for computers, and even an alternative format for accessibility purposes
Import the device lib
import {Device} from "fastly:device"
Use the Device class :
router.get("/device", async (req, res) => {

  const ua = req.headers.get('user-agent')

  const machine = Device.lookup(ua)

  res.json({
    ua,
    machine
  });

});
The route will send back those data when connecting with a Google Pixel 7 user-agent :
{
"ua": "Mozilla/5.0 (Linux; Android 13; Pixel 7) AppleWebKit/537.36 (KHTML, like Gecko) Chrome/116.0.0.0 Mobile Safari/537.36",
"machine": {
"name": "Google Pixel 7",
"brand": "Google",
"model": "Pixel 7",
"hardwareType": null,
"isDesktop": null,
"isGameConsole": null,
"isMediaPlayer": null,
"isMobile": null,
"isSmartTV": null,
"isTablet": null,
"isTouchscreen": null
}
Read environement variables / set by Fastly
You can access those env variables within your compute code :
FASTLY_CACHE_GENERATION
FASTLY_CUSTOMER_ID
FASTLY_HOSTNAME
FASTLY_POP
FASTLY_REGION
FASTLY_SERVICE_ID
FASTLY_SERVICE_VERSION
FASTLY_TRACE_ID
To so so import :
import { env } from "fastly:env";
Then use is like so :
router.get("/env", async (req, res) => {

    const hostname = env("FASTLY_HOSTNAME");
    const serviceId = env('FASTLY_SERVICE_ID');
    const cacheGeneration = env('FASTLY_CACHE_GENERATION');
    const pop = env('FASTLY_POP');
    const region = env('FASTLY_REGION');
    const serviceVersion = env('FASTLY_SERVICE_VERSION');

    res.json({
        hostname,
        serviceId,
        cacheGeneration,
        region,
        pop,
        serviceVersion
    });

});
This code returns :
{
"hostname": "cache-par-lfpg1960091",
"serviceId": "abqGMGiPUkqTNvD7cgRiz4",
"cacheGeneration": "0",
"region": "EU-West",
"pop": "PAR",
"serviceVersion": "37"
}
Edge Rate limiter / set rate limit at the edge
A rate limiter is like a gatekeeper that controls how often people or programs can access your app or website. It helps keep out bad behavior like too many requests from hackers or automated tools trying to grab all your data or slow down your site. By limiting requests, you protect your server, ensure everyone gets a fair chance to use your service, and keep your app or website running smoothly without overloads.
Import the device lib :
import { RateCounter, PenaltyBox, EdgeRateLimiter } from 'fastly:edge-rate-limiter';
Then use is like so :
router.get('/rateLimit', async (req, res) => {

    const rc = new RateCounter('rc')
    const pb = new PenaltyBox('pb')
    const limiter = new EdgeRateLimiter(rc, pb);

    if (!req.ip) res.withStatus(403).json({ error: "No ip set" });

    const shouldBeBlocked = limiter.checkRate(
        req.ip, // The client to rate limit.
        1, // The number of requests this execution counts as.
        10, // The time window to count requests within.
        100, // The maximum average number of requests per second calculated over the rate window.
        1 // The duration in minutes to block the client if the rate limit is exceeded.
    );

    if(shouldBeBlocked) res.withStatus(403).json({ shouldBeBlocked, error: "Number of requests exceeded" });

    res.json({
        shouldBeBlocked
    })

});
See it in action
To test the rate limiter I used Siege to make hundreds of HTTP calls with the following command :
siege "https://likely-destined-satyr.edgecompute.app/rateLimit"
As you can see in the video underneath we get some 200 and then quicly we get only 403 :
How to use a Rate Limit to protect your origin ?
The idea of rate limiting is to protect your origin; a high number of requests against a specific resource could cause service disruption. Not necessarily by taking down a server but most often by degrading performance. We all know how important web performance is in the goal of delivering a high-end experience to all our users.
Here’s a piece of code that rate limits the requester when too many requests are performed in a short amount of time.
There’s something important to understand with rate limiting: the primary goal is to protect your production traffic. In other words, when you get a cache MISS. So when you test an edge rate limit rule, be sure not to hit the cache.
The following code has the sole objective of proxying the origin and adding a rate limit rule.
import { Router } from "@fastly/expressly";
import { RateCounter, PenaltyBox, EdgeRateLimiter } from 'fastly:edge-rate-limiter';
import { CacheOverride } from "fastly:cache-override";

const router = new Router();


router.all("(.*)", async (req, res) => {

  const rc = new RateCounter('rc')
  const pb = new PenaltyBox('pb')
  const limiter = new EdgeRateLimiter(rc, pb);

  if (!req.ip) res.withStatus(403).json({ error: "No ip set" });

  const shouldBeBlocked = limiter.checkRate(
      req.ip, // The client to rate limit.
      3, // The number of requests this execution counts as.
      10, // The time window to count requests within.
      12, // The maximum average number of requests per second calculated over the rate window.
      10 // The duration in minutes to block the client if the rate limit is exceeded.
  );

  if(shouldBeBlocked) res.withStatus(403).json({ shouldBeBlocked, error: "Number of requests exceeded" });

  res.headers.set('reqip', req.ip);

  res.send(await fetch(req, {
    backend: "fast_antoinebrossault_com",
    cacheOverride: new CacheOverride("pass", {})

  }));

});


router.listen();
If you need a tool to test an edge rate limit rule, I previously used Siege in this article, but I discovered another tool that is performant and easy to use. It’s called autocannon. Here’s a command you can use to run a lot of requests and analyze the results of those requests:
npx autocannon --renderStatusCodes --duration 30 "https://faaaaast-erl.global.ssl.fastly.net/_nuxt/1dfb24c.js"
Import your own code
Because it’s always a good idea to split your code into different files for better readability, I’m going to show you how you can do it with Fastly Compute and JavaScript.
You have to use the ESM syntax like this:
In the « /src/« ` folder
export const hello = () => {
    console.log('👋 Hello, world!');
};
import { hello } from './myModule.js';

hello();
Conclusion
With Fastly Compute, JavaScript, and Expressly, we can handle our requests and rules at the edge. I find this method efficient and sleek compared to using VCL. As a JavaScript developer, it feels natural and easy to use. If you’re familiar with PWAs and Service Workers, you’ll notice that Fastly’s approach to handling requests is similar to the Service Worker API they aim to implement.