03/11/2025
In a previous artcile we covered the core concepts of Deployments, Services, and Ingress Deploying WordPress is the perfect next step. It introduces two crucial new Kubernetes concepts that build on your Docker knowledge
- Persistent Storage: In Docker, you’d use a volume like
-v /my/files:/var/www/htmlto save your data. In Kubernetes, you need a way to do this that works even if your app (Pod) gets moved to a different node. We’ll usePersistentVolumeClaims(PVCs) for this. -
Secrets: You should never put passwords in your config files. Kubernetes has a special object called a
Secretto store sensitive data like your database password. -
App-to-App Communication: Your WordPress app needs to talk to your MySQL database. We’ll use a
Servicefor this, but it will be a special internal-only type calledClusterIP.
Here is a step-by-step plan to get our WordPress site running.
Create a Secret for Your Passwords
First, let’s create a Secret to hold all the passwords for our database. This keeps them out of our YAML files.
Run this command on your master node. Remember to change the passwords!
kubectl create secret generic wordpress-db-secret \
  --from-literal=MYSQL_ROOT_PASSWORD='YOUR_ROOT_PASSWORD' \
  --from-literal=MYSQL_PASSWORD='YOUR_WORDPRESS_DB_PASSWORD' \
  --from-literal=MYSQL_USER='wordpress'
I’m going to use
kubectl create secret generic wordpress-db-secret \
  --from-literal=MYSQL_ROOT_PASSWORD='admin' \
  --from-literal=MYSQL_PASSWORD='admin' \
  --from-literal=MYSQL_USER='wordpress'
This creates one Secret named wordpress-db-secret with three separate values inside it.
This should return :
secret/wordpress-db-secret created
You can check the secret creation by running :
kubectl get secret wordpress-db-secret
Create the « File Store » (PersistentVolumeClaims)
You need two persistent storage areas: one for the MySQL database files and one for the WordPress files (like your uploads, themes, and plugins).
Which will be the equivalent of mounting local directory inside a container with Docker like
-v /my/files:/var/www/html
We’ll create two PersistentVolumeClaim (PVC) objects. Think of a PVC as a request for storage. The good news is that K3s comes with a Local Path Provisioner built-in, which will automatically fulfill these requests by creating storage directories on your nodes.
Create a file named storage.yaml:
apiVersion: v1
kind: PersistentVolumeClaim
metadata:
  name: mysql-pv-claim  # A claim for the database
spec:
  accessModes:
    - ReadWriteOnce    # This volume can be mounted by one node at a time
  resources:
    requests:
      storage: 5Gi     # Request 5 Gigabytes
---
apiVersion: v1
kind: PersistentVolumeClaim
metadata:
  name: wordpress-pv-claim # A claim for the WP files
spec:
  accessModes:
    - ReadWriteOnce
  resources:
    requests:
      storage: 10Gi    # Request 10 Gigabytes
Apply it:
kubectl apply -f storage.yaml
It should return
persistentvolumeclaim/mysql-pv-claim created
persistentvolumeclaim/wordpress-pv-claim created
You can check that they were created and « Bound » (fulfilled) by running:
kubectl get pvc
It worked if you see something like :
NAME                 STATUS    VOLUME   CAPACITY   ACCESS MODES   STORAGECLASS   VOLUMEATTRIBUTESCLASS   AGE
mysql-pv-claim       Pending                                      local-path     <unset>                 27s
wordpress-pv-claim   Pending                                      local-path     <unset>                 27s
Deploy MySQL
Now we’ll deploy the database. This will consist of two parts in one file:
- A
Deploymentto run the MySQL container. -
A
Serviceso WordPress can find the database.
Create a file named mysql.yaml:
apiVersion: v1
kind: Service
metadata:
  name: mysql  # This is the stable DNS name WordPress will use to connect
spec:
  ports:
  - port: 3306
  selector:
    app: mysql   # Connects this service to Pods with the label "app: mysql"
  type: ClusterIP  # IMPORTANT: Only reachable *inside* the cluster
---
apiVersion: apps/v1
kind: Deployment
metadata:
  name: mysql
spec:
  replicas: 1
  selector:
    matchLabels:
      app: mysql
  template:
    metadata:
      labels:
        app: mysql # The label the Service is looking for
    spec:
      containers:
      - name: mysql
        image: mysql:8.0 # Using MySQL 8.0
        env:
        - name: MYSQL_ROOT_PASSWORD
          valueFrom:
            secretKeyRef:
              name: wordpress-db-secret  # The secret we created
              key: MYSQL_ROOT_PASSWORD # The specific key inside the secret
        - name: MYSQL_PASSWORD
          valueFrom:
            secretKeyRef:
              name: wordpress-db-secret
              key: MYSQL_PASSWORD
        - name: MYSQL_USER
          valueFrom:
            secretKeyRef:
              name: wordpress-db-secret
              key: MYSQL_USER
        - name: MYSQL_DATABASE
          value: "wordpress" # We'll hardcode the database name
        ports:
        - containerPort: 3306
        volumeMounts:
        - name: mysql-persistent-storage
          mountPath: /var/lib/mysql # Mount the storage
      volumes:
      - name: mysql-persistent-storage
        persistentVolumeClaim:
          claimName: mysql-pv-claim # Use the PVC we created
Apply it:
kubectl apply -f mysql.yaml
It should return
service/mysql created
deployment.apps/mysql created
Deploy WordPress
Now for the main event! This is very similar to the MySQL setup. We create a Deployment and a Service.
Create a file named wordpress.yaml:
apiVersion: v1
kind: Service
metadata:
  name: wordpress # The name our Ingress will point to
spec:
  ports:
  - port: 80
    targetPort: 80
  selector:
    app: wordpress
  type: ClusterIP # We'll expose this with Ingress, so ClusterIP is perfect
---
apiVersion: apps/v1
kind: Deployment
metadata:
  name: wordpress
spec:
  replicas: 2 # Let's run 2 replicas for high availability
  selector:
    matchLabels:
      app: wordpress
  template:
    metadata:
      labels:
        app: wordpress
    spec:
      containers:
      - name: wordpress
        image: wordpress:latest
        env:
        - name: WORDPRESS_DB_HOST
          value: "mysql" # This is the name of the MySQL Service!
        - name: WORDPRESS_DB_USER
          valueFrom:
            secretKeyRef:
              name: wordpress-db-secret
              key: MYSQL_USER
        - name: WORDPRESS_DB_PASSWORD
          valueFrom:
            secretKeyRef:
              name: wordpress-db-secret
              key: MYSQL_PASSWORD
        - name: WORDPRESS_DB_NAME
          value: "wordpress" # Must match the MYSQL_DATABASE name
        ports:
        - containerPort: 80
        volumeMounts:
        - name: wordpress-persistent-storage
          mountPath: /var/www/html # Mount the storage for WP files
      volumes:
      - name: wordpress-persistent-storage
        persistentVolumeClaim:
          claimName: wordpress-pv-claim # Use the other PVC
And we apply it :
kubectl apply -f wordpress.yaml
It should return
service/wordpress created
deployment.apps/wordpress created
Expose WordPress with Ingress
This is the final step, and it’s exactly what we did for our Node.js app. We’ll create an Ingress to route external traffic to our new WordPress Service.
Create a file named wordpress-ingress.yaml:
apiVersion: networking.k8s.io/v1
kind: Ingress
metadata:
  name: wordpress-ingress
  annotations:
    nginx.ingress.kubernetes.io/rewrite-target: /
spec:
  rules:
  - host: wordpress.home # Or whatever domain you want
    http:
      paths:
      - path: /
        pathType: Prefix
        backend:
          service:
            name: wordpress # Point to the WordPress Service
            port:
              number: 80 # On port 80
Apply it:
kubectl apply -f wordpress-ingress.yaml
It should return
ingress.networking.k8s.io/wordpress-ingress created
Setup the DNS
Update your DNS: Just like before, add your new host to your /etc/hosts file (or your Pi-hole):
192.168.1.68 wordpress.home
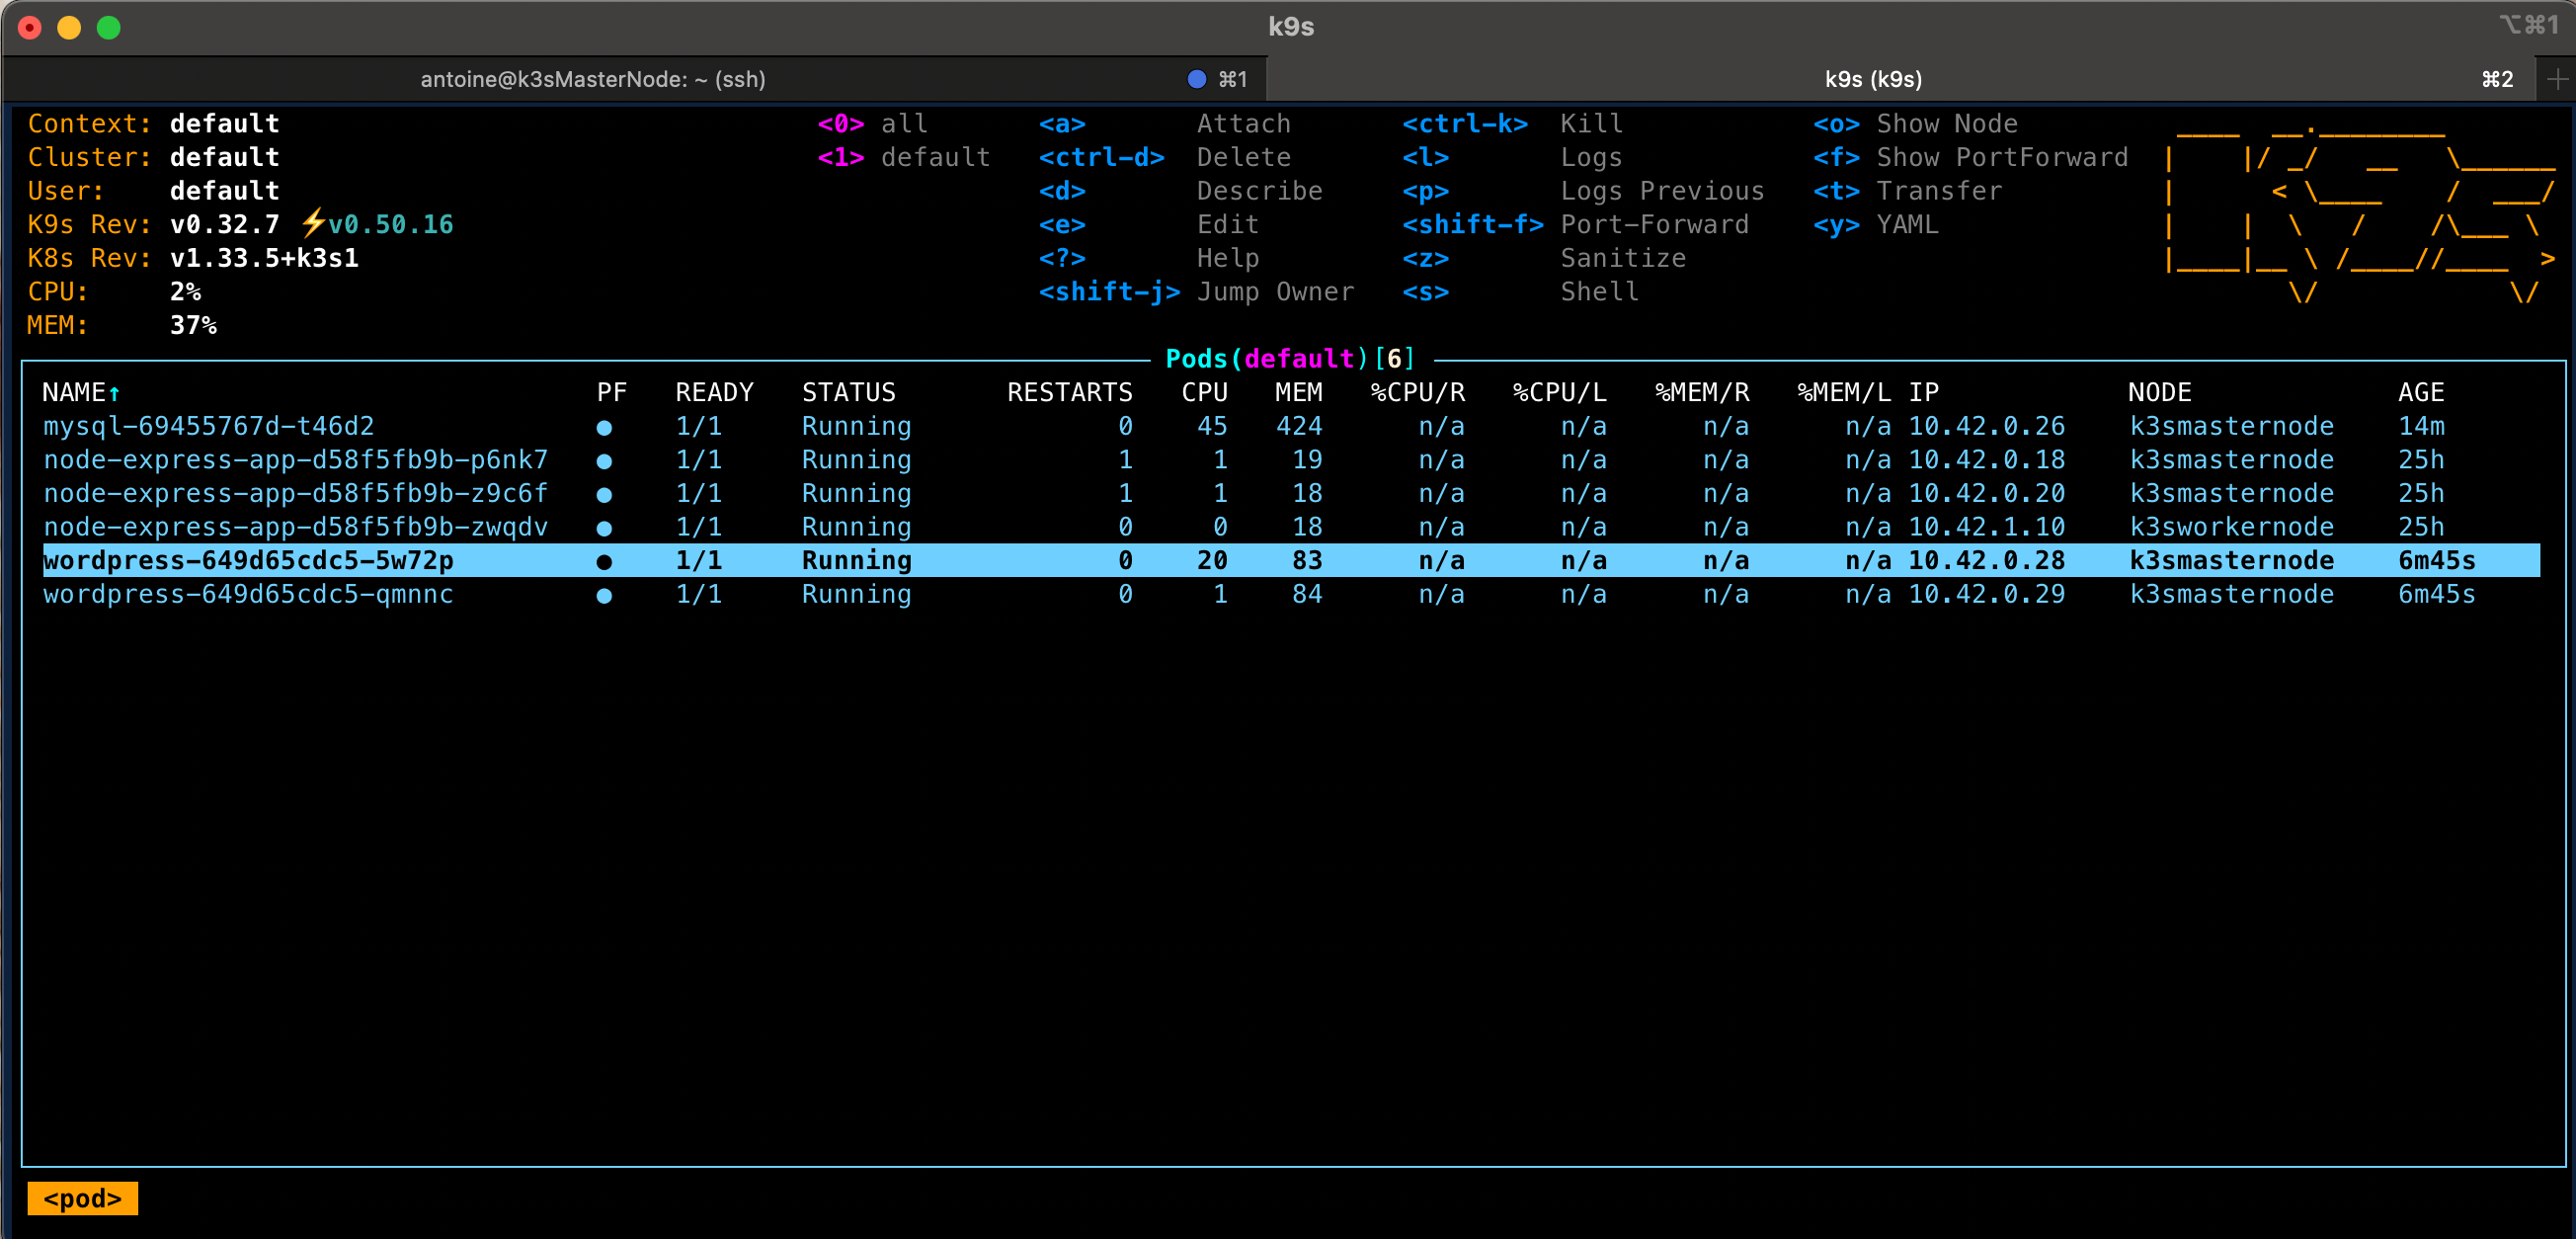
Check Your Cluster: You can see everything you’ve created:
kubectl get all,ingress,pvc
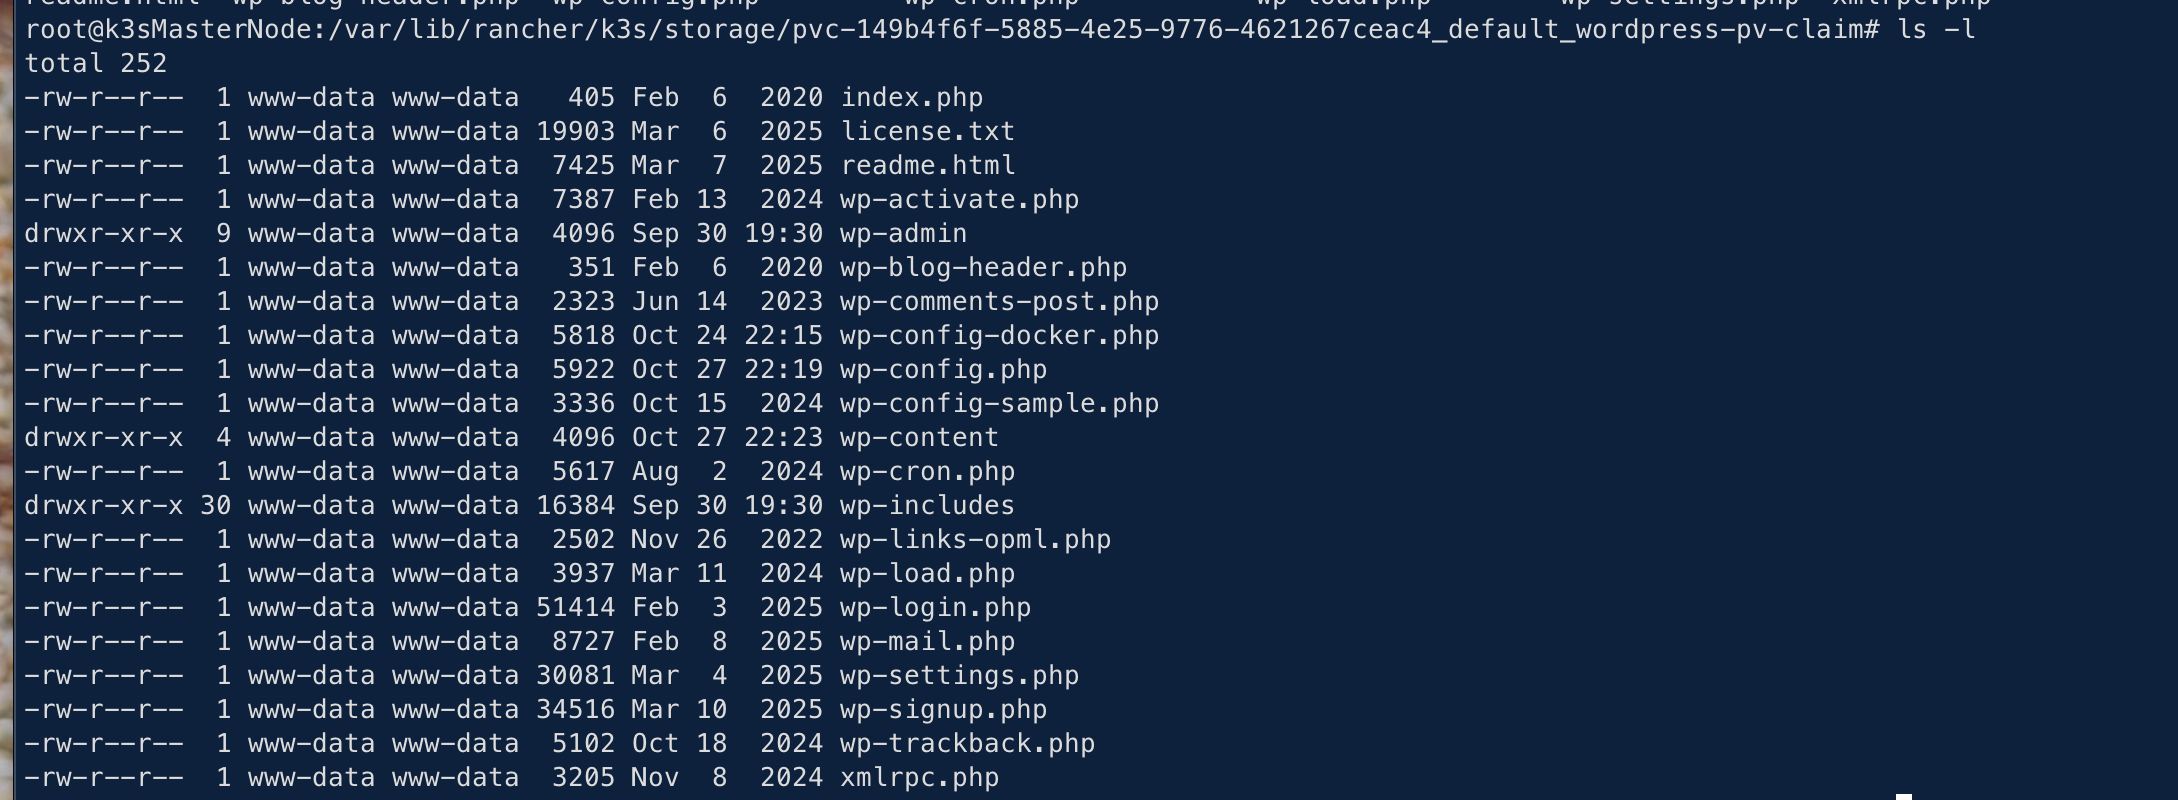
Our WordPress files will be saved in /var/lib/rancher/k3s/storage/ on one of your nodes (managed by the wordpress-pv-claim), and your database data will be in a similar location (managed by the mysql-pv-claim). They will both persist even if you delete or restart the Pods.
root@k3sMasterNode:/var/lib/rancher/k3s/storage#  ls -l
total 8
drwxr-xr-x 5 www-data www-data 4096 Oct 24 22:16 pvc-149b4f6f-5885-4e25-9776-4621267ceac4_default_wordpress-pv-claim
drwxrwxrwx 8      999 root     4096 Oct 27 22:12 pvc-8b33a04a-72d3-466a-a172-222220597d88_default_mysql-pv-claim
And I can explore my pv-claim
cd /var/lib/rancher/k3s/storage/pvc-149b4f6f-5885-4e25-9776-4621267ceac4_default_wordpress-pv-claim#
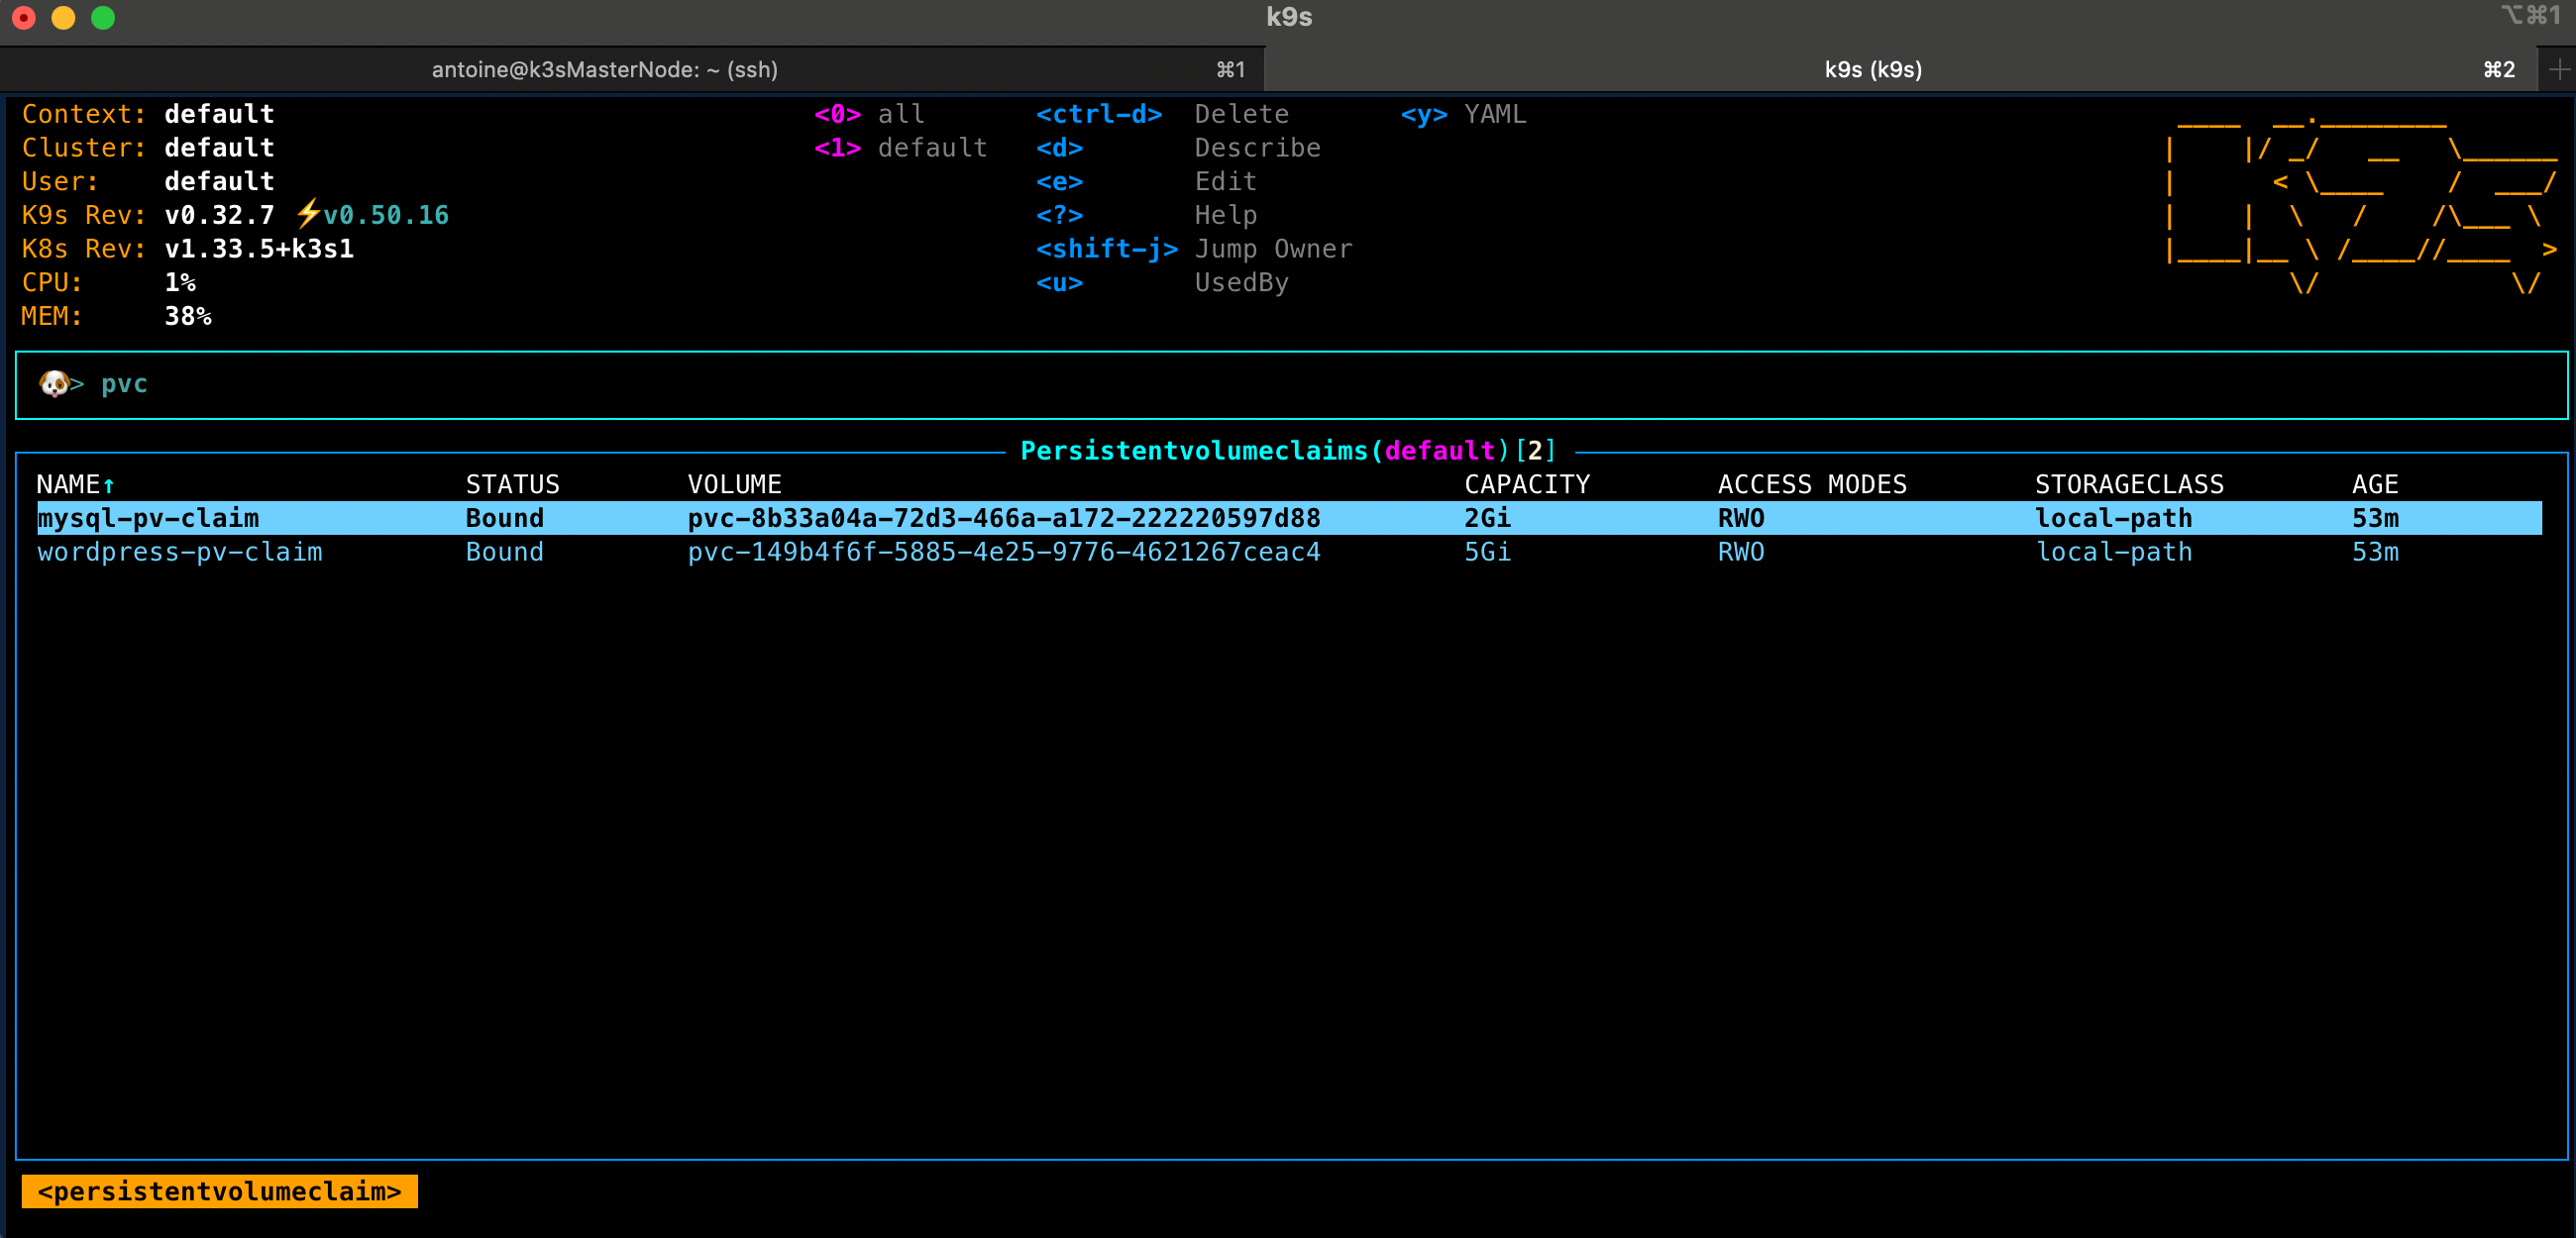
We can explore the Persistent Volume Claim with K9 by doing:
- In K9s, type
:pvc(or:persistentvolumeclaim) and press Enter. -
You will see a list of all your PVCs, like
mysql-pv-claimandwordpress-pv-claim. -
This view is great for checking their Status (it should say
Bound) and how much Capacity they have.
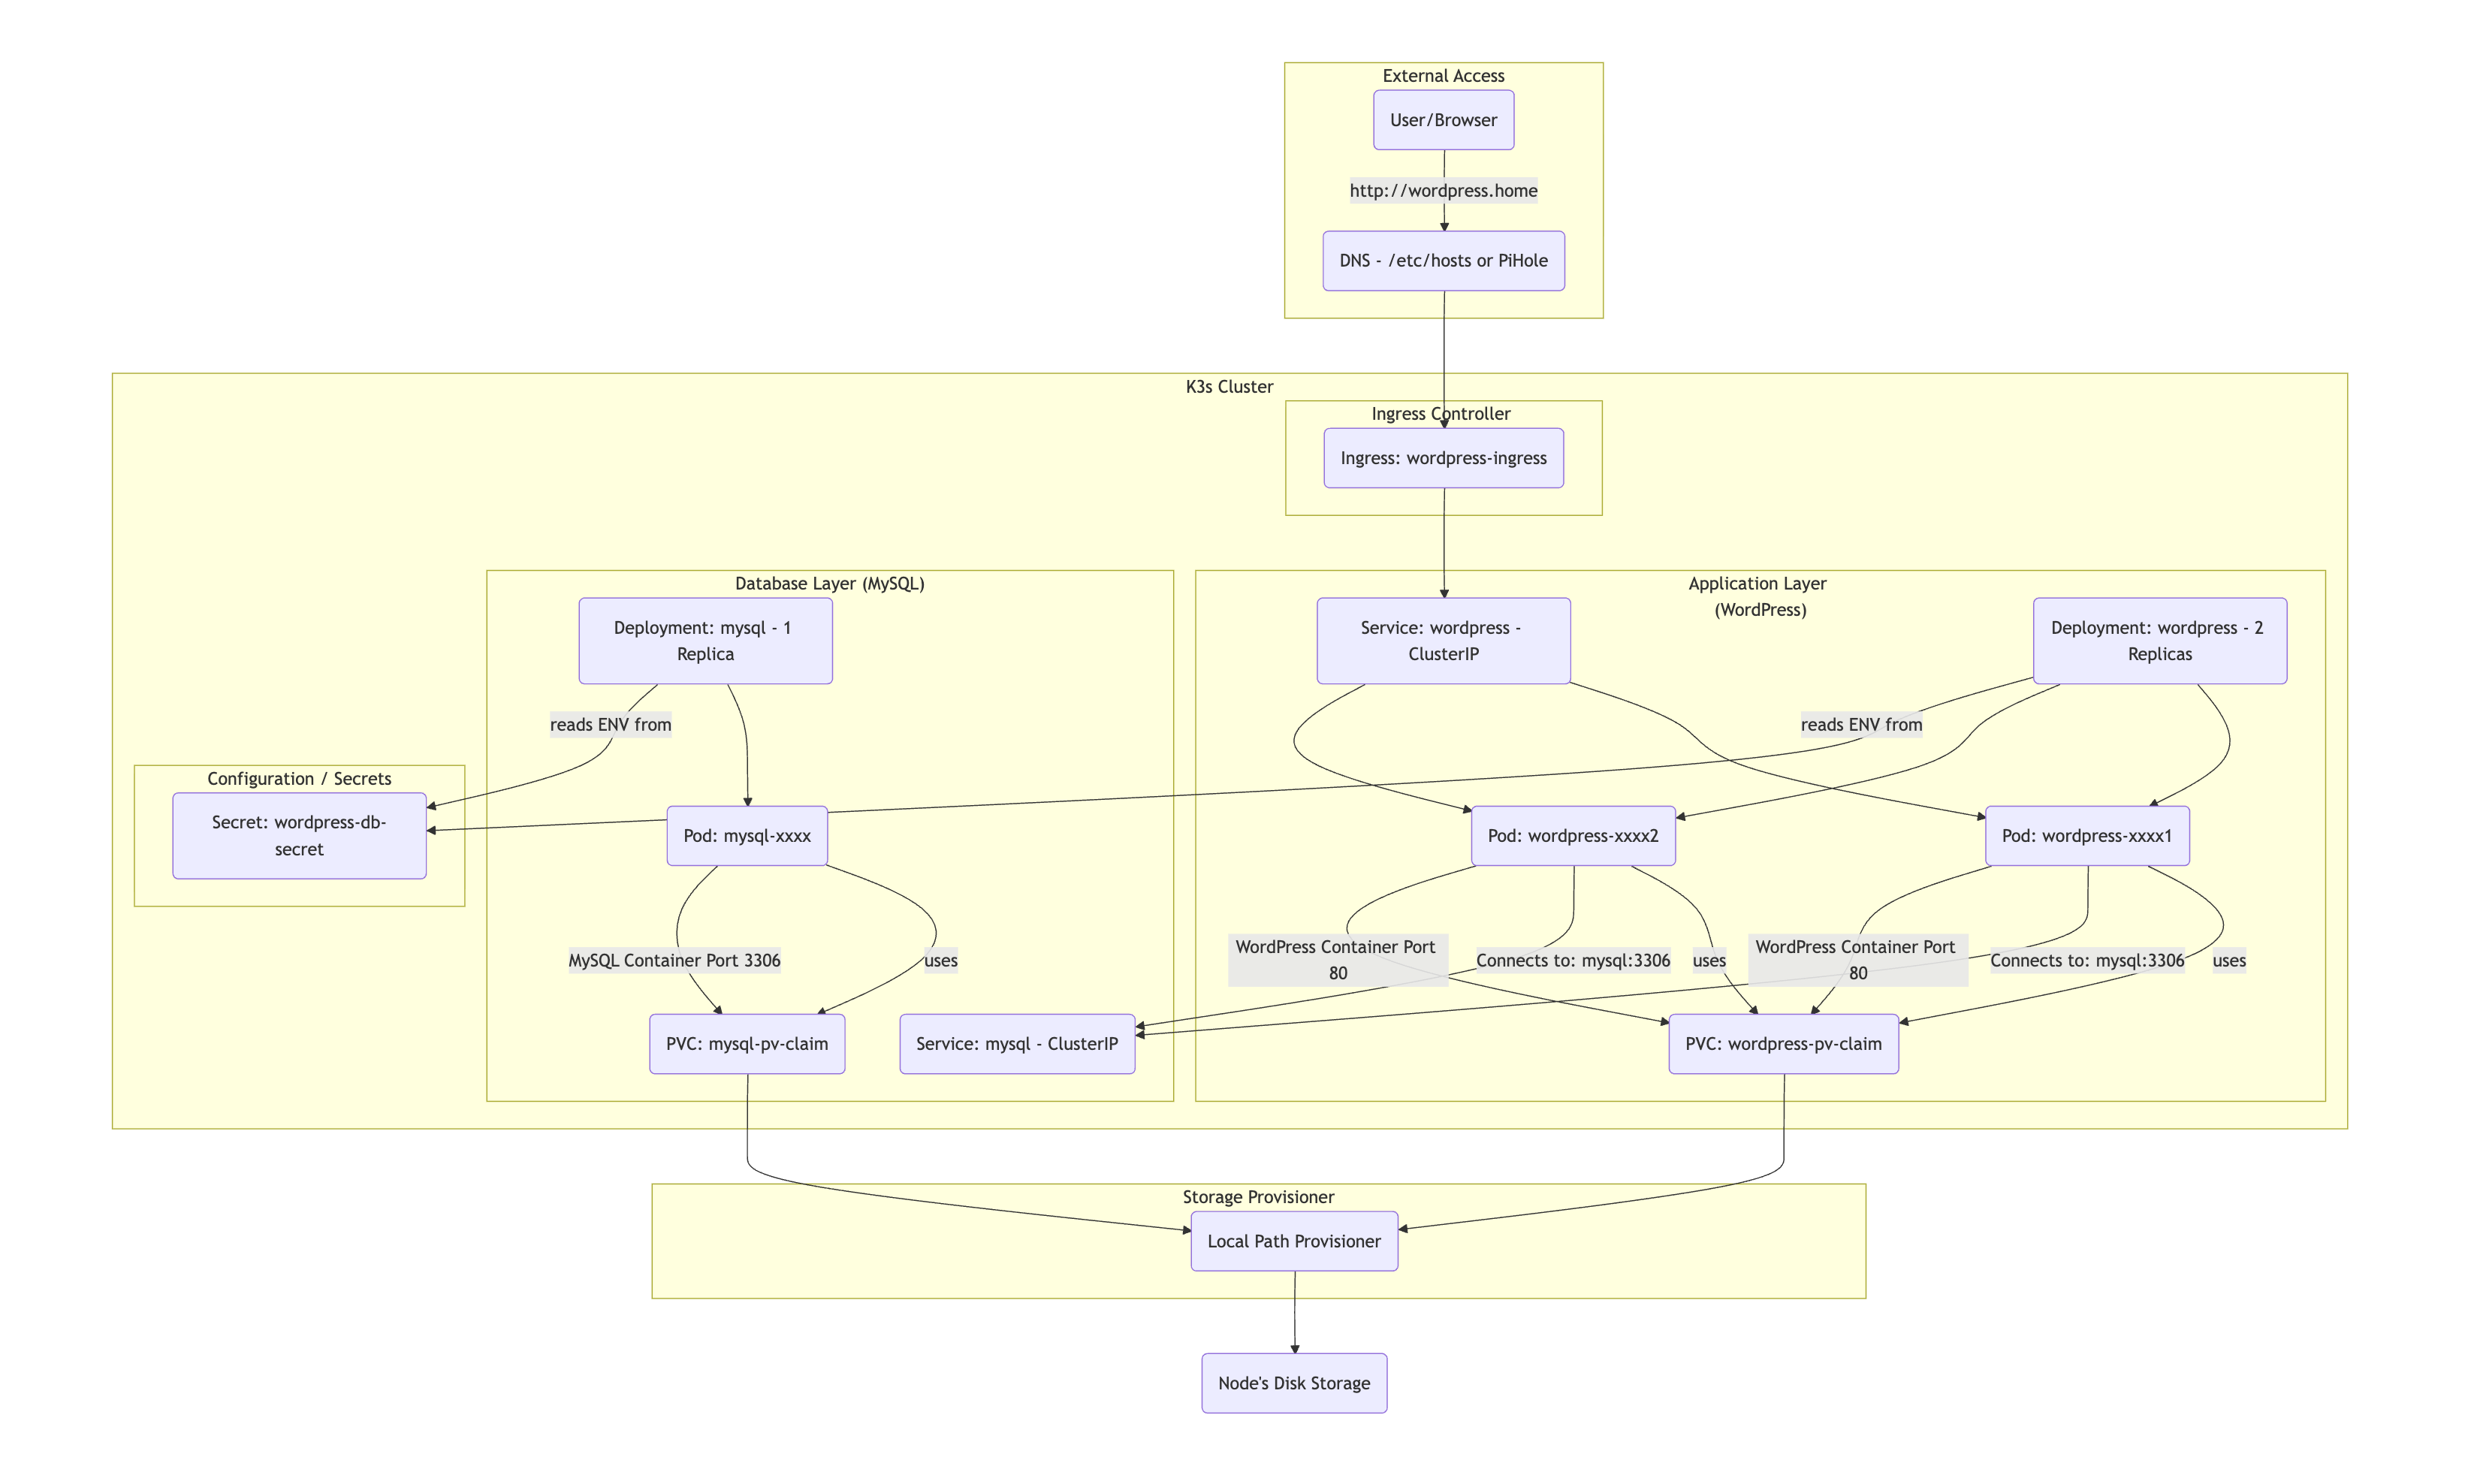
What we created
Here’s a not so simple or super clear diagram of what we created, but if you take the time to explore it, and if you understood this article, I believe it will make sense for you.
The Kubernetes-to-Docker-Compose Map
Now you have a good understanding of how Kubernetes works, and you should be able to translate what you know from Docker to Kubernetes. But I made for you a quick cheat sheet.
| Kubernetes (K3s) Object | Docker Compose + Caddy Equivalent |
|---|---|
Deployment |
A service definition in your docker-compose.yaml (e.g., services: wordpress:). |
Pod |
A running Docker container instance managed by that service. |
Service (ClusterIP) |
Docker Compose’s internal networking. (e.g., when your wordpress container can reach your mysql container just by using the name mysql). |
Ingress |
Your Caddyfile or Caddy’s configuration. It’s the reverse proxy that routes wordpress.home to the right container. |
PersistentVolumeClaim |
A named volume in your docker-compose.yaml (e.g., volumes: - wp_data:/var/www/html). |
Secret |
Your .env file that you load with env_file: .env. |
| K3s Nodes (Master/Worker) | The single VM/server you are running docker-compose on. |
You have now learned the complete set of building blocks to run almost any application you can run in Docker or Docker Compose.
Think of it this way: any project you have in a docker-compose.yaml file can be « translated » to K3s using the objects you now know.
Your New « Translation » Toolkit
When you look at any of your Docker projects, you can just map the concepts:
image: ...-This goes into your
Deployment.yaml.-
environment: ...orenv_file: .env- Passwords and API keys go into a
Secret.yaml. -
Regular settings (like
PUID,PGID, or a domain name) go into aConfigMap.yaml. (This is a new one, but it works exactly like aSecret, just for non-sensitive data).
- Passwords and API keys go into a
-
volumes: - ./config:/config-This becomes a
PersistentVolumeClaim.yaml(a PVC). -
ports: - 8080:80(for web access)- This is handled by a
Service.yaml(to create the internal connection) plus anIngress.yaml(to expose it to your network with a nice name like `http://app.home`).
- This is handled by a
- Internal Networking (how apps talk to each other)
- This is what your
Service.yamldoes. Your WordPress app could talk tomysqlbecause you made aServicenamedmysql.
- This is what your
Have fun !