Having quality and accurate data is an absolute imperative for HubSpot users. Precise data is the lifeblood of any successful CRM strategy, and it serves as the foundation for meaningful customer interactions. Inaccurate or outdated information can lead to missed opportunities, ineffective marketing campaigns, and a decrease in overall productivity. As we delve into the power of contact enrichment via third-party APIs, particularly PeopleDataLabs, it becomes evident that integrating high-quality data is not just an option; it's a strategic necessity for optimizing the capabilities of HubSpot CRM.
Concept
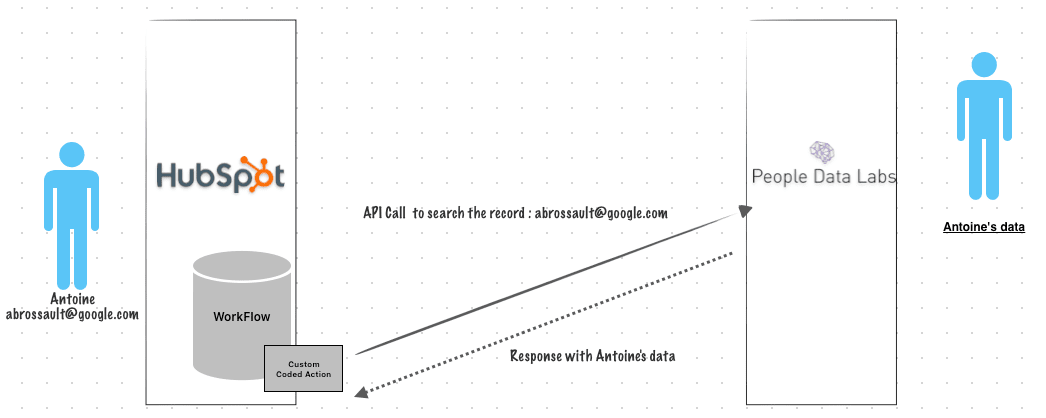
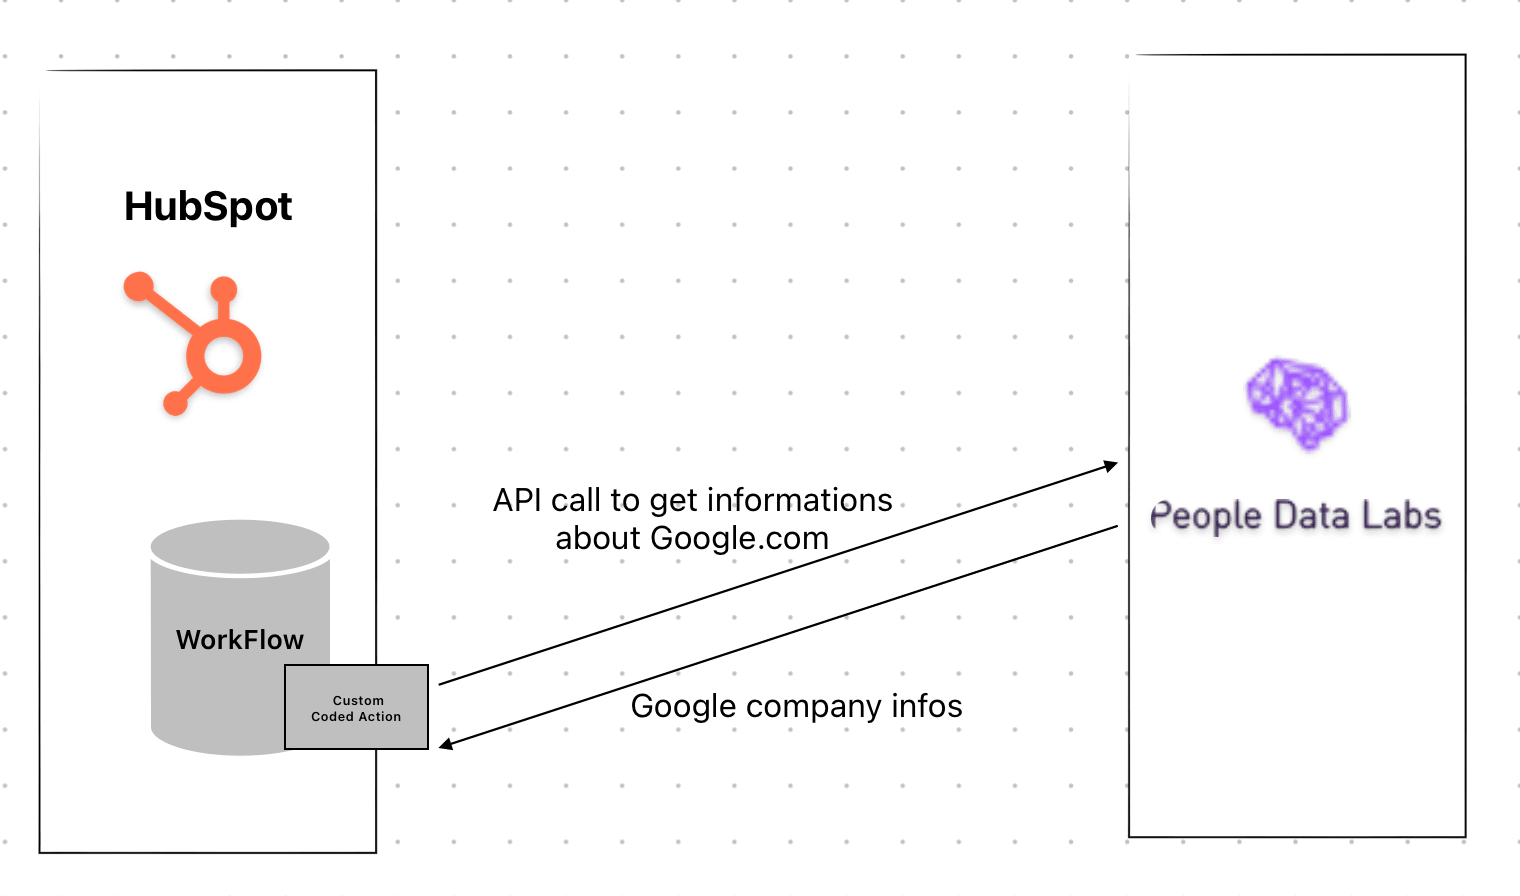
The concept is pretty simple, in a WorkFlow you send the person email address to the PeopleDataLabs’ API. If there’s a match in their record we update the contact’s information.
See how it works / and implement it
Set the custom code block
PeopleDataLabs API key
You need to get an API key on the PeopleDataLabs website’s.
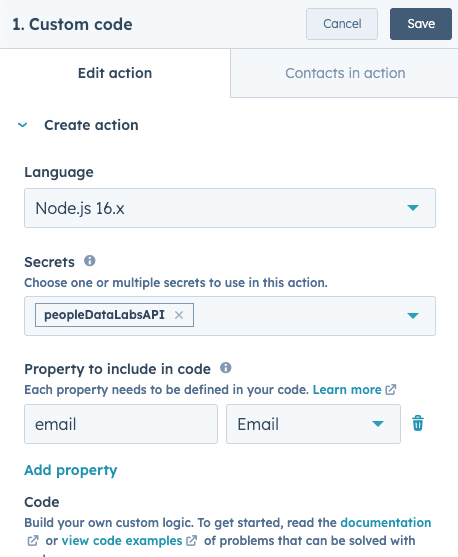
You need to set the peopleDataLabsAPI key in the secret, the API key has to be set in the secret section of the Custom Coded Action. Use the name peopleDataLabsAPI
Set the email variable
Set the variable name email in the property to include in code.
Your setup should look like this :
The code ready to implement
Here’s the JavaScript code you can copy paste to the custom code block.
const axios = require('axios');


exports.main = async (event, callback) => {

    if (!process.env.peopleDataLabsAPI) throw new Error('The peopleDataLabs API key has to be set in the secret section');

    if (process.env.peopleDataLabsAPI.trim() === '') throw new Error(`The peopleDataLabs API key can't be empty`);

    const email = event.inputFields.email;

    if (!email) throw new Error('email is not set, are you sure you put email in the "properties to include in code" ? ');

    const personInfos = await getPersonInfos(email).catch(axiosErrorHandler)

    if (!personInfos.data) throw new Error(`We couldn't grab your email infos`);

    if (personInfos.data.status === 404) throw new Error(`The API query worked but we didnd't find any match`);

    if (personInfos.data.status !== 200) throw new Error(`The API query worked but didn't return a 200 status code instead we got ${personInfos.data.status}`);

    if (personInfos.data.total < 1) throw new Error(`The API query worked but no result has been returned`);

    if (!personInfos.data.data) throw new Error(`The API query worked but there's no data`);

    if (personInfos.data.data.length === 0) throw new Error(`The API query worked but no result has been returned, the data array is empty`);


    const {
        full_name,
        first_name,
        middle_initial,
        middle_name,
        last_initial,
        last_name,
        gender,
        birth_year,
        birth_date,
        linkedin_url,
        linkedin_username,
        linkedin_id,
        facebook_url,
        facebook_username,
        facebook_id,
        twitter_url,
        twitter_username,
        github_url,
        github_username,
        work_email,
        personal_emails,
        recommended_personal_email,
        mobile_phone,
        industry,
        job_title,
        job_title_role,
        job_title_sub_role,
        job_title_levels,
        job_onet_code,
        job_onet_major_group,
        job_onet_minor_group,
        job_onet_broad_occupation,
        job_onet_specific_occupation,
        job_onet_specific_occupation_detail,
        job_company_id,
        job_company_name,
        job_company_website,
        job_company_size,
        job_company_founded,
        job_company_industry,
        job_company_linkedin_url,
        job_company_linkedin_id,
        job_company_facebook_url,
        job_company_twitter_url,
        job_company_location_name,
        job_company_location_locality,
        job_company_location_metro,
        job_company_location_region,
        job_company_location_geo,
        job_company_location_street_address,
        job_company_location_address_line_2,
        job_company_location_postal_code,
        job_company_location_country,
        job_company_location_continent,
        job_last_updated,
        job_start_date,
        location_name,
        location_locality,
        location_metro,
        location_region,
        location_country,
        location_continent,
        location_street_address,
        location_address_line_2,
        location_postal_code,
        location_geo,
        location_last_updated,
        phone_numbers,
        emails,
        interests,
        skills,
        location_names,
        regions,
        countries,
        street_addresses,
        experience,
        education,
        profiles,
        version_status
    } = personInfos.data.data[0];


    const personal_email = Array.isArray(personal_emails) ? personal_emails[0] : null

    const phone_number = Array.isArray(phone_numbers) ? phone_numbers[0] : null

    callback({
        outputFields: {
            full_name,
            first_name,
            middle_initial,
            middle_name,
            last_initial,
            last_name,
            gender,
            birth_year,
            birth_date,
            linkedin_url,
            linkedin_username,
            linkedin_id,
            facebook_url,
            facebook_username,
            facebook_id,
            twitter_url,
            twitter_username,
            github_url,
            github_username,
            work_email,
            personal_email,
            recommended_personal_email,
            mobile_phone,
            industry,
            job_title,
            job_title_role,
            job_title_sub_role,
            job_title_levels,
            job_onet_code,
            job_onet_major_group,
            job_onet_minor_group,
            job_onet_broad_occupation,
            job_onet_specific_occupation,
            job_onet_specific_occupation_detail,
            job_company_id,
            job_company_name,
            job_company_website,
            job_company_size,
            job_company_founded,
            job_company_industry,
            job_company_linkedin_url,
            job_company_linkedin_id,
            job_company_facebook_url,
            job_company_twitter_url,
            job_company_location_name,
            job_company_location_locality,
            job_company_location_metro,
            job_company_location_region,
            job_company_location_geo,
            job_company_location_street_address,
            job_company_location_address_line_2,
            job_company_location_postal_code,
            job_company_location_country,
            job_company_location_continent,
            job_last_updated,
            job_start_date,
            location_name,
            location_locality,
            location_metro,
            location_region,
            location_country,
            location_continent,
            location_street_address,
            location_address_line_2,
            location_postal_code,
            location_geo,
            location_last_updated,
            phone_number
        }
    });

}


/**
 * Checks if a given email address is valid.
 *
 * @param {string} email - The email address to be validated.
 * @returns {boolean} True if the email is valid, false otherwise.
 *
 * @example
 * const isEmailValid = isValidEmail("[email protected]");
 * // Returns true
 */
const isValidEmail = (email) => /^[^\s@]+@[^\s@]+\.[^\s@]+$/.test(email);


/**
 * Gets the personal information of a person from People Data Labs, given their email address.
 *
 * @param email The email address of the person to get information for.
 * @throws {Error} If the email parameter is not a valid string or is empty.
 * @returns {Promise<axios.Response>} A promise that resolves to an axios response object containing the person's information.
 */
const getPersonInfos = async (email) => {

    if (typeof email !== 'string' || email.trim() === '') throw new Error('Invalid email parameter. It must be a non-empty string.');

    if (!isValidEmail(email)) throw new Error('Not a valid email passed as a parameter of the getPersonInfos() function ');

    const endpoint = 'https://api.peopledatalabs.com/v5/person/search';

    const params = {
        "dataset": "email",
        "size": 1,
        "sql": `SELECT * FROM person WHERE (emails.address = '${email}' )`,
        pretty: true,
    };

    const config = {
        headers: {
            'X-Api-Key': process.env.peopleDataLabsAPI,
        },
        params,
    };

    return axios.get(endpoint, config)

}


/**
 * Handles errors thrown by axios requests and logs relevant information.
 *
 * @param {Error} error - The error object thrown by axios.
 */
const axiosErrorHandler = error => {
    if (error.response) {
        // The request was made and the server responded with a status code
        // that falls out of the range of 2xx
        console.log(error.response.data);
        console.log(error.response.status);
        console.log(error.response.headers);
    } else if (error.request) {
        // The request was made but no response was received
        // `error.request` is an instance of XMLHttpRequest in the browser
        // and an instance of http.ClientRequest in node.js
        console.log(error.request);
    } else {
        // Something happened in setting up the request that triggered an Error
        console.log('Error', error.message);
    }
}
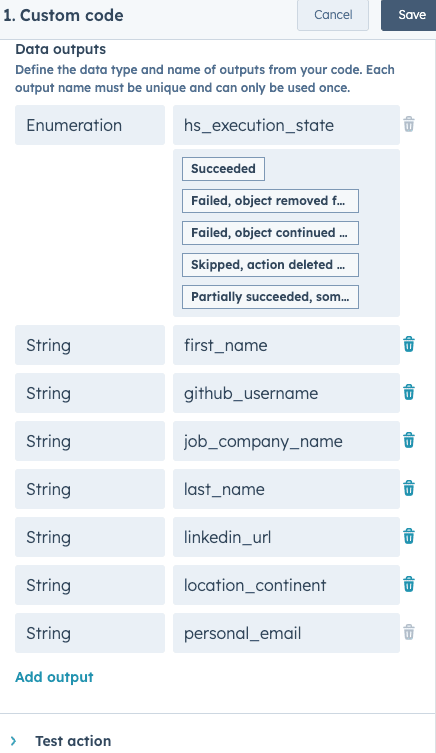
Output
The output should look like this :
Create a data flow, where the data comes and goes
I definitely recomend to create a data flow sketch or schema which is vital for maintaining a clear perspective on how data enters and exits your systems. It serves as a visual roadmap, offering a comprehensive understanding of the data’s journey. This clarity enables efficient error detection, ensures security and compliance,streamlines processes,and facilitates smooth change management when systems or processes evolve.
From HubSpot to your app
To achieve a connection bewtten HubSpot and your app we will the Workflows which serve as the automation powerhouse within the CRM. They allow you to set up a sequence of actions triggered by specific events or conditions. In essence, this proactive solution enables you to orchestrate actions based on predefined triggers, creating a seamless and efficient system of automated responses.
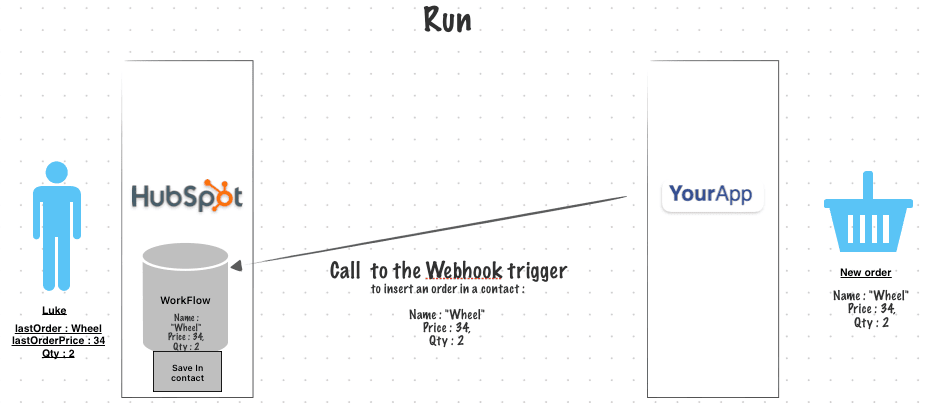
Create data in your app from HubSpot
Hover the video to play the animation
In the depicted schema, when a contact is added to HubSpot, it initiates a Workflow. Within this Workflow, a webhook block or a custom code block is executed. These blocks facilitate an API call to our application’s API, allowing for the seamless insertion of the contact’s information into our own system. This automated process ensures that data synchronization between HubSpot and our application is efficient and accurate.
Demo
1 – Create a WorkFlow
The WorkFlow you have to create should be based on the object you want to create in your app. E.g : if you want to send an HubSpot contact in your app create a WorkFlow based on contact.
2 – Create a filter
You may need to perform this action only for some of your contacts which match specific criteria. If it’s the case, then set the filters accordingly.
3 – Choose between a Custom Code block and a webhook
Webhook :
You can choose a webhook block to achieve this connection :
- If you have to execute a
POSTrequest ( a webhook can runPOSTorGETrequests only ) - If you don’t have to match a specific payload, then you can use a webhook. The payload HubSpot will send to your endpoint will look like this ( for contact). With a webhook, you will have to parse the request on the app.

Custom Code :
If you have to match a specific payload (aligned with the data your API expect) then a custom code is a better solution.
In this example, my API requires a POST
For this endpoint :
POST https://partner-app.antoinebrossault.com/api/user
With this JSON Body :
{
    "name": "John",
    "lastname": "Doe",
    "email": "[email protected]",
    "tokensAvailable": 100,
    "carManufacturer": "Toyota",
    "carModel": "Camry"
}
And with an autorization header set
authorization: `Bearer <myAuthorizationToken>`
My code looks like this :
const axios = require('axios');

const axiosConfig = {
    headers: {
        authorization: `Bearer ${process.env.myAPIsecret}`
    }
};


exports.main = async (event, callback) => {

    const tokensAvailable = parseInt(event.inputFields['tokensAvailable']);

    const carManufacturer = event.inputFields['carManufacturer'];

    const carModel = event.inputFields['carModel'];

    const name = event.inputFields['name'];

    const lastname = event.inputFields['lastname'];

    const email = event.inputFields['email'];

    const dataToSend = {
        name,
        lastname,
        email,
        tokensAvailable,
        carManufacturer,
        carModel
    };


    let userToCreate = null;

    try {

        userToCreate = await axios.post(`https://partner-app.antoinebrossault.com/api/user`, dataToSend, axiosConfig).catch();

        if (!userToCreate.data) throw new Error(`We failed to create the user for ${event.inputFields['email']}... 😬`);

    } catch (error) {

        console.log(`error ${error}`)
    }


    callback({
        outputFields: {
            changes: userToCreate.data.changes,
            lastID: userToCreate.data.lastID
        }
    });

}
Read data in your app from HubSpot
Hover the video to play the animation
To read data in your app from HubSpot, you can create a WorkFlow, and in that WorkFlow run an API call to get the data. That API call can be done with a webhook block or a Custom Code block.
Demo
1 – Create a WorkFlow
The WorkFlow you have to create should be based on the object you want to enrich.
2 – Create a filter
You may need to perform this action only for some of your contacts which match specific criterias. If it’s the case, then set the filters accordingly.
3 – Choose between a Custom Code block and a webhook
Webhook :
If your API endpoint requires a GET or a POST and contains query parameters, then you can use a webhook.
https://partner-app.antoinebrossault.com/api/user/[email protected]
✅ This endpoint can be used in a webhook as the email parameter is a query parameter [email protected]
https://partner-app.antoinebrossault.com/api/user/[email protected]
❌ At the opposite, this endpoint can’t be used in a webhook block, because the parameter email [email protected] is not passed as a query parameter
If your endpoint is not compatible with a webhook, don’t worry, just use a Custom Code block.
Custom code :
The pro of a Custom Code is it’s flexibility, there’s no API a Custom Code can’t call.
Here’s a Custom Code which calls the same endpoint used above.
// Import the Axios library for making HTTP requests
const axios = require('axios');

exports.main = async (event, callback) => {

  // Extract the 'email' field from the 'event' parameter
  const email = event.inputFields.email;

  // Use Axios to make an asynchronous HTTP GET request to retrieve contact information
  const contactInfos = await axios.get(`https://partner-app.antoinebrossault.com/api/user/${email}`);

  // Check if the 'contactInfos' response data is empty, and if so, throw an error
  if (!contactInfos.data) throw new Error(`We failed to get infos for ${email}... 😬`);

  // Log the retrieved 'contactInfos' data to the console
  console.log(contactInfos.data)

  // Call the 'callback' function to return the result of the API call to the  WorkFlow
  callback({
    outputFields: {
      // Map specific properties from 'contactInfos' data to output fields
      "tokensAvailable": contactInfos.data.tokensAvailable,
      "carManufacturer": contactInfos.data.carManufacturer,
      "carModel": contactInfos.data.carModel,
      "avatar": contactInfos.data.avatar
    }
  });
}
This code doesn’t use an endpoint with query parameters, as we call this endpoint :
const contactInfos = await axios.get(`https://partner-app.antoinebrossault.com/api/user/${email}`);
The endpoint in my code contains the variable email, ${email} then when the call is executed the URL is :
https://partner-app.antoinebrossault.com/api/user/[email protected]
Assuming [email protected] is the email address of the contact enrolled the Workflow.
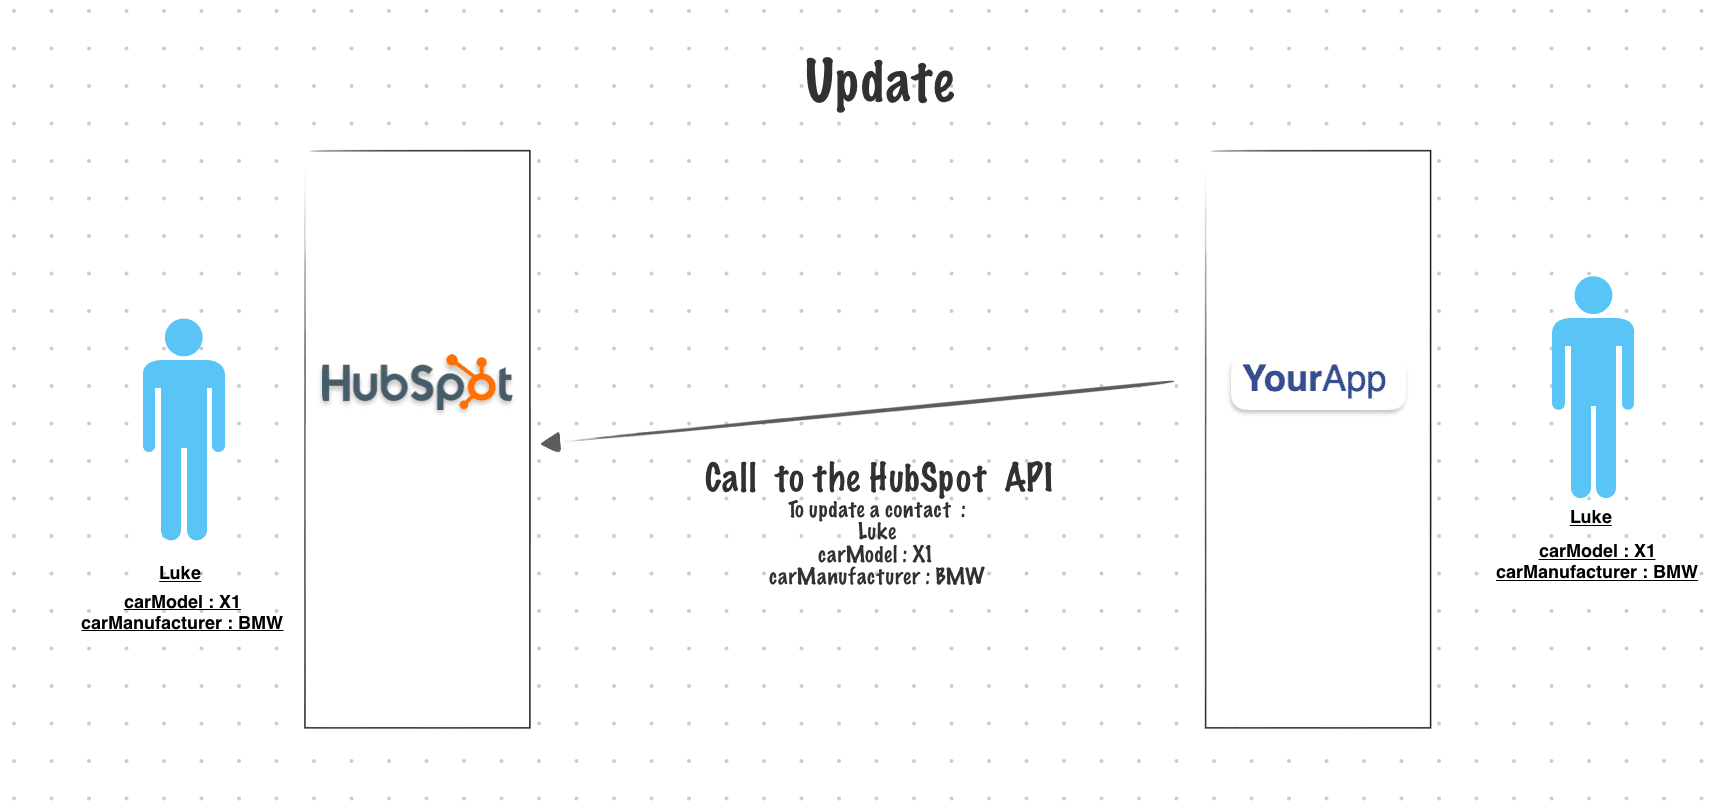
Update data in your app from HubSpot
Hover the video to play the animation
If you want to update data in your app in reaction to an event in HubSpot, there’s high chances you will need to perform a PATCH request. To do so, your only option is to use a Custom Code block inside a Workflow.
In my own Application I need to perform a PATCH request like so :
PATCH https://partner-app.antoinebrossault.com/api/user
With this JSON Body :
{
    "name": "John",
    "lastname": "Doe",
    "email": "[email protected]",
    "tokensAvailable": 100,
    "carManufacturer": "Toyota",
    "carModel": "Camry"
}
And with an autorization header set
authorization: `Bearer <myAuthorizationToken>`
Demo
1 – Create a WorkFlow
The WorkFlow you have to create should be based on the object you want to update, and the re-enrollement should be activated in the WorkFlow.
2 – Create a filter
You may need to perform this action only for some of your contacts which match specific criteria. If it’s the case, then set the filters accordingly.
3 – Add a custom code block
// Import the Axios library for making HTTP requests
const axios = require('axios');

// Configure the Axios request headers with an authorization token
const axiosConfig = {
    headers: {
        authorization: `Bearer ${process.env.myAPIsecret}`
    }
};

// Export an asynchronous function named 'main' that takes 'event' and 'callback' parameters
exports.main = async (event, callback) => {

    // Extract and parse specific input fields from the 'event' parameter
    const tokensAvailable = parseInt(event.inputFields['tokensAvailable']);
    const carManufacturer = event.inputFields['carManufacturer'];
    const carModel = event.inputFields['carModel'];
    const name = event.inputFields['name'];
    const lastname = event.inputFields['lastname'];
    const email = event.inputFields['email'];

    // Create an object 'dataToSend' with the extracted input fields and add a 'fromHs' property
    const dataToSend = {
        name,
        lastname,
        email,
        tokensAvailable,
        carManufacturer,
        carModel,
        fromHs: true
    };

    // Log a message indicating the intention to update user data and the content of 'dataToSend'
    console.log(`Let's update ${email} with ${JSON.stringify(dataToSend)}`);

    // Perform an HTTP PATCH request to update the user data
    const res = await axios.patch('https://partner-app.antoinebrossault.com/api/user', dataToSend, axiosConfig).catch(axiosErrorHandler);

    // Check if the 'res' response data is empty, and if so, throw an error
    if (!res.data) throw new Error(`We failed to update infos for ${event.inputFields['email']}... 😬`);

    // Call the 'callback' function with an object containing output fields
    callback({
        outputFields: {
            changes: res.data.changes
        }
    });
}

/**
 * Handles errors thrown by axios requests and logs relevant information.
 *
 * @param {Error} error - The error object thrown by axios.
 */
const axiosErrorHandler = error => {
    if (error.response) {
        // The request was made and the server responded with a status code
        // that falls out of the range of 2xx. Log response data, status, and headers.
        console.log(error.response.data);
        console.log(error.response.status);
        console.log(error.response.headers);
    } else if (error.request) {
        // The request was made but no response was received. Log the request object.
        console.log(error.request);
    } else {
        // Something happened in setting up the request that triggered an Error. Log the error message.
        console.log('Error', error.message);
    }
}
From your app to HubSpot
The first step in this process is defining the event that triggers the data transfer to HubSpot. In your case, you want to initiate this process when a contact is created in your application. This event could also be a user registration, a purchase, or any other activity that’s meaningful to your business.
Once the event is detected in your application, you need to collect the relevant data about the contact. This typically includes their name, email address, company information, and any other data that is important to you.
After collecting the necessary data, it’s time to send it to HubSpot. This is done by making an API call to HubSpot’s API. You’ll need to use the HubSpot API endpoint for creating or updating contacts. This typically involves sending a POST or a PATCH request to a specific URL with the contact data in a structured format (JSON).
Create data in HubSpot from your APP

In order to synchronize your App with HubSpot when data is created you need to call the HubSpot API and send the data to HubSpot.
Demo
Update data HubSpot from your APP
To run an update it’s the exact same concept, but instead of calling the API endpoint do create, we use the endpoint do update.
Demo
Use the new HubSpot WorkFlow triggers
There’s a new feature in HubSpot Workflows: « Trigger workflows from webhooks (Operations Hub Professional and Enterprise only). »
With this feature, you can initiate a workflow by making a call to a URL (webhook).
To activate the workflow, you need to execute a POST request to that URL and can include data in the body in JSON format.
This data can then be utilized within the workflow to perform various tasks, such as creating a record, updating an existing record, and more.
Code example used in the demo :
const axios = require('axios');


(async () => {


    const endpoint = "https://api-na1.hubapi.com/automation/v4/webhook-triggers/21169044/TXcgqlT"

    await axios.post(endpoint,{
        hello: true,
        orderNum : 32322,
        clientEmail : "[email protected]",
        items: [
            {
                name: 'Wheel',
                price : 34,
                qty : 2
            },
            {
                name: 'Engine',
                price : 8000,
                qty : 1
            }
        ]
    })


})();
Demo
In the upcoming video, we’ll start by explaining the fundamental concept behind the Visitor Identification API. Then, we’ll walk you through the code that brings this concept to life. Whether you’re an experienced developer or just getting started, this video will provide valuable insights into leveraging the full potential of HubSpot’s Visitor Identification API
The visitor identification API doc
Schema
Prerequisites
Before you get started, ensure that you meet the following prerequisites:
- You must have an existing web application with an authentication system.
- Set up a private app in HubSpot.
- Your HubSpot account should have a qualifying Professional or Enterprise subscription.
Integration Steps
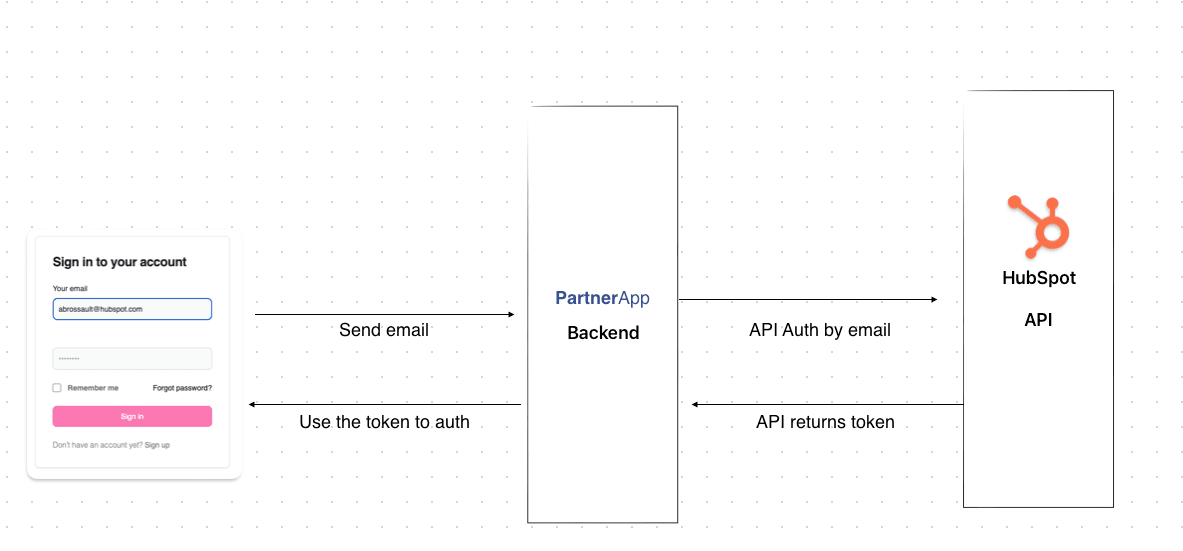
1. User Authentication
Begin by allowing users to log in with your current login form on your website. Ensure that your authentication system is in place.
As an example, the auth form could look like this :
This HTML form with the id « login » contains an email input field where users can enter their email address. When they click the « Send » button, the form will be submitted.
<form id="login">
    <input type="email" id="email" >
    <input type="password" id="password" >
    <button type="submit"> Login </button>
</form>
2. Generate an Identification Token
To generate an identification token, you will need to use the Visitor Identification API. This should be done on the backend of your web application. You can pass in the email address of the authenticated visitor.
Here’s the router which handldes the POST request to login the user :
fastify.post("/login", async function(request, reply) {

  const user = {
    email: request.body.email,
  };

  const authResult = await hubSpotAPI.authVisitor(user.email);

  console.log(authResult);

  reply.send({token:authResult});

});
As you can see I call a function I created :
const authResult = await hubSpotAPI.authVisitor(user.email);
The function looks like this :
In this function I call ( POST ) the HubSpot API on the following endpoint
curl --request POST \
  --url https://api.hubapi.com/conversations/v3/visitor-identification/tokens/create \
  --header 'authorization: Bearer YOUR_ACCESS_TOKEN' \
  --header 'content-type: application/json' \
  --data '{
  "email": "[email protected]",
  "firstName": "Gob",
  "lastName": "Bluth"
}'
NB : you need to use your private app token to make this call.
exports.authVisitor = async (email) => {

    if (!email) throw new Error('you need to set an email ');

    const url = 'https://api.hubspot.com/conversations/v3/visitor-identification/tokens/create';

    const postData = {
        email
    };

    const response = await axios.post(url, postData, axiosConfig).catch(axiosErrorHandler)

    if(!response) throw new Error(`API didn't respond...`)

    if(!response.data) throw new Error(`API didn't respond with data ...`)

    if(!response.data.token) throw new Error(`API didn't respond with a token ...`)

    return response.data.token;

}
Once I get the token I return the token to my controller, to pass it to the front-end.
3. Set Properties in hsConversationsSettings
Using the token generated in Step 2, you should set specific properties on the hsConversationsSettings object on the window. These properties include the identificationEmail and identificationToken. Here’s an example:
window.hsConversationsSettings = {
   identificationEmail: "[email protected]",
   identificationToken: "<TOKEN FROM STEP 2>"
};
My JavaScript code executed for the login and the auth with HubSpot looks like this
document.querySelector('#login')?.addEventListener("submit", async (event) => {

    event.preventDefault();

    const emailInput = document.querySelector('#email');

      try {

            const response = await fetch("/login",  {
                method: 'POST',
                headers: {
                'Content-Type': 'application/json',
                },
                body: JSON.stringify({
                    email : emailInput.value
                })
            });


            if (!response.ok) throw new Error(`Request failed with status: ${response.status}`);

            const data = await response.json();

            if(!data.token) throw new Error(`No token received by the backend`);

            window.hsConversationsSettings = {
                identificationEmail: emailInput.value,
                identificationToken: data.token
            };

            window.HubSpotConversations.widget.load();


            window.location.replace("/mytickets/");


    } catch (error) {

            console.error('An error occurred:', error);

    }
}
The important part is :
In this part, I use the token to set the right cookie in the user browser. Thanks to this cookie the user will not have to put his email address in the forms / chat
window.hsConversationsSettings = {
    identificationEmail: emailInput.value,
    identificationToken: data.token
};

window.HubSpotConversations.widget.load();
Quick explanation
In this video, I dive into a game-changing solution for efficient user assignment management in HubSpot. Discover how my custom coded action automates user assignments, ensuring tasks are handled seamlessly, even during peak vacation periods. Say goodbye to the complexity of traditional if/then branches and hello to a more efficient CRM workflow.
Comprehensive explanation of the logic
Join me in this comprehensive video as I deep dive into the intricacies of user assignment management within HubSpot CRM. I explore the challenges CRM managers face with traditional if/then branches and unveil my custom coded action. Learn how this solution not only automates assignments but also enhances scalability, reduces errors, and ensures consistent, fair practices. Say goodbye to manual complexities and hello to a more efficient and effective CRM workflow. Watch to discover the future of user assignment management.
The Challenge of Traditional Workflow Branches
Managing user assignments in HubSpot CRM using traditional if/then branches in a workflow can become a complex and time-consuming endeavor. Here’s why:
- Complexity: With a growing number of users, the complexity of creating and managing these conditional branches increases exponentially. It can become a tangled web of conditions and exceptions, making it challenging to maintain and troubleshoot.
-
Resource-Intensive: These traditional workflows require substantial resources in terms of time and human effort. CRM managers need to constantly update and monitor the conditions to ensure that they align with the ever-changing user availability.
-
Scalability Issues: As your business grows and more users are added to the CRM system, the traditional if/then branches approach becomes less scalable. It’s not an efficient way to handle assignments in a dynamic environment.
-
Risk of Overlooking Assignments: In busy periods or during employee vacations, there’s a higher risk of overlooking assignments or assigning tasks to users who are out of the office. This can lead to delays and customer dissatisfaction.
The Advantages of this Custom Coded Action
Now, let’s discuss why Operations Hub pro solution is a game-changer in managing user assignments:
- Automation: The custom solution automates the assignment process, reducing the need for manual intervention. It checks user availability and makes assignments accordingly, even during peak vacation periods.
-
Efficiency: The solution is highly efficient, ensuring that every task is assigned promptly and to an available user. It eliminates the time-consuming process of manually verifying each user’s status.
-
Scalability: This custom solution is highly scalable. It doesn’t matter if you have a dozen users or hundreds; it can handle the assignment process effectively.
-
Error Reduction: With automated checks and backups in place, the risk of overlooking assignments or assigning tasks to unavailable users is drastically reduced. This leads to improved task management and enhanced customer satisfaction.
-
Flexibility: The system is adaptable. It can handle different scenarios, such as identifying a backup user when the primary user is out of the office or selecting an available team member if needed.
-
Time and Resource Savings: By automating the assignment process, CRM managers save a significant amount of time and effort that can be redirected toward more strategic tasks.
-
Consistency: The solution ensures consistent and fair assignment practices. There’s no room for bias or oversight in the process.
In conclusion, this custom code solution offers a superior approach to managing user assignments in HubSpot CRM, particularly when dealing with many users. Its automation, efficiency, scalability, and error reduction capabilities make it a valuable tool in streamlining your CRM workflow. By eliminating the complexities and resource demands associated with traditional if/then branches, it provides a reliable and consistent method for managing user assignments and ultimately improving customer relationship management.
How to implement ?
You will need :
- A private App Token with read and write access to the object you need to manage. The private app also needs to read the teams
- An access key to the Google spreadsheet API
- Operations Hub Pro
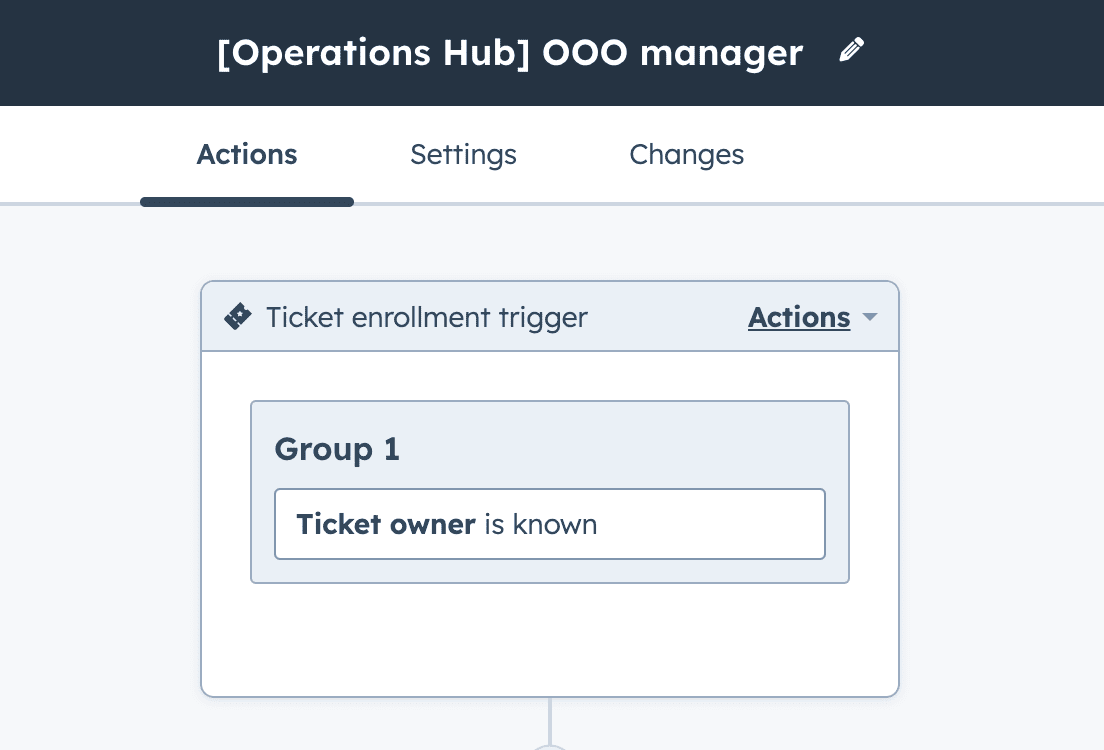
Create a Workflow based on the object you want to re-assign
In this example, I’m going to use a ticket based WorkFlow. Create a WorkFlow based on ticket with the filter : ticket owner is known.
It should look like this :
Copy the following spreadsheet
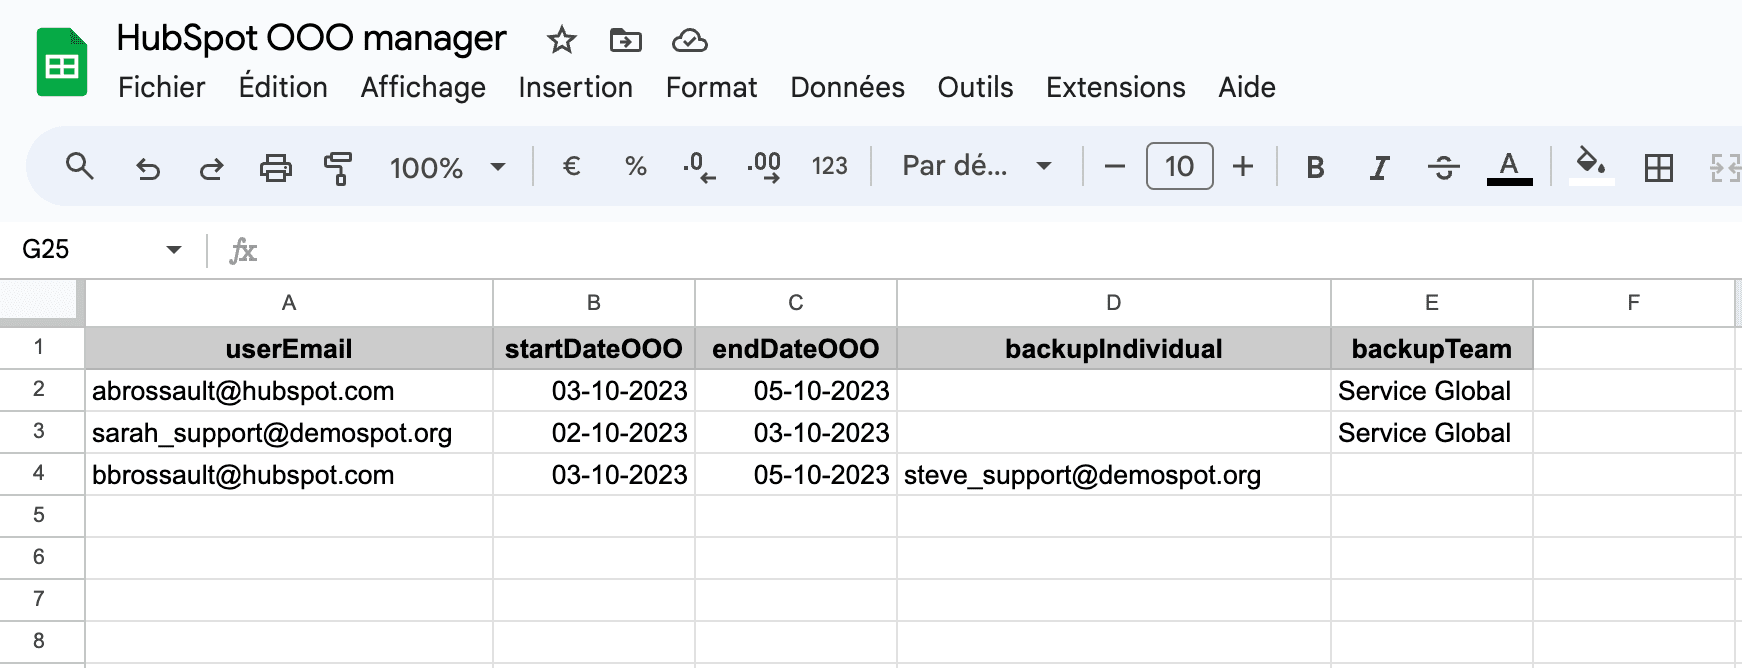
( Click on the picture to open the spreadsheet )
Create API access for the Google Sheet API
To be able to connect the spreadsheet with HubSpot you need Google Sheet API tokens. Here’s how to get a key :
Go on the Google spreadsheet API page
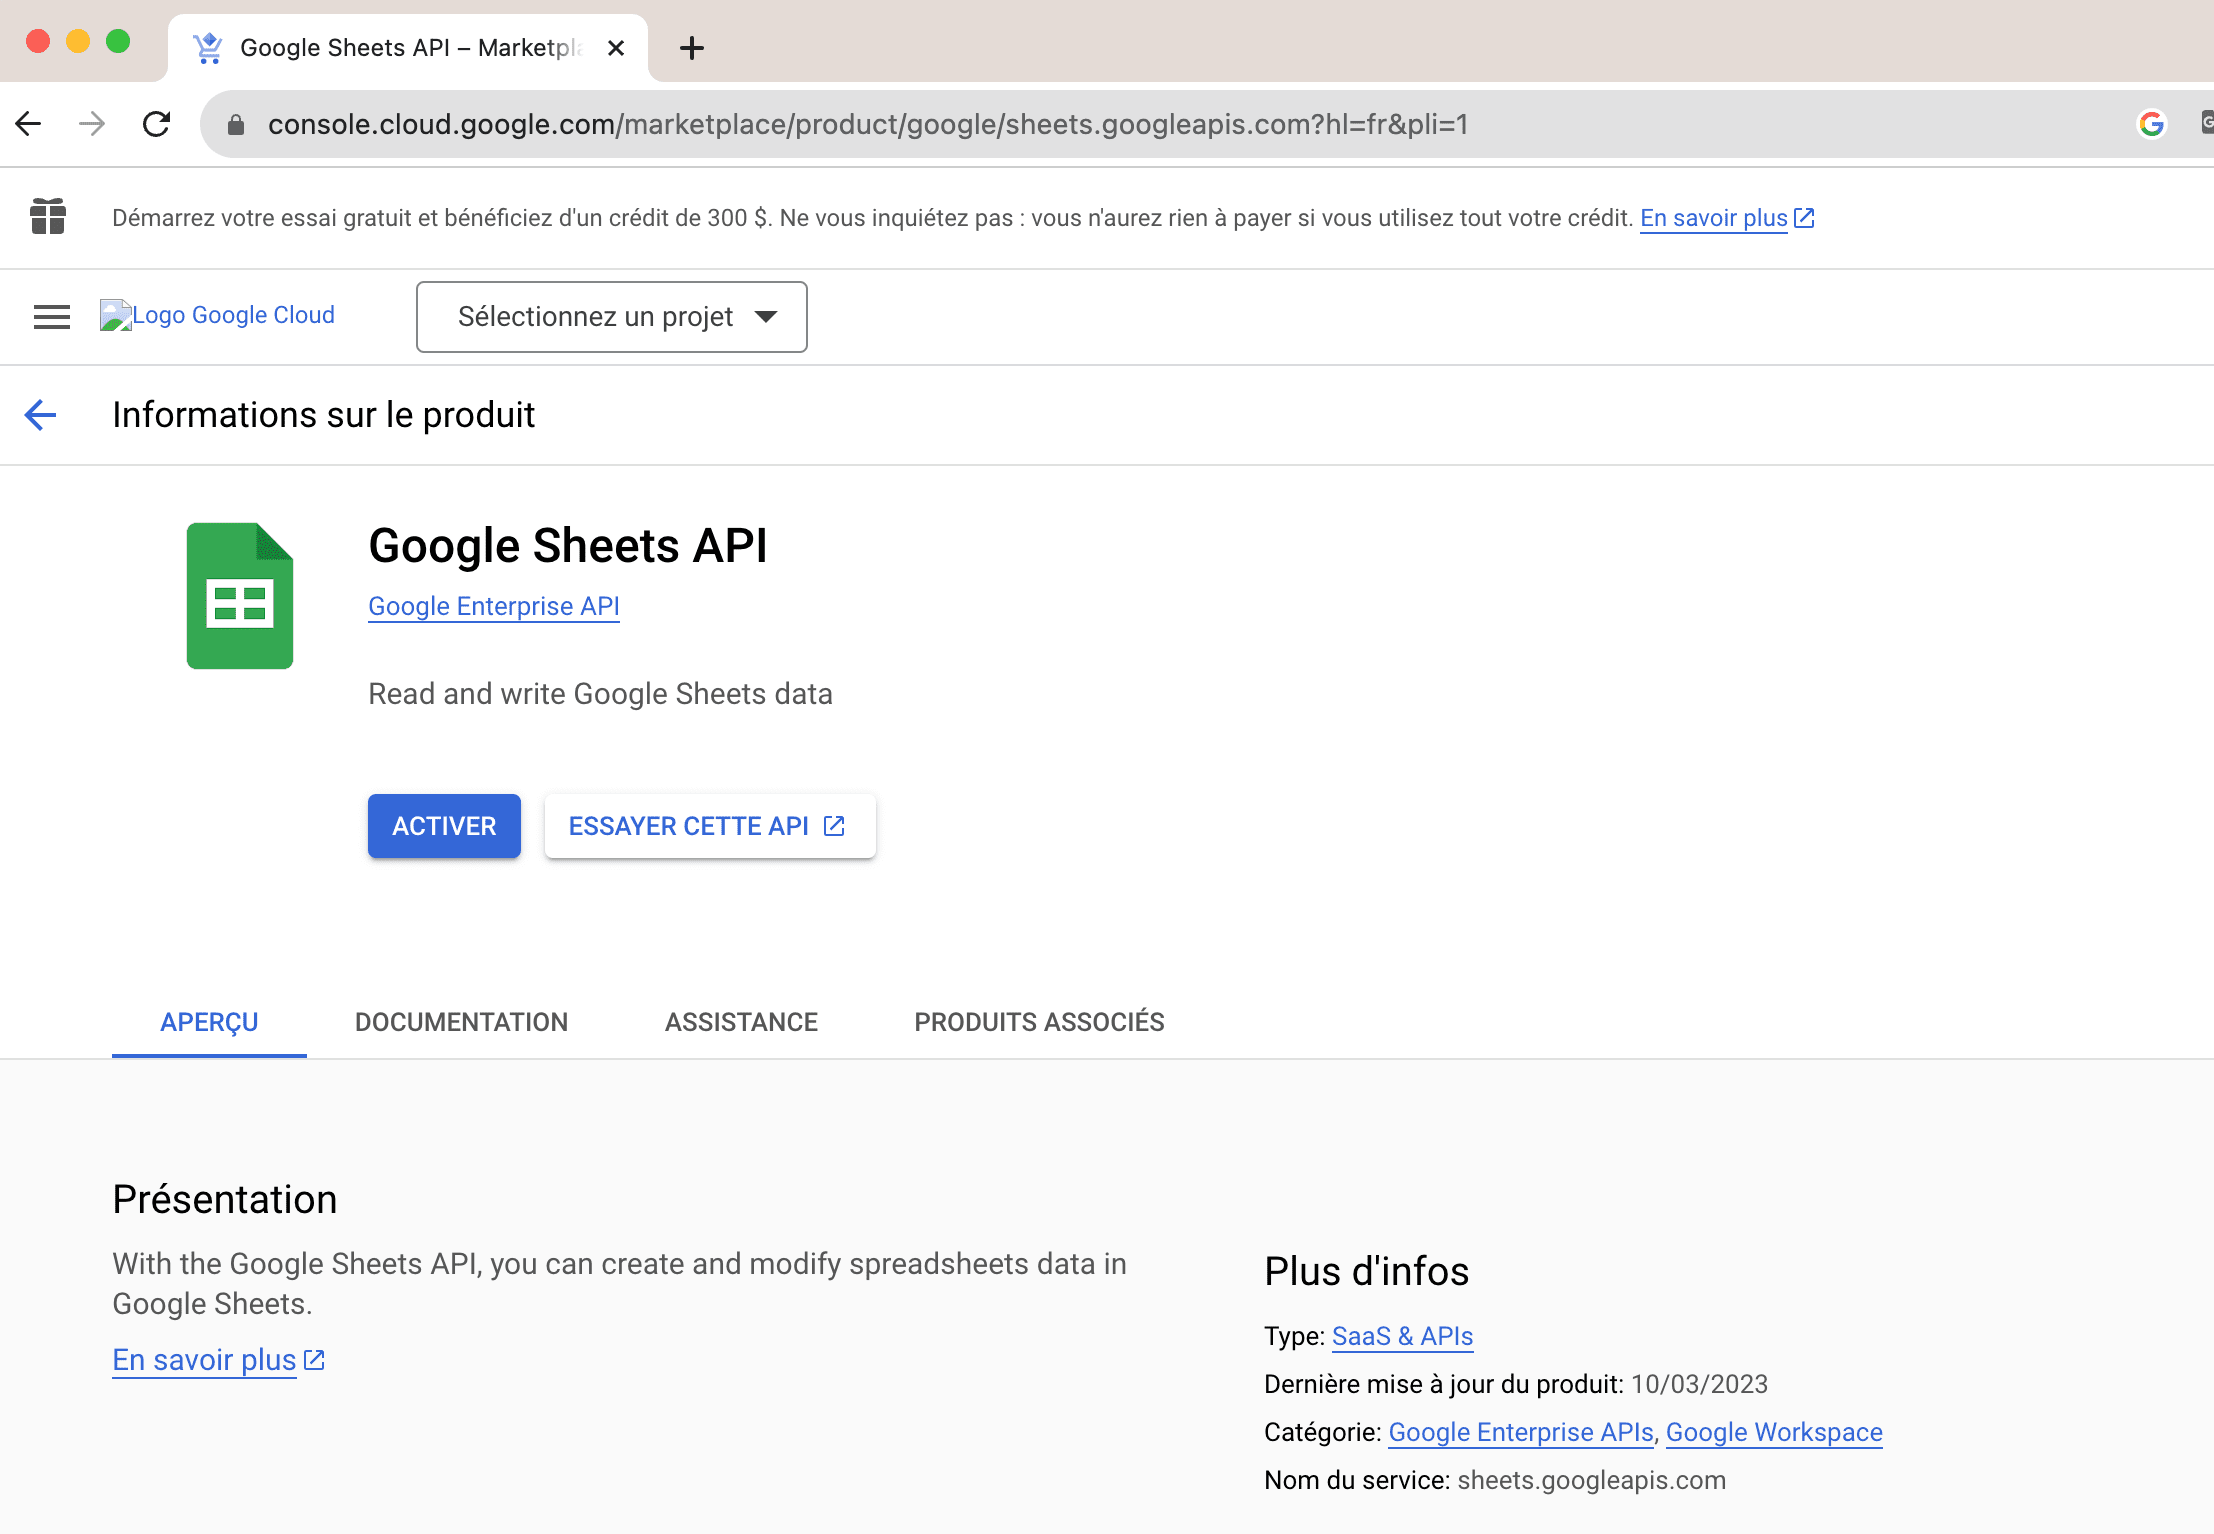
Click on activate
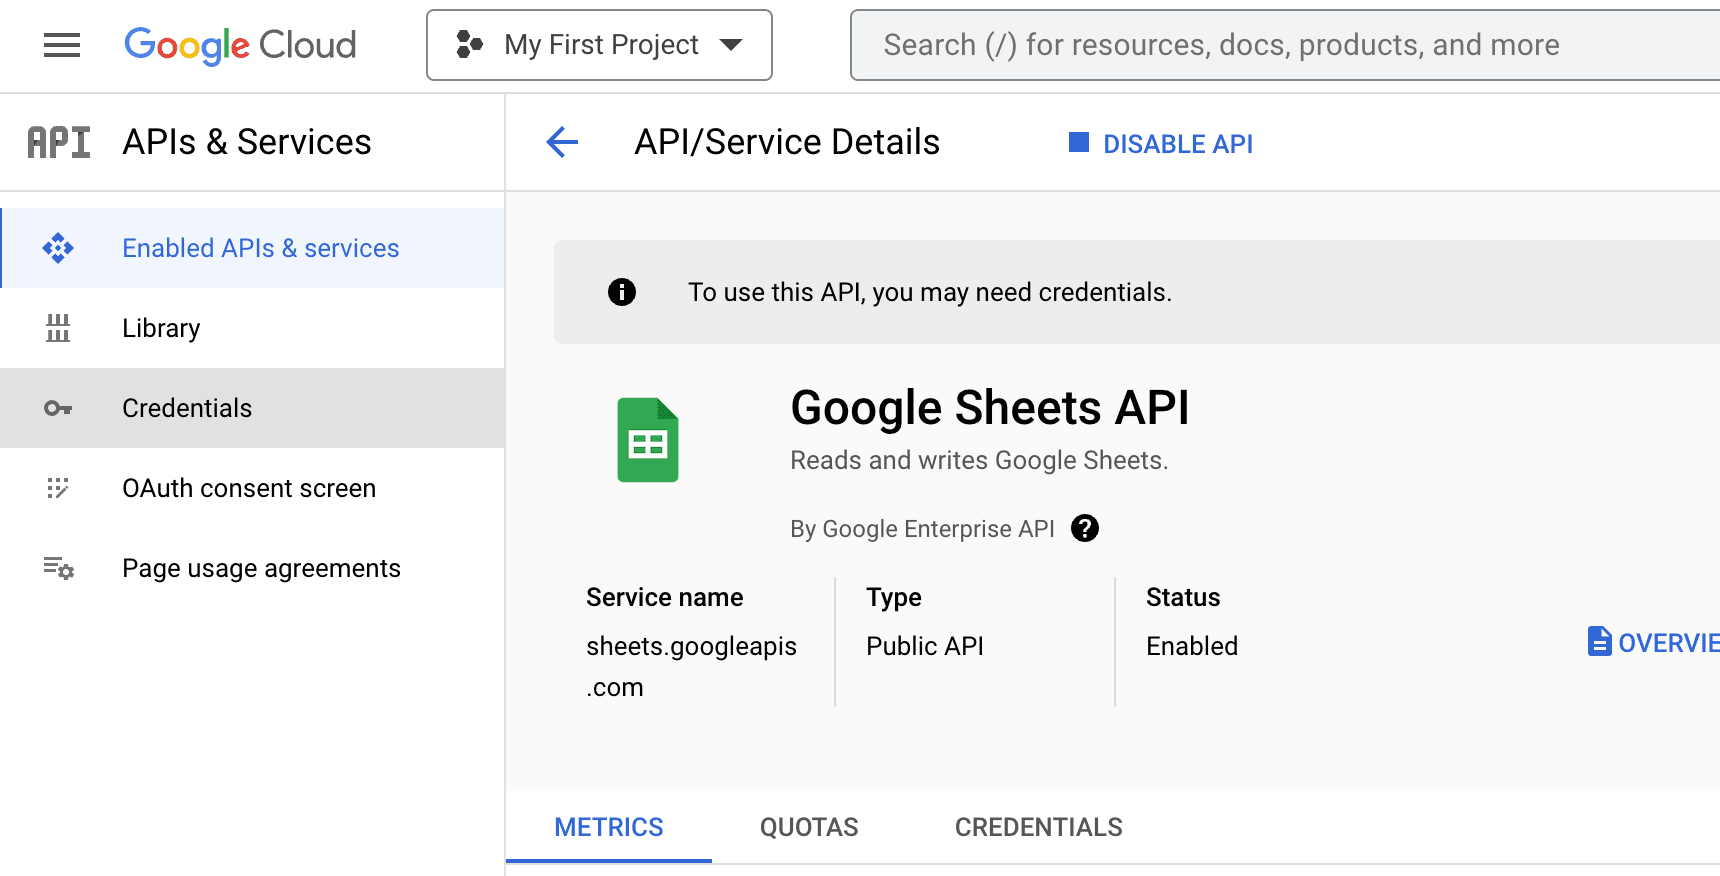
Click on credentials
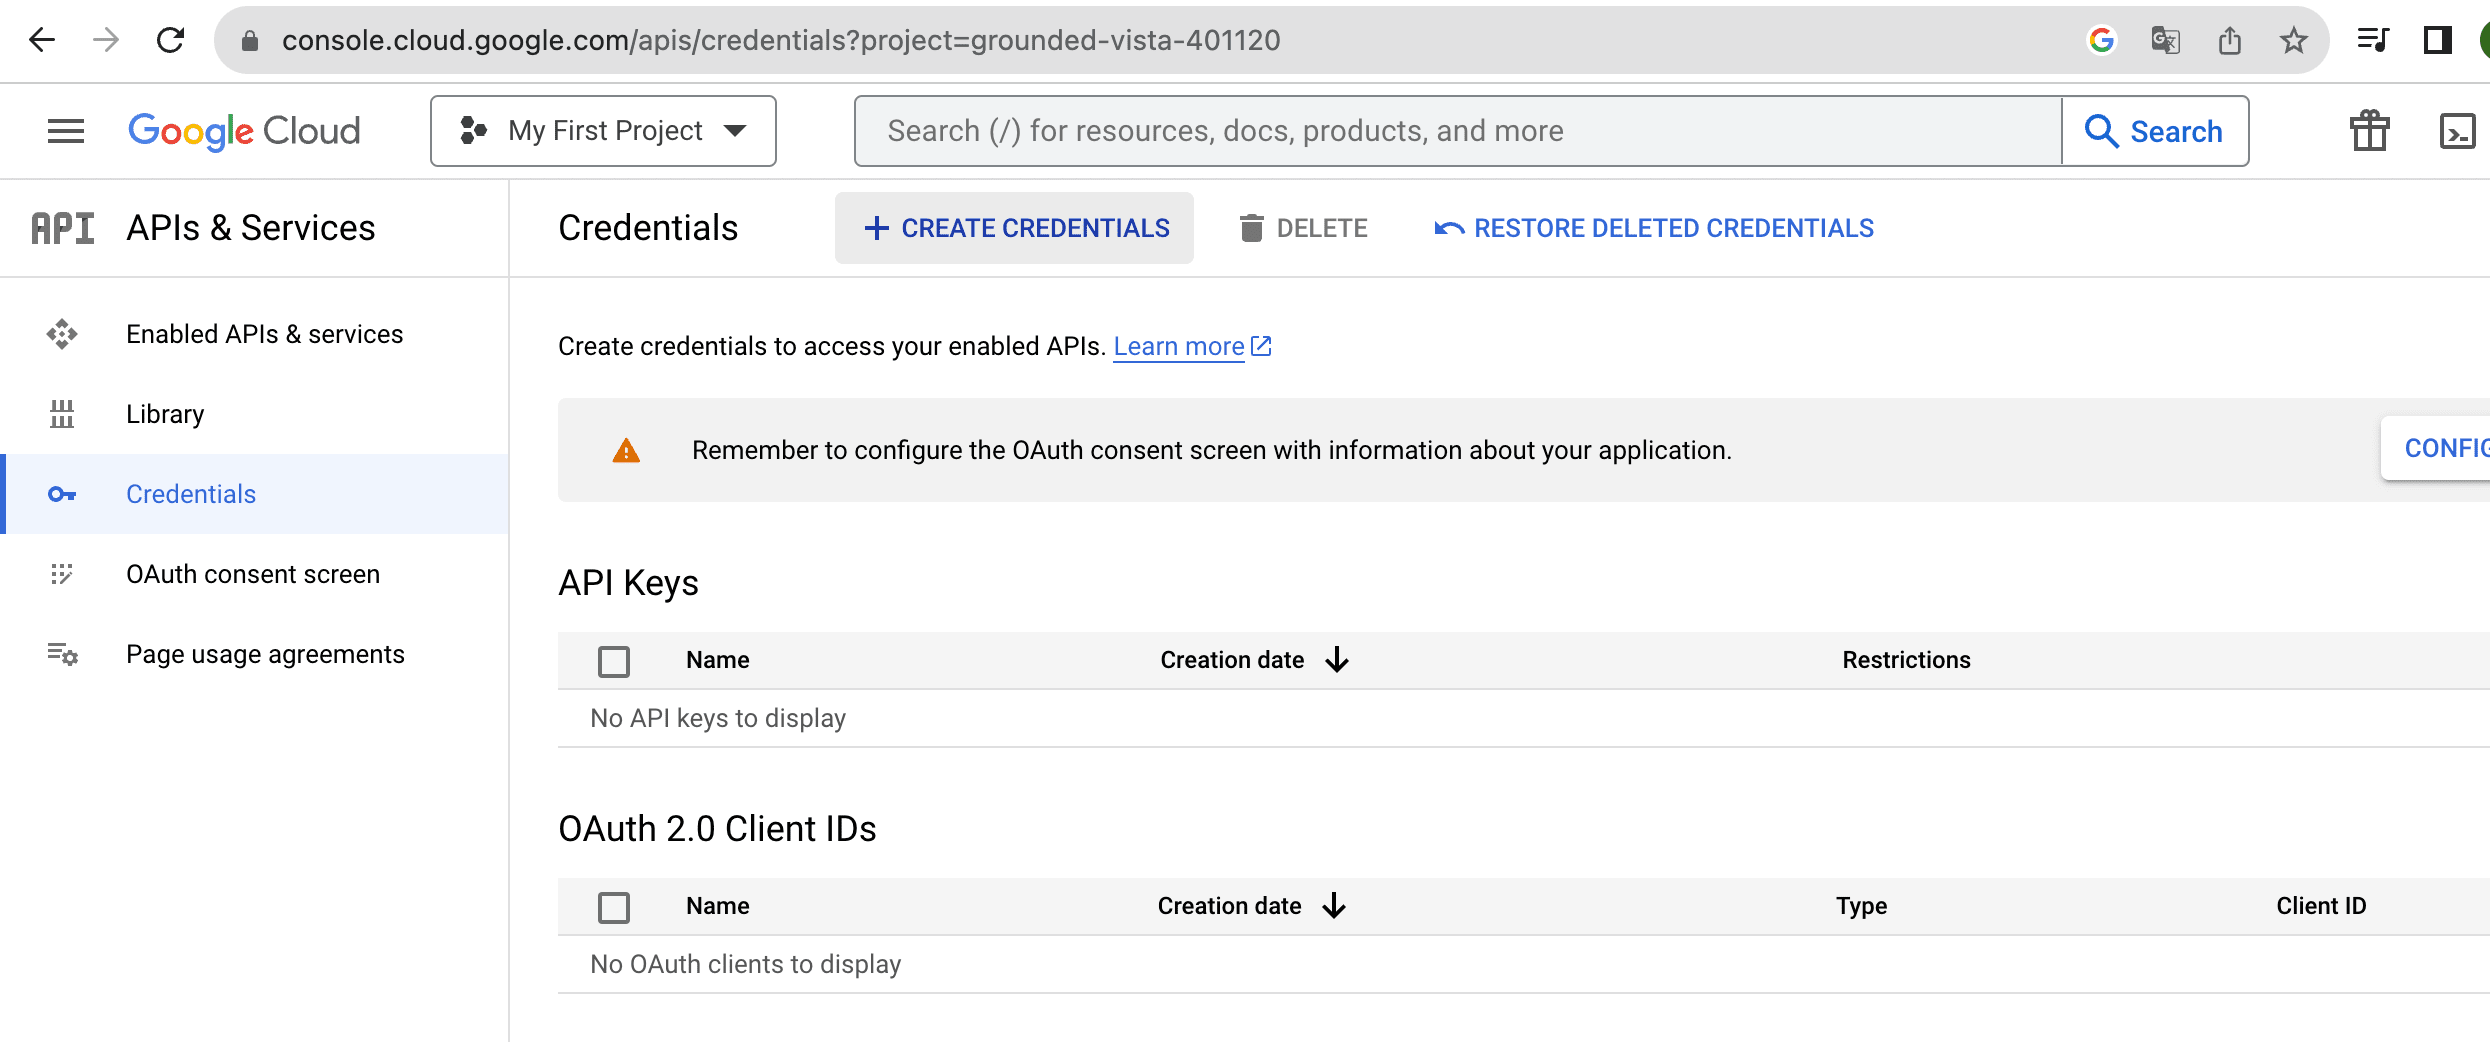
Click on Create Credentials
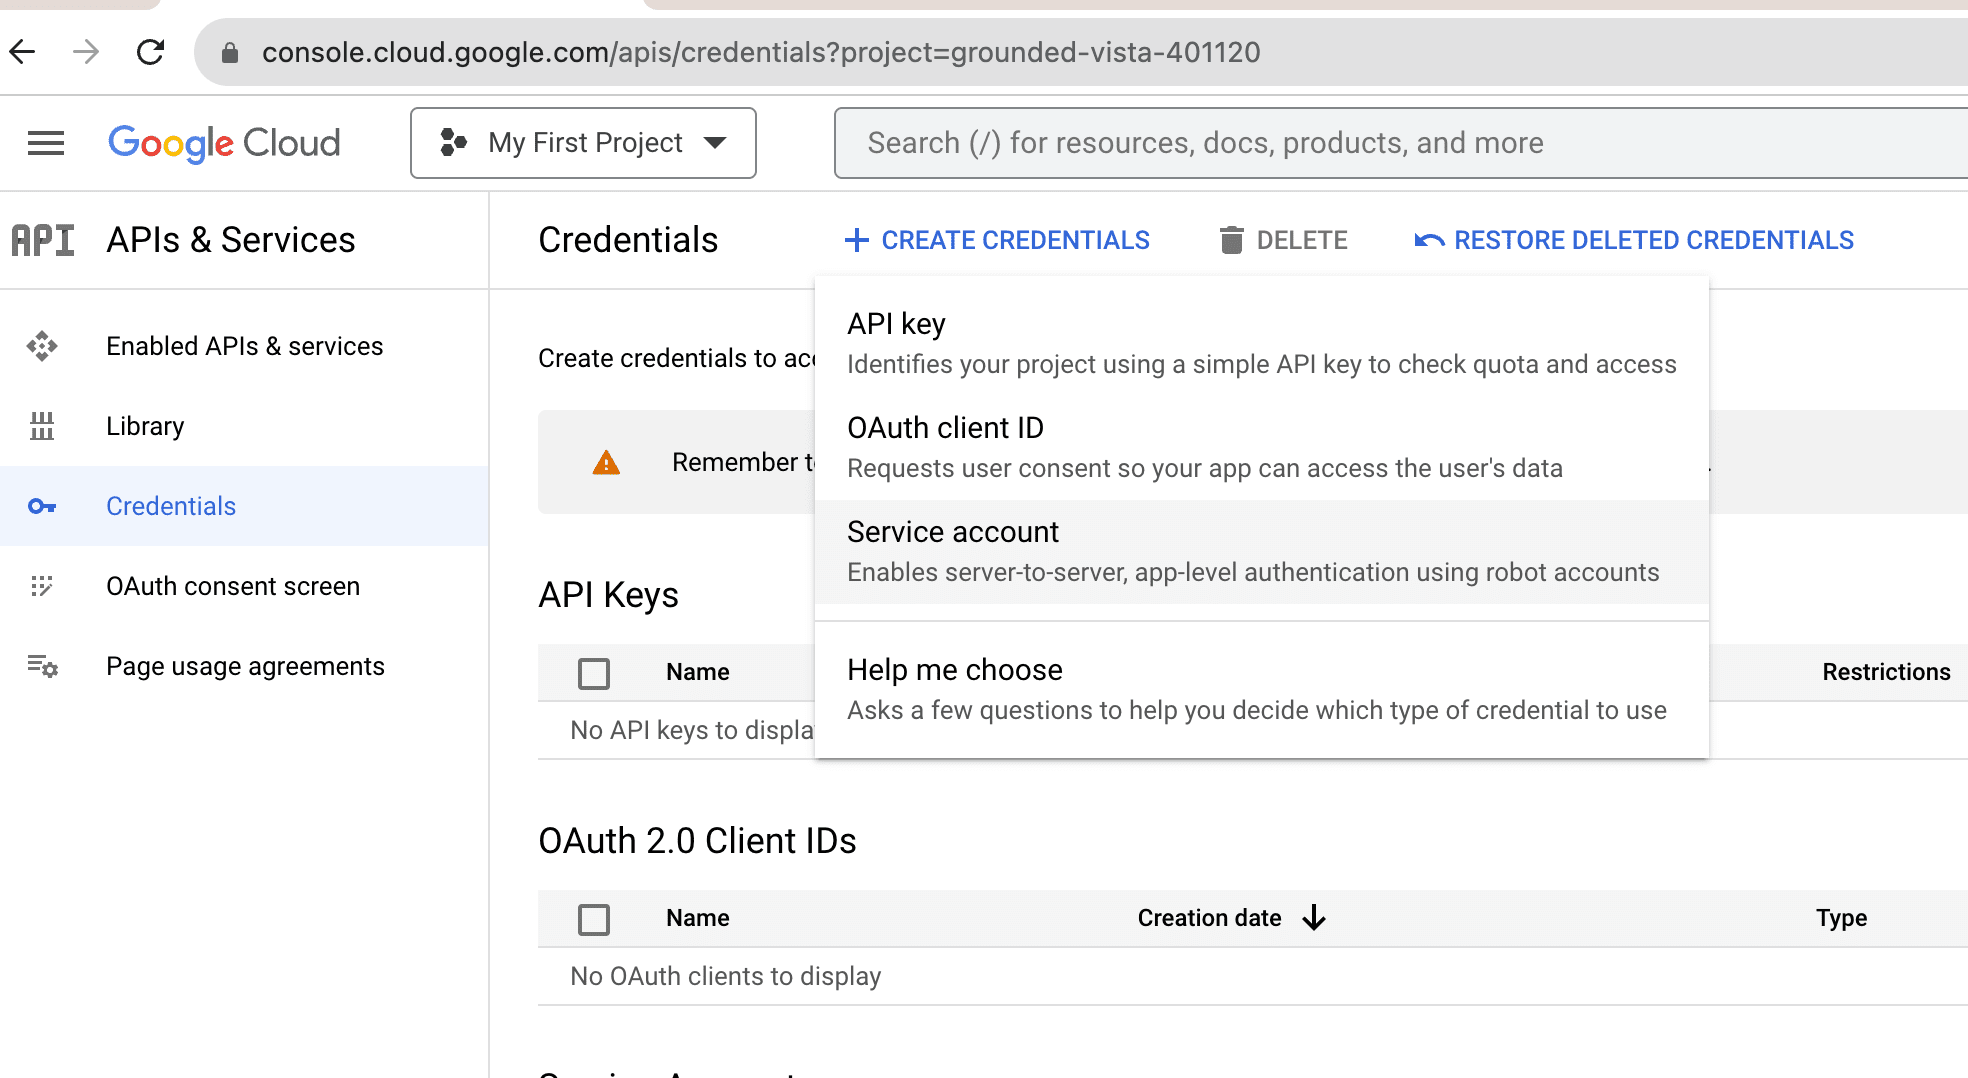
Click on Service account
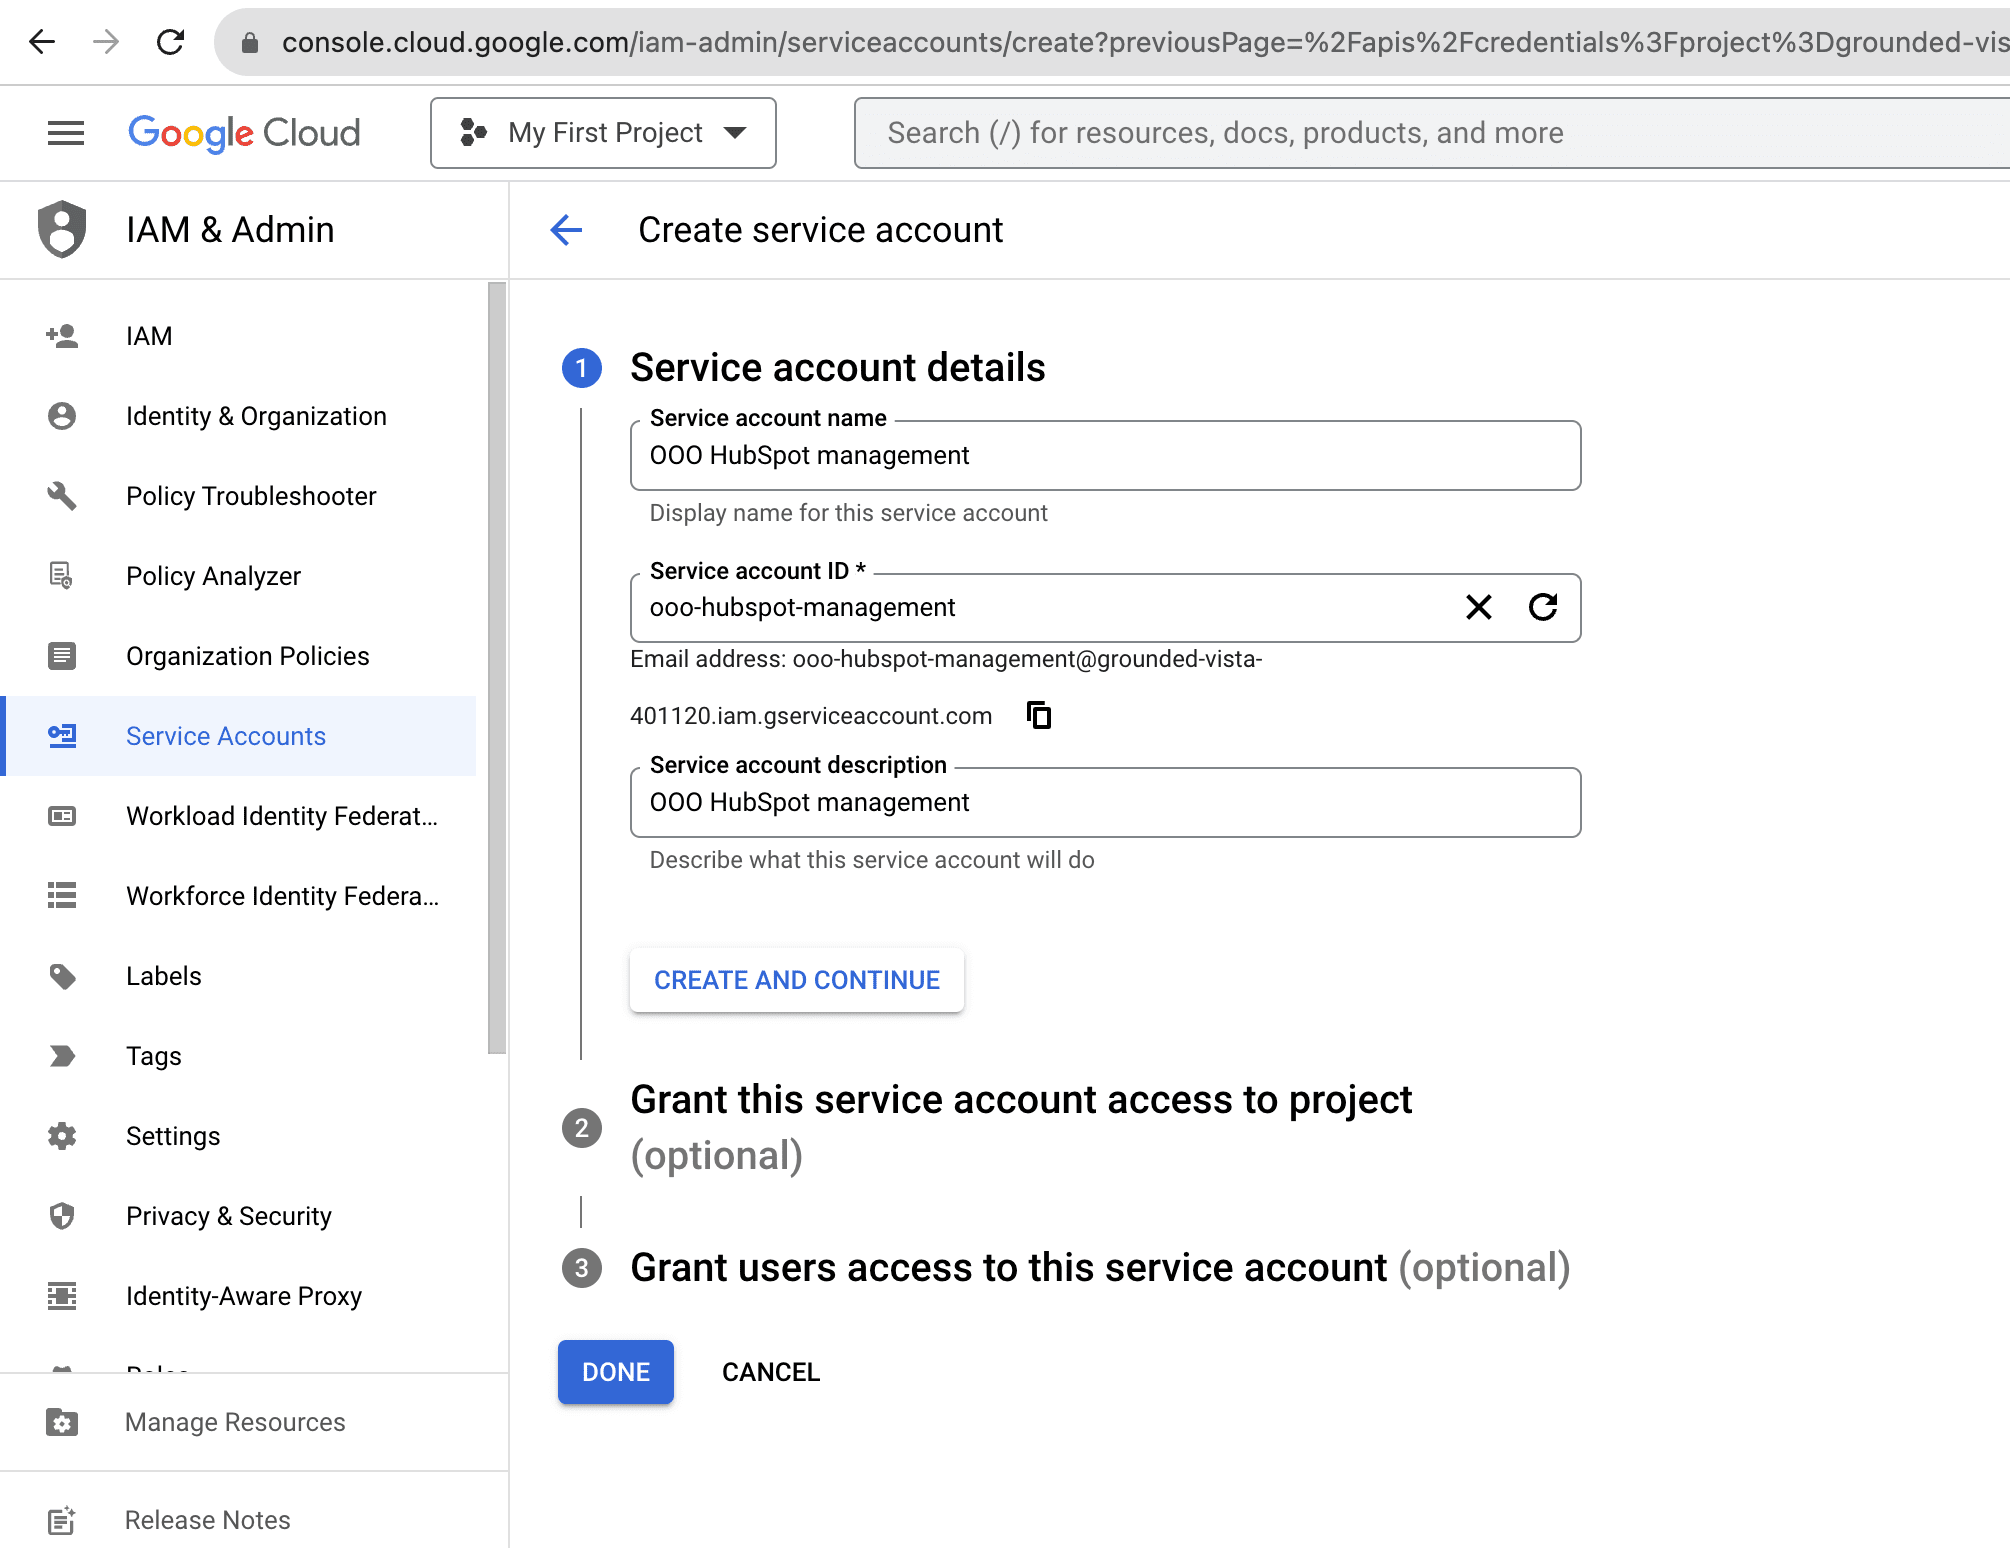
Enter the name you want in Service Account Name
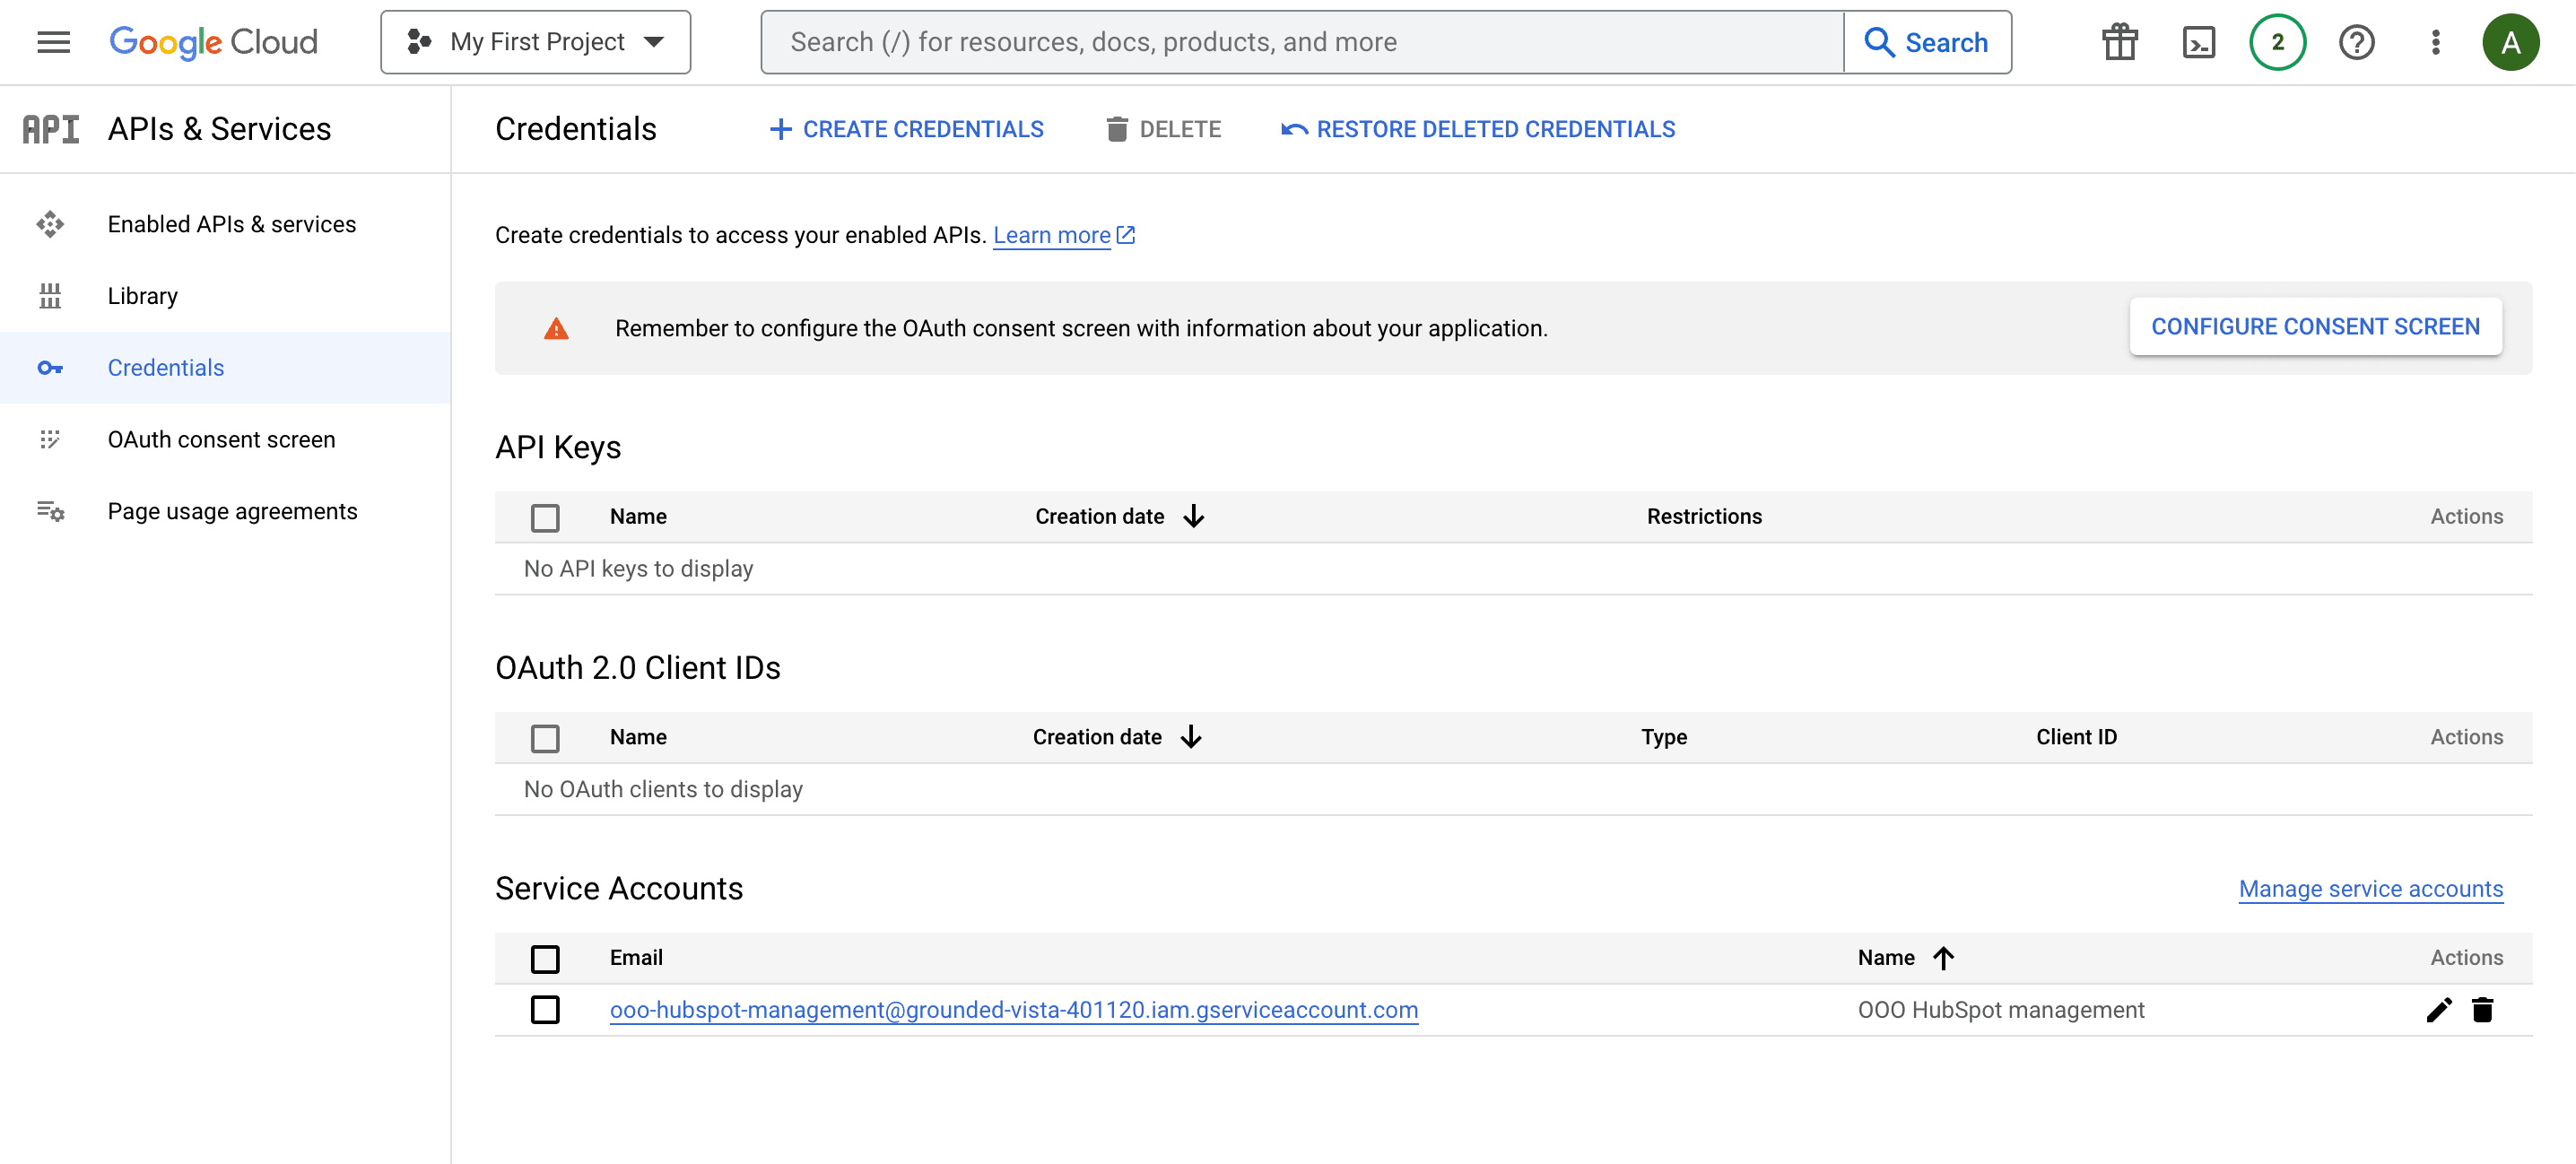
Click on the service account you just created
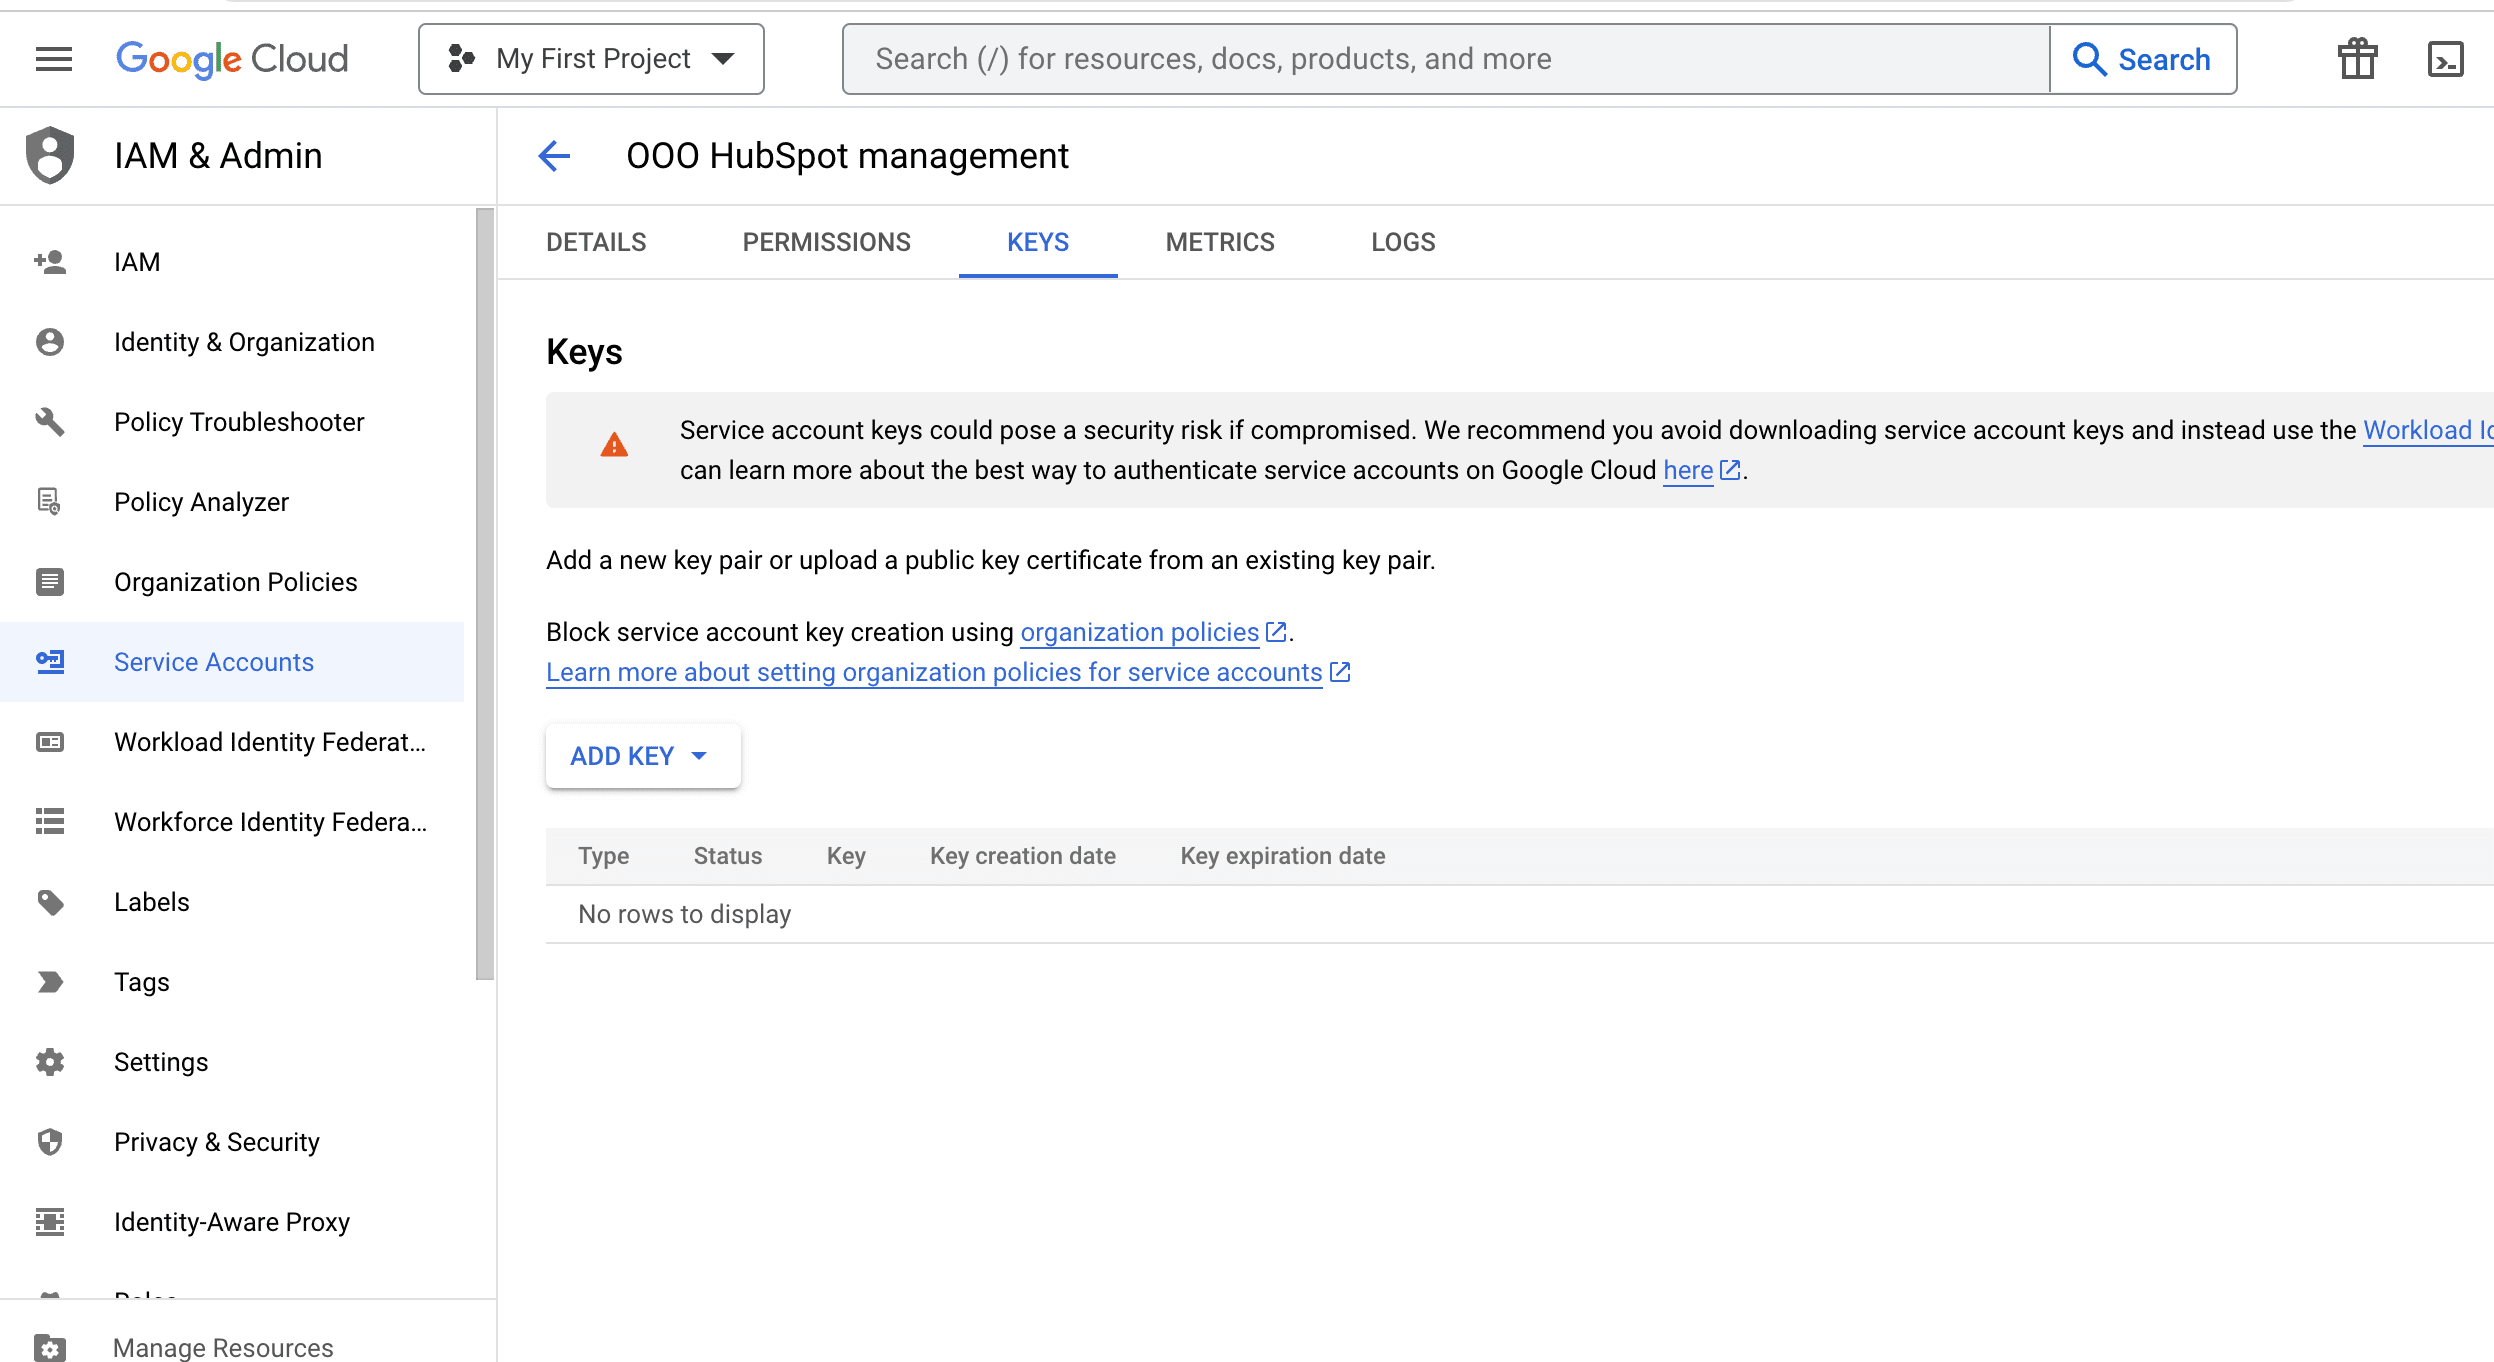
Click Add Key
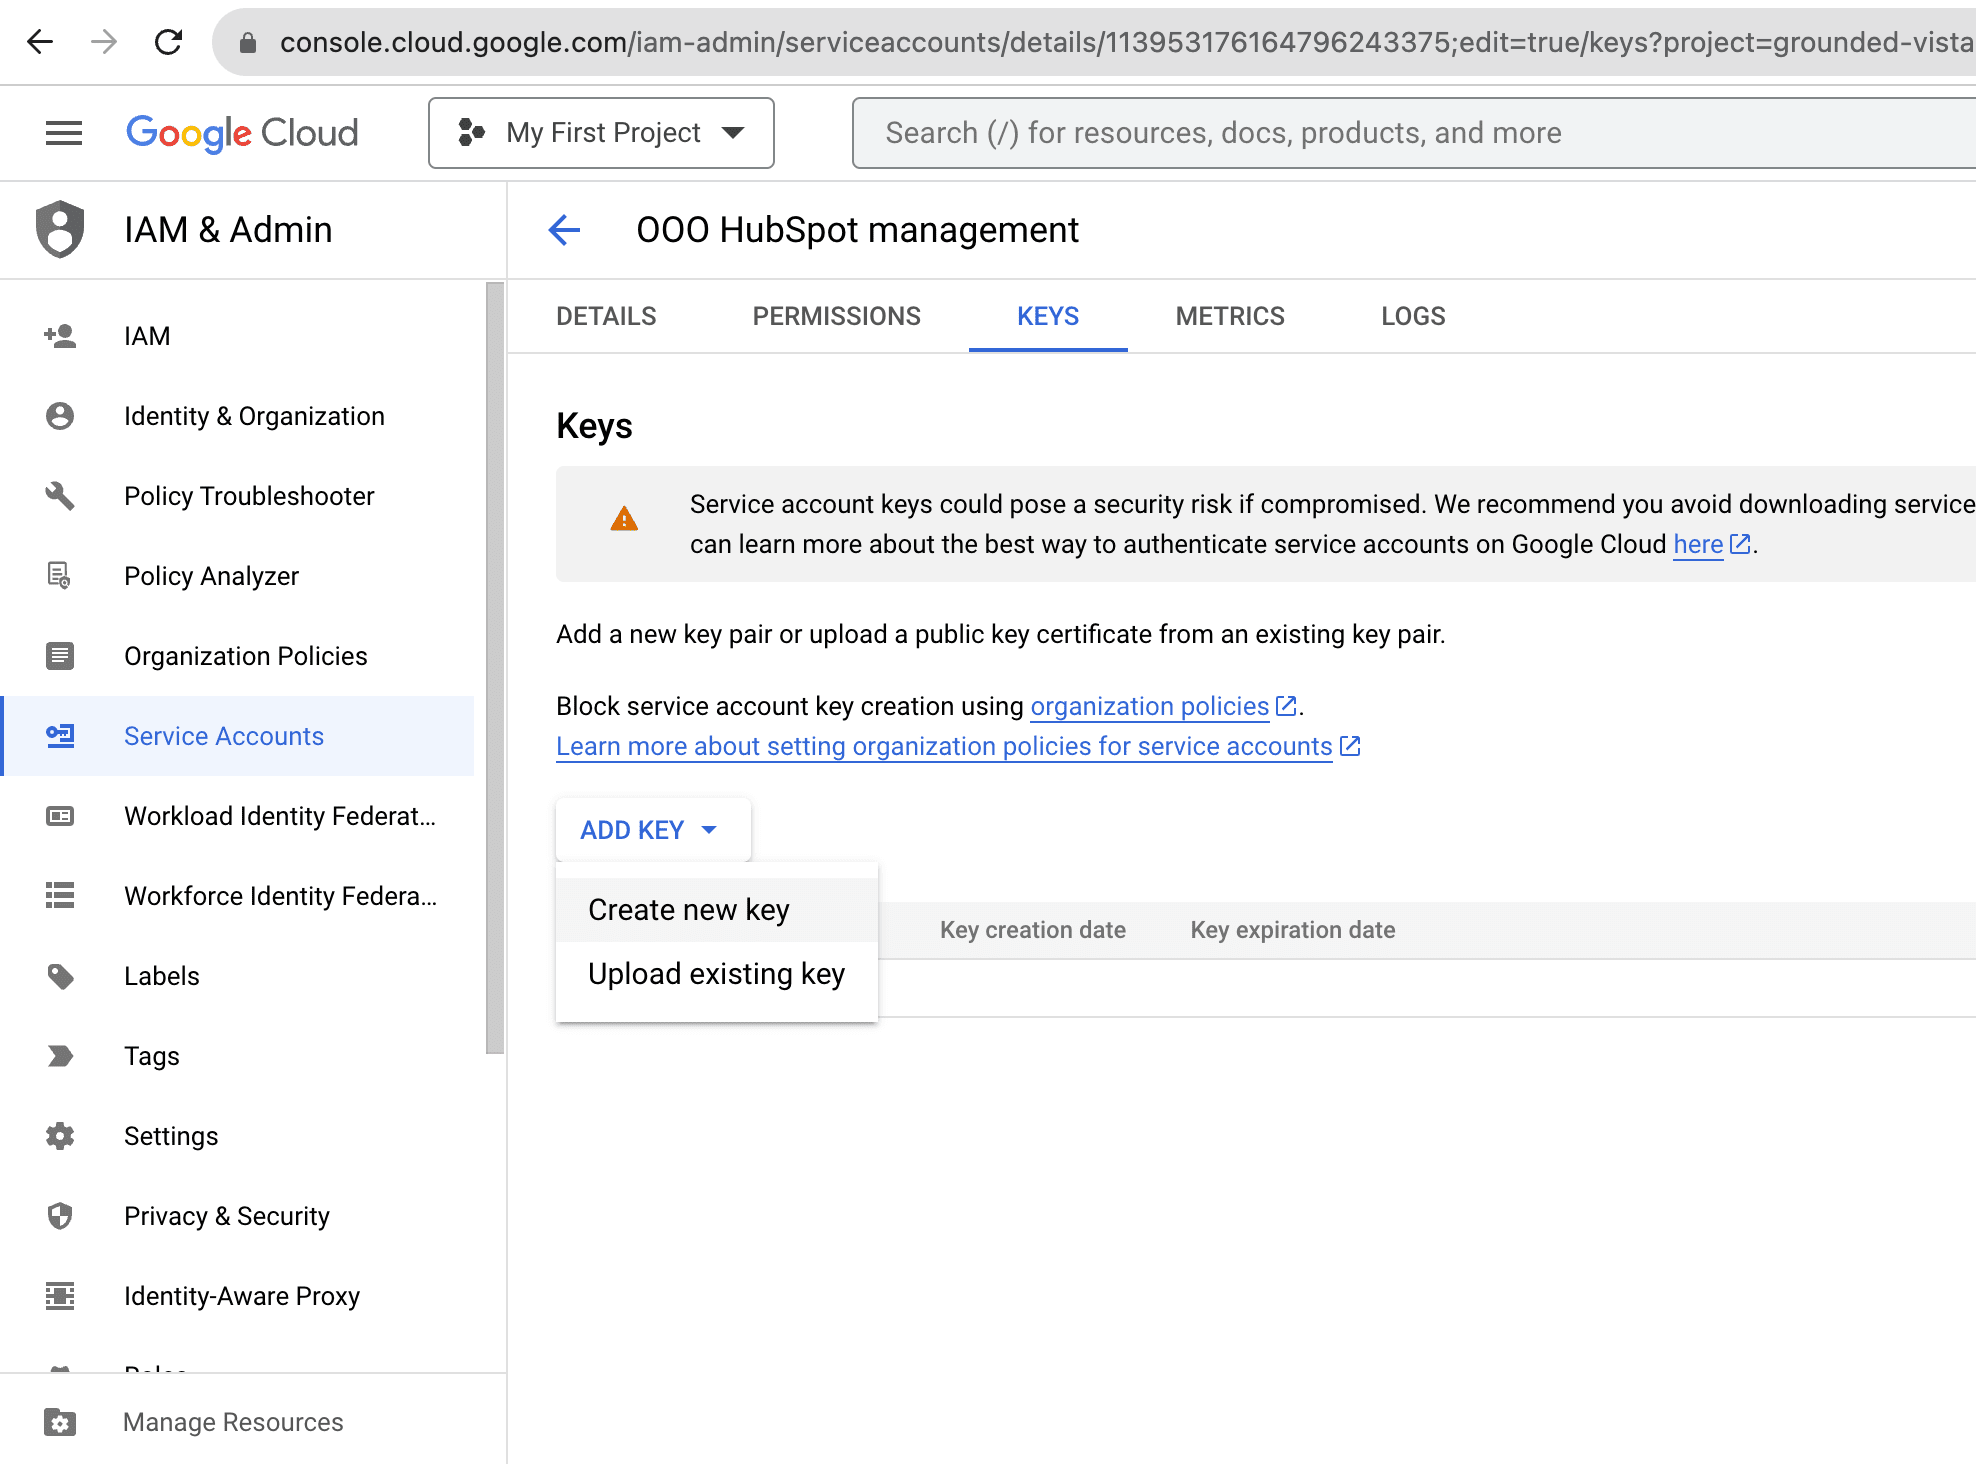
Click Create new Key
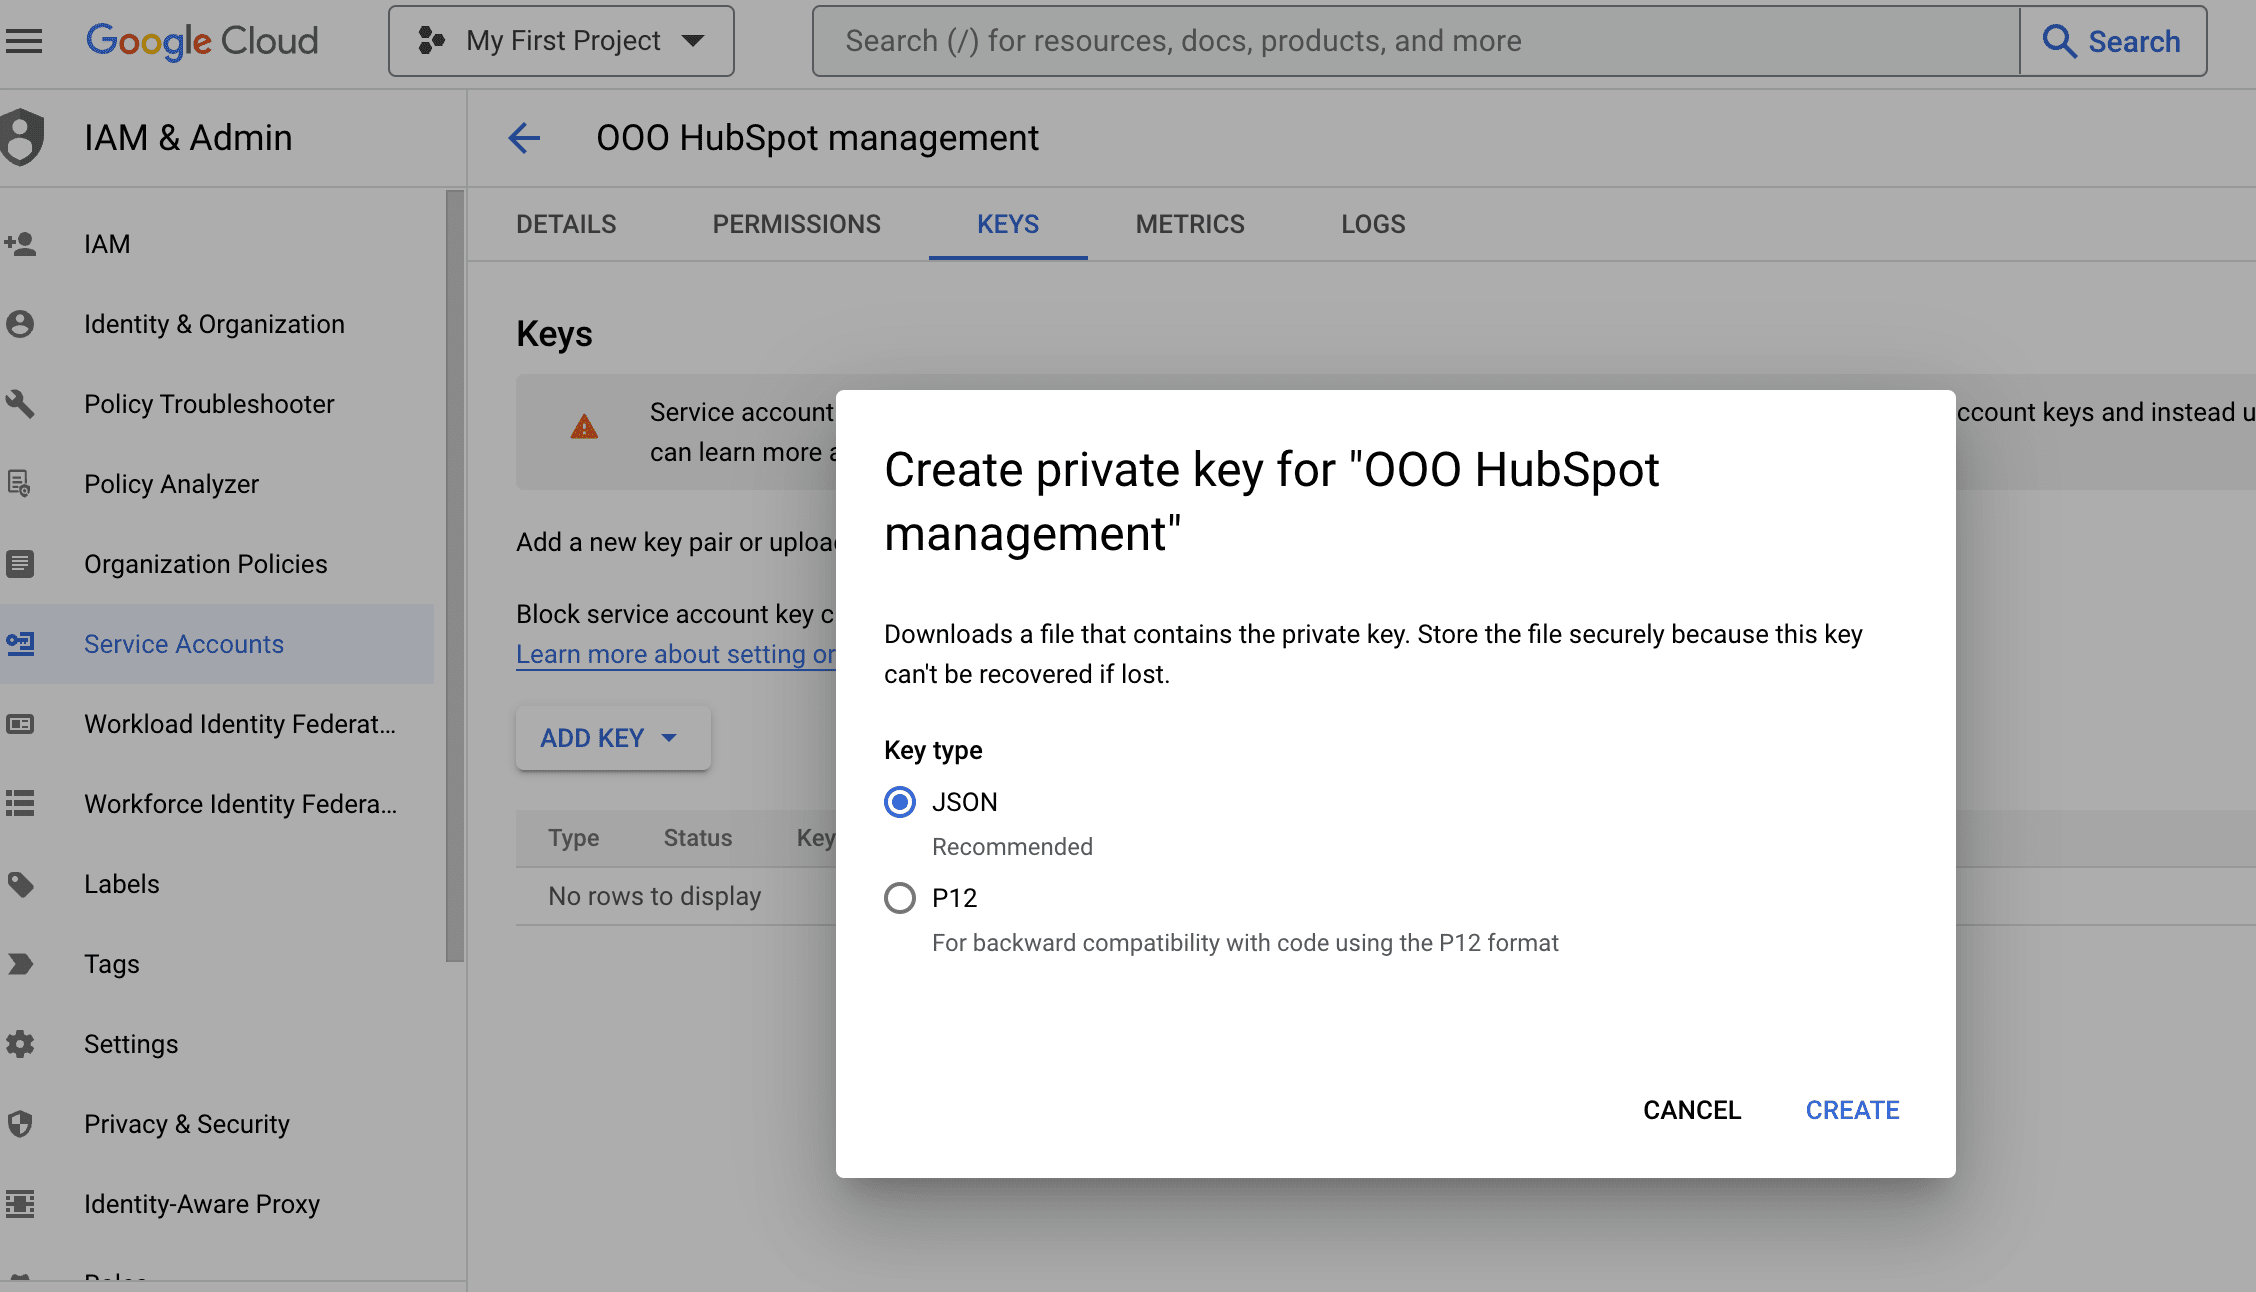
Select JSON and click create, the key will be downloaded to your computer.
Get the data from the key
To open a JSON file manually and copy the values for the privateKey and client_email keys without using a code editor, you can use a text editor or a viewer that allows you to open and read JSON files. Here’s how you can do it manually:
Using a Text Editor (e.g., Notepad on Windows or TextEdit on macOS):
- Locate the JSON you just downloaded to open.
- Right-click on the file and choose « Open with » or « Open » (depending on your operating system).
- Select a text editor from the list of available programs (e.g., Notepad on Windows or TextEdit on macOS).
- The JSON file will open in the text editor.
- Manually locate the « privateKey » and « client_email » keys in the JSON file, and copy their corresponding values.
Using a Web Browser (e.g., Chrome):
- Open Google Chrome.
- Drag and drop the JSON file into a new tab in your Chrome browser.
- Chrome will display the JSON file in a readable format.
- Manually locate the « privateKey » and « client_email » keys in the displayed JSON, and copy their corresponding values.
So you should end-up with something like this :
"-----BEGIN PRIVATE KEY-----\nMIIEvQIBADANBgkqhkiG9w0BAQEFAASCBKcwggSjAgEAAoIBAQDiNjl5cU33NjqJ\nb/PHMkE9EGd0HYfBuOe65yis4xJZtIf8tiEuA0kVb5uApE4P5cS9RPli1rr8zOPP\nNWolFqVhaIKeZQRoq2d3m73ea99AHOFXtg/zajAEOSe1MNMIVQc3jCQXEAN/RMua\n1ADgaYLyhLs2fhrxEg42Ld4GUWmSbX3uGMvio9JxEYWtJIuhPJCNpd5bgQd86D9M\nzF2EimVtYnXGon4i+w7YafRX2c7CooAEt00tM/jQgMSU1D2gr30bOfJJMDZ1QwIq\n9O473tIDXy3YTusm/yRSss0o/xm8Va9CXqQ3IBqytSev1ufXaQbo8+TxJ+Ospp4c\nURSyuLm7AgMBAAECggEAYpd2kk8HR5UriyYvjiSBmY8yP8H1HsIrwWKpcDyhjVZp\nJIPuzyKgckbL9BPob/ZZOpK6zNDA+5iDO5bQtex6VQubTlTByKrX9CH9bVj/mu5b\naoKPziv8VILiow5uE8YXWKbsPd79XzVJNihrX2OtLm0aOWRZ8rLHXea8y20lQatE\nP1uhWDgwYPJm9r5sjszALzNlETivrbxOVxpso+hqybj370eJzblLgXadwBOhdx3u\nv3UGzfX9i/qVnY5ywEZUd7G/Tmrx97LC5y2pCYOr7p1wdVt4ukdgsAkG59VaQ3WC\n9y8Pc5Yg3n1Y+8Hp+ih3b/IkMurdiT6l2UGcv8ZkJQKBgQDyLMSIRX2NkBQ02nPO\nVFvV5HnXYH/z4D6Uw32PHb3hkHhM7Dku8BiG+emeto1cVDyfkMxliwUXtCDBn6X8\n5ZRg0Ru7oPj/qPMcBpWD4hqdqf5N+IQ+v7lW+8uE8Eaz8WbpgJBpadEQRKS6NYnF\napVX0cYteqBlYRE3I/Ph5/IdfwKBgQDvICq0CByrWs9CH4tyxU76EiPR2Ggfqs5C\nYlUD3BzjkCmBSc1H2yww/SygnzhrgWiGwdkzmYSrDvBo6eoM0E0sO8tGTwA2WUNZ\nwRTL20ErPsLPucFqGMBZ2YHis0MXW/PGNBO6ZADX67iE8xXOk27tQ5wB+gIlOHgt\n4CE9RAl5xQKBgF3mU9HOt+7i1aLkrRBsjysxKrkC9rnV0g4WeqG6U3yZarvQwB9e\nAvSbBCWA/PC2zMbF+yrIK5JUSnso7tBPKCgeDFXFBacDmDfeqax4R/+oAS20VXqL\nFk8O1IvYKmHtEQ0qx1PILsLTCtgUmDXOrNdfRCswJ+8HIwixTQfjynH7AoGAYJth\nRTylwIC+jRtLbkHSh2s+t2+zmV+bVux9JkMOFM3QRuB3I9mjP+N43SeWVrCAdzjn\ntFYIaEdvzyL5oNWi6AT8Odp+3nYvpJpB+Z4J9Ru0/tEwF9oKFAKw29LKfyxyDxhJ\nBBuUz6b29Bd1LvEXdpnC9HV52mm2++m55BORtHUCgYEAwcXk0P0WqcgEOnuoR7xQ\nEwsjskxqf5Zs/NL2clleJ1qnlrkFqZUKP8J0agTGTjCoR6qPJ15fv9afBDAaCXRw\nr7OIJc0BEJgTeicu6JrXUhk7bsLW9DqtY3GHKHkkZAQgoryBDWD5jeIoiLWBrFVo\nOef8OpRPaC5A/7Me+9prkGs=\n-----END PRIVATE KEY-----\n"


"ooo-hubspot-management@grounded-vista-401120.iam.gserviceaccount.com"
Once you have those the key and the email address. Create a custom code block in the WorkFlow
Create a custom code block to store our credentials
In that Custom Coded Action block paste the following code :
const sheetId = "";

const privateKey  = "";

const clientEmail = ""


exports.main = async (event, callback) => {

    if(!sheetId) throw new Error(`sheetId has to be set !`);
    if(sheetId === "") throw new Error(`sheetId can't be empty !`);


    if(!privateKey) throw new Error(`privateKey has to be set !`);
    if(privateKey === "") throw new Error(`privateKey can't be empty !`);


    if(!clientEmail) throw new Error(`clientEmail has to be set !`);
    if(clientEmail === "") throw new Error(`clientEmail can't be empty !`);


    callback({
        outputFields: {
            sheetId,
            privateKey,
            clientEmail
        }
    });

}
In this code we are going to set our credentials.
Follow the video to see how to create this block
So you should end-up with this :
const sheetId = "1FtQiR3k1nYSW2oiVenq0UwdSCRJauf_Q3gT9vkyeH1k";

const privateKey  = "-----BEGIN PRIVATE KEY-----\nMIIEvQIBADANBgkqhkiG9w0BAQEFAASCBKcwggSjAgEAAoIBAQDiNjl5cU33NjqJ\nb/PHMkE9EGd0HYfBuOe65yis4xJZtIf8tiEuA0kVb5uApE4P5cS9RPli1rr8zOPP\nNWolFqVhaIKeZQRoq2d3m73ea99AHOFXtg/zajAEOSe1MNMIVQc3jCQXEAN/RMua\n1ADgaYLyhLs2fhrxEg42Ld4GUWmSbX3uGMvio9JxEYWtJIuhPJCNpd5bgQd86D9M\nzF2EimVtYnXGon4i+w7YafRX2c7CooAEt00tM/jQgMSU1D2gr30bOfJJMDZ1QwIq\n9O473tIDXy3YTusm/yRSss0o/xm8Va9CXqQ3IBqytSev1ufXaQbo8+TxJ+Ospp4c\nURSyuLm7AgMBAAECggEAYpd2kk8HR5UriyYvjiSBmY8yP8H1HsIrwWKpcDyhjVZp\nJIPuzyKgckbL9BPob/ZZOpK6zNDA+5iDO5bQtex6VQubTlTByKrX9CH9bVj/mu5b\naoKPziv8VILiow5uE8YXWKbsPd79XzVJNihrX2OtLm0aOWRZ8rLHXea8y20lQatE\nP1uhWDgwYPJm9r5sjszALzNlETivrbxOVxpso+hqybj370eJzblLgXadwBOhdx3u\nv3UGzfX9i/qVnY5ywEZUd7G/Tmrx97LC5y2pCYOr7p1wdVt4ukdgsAkG59VaQ3WC\n9y8Pc5Yg3n1Y+8Hp+ih3b/IkMurdiT6l2UGcv8ZkJQKBgQDyLMSIRX2NkBQ02nPO\nVFvV5HnXYH/z4D6Uw32PHb3hkHhM7Dku8BiG+emeto1cVDyfkMxliwUXtCDBn6X8\n5ZRg0Ru7oPj/qPMcBpWD4hqdqf5N+IQ+v7lW+8uE8Eaz8WbpgJBpadEQRKS6NYnF\napVX0cYteqBlYRE3I/Ph5/IdfwKBgQDvICq0CByrWs9CH4tyxU76EiPR2Ggfqs5C\nYlUD3BzjkCmBSc1H2yww/SygnzhrgWiGwdkzmYSrDvBo6eoM0E0sO8tGTwA2WUNZ\nwRTL20ErPsLPucFqGMBZ2YHis0MXW/PGNBO6ZADX67iE8xXOk27tQ5wB+gIlOHgt\n4CE9RAl5xQKBgF3mU9HOt+7i1aLkrRBsjysxKrkC9rnV0g4WeqG6U3yZarvQwB9e\nAvSbBCWA/PC2zMbF+yrIK5JUSnso7tBPKCgeDFXFBacDmDfeqax4R/+oAS20VXqL\nFk8O1IvYKmHtEQ0qx1PILsLTCtgUmDXOrNdfRCswJ+8HIwixTQfjynH7AoGAYJth\nRTylwIC+jRtLbkHSh2s+t2+zmV+bVux9JkMOFM3QRuB3I9mjP+N43SeWVrCAdzjn\ntFYIaEdvzyL5oNWi6AT8Odp+3nYvpJpB+Z4J9Ru0/tEwF9oKFAKw29LKfyxyDxhJ\nBBuUz6b29Bd1LvEXdpnC9HV52mm2++m55BORtHUCgYEAwcXk0P0WqcgEOnuoR7xQ\nEwsjskxqf5Zs/NL2clleJ1qnlrkFqZUKP8J0agTGTjCoR6qPJ15fv9afBDAaCXRw\nr7OIJc0BEJgTeicu6JrXUhk7bsLW9DqtY3GHKHkkZAQgoryBDWD5jeIoiLWBrFVo\nOef8OpRPaC5A/7Me+9prkGs=\n-----END PRIVATE KEY-----\n";

const clientEmail = "ooo-hubspot-management@grounded-vista-401120.iam.gserviceaccount.com";


exports.main = async (event, callback) => {

    if(!sheetId) throw new Error(`sheetId has to be set !`);
    if(sheetId === "") throw new Error(`sheetId can't be empty !`);


    if(!privateKey) throw new Error(`privateKey has to be set !`);
    if(privateKey === "") throw new Error(`privateKey can't be empty !`);


    if(!clientEmail) throw new Error(`clientEmail has to be set !`);
    if(clientEmail === "") throw new Error(`clientEmail can't be empty !`);


    callback({
        outputFields: {
            sheetId,
            privateKey,
            clientEmail
        }
    });

}
Add a second custom code block for our logic
The code is available on this link you can use the copy button on the top right corner.
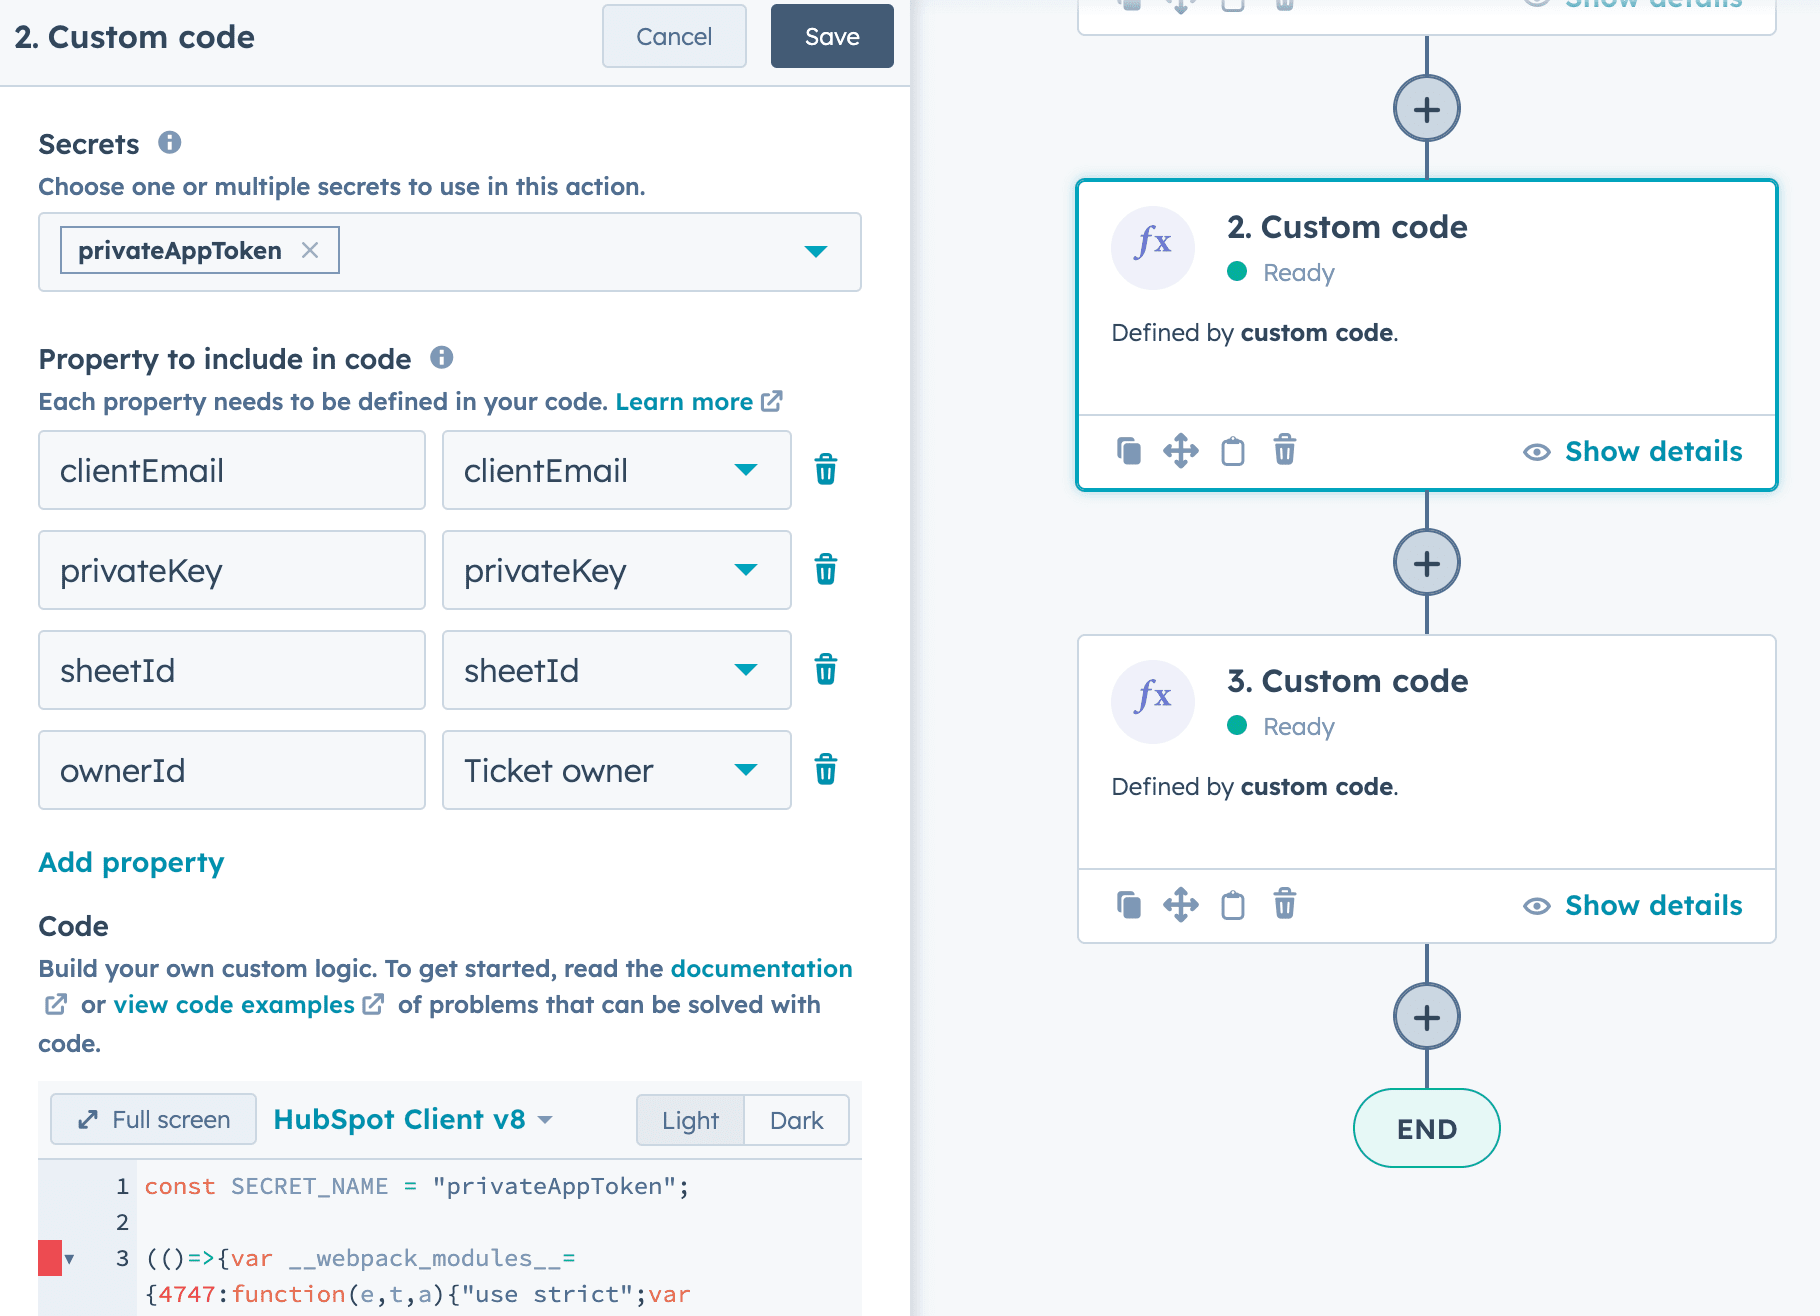
Important after you pasted the code add the following line on top of the file
const SECRET_NAME = "privateAppToken";
Between the quote put the name of your token, in my case my token is named privateAppToken but if yours is different edit it.
So the Secret selected and the SECRET_NAME should match like what we have on this screenshot :
Add a third block to assign
/*
 *
 * Edit your Secret Name here
 */
const SECRET_NAME = "privateAppToken"


const OBJECTS_TYPE = "tickets"
/*
 *
 *
 * Only edit below this line if you know what you are doing
 *
 *
 */

const axios = require('axios');

const SECRET_NAME_TO_USE = SECRET_NAME ? SECRET_NAME : "privateAppToken";

const axiosConfig = {
    headers: {
        authorization: `Bearer ${process.env[SECRET_NAME_TO_USE]}`
    }
};

exports.main = async (event, callback) => {

    const ownerId = event.inputFields.ownerId;

    if (!ownerId) throw new Error('ownerId is not set, are you sure you put ownerId in the "properties to include in code" ? ');

    const objectId = event.object.objectId;

    const user = await getUserDataById(ownerId).catch(axiosErrorHandler);

    if(!user.data) throw new Error(`Error when getting ${ownerId} infos`)

    const {email,id} = user.data;

    const update = await updateOwnerId(objectId,id).catch(axiosErrorHandler)

    if (!update.data) throw new Error(`We couldn't update the object owner`);


    if(update.data.id) console.log(`Association worked ! ${email} is now the owner`)


    callback({
        outputFields: {
            newOwner : update.data && update.data.id ? email : null
        }
    });

}

/**
 * From a userId we can get an owner id
 * @param {*} userId
 * @returns
 */
const getUserDataById = async (ownerId) => {
    const endPoint = `https://api.hubapi.com/crm/v3/owners/${ownerId}?idProperty=userId`;
    const data = await axios.get(endPoint, axiosConfig);
    return data;
}


const updateOwnerId = async (objectId,ownerId) => {

    if (!ownerId) throw new Error('ownerId is not set as a parameter');
    if (!objectId) throw new Error('objectId is not set as a parameter');

    const endpoint = `https://api.hubapi.com/crm/v3/objects/${OBJECTS_TYPE}/${objectId}`;

    return axios.patch(endpoint, {
        "properties": {
            "hubspot_owner_id": ownerId
        }
    }, axiosConfig);
}


/**
 * Handles errors thrown by axios requests and logs relevant information.
 *
 * @param {Error} error - The error object thrown by axios.
 */
const axiosErrorHandler = error => {
    if (error.response) {
        // The request was made and the server responded with a status code
        // that falls out of the range of 2xx
        console.log(error.response.data);
        console.log(error.response.status);
        console.log(error.response.headers);
    } else if (error.request) {
        // The request was made but no response was received
        // `error.request` is an instance of XMLHttpRequest in the browser
        // and an instance of http.ClientRequest in node.js
        console.log(error.request);
    } else {
        // Something happened in setting up the request that triggered an Error
        console.log('Error', error.message);
    }
}
Turn the WorkFlow on and set the backups
Demo
How language detect works in HubSpot ?
Text_LanguageDetect is a PHP library renowned for its language detection capabilities. Although natively designed for PHP, you can harness its power within your HubSpot workflows using a custom code block in JavaScript. Let’s explore how this library can benefit your HubSpot environment.
Language Identification
The primary feature of This Custom Coded Action is its accurate language identification. In a CRM like HubSpot, where interactions occur in multiple languages, this Custom Coded Action can automatically categorize and sort text content based on language. This facilitates more targeted and relevant communication, ensuring that your customers receive information in their preferred language.
Personalized Customer Communication
HubSpot’s strength lies in personalizing customer interactions. By incorporating this Custom Coded Action you can take personalization to the next level. Create workflows that adapt based on detected language, sending emails, responses, or content in the language your customers prefer. This enhancement improves the overall customer experience, making it more engaging and satisfying.
Language-Specific Automation
Use this Custom Coded Action to trigger automation based on language. For instance, you can set up workflows that route customer inquiries to language-specific support teams. This ensures that your customers receive support and information in their preferred language, enhancing engagement and satisfaction.
Integration with HubSpot Workflows
Integrating this Custom Coded action into your HubSpot workflows is seamless using the custom code block feature. This integration empowers you to create dynamic, language-aware processes within your CRM.
This Custom Coded action is a powerful tool for enhancing your HubSpot CRM when dealing with multilingual content and global customer interactions. By accurately identifying languages, personalizing customer communication, automating language-specific processes, you can provide a more tailored and effective customer experience.
Deploying Language Detection Code in HubSpot
Follow these steps to integrate the language detection functionality into your CRM:
1. Create a Blank Workflow
Start by creating a new workflow in your HubSpot account. This workflow will be the foundation for implementing the language detection code.
2. Create a Trigger with a Filter
Within your workflow, establish a trigger with a filter to specify when language detection should occur. For instance, if you want to detect the language based on a description, you can set a filter such as « Description is known. » This filter will determine when this custom code will be executed.
3. Add a Custom Code Block
To integrate language detection into your workflow, you’ll need to use a custom code block. This is where you’ll include the JavaScript code responsible for language detection.
4. Include Properties in the Code
Within the custom code block, you should define the properties you want to analyze. For example, if you’re detecting language based on a product description, you might use a variable like textToAnalyze to represent the description text.
5. Copy Code from the Repository
To make this integration even more straightforward, we’ve provided a repository with pre-compiled code for language detection. You can access this repository at github Detect-language.
Inside the repository, navigate to the dist folder and copy the contents. These pre-compiled files contain the necessary code to execute language detection using this custom code.
6. Set Output Variables
In your custom code block, you need to specify the output variables and their types. For language detection, you typically want to capture the detected language and the confidence level. Define the following variables:
languagewith the type ‘string’confidencewith the type ‘number’
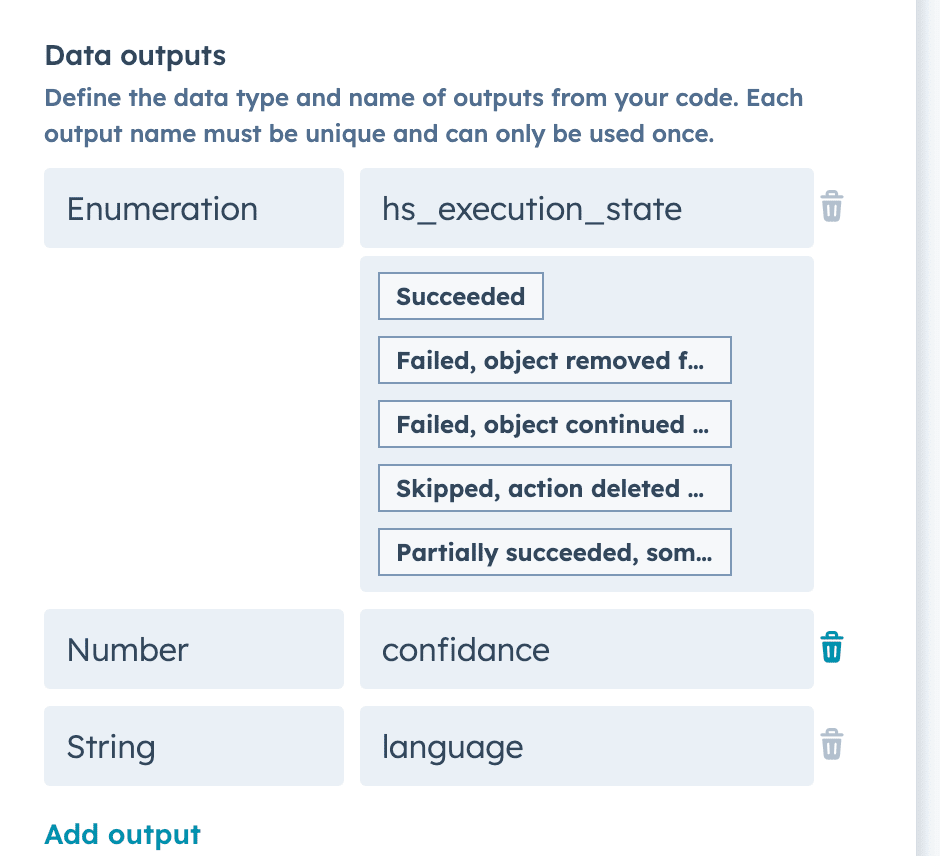
This step ensures that the detected language and the confidence score are made available for use in your HubSpot workflow.
By following these steps, you’ll seamlessly integrate language detection into your HubSpot workflow, enabling you to automate language detection and enhance your CRM’s capabilities for personalized customer communication and content organization.
The source code
Do not copy this code, it’s the source code use the code in the /dist folder of this repo : github Detect-language.
const LanguageDetect = require('languagedetect');

exports.main = async (event, callback) => {


    const textToAnalyze = event.inputFields.textToAnalyze;

    if (!textToAnalyze) throw new Error('textToAnalyze is not set, are you sure you put textToAnalyze in the "properties to include in code" ? ');


    const lngDetector = new LanguageDetect();

    const languageFound = lngDetector.detect(textToAnalyze,2);

    if(languageFound.length === 0) throw new Error('We failed to indentify the language');

    const [language, confidance]= languageFound[0];

    if(!language) throw new Error('Error when identifing the language');

    if(!confidance) throw new Error('Error when identifing the language no confidance data');


    callback({
        outputFields: {
            language,
            confidance
        }
    });

}
What is HubSpot-OperationHub-cca-compiler?
HubSpot-OperationHub-cca-compiler is a local development tool that provides a framework for working on your Custom Coded Actions (CCAs) locally and executing them in the same context as HubSpot. With this tool, you can write your CCAs using the libraries you want, even if they are not officially supported by HubSpot.
Demo
Key Features
Here are some of the key features and benefits of HubSpot-OperationHub-cca-compiler:
1. Library Freedom
Want to create a Custom Coded Action to perform a specific task, like validating phone number formats? Instead of writing all the logic from scratch, you can look for open-source modules and libraries online. However, Custom Coded Actions don’t allow you to import external libraries directly. HubSpot-OperationHub-cca-compiler offers a solution to this limitation. You can install the libraries you need locally, and the tool will package everything into a single file that works seamlessly within HubSpot.
2. Easy Setup
Using HubSpot-OperationHub-cca-compiler is straightforward. Start by cloning the project and installing the necessary dependencies with a simple command:
git clone https://github.com/Antoinebr/HubSpot-OperationHub-cca-compiler.git
cd HubSpot-OperationHub-cca-compiler
npm install
Create a .env file with your private App Token, which should look like this:
privateAppToken = "your-private-app-token"
3. Project Initialization
To create a new Custom Coded Action project, you can use the following command:
npm run init <nameOfYourProject>
For example:
npm run init my-new-custom-coded-action
This command generates a template that contains a file named cca.js. This is where you write your custom code.
4. Code Your CCA
Inside cca.js, you can write your CCA logic. The template provides a clear structure for your code, making it easy to follow. Here’s an example of a CCA that formats phone numbers:
const format = require('@sturdynut/i18n-phone-formatter');

exports.main = async (event, callback) => {
    const phoneNumber = event.inputFields.phoneNumber;

    if (!phoneNumber) throw new Error('phoneNumber is not set, are you sure you put phoneNumber in the "properties to include in code"?');

    const countryCode = event.inputFields.countryCode;

    if (!countryCode) throw an Error('countryCode is not set, are you sure you put country in the "properties to include in code"?');

    const formattedNumber = format.formatE164(countryCode, phoneNumber);

    callback({
        outputFields: {
            formattedNumber
        }
    });
}
The event.js file represents the properties you can include in your code, making it easy to interact with the data.
5. Node Modules
You can install any node modules you require for your project. Install them with npm, and then use them within your code:
npm install @sturdynut/i18n-phone-formatter
And then add it to your code :
const format = require('@sturdynut/i18n-phone-formatter');
6. Build and Deploy
After writing your CCA, build the project by running the following command:
npm run build <nameOfTheFolder>
This command creates a dist/ folder inside your project, which contains the compiled code.
Unfortunately, there’s no automated deployment for the compiled code. You will need to manually copy and paste the contents of dist/index.js into the Custom Coded Action block in HubSpot.
Conclusion
HubSpot-OperationHub-cca-compiler is a valuable tool for anyone looking to overcome limitations in HubSpot’s Operations Hub. It empowers you to work with the libraries you need, providing greater flexibility in your custom coding projects. With an easy setup process and well-structured templates, this tool streamlines the development and deployment of Custom Coded Actions, enhancing your capabilities within HubSpot.
Concept
See how it works / and implement it
PeopleDataLabs API key
You need to get an API key on the PeopleDataLabs website’s.
You need to set the peopleDataLabsAPI key in the secret, the API key has to be set in the secret section of the Custom Coded Action. Use the name peopleDataLabsAPI
Set the domain name variable
Set the variable name domainName in the property to include in code.
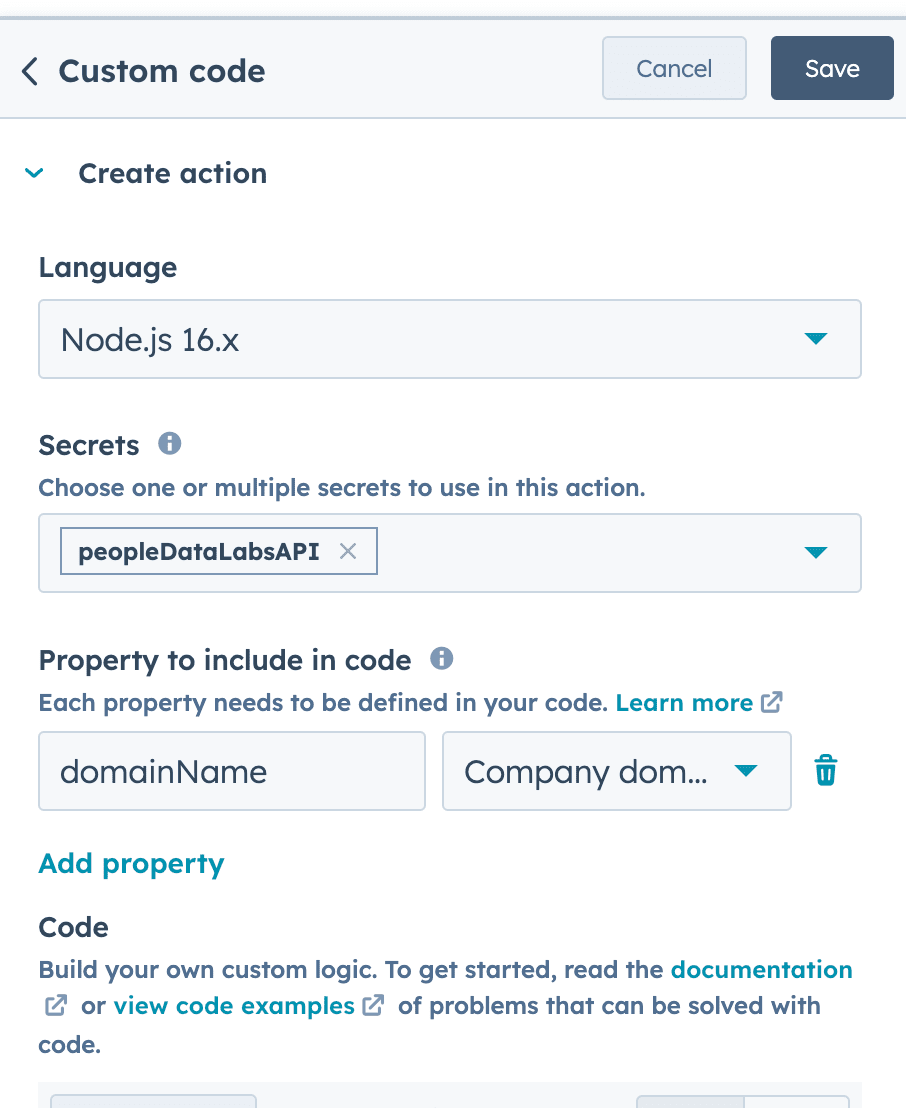
Code
Paste the following code :
const axios = require('axios');


exports.main = async (event, callback) => {

    if (!process.env.peopleDataLabsAPI) throw new Error('The peopleDataLabs API key has to be set in the secret section');

    const domainName = event.inputFields.domainName;

    if (!domainName) throw new Error('domainName is not set, are you sure you put domainName in the "properties to include in code" ? ');

    const websiteInfos = await getWebsiteInfos(domainName).catch(axiosErrorHandler)

    if (!websiteInfos.data) throw new Error(`We couldn't grab your websiteInfos infos`);

    const {
        name,
        size,
        employee_count,
        id,
        founded,
        industry,
        linkedin_id,
        linkedin_url,
        facebook_url,
        twitter_url,
        summary
    } = websiteInfos.data;


    callback({
        outputFields: {
            name,
            size,
            employee_count,
            id,
            founded,
            industry,
            linkedin_id,
            linkedin_url,
            facebook_url,
            twitter_url,
            summary
        }
    });

}


/**
 * Retrieves information about a website's associated company using the PeopleDataLabs API.
 *
 * @async
 * @function
 * @param {string} domainName - The domain name of the website for which you want to fetch information.
 * @throws {Error} Throws an error if domainName is not a string or if it is empty.
 * @returns {Promise<Object>} A Promise that resolves to an object containing information about the company.
 * @see {@link https://docs.peopledatalabs.com/|PeopleDataLabs API Documentation}
 */
const getWebsiteInfos = async (domainName) => {

    if (typeof domainName !== 'string' || domainName.trim() === '') throw new Error('Invalid domainName parameter. It must be a non-empty string.');
    // Construct the API endpoint URL with the provided domainName and API key.
    const endpoint = `https://api.peopledatalabs.com/v5/company/enrich?api_key=${process.env.peopleDataLabsAPI}&pretty=True&website=${domainName}`;

    // Make a GET request to the API and return the result.
    return axios.get(endpoint);
}

/**
 * Handles errors thrown by axios requests and logs relevant information.
 *
 * @param {Error} e - The error object thrown by axios.
 */
const axiosErrorHandler = e => {
    console.log(e);
    //console.log("The : ", e.config.method, " call on", e.config.url, "failed");
    console.log("error code retuned ", e.code);
    console.log("error data returned ", e.response.data);

}
Set the output / to use the data in the WorkFlow
name,
size,
employee_count,
id,
founded,
industry,
linkedin_id,
linkedin_url,
facebook_url,
twitter_url,
summary
Like so :
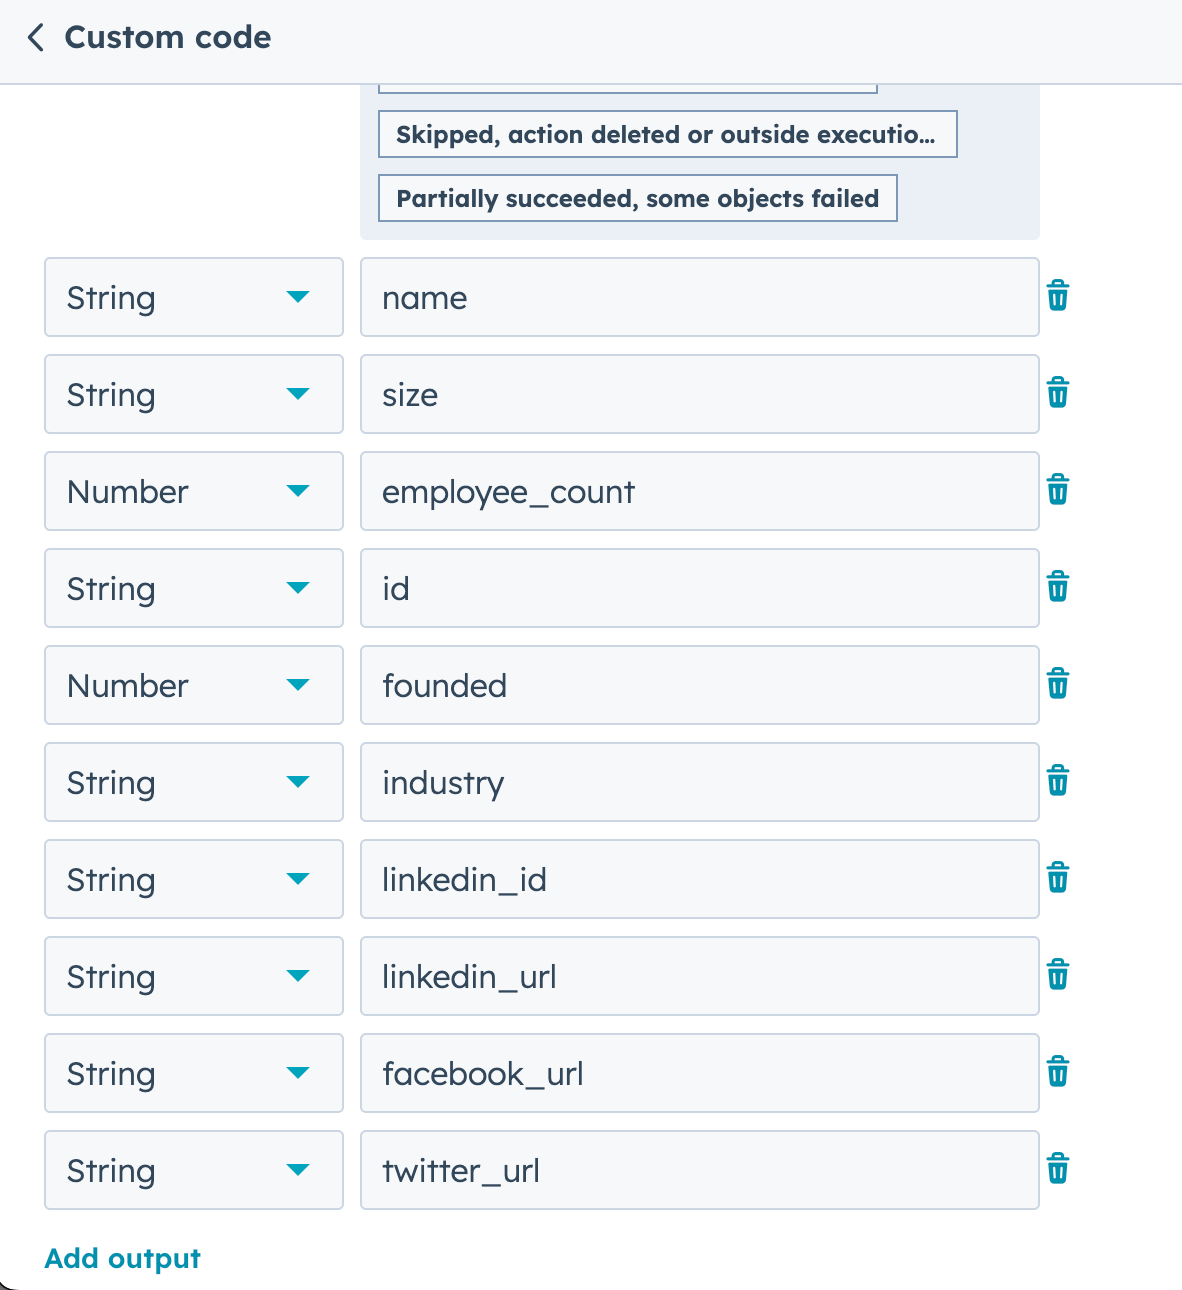
Then don’t forget to finish the logic with copy property values blocks to update the company record.
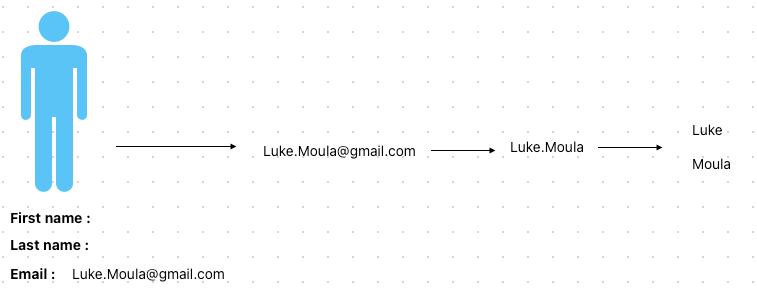
The logic / to find the firstname and gender
The idea is to split an email by a delimiter if one exists, then search in a huge first names list for a match.
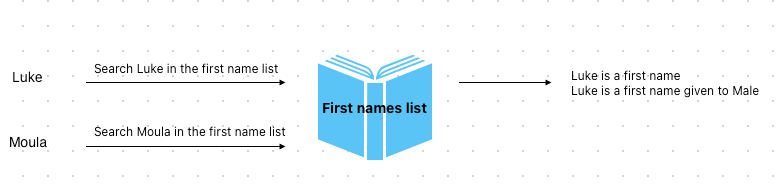
Demo / see the logic in action
Take a look at this video to see the logic in action
Implement / in your portal
Follow this video to implement this Custom Coded Action
The code / ready to be used
Here’s where you will find the code :
The source / code
Here’s the logic I created, but do not use this code in the Custom Coded Action ! Use the link above.
( This code is just the source code requires a extra build step ( Webpack ) ) this is why you can’t use that code directly.
const firstnames = require('./firstnames.js');

exports.main = async (event, callback) => {

    const email = event.inputFields.email;
    if (!email) throw new Error('email is not set, are you sure you put email in the "properties to include in code" ? ');

    const emailWithoutDomain = email.split('@')[0];


    const firstNameAndLastName = splitString(emailWithoutDomain);

    if(firstNameAndLastName.length === 1) throw new Error(`${email} can't be splitted by a separator`);

    const chunks = splitString(emailWithoutDomain).map(chunk => capitalizeString(chunk));

    const firstNameFound = [];

    for (const chunk of chunks) {

        if (firstnames[chunk]) {
            firstNameFound.push({
                firstName: chunk,
                gender: firstnames[chunk].gender
            });
        }
    }

    if(firstNameFound.length === 0) throw new Error('The firstName was not in the database');


    callback({
        outputFields: {
            gender: firstNameFound.length > -1 ? firstNameFound[0].gender : "N/A",
            firstName: firstNameFound.length > -1 ? firstNameFound[0].firstName : "N/A"
        }
    });

}


/**
 * Splits a string into an array of parts based on delimiters such as commas, dashes, underscores, dots, and forward slashes.
 *
 * @param {string} str - The string to be split.
 * @returns {array} - An array of the split string parts.
 */
const splitString = (str) => {
    return str.split(/[-_.]+/);
}

exports.splitString = splitString;


/**
 * Capitalizes the first character of a string.
 *
 * @param {string} str - The string to capitalize.
 * @returns {string} - The capitalized string.
 */
const capitalizeString = (str) => {
    return str.charAt(0).toUpperCase() + str.slice(1);
}
exports.capitalizeString = capitalizeString;
The logic we want to create

As you can see the deal is renamed based on the existing deals
Prerequisites
- HubSpot and Operations Hub
- Basic JavaScript knowledge
- Node.js installed on your computer ( if you want to follow along the coding part )
- An API key for your portal ( private App token )
The logic
- In a WorkFlow for every new deals which do not contain a given separator here
-RQ - First we ask the HubSpot API the latest deal containing
-RQ - Split the name by the separator to get the numeric value after the separator
- Add one to this value
- Build the new deal name and return it to the Workflow
How to / tutorial
In this video I explain the concept, then I show you how to code the logic and how to implement it.
The code
Here’s the final code which you can implement in your portal :
/***
 *  SET THE SEPARTOR
 *  Here set the separator
 *  If your deals name are Deal-RQ001 then set "-RQ" as a sepator
 *  The code will read the latest deal
 */

const separator = "-RQ";


const axios = require('axios');

const axiosConfig = {
    headers: {
        authorization: `Bearer ${process.env.privateAppToken}`
    }
};

exports.main = async (event, callback) => {

    if (!separator || separator === "") throw new Error('separator is not set, are you sure you put separator in the code ? ( see first lines )');

    const dealName = event.inputFields.dealName;

    if (!dealName) throw new Error('dealName is not set, are you sure you put dealName in the "properties to include in code" ? ');

    const deals = await searchDealsWithSeparator(separator).catch(axiosErrorHandler);

    console.log(deals.data.results[0].properties.dealname);

    const latestDealName = deals.data.results[0].properties.dealname;


    if (!latestDealName.includes(separator)) throw new Error("The deal doesn't contain the right separator")

    const numericValueAfterSeparator = latestDealName.split(separator)[1]


    const newNumericValue = parseInt(numericValueAfterSeparator) + 1;


    callback({
        outputFields: {
            newDealName: `${dealName}${separator}${newNumericValue}`
        }
    });

}


const getLastestsDeals = async () => {

    const endpoint = `https://api.hubapi.com/deals/v1/deal/recent/`;

    return axios.get(endpoint, axiosConfig);
}


const searchDealsWithSeparator = async (separator) => {

    const endpoint = `https://api.hubapi.com/crm/v3/objects/deals/search`;

    return axios.post(endpoint, {
        "filterGroups": [{
            "filters": [{
                "value": `*${separator}*`,
                "propertyName": "dealname",
                "operator": "CONTAINS_TOKEN"
            }]
        }],
        "properties": [
            "hubspot_owner_id",
            "dealname",
            "name"
        ],
        "sorts": [{
            "propertyName": "id",
            "direction": "DESCENDING"
        }],
        "limit": 1,
        //"after": after
    }, axiosConfig);

}
/**
 * Handles errors thrown by axios requests and logs relevant information.
 *
 * @param {Error} e - The error object thrown by axios.
 */
const axiosErrorHandler = e => {
    console.log("The : ", e.config.method, " call on", e.config.url, "failed");
    console.log("error code retuned ", e.code);
    console.log("error data returned ", e.response.data);
}
Enrichir son CRM HubSpot en se basant sur le SIRET
Le registre du commerce à beaucoup d’informations sur vos clients, le SIRET peut vous aider à les récupérer et enrichir votre CRM.
Depuis le numéro SIRET, vous pouvez notamment récupérer la raison sociale exacte d’une entreprise son effectif ou encore son adresse postale.
Concept et démonstration
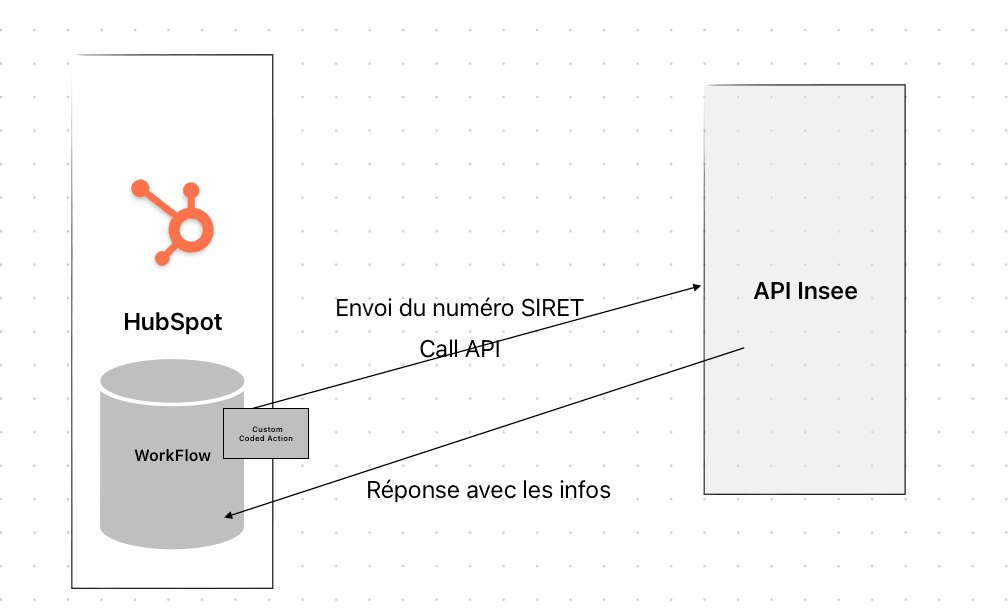
Concept de l’appel à une API via Operations Hub
Le principe est assez simple, un WorkFlow utilisera un block Custom Code pour envoyer une requête à l’API de l’INSEE pour demander des infos.
Si l’API de l’INSEE renvoie les informations, alors nous les sauvegardons dans l’objet entreprise. Rien de plus simple.
Démonstration de l’intégration
Mieux qu’un long discours, j’ai enregistré une courte vidéo qui montre cette intégration en fonctionnement. Dans cette video je vais montrer les informations que renvoie l’API à HubSpot.
Pourquoi ne peut on pas trouver le numéro SIRET d’une entreprise ?
En fait l’API SIREN le propose, mais le soucis se trouve sur la clé de recherche.Je m’explique, si vous cherchez un numéro de SIRET en se basant sur nom de l’entreprise, vous allez avoir énormement de réponses… Et que faire avec 25, 30… SIRET, comment décider celui qui correspond à l’entreprise que vous avez dans le CRM ?.. C’est compliqué, il faudrait rafiner la data.
De ce fait je n’aborderais pas ce point dans l’article.
Prérequis
Pour mettre en place cette intégration, il vous faudra Operations Hub pro, car nous allons utiliser le block custom code. Vous allez aussi avoir besoin de créer un compte sur le site de l’INSEE pour récupérer un accès à l’API.
Il va aussi vous fallour une propriété SIREN dans vos entrerprises ou contacts
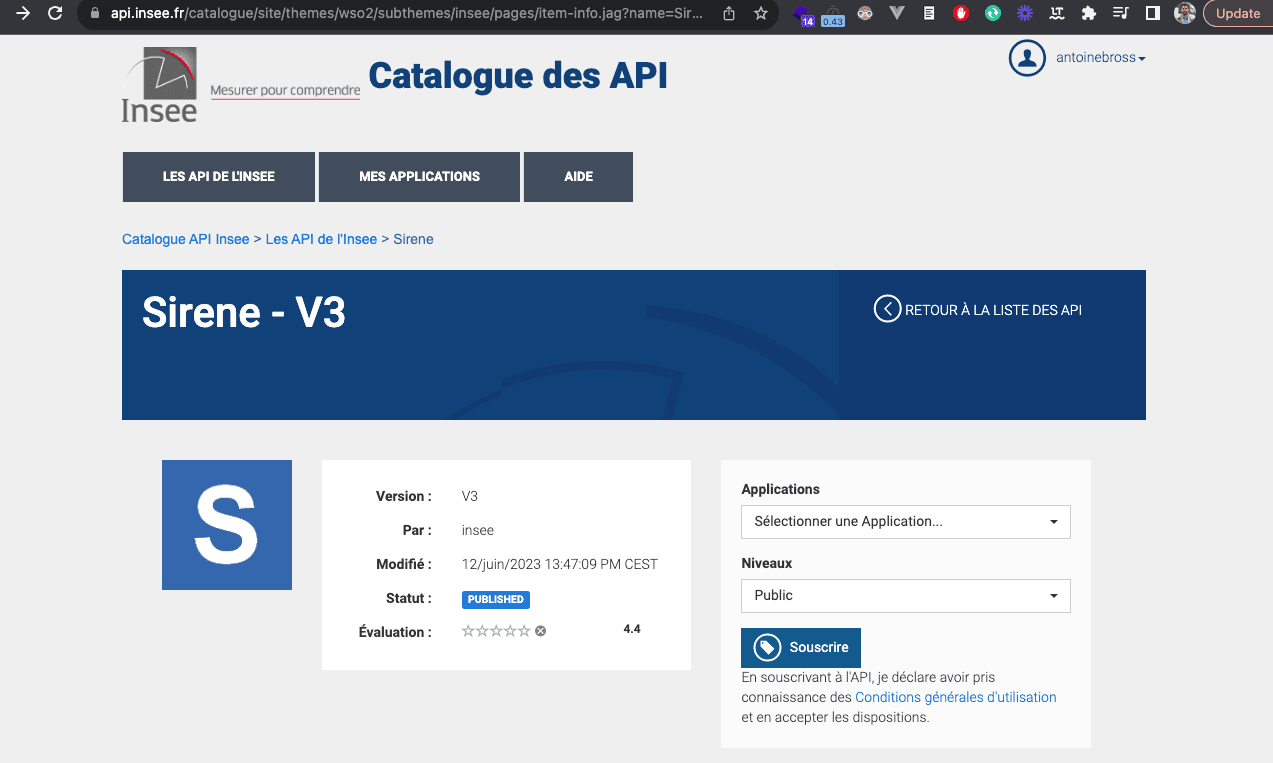
Créer un compte api.insee.fr
Il vous faut un compte INSEE, rendez-vous sur cette URL pour ce faire.

Cliquez sur créer son compte

Remplissez le formulaire :

Souscrivez à l’API SIREN
Générez un jeton d’accès
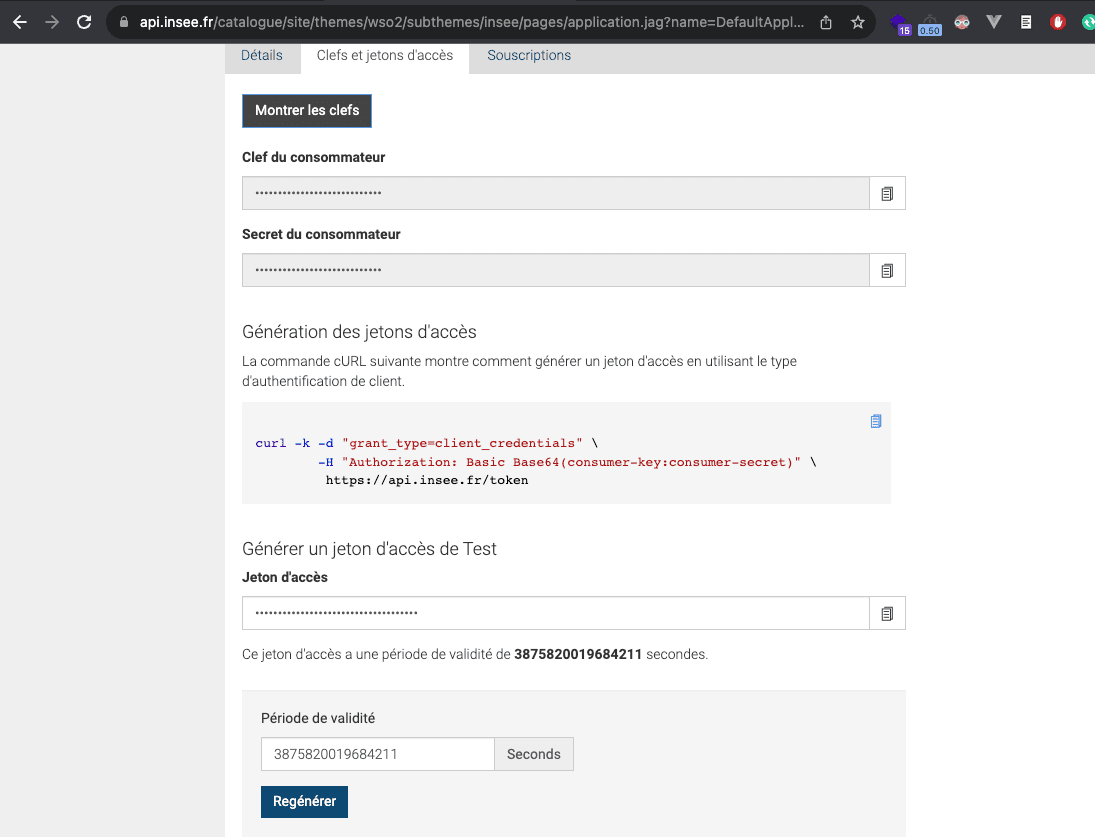
J’ai mis en place un jeton d’accès qui n’expire jamais en metant la valeur la plus élevée possible, j’ai mis : 3875820019684211 secondes.
Mettre en place le workflow
Créez un WorkFlow qui se base sur entreprise ou autre.
Le trigger du WorkFlow
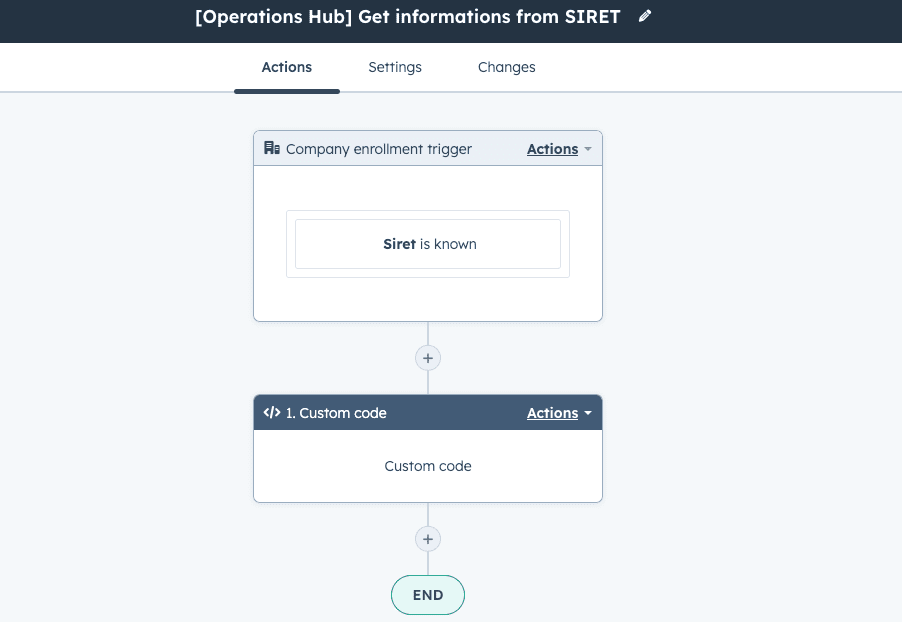
Installez le custom code
Séléctionnez le language
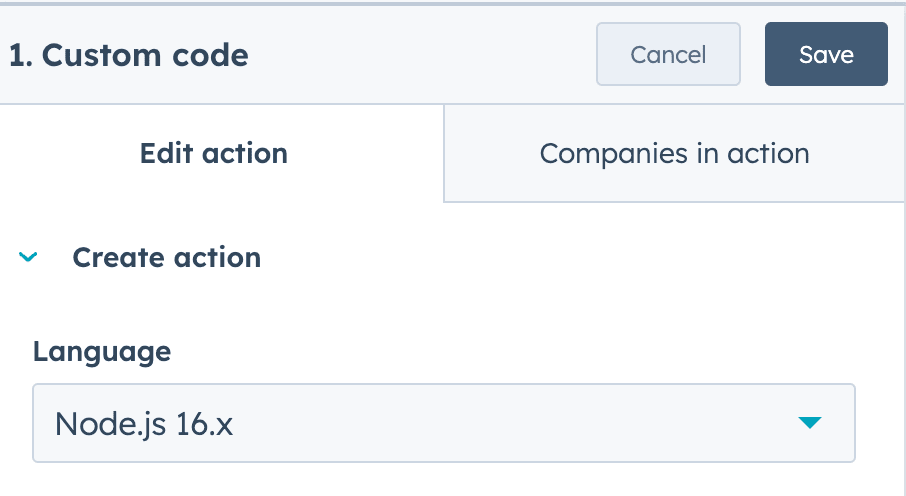
Ici notre Custom Coded Action est écrite en JavaScript il vous faut donc séléctionner Node.js comme language.
Insérez votre jetons d’accès comme secret
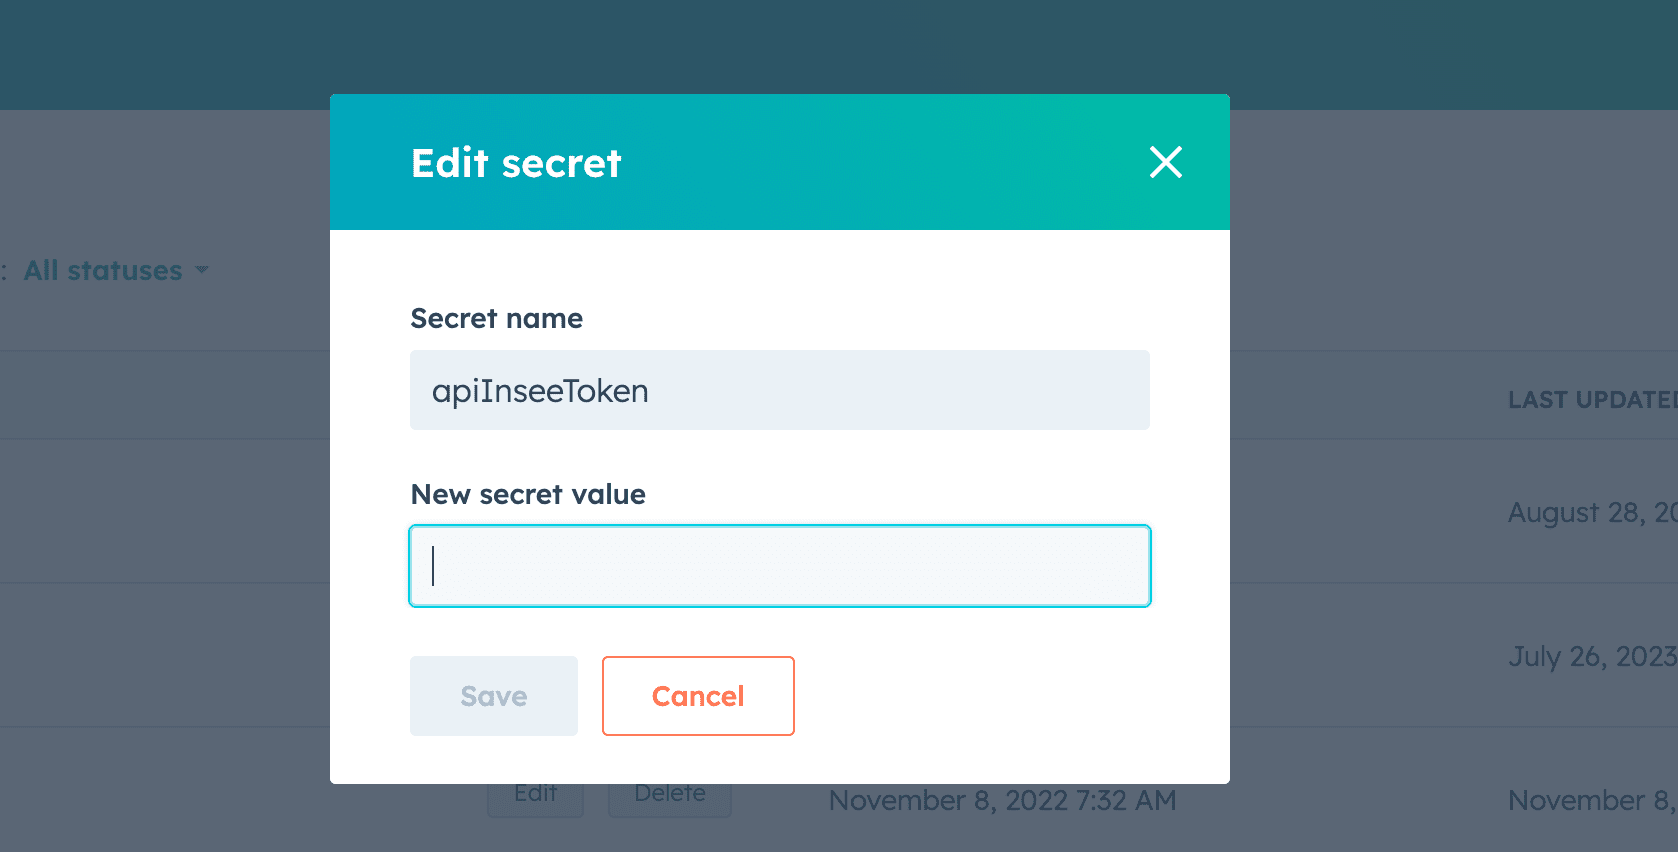
Nommez votre secret apiInseeToken attention de en pas rajouter ou d’enlever des majuscules ou des espaces.
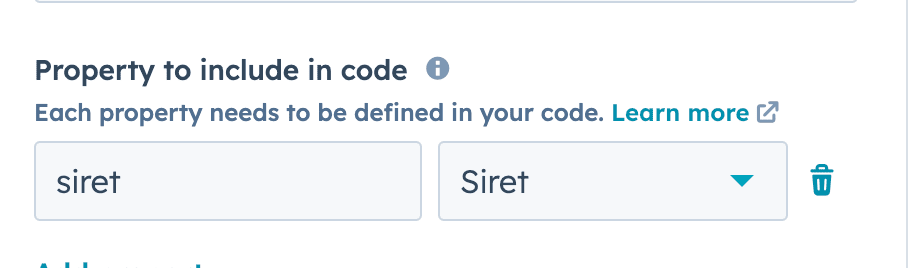
Ajoutez une variable SIRET
La variable siret correspond à la porpriété qui cotient le numéro SIRET.
Ajoutez-la comme ce-ci :
Collez le code suivant :
const axios = require('axios');

const axiosConfig = {
    headers: {
        authorization: `Bearer ${process.env.apiInseeToken}`
    }
};

exports.main = async (event, callback) => {

    const siret = event.inputFields.siret;

    if (!siret) throw new Error('siret is not set, are you sure you put siret in the "properties to include in code" ? ');


    const siretInfos = await getInfosFromSiret(siret).catch(axiosErrorHandler)

    if (!siretInfos.data) throw new Error(`We couldn't grab your siretInfos`);

    /**
     *
     * Etablissement DATA
     *
     **/
    const { etablissement } = siretInfos.data;

    if (!etablissement) throw new Error(`Couldn't get the etablissement data`);

    const {
        siren,
        nic,
        statutDiffusionEtablissement,
        dateCreationEtablissement,
        trancheEffectifsEtablissement,
        anneeEffectifsEtablissement,
        activitePrincipaleRegistreMetiersEtablissement,
        dateDernierTraitementEtablissement,
        etablissementSiege,
        nombrePeriodesEtablissement,
    } = etablissement;


    /**
     *
     * Etablissement Unite Legale
     *
     **/

    let etatAdministratifUniteLegale = null;
    let statutDiffusionUniteLegale = null;
    let dateCreationUniteLegale = null;
    let categorieJuridiqueUniteLegale = null;
    let denominationUniteLegale = null;
    let sigleUniteLegale = null;
    let denominationUsuelle1UniteLegale = null;
    let denominationUsuelle2UniteLegale = null;
    let denominationUsuelle3UniteLegale = null;
    let sexeUniteLegale = null;
    let nomUniteLegale = null;
    let nomUsageUniteLegale = null;
    let prenom1UniteLegale = null;
    let prenom2UniteLegale = null;
    let prenom3UniteLegale = null;
    let prenom4UniteLegale = null;
    let prenomUsuelUniteLegale = null;
    let pseudonymeUniteLegale = null;
    let activitePrincipaleUniteLegale = null;
    let nomenclatureActivitePrincipaleUniteLegale = null;
    let identifiantAssociationUniteLegale = null;
    let economieSocialeSolidaireUniteLegale = null;
    let societeMissionUniteLegale = null;
    let caractereEmployeurUniteLegale = null;
    let trancheEffectifsUniteLegale = null;
    let anneeEffectifsUniteLegale = null;
    let nicSiegeUniteLegale = null;
    let dateDernierTraitementUniteLegale = null;
    let anneeCategorieEntreprise = null;


    if (typeof etablissement.uniteLegale !== "undefined") {

        etatAdministratifUniteLegale = etablissement.uniteLegale.etatAdministratifUniteLegale;
        statutDiffusionUniteLegale = etablissement.uniteLegale.statutDiffusionUniteLegale;

        dateCreationUniteLegale = etablissement.uniteLegale.dateCreationUniteLegale;
        categorieJuridiqueUniteLegale = etablissement.uniteLegale.categorieJuridiqueUniteLegale;
        denominationUniteLegale = etablissement.uniteLegale.denominationUniteLegale;
        sigleUniteLegale = etablissement.uniteLegale.sigleUniteLegale;

        denominationUsuelle1UniteLegale = etablissement.uniteLegale.denominationUsuelle1UniteLegale;
        denominationUsuelle2UniteLegale = etablissement.uniteLegale.denominationUsuelle2UniteLegale;
        denominationUsuelle3UniteLegale = etablissement.uniteLegale.denominationUsuelle3UniteLegale;

        sexeUniteLegale = etablissement.uniteLegale.sexeUniteLegale;
        nomUniteLegale = etablissement.uniteLegale.nomUniteLegale;
        nomUsageUniteLegale = etablissement.uniteLegale.nomUsageUniteLegale;

        prenom1UniteLegale = etablissement.uniteLegale.prenom1UniteLegale;
        prenom2UniteLegale = etablissement.uniteLegale.prenom2UniteLegale;
        prenom3UniteLegale = etablissement.uniteLegale.prenom3UniteLegale;

        prenom4UniteLegale = etablissement.uniteLegale.prenom4UniteLegale;
        prenomUsuelUniteLegale = etablissement.uniteLegale.prenomUsuelUniteLegale;
        pseudonymeUniteLegale = etablissement.uniteLegale.pseudonymeUniteLegale;


        activitePrincipaleUniteLegale = etablissement.uniteLegale.activitePrincipaleUniteLegale;
        nomenclatureActivitePrincipaleUniteLegale = etablissement.uniteLegale.nomenclatureActivitePrincipaleUniteLegale;
        identifiantAssociationUniteLegale = etablissement.uniteLegale.identifiantAssociationUniteLegale;

        economieSocialeSolidaireUniteLegale = etablissement.uniteLegale.economieSocialeSolidaireUniteLegale;
        societeMissionUniteLegale = etablissement.uniteLegale.societeMissionUniteLegale;
        caractereEmployeurUniteLegale = etablissement.uniteLegale.caractereEmployeurUniteLegale;

        trancheEffectifsUniteLegale = etablissement.uniteLegale.trancheEffectifsUniteLegale;
        anneeEffectifsUniteLegale = etablissement.uniteLegale.anneeEffectifsUniteLegale;
        nicSiegeUniteLegale = etablissement.uniteLegale.nicSiegeUniteLegale;

        dateDernierTraitementUniteLegale = etablissement.uniteLegale.dateDernierTraitementUniteLegale;
        anneeCategorieEntreprise = etablissement.uniteLegale.anneeCategorieEntreprise;
    }

    /*
     *
     * Adresse Etablissement
     *
     */


    let complementAdresseEtablissement = null;
    let numeroVoieEtablissement = null;
    let indiceRepetitionEtablissement = null;
    let typeVoieEtablissement = null;
    let libelleVoieEtablissement = null;
    let codePostalEtablissement = null;
    let libelleCommuneEtablissement = null;
    let libelleCommuneEtrangerEtablissement = null;
    let distributionSpecialeEtablissement = null;
    let codeCommuneEtablissement = null;
    let codeCedexEtablissement = null;
    let libelleCedexEtablissement = null;
    let codePaysEtrangerEtablissement = null;
    let libellePaysEtrangerEtablissement = null;

    if (typeof etablissement.adresseEtablissement !== "undefined") {

        complementAdresseEtablissement = etablissement.adresseEtablissement.complementAdresseEtablissement;
        numeroVoieEtablissement = etablissement.adresseEtablissement.numeroVoieEtablissement;
        indiceRepetitionEtablissement = etablissement.adresseEtablissement.indiceRepetitionEtablissement;
        typeVoieEtablissement = etablissement.adresseEtablissement.typeVoieEtablissement;
        libelleVoieEtablissement = etablissement.adresseEtablissement.libelleVoieEtablissement;
        codePostalEtablissement = etablissement.adresseEtablissement.codePostalEtablissement;
        libelleCommuneEtablissement = etablissement.adresseEtablissement.libelleCommuneEtablissement;
        libelleCommuneEtrangerEtablissement = etablissement.adresseEtablissement.libelleCommuneEtrangerEtablissement;
        distributionSpecialeEtablissement = etablissement.adresseEtablissement.distributionSpecialeEtablissement;
        codeCommuneEtablissement = etablissement.adresseEtablissement.codeCommuneEtablissement;
        codeCedexEtablissement = etablissement.adresseEtablissement.codeCedexEtablissement;
        libelleCedexEtablissement = etablissement.adresseEtablissement.libelleCedexEtablissement;
        codePaysEtrangerEtablissement = etablissement.adresseEtablissement.codePaysEtrangerEtablissement;
        libellePaysEtrangerEtablissement = etablissement.adresseEtablissement.libellePaysEtrangerEtablissement;
    }


    /*
     *
     * Adresse Etablissement 2
     *
     */

    let complementAdresse2Etablissement = null;
    let numeroVoie2Etablissement = null;
    let indiceRepetition2Etablissement = null;
    let typeVoie2Etablissement = null;
    let libelleVoie2Etablissement = null;
    let codePostal2Etablissement = null;
    let libelleCommune2Etablissement = null;
    let libelleCommuneEtranger2Etablissement = null;
    let distributionSpeciale2Etablissement = null;
    let codeCommune2Etablissement = null;
    let codeCedex2Etablissement = null;
    let libelleCedex2Etablissement = null;
    let codePaysEtranger2Etablissement = null;
    let libellePaysEtranger2Etablissement = null;


    if (typeof etablissement.adresse2Etablissement !== "undefined") {

        complementAdresse2Etablissement = etablissement.adresse2Etablissement.complementAdresse2Etablissement;
        numeroVoie2Etablissement = etablissement.adresse2Etablissement.numeroVoie2Etablissement;

        indiceRepetition2Etablissement = etablissement.adresse2Etablissement.indiceRepetition2Etablissement;
        typeVoie2Etablissement = etablissement.adresse2Etablissement.typeVoie2Etablissement;
        libelleVoie2Etablissement = etablissement.adresse2Etablissement.libelleVoie2Etablissement;


        codePostal2Etablissement = etablissement.adresse2Etablissement.codePostal2Etablissement;
        libelleCommune2Etablissement = etablissement.adresse2Etablissement.libelleCommune2Etablissement;
        libelleCommuneEtranger2Etablissement = etablissement.adresse2Etablissement.libelleCommuneEtranger2Etablissement;

        distributionSpeciale2Etablissement = etablissement.adresse2Etablissement.distributionSpeciale2Etablissement;
        codeCommune2Etablissement = etablissement.adresse2Etablissement.codeCommune2Etablissement;
        codeCedex2Etablissement = etablissement.adresse2Etablissement.codeCedex2Etablissement;

        libelleCedex2Etablissement = etablissement.adresse2Etablissement.libelleCedex2Etablissement;
        codePaysEtranger2Etablissement = etablissement.adresse2Etablissement.codePaysEtranger2Etablissement;
        libellePaysEtranger2Etablissement = etablissement.adresse2Etablissement.libellePaysEtranger2Etablissement;

    }


    callback({
        outputFields: {
            siren,
            nic,
            siret,
            statutDiffusionEtablissement,
            dateCreationEtablissement,
            trancheEffectifsEtablissement,
            anneeEffectifsEtablissement,
            activitePrincipaleRegistreMetiersEtablissement,
            dateDernierTraitementEtablissement,
            etablissementSiege,
            nombrePeriodesEtablissement,
            etatAdministratifUniteLegale,
            statutDiffusionUniteLegale,
            dateCreationUniteLegale,
            categorieJuridiqueUniteLegale,
            denominationUniteLegale,
            sigleUniteLegale,
            denominationUsuelle1UniteLegale,
            denominationUsuelle2UniteLegale,
            denominationUsuelle3UniteLegale,
            sexeUniteLegale,
            nomUniteLegale,
            nomUsageUniteLegale,
            prenom1UniteLegale,
            prenom2UniteLegale,
            prenom3UniteLegale,
            prenom4UniteLegale,
            prenomUsuelUniteLegale,
            pseudonymeUniteLegale,
            activitePrincipaleUniteLegale,
            nomenclatureActivitePrincipaleUniteLegale,
            identifiantAssociationUniteLegale,
            economieSocialeSolidaireUniteLegale,
            societeMissionUniteLegale,
            caractereEmployeurUniteLegale,
            trancheEffectifsUniteLegale,
            anneeEffectifsUniteLegale,
            nicSiegeUniteLegale,
            dateDernierTraitementUniteLegale,
            anneeCategorieEntreprise,
            complementAdresseEtablissement,
            numeroVoieEtablissement,
            indiceRepetitionEtablissement,
            typeVoieEtablissement,
            libelleVoieEtablissement,
            codePostalEtablissement,
            libelleCommuneEtablissement,
            libelleCommuneEtrangerEtablissement,
            distributionSpecialeEtablissement,
            codeCommuneEtablissement,
            codeCedexEtablissement,
            libelleCedexEtablissement,
            codePaysEtrangerEtablissement,
            libellePaysEtrangerEtablissement,
            complementAdresse2Etablissement,
            numeroVoie2Etablissement,
            indiceRepetition2Etablissement,
            typeVoie2Etablissement,
            libelleVoie2Etablissement,
            codePostal2Etablissement,
            libelleCommune2Etablissement,
            libelleCommuneEtranger2Etablissement,
            distributionSpeciale2Etablissement,
            codeCommune2Etablissement,
            codeCedex2Etablissement,
            libelleCedex2Etablissement,
            codePaysEtranger2Etablissement,
            libellePaysEtranger2Etablissement
        }
    });

}


const getInfosFromSiret = async (siret) => {

    if (!siret || siret === "") throw new Error('Siret is missing');

    const endpoint = `https://api.insee.fr/entreprises/sirene/V3/siret/${siret}`;

    return axios.get(endpoint, axiosConfig);
}

const searchSiret = async (query) => {

    const endpoint = `https://api.insee.fr/entreprises/sirene/V3/siren?q=periode(denominationUniteLegale:${query})`;

    return axios.get(endpoint, axiosConfig);

}

/**
 * Handles errors thrown by axios requests and logs relevant information.
 *
 * @param {Error} e - The error object thrown by axios.
 */
const axiosErrorHandler = e => {
    console.log("The : ", e.config.method, " call on", e.config.url, "failed");
    console.log("error code retuned ", e.code);
    console.log("error data returned ", e.response.data);
}
Configurez la sortie ( output function )
Sauvegarder le resultat dans le CRM
Pour sauvegarder les infos dans la fiche entreprise il suffit d’utiliser le block copy property value rien de plus simple. Il suffit de deux clics pour convertir ce que l’on a configuré dan le « data output » en propriété du CRM.
Sentiment analysis demo
The fastest way to understand what you can achieve with this automation is to watch this short video.
The concept / schema
The concept is pretty simple, first we get the message from a user, then we create a Workflow which will listen new tickets.
This Workflow sends the content of the message to an API, then the API returns the sentiment.
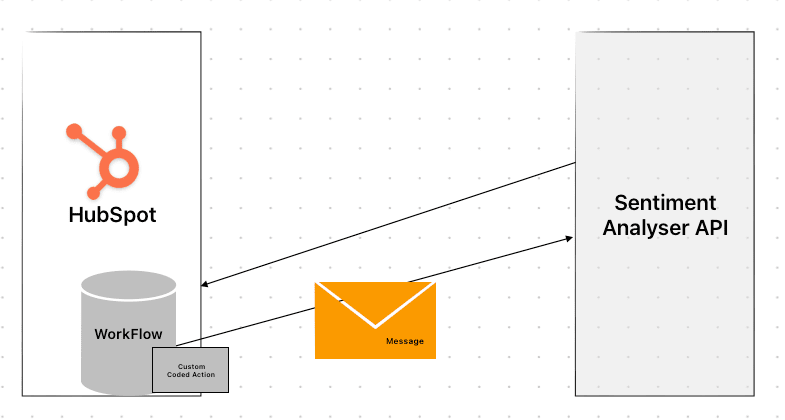
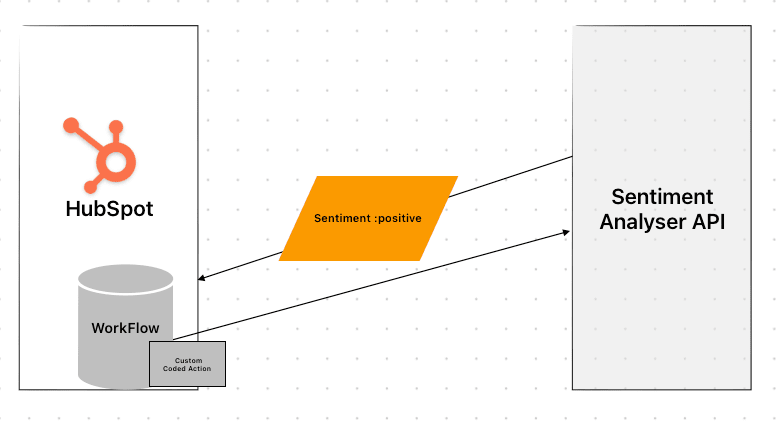
Then we save the sentiment in the ticket.
How to set it up
In this part, I will explain how to create the workflow.
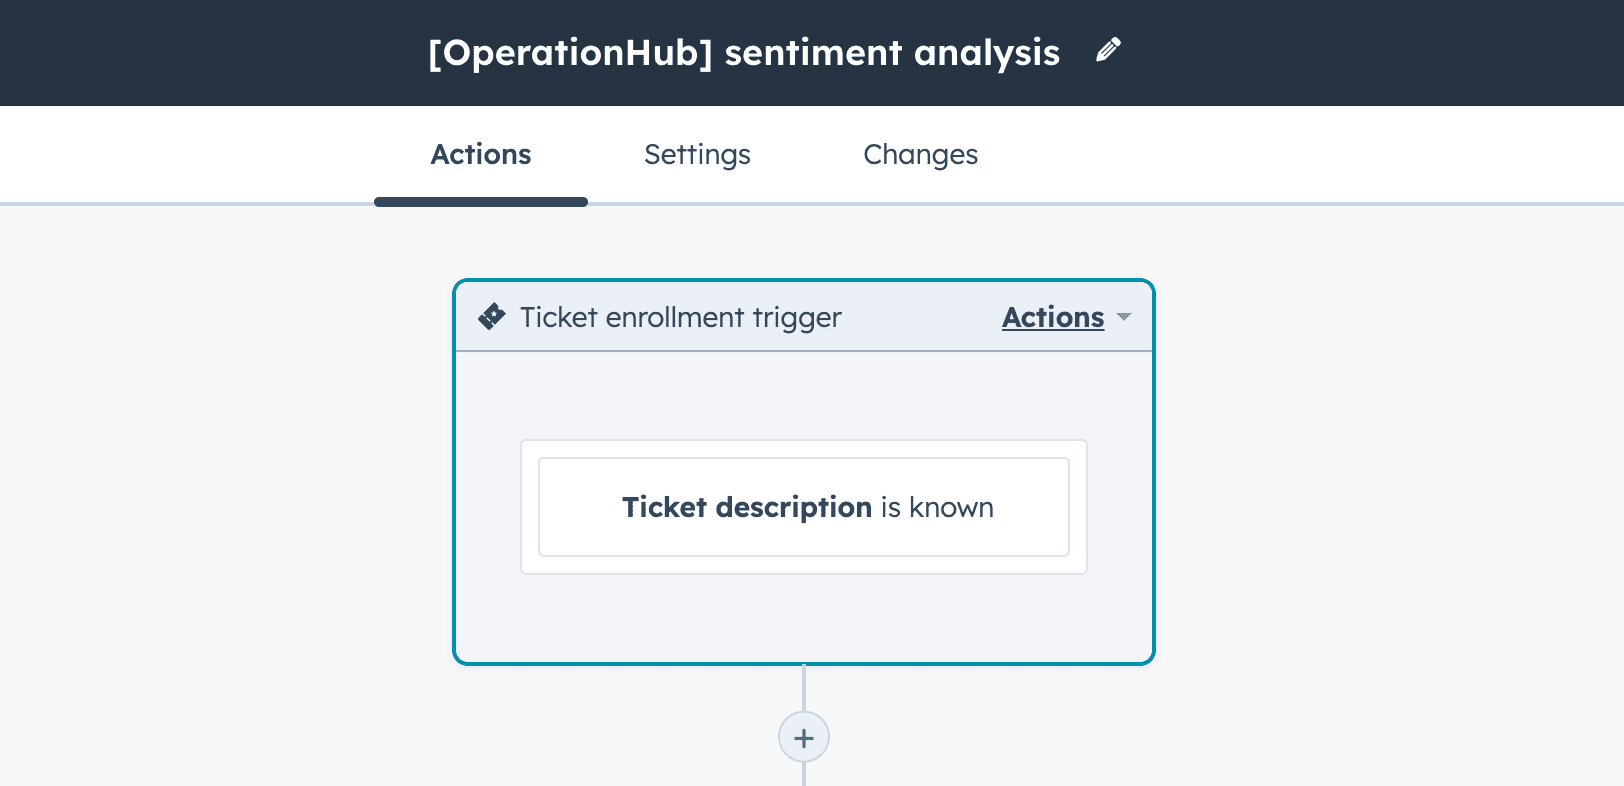
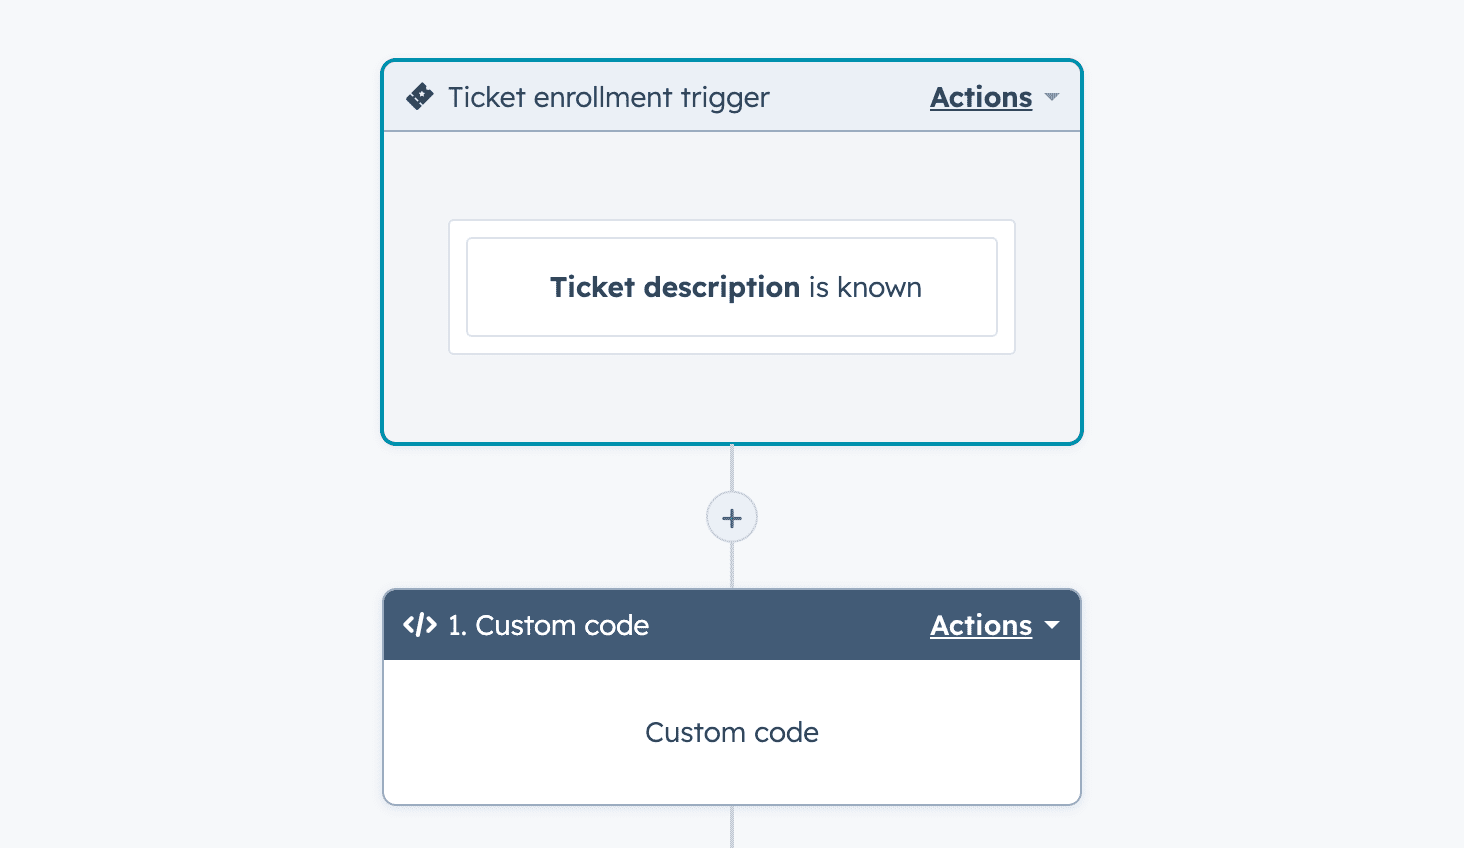
The Workflow trigger
Here’s the Workflow trigger we use is ticket description is known, so when we have a message to analyze.
Send the message to the API
Register to the API and grab an API key
We’re going to use the API Layer sentiment analysis API.
First go on this link and register, then find the Sentiment Analysis API
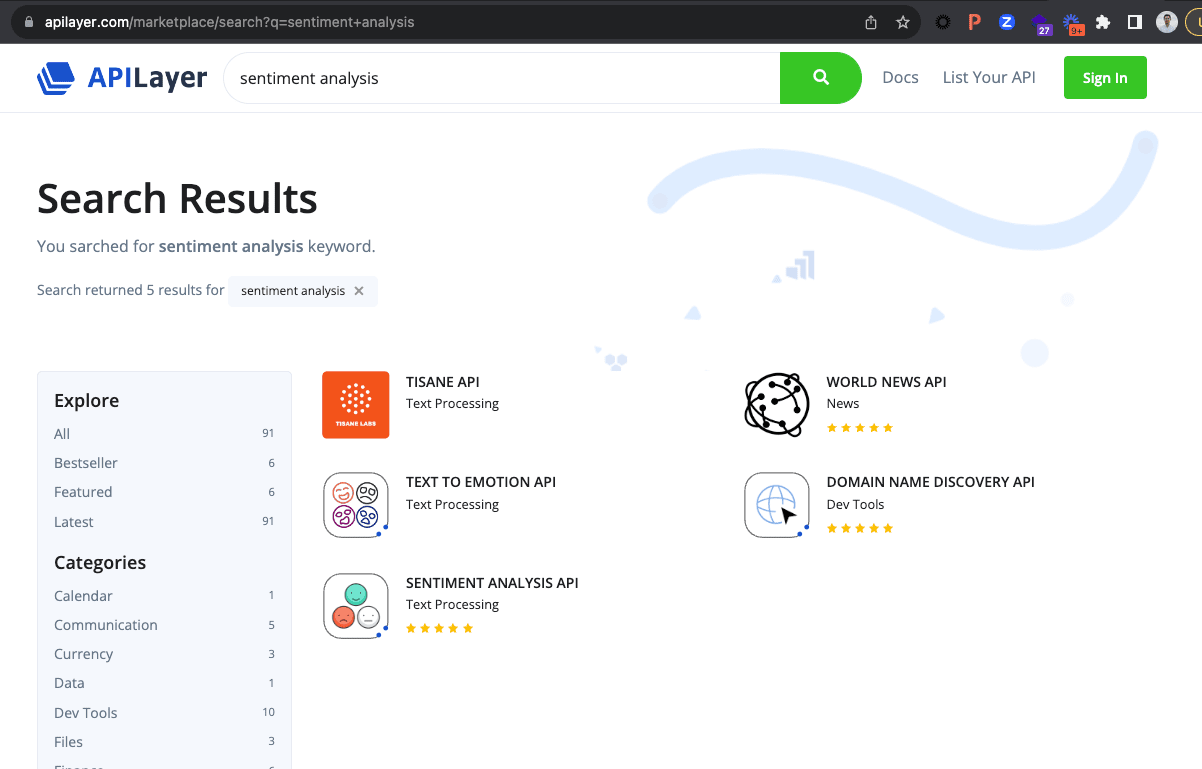
Take the free plan as you can analyze up to 1000 messages per month.
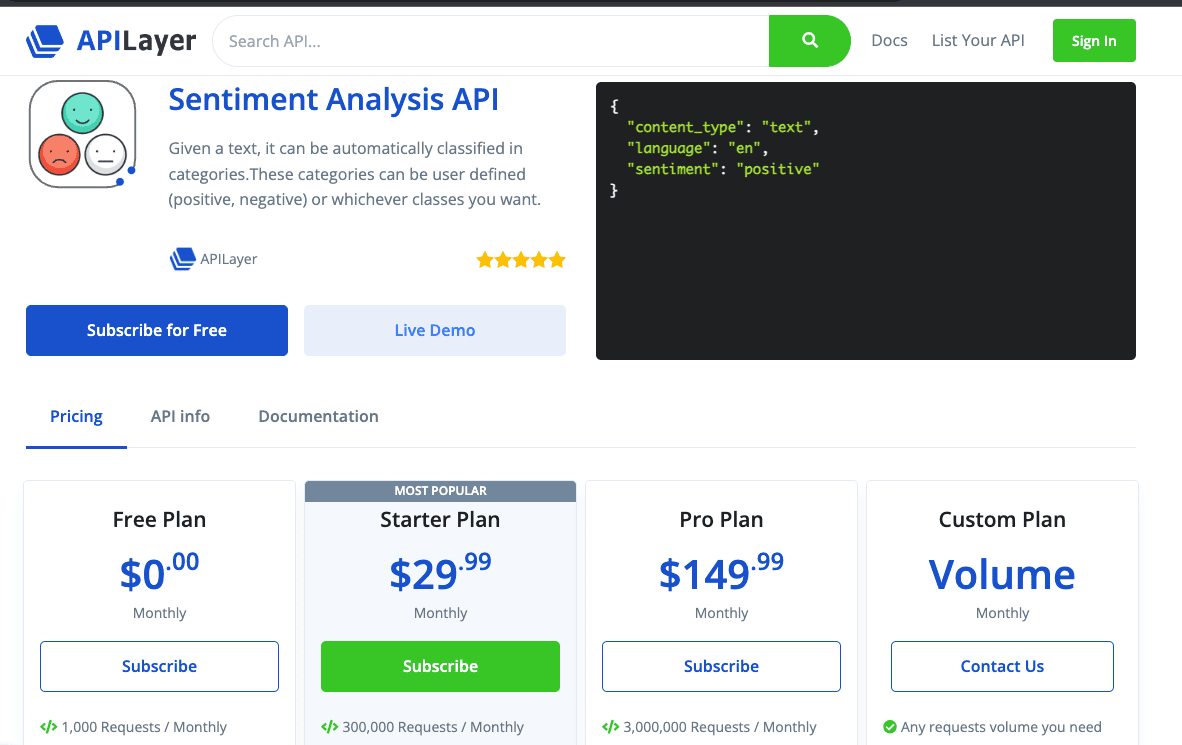
Then Get the API key :

Set up the code in the custom coded action
To send the message to the API, we use the custom code block, so create one.
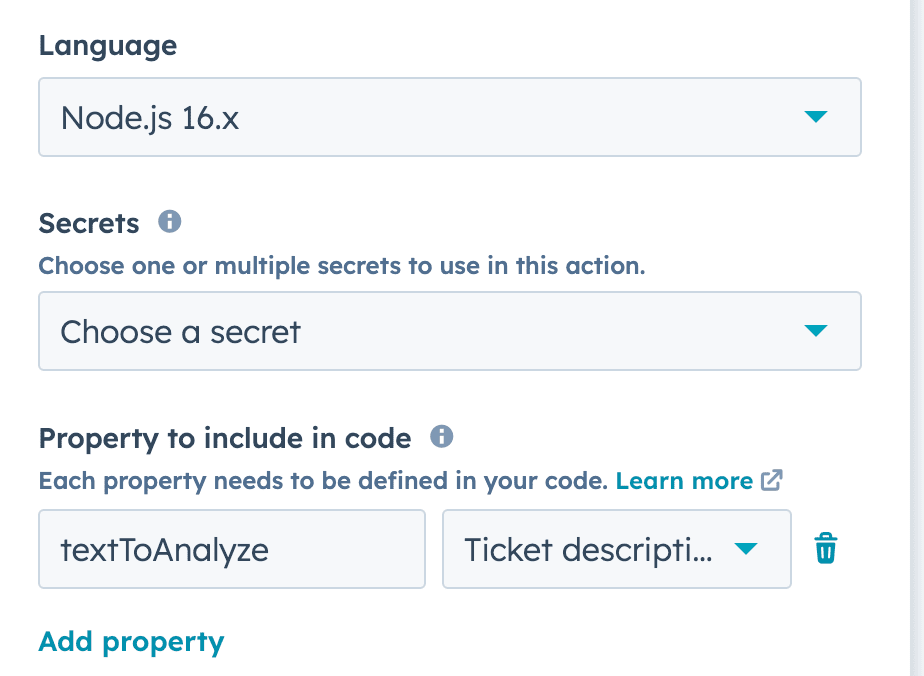
For the language pick Node.js :
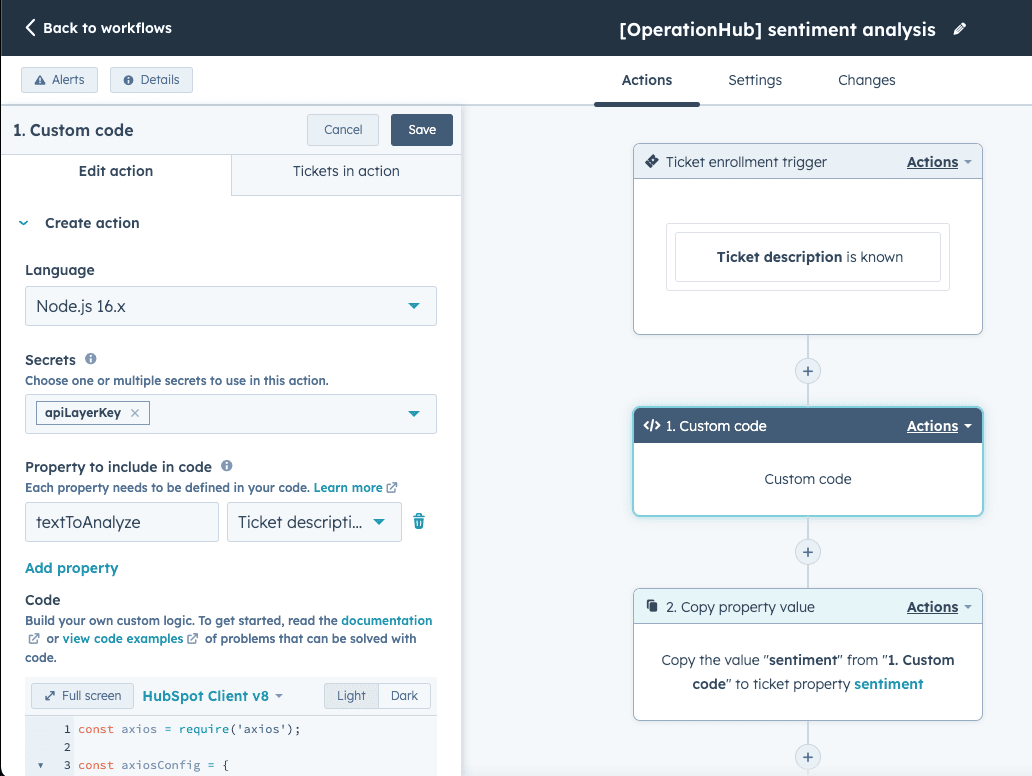
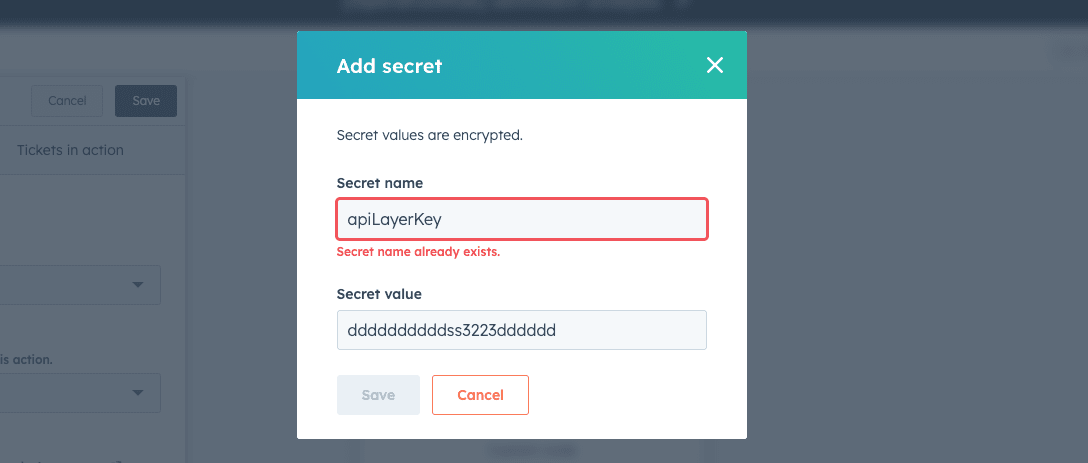
Then add a secret with the name : apiLayerKey , so click on add secret and paste the API key you got from API layer as the value.
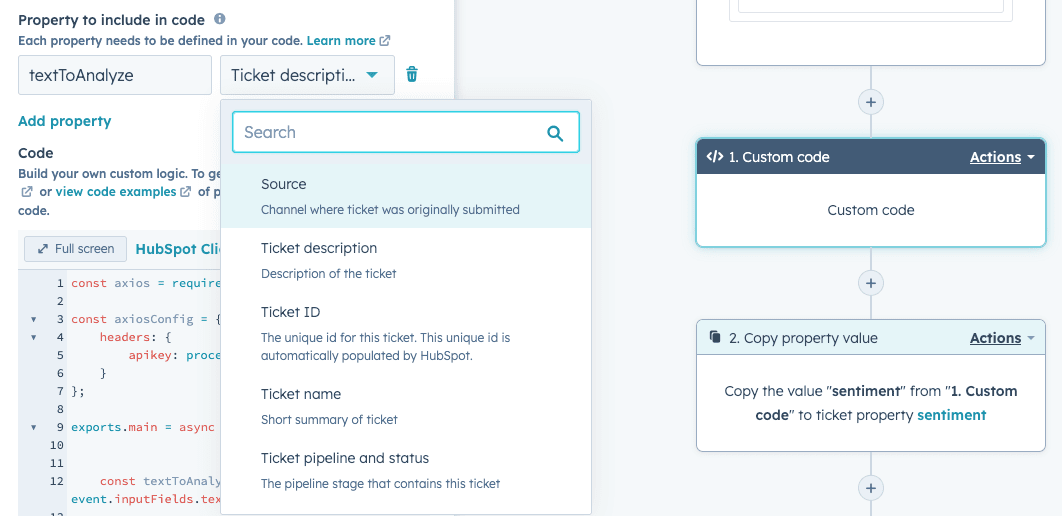
Then add the message you want to analyze here, in my example I would like to analyze the Ticket description so in the section property to include in code I pick the ticket property Ticket description
On the left of the dropdown we have to name our property, put the name : textToAnalyze do not change the casing and do not add extra white spaces.
Paste the code :
In the code section remove everything then paste the following code :
const axios = require('axios');

const axiosConfig = {
    headers: {
        apikey: process.env.apiLayerKey
    }
};

exports.main = async (event, callback) => {


    const textToAnalyze = event.inputFields.textToAnalyze;

    if (!textToAnalyze) throw new Error('textToAnalyze is not set, are you sure you put textToAnalyze in the "properties to include in code" ? ');


    const analysis = await analyzeSentiment(textToAnalyze).catch(axiosErrorHandler)

    if (!analysis.data) throw new Error(`We couldn't grab the analysis infos`);

    const { sentiment, language, confidence } = analysis.data;

    callback({
        outputFields: {
            sentiment,
            language,
            confidence
        }
    });

}


const analyzeSentiment = body => {

    if (!body) throw new Error(`There's no body`);

    const endpoint = `https://api.apilayer.com/sentiment/analysis`;

    return axios.post(endpoint, body, axiosConfig);

}


/**
 * Handles errors thrown by axios requests and logs relevant information.
 *
 * @param {Error} e - The error object thrown by axios.
 */
const axiosErrorHandler = e => {
    console.log("The : ", e.config.method, " call on", e.config.url, "failed");
    console.log("error code retuned ", e.code);
    console.log("error data returned ", e.response.data);
}
Add the output
The Custom Coded Action outputs’ is the data returned by the block to the workflow. In other words, the data other workflow blocks will be capable to use.
So in the output section add the following with the appropriate types (the order doesn’t matter)
string : sentiment
string : language
number : confidence

Test the logic
Now you can save the block, before that you can also give it a try by analyzing one of the existing ticket
Save the result in the ticket
To save the result in the ticket, nothing easier, just use the copy property value block.
Use the sentiment value for the automation
Starting from here, you have the sentiment in your workflow, a so lot of automation can be run based on this. Why not sending an internal message to the contact owner ? This is the power of the workflows, so the automations are up to you.
Write your first Custom Coded Action
In this article I’m will guide you and how to create your first Custom Coded Action. If you are not a developer this article is for you. I will explain without too much sideways how to create your first Custom Coded Action.
Let’s get started
Anatomy of a Custom Coded Action
First create a Workflow in my example I created one based on contact.
Then click on the plus sign to add a new block.
![]()
Select the Custom Code block
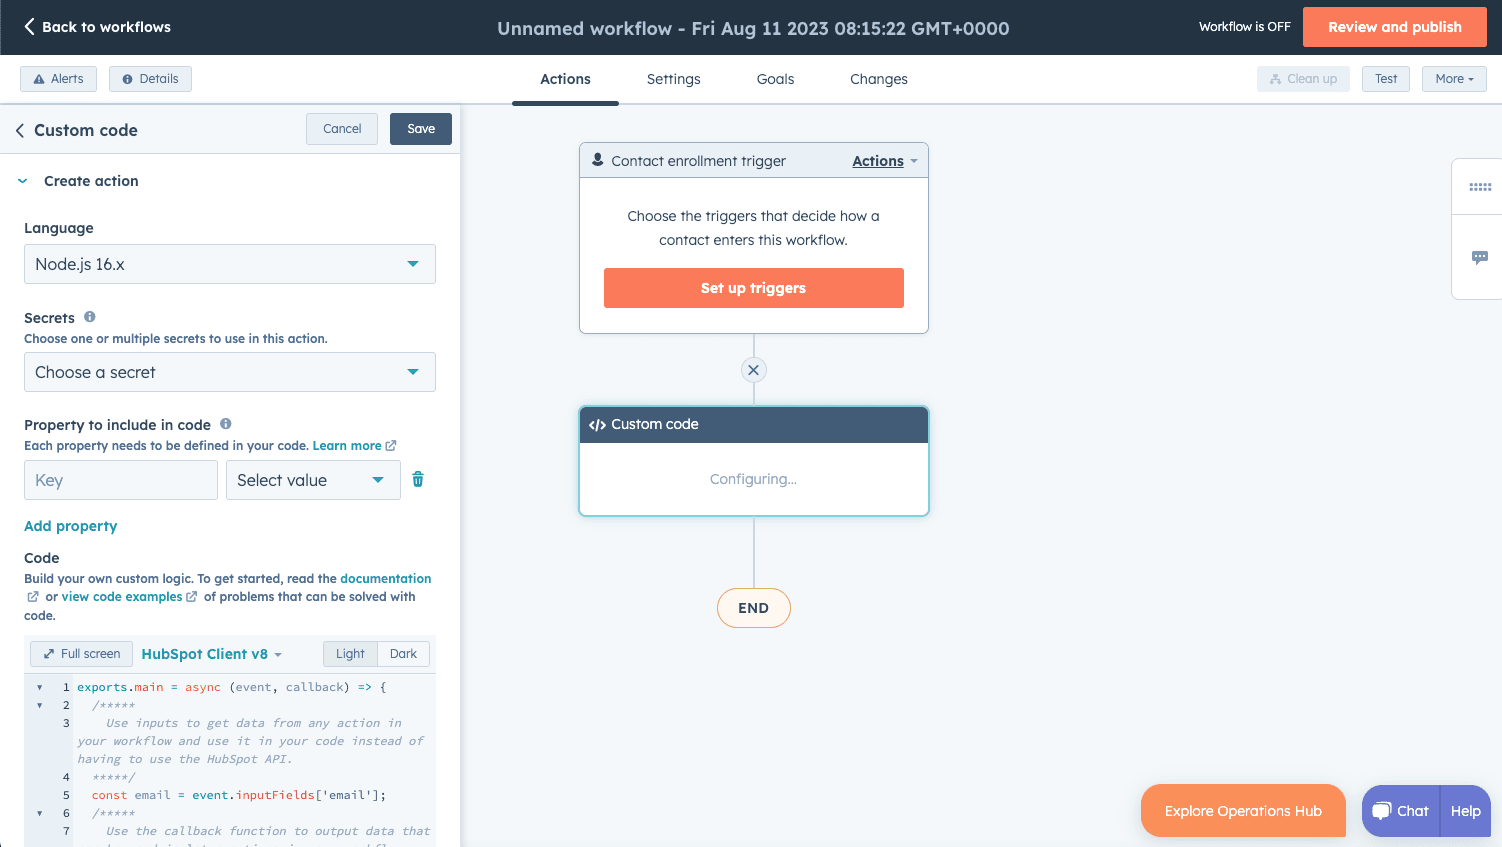
The code
Let’s take a look at the default code provided by HubSpot :
Variables
To use a custom property in your code, you have to select it in the « property to include in code » section.
Here I selected two contact properties : Email and carPlate to select the properties you want to use in your code click on the dropdown.
Then on the fields on the left you can set the variable name you want. Here I ketp the default names.
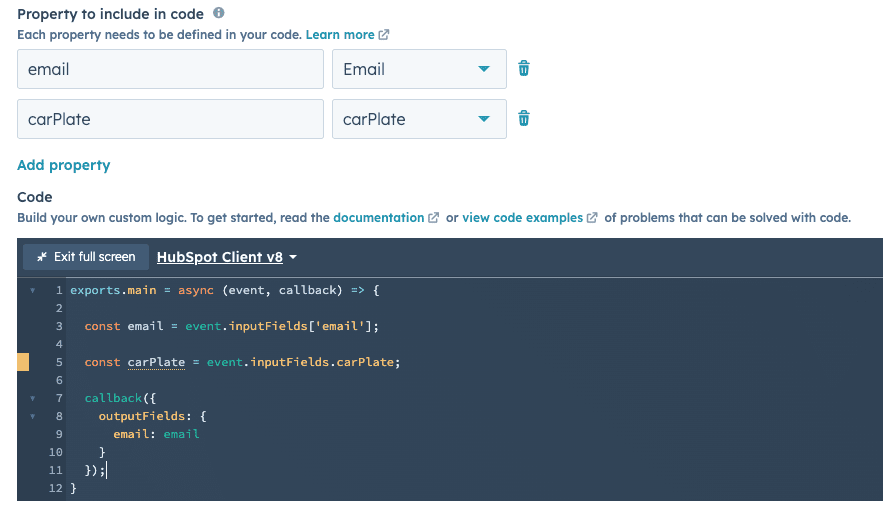
Then to use it in your code you have to use the following notation :
To access the email address in your code use :
const email = event.inputFields['email'];
Now, the contact’s email address will be set in the email variable.
The const email =parts means we store the email address in the email variable
Alternatively, you can use the dot notation like so :
const email = event.inputFields.email;
The keyword const is used most of the time to declare a variable, but you can also use the let keyword.
Like so :
let email = event.inputFields.email
The difference between const and let is : const cannot be reassigned, but let can.
Example :
This doesn’t work :
const email = event.inputFields.email:
email = "[email protected]";
But if you use let instead it will work
let email = event.inputFields.email:
email = "[email protected]";
In a nutshell:
« const » is for things that won’t change – once you put something in that box, it stays that way. « let » is for things that might change – you can put something in the box and later replace it with something else.
So, when you’re picking between « const » and « let, » think about whether you want a locked box that won’t change or a flexible box that you can update whenever you need to.
Display / return value from our code
To display something from our code you can use console.log() which is a function.
Think of console.log like a talking mirror that helps you understand what’s happening inside your program:
- Talking Mirror (console.log): Imagine you have a magical mirror that can talk. Whenever you want to know what’s going on inside a room, you ask the mirror to tell you. It gives you information about what’s happening without affecting the room itself.
-
Your Message (Value to Log): To understand what’s happening, you tell the mirror something specific. It could be anything – a thought, a question, or just a random observation.
-
Mirror’s Response (Output): The mirror takes your message and speaks it out loud. It tells you exactly what you asked for. This doesn’t change anything inside the room; it just gives you information.
// The talking mirror (console.log)
let message = "Hello, magical mirror!";
console.log(message); // The mirror responds by showing the message

let number = 42;
console.log("The answer to everything is:", number); // The mirror responds again
So in our Custom Coded Action if I want to display the email address or / and the car plate my code will look like this :
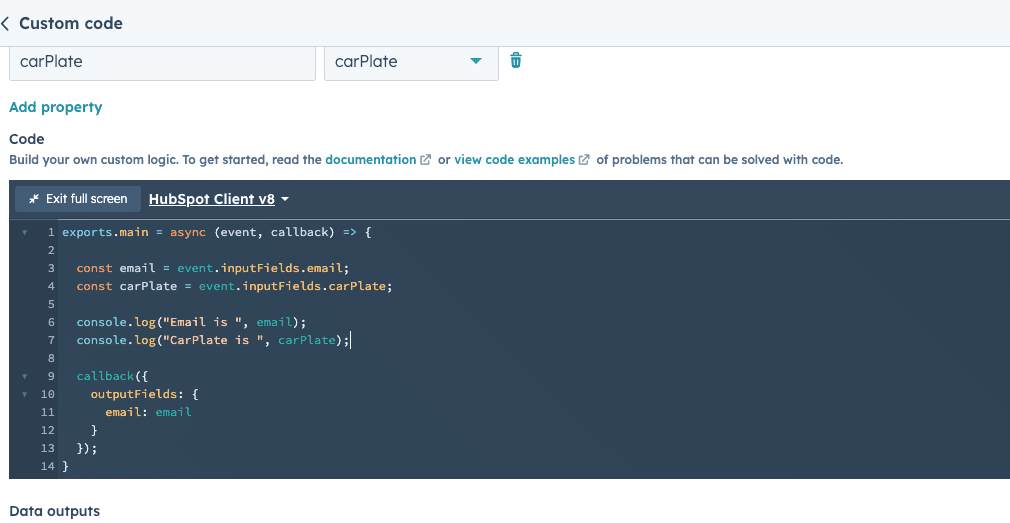
Then if I click Test
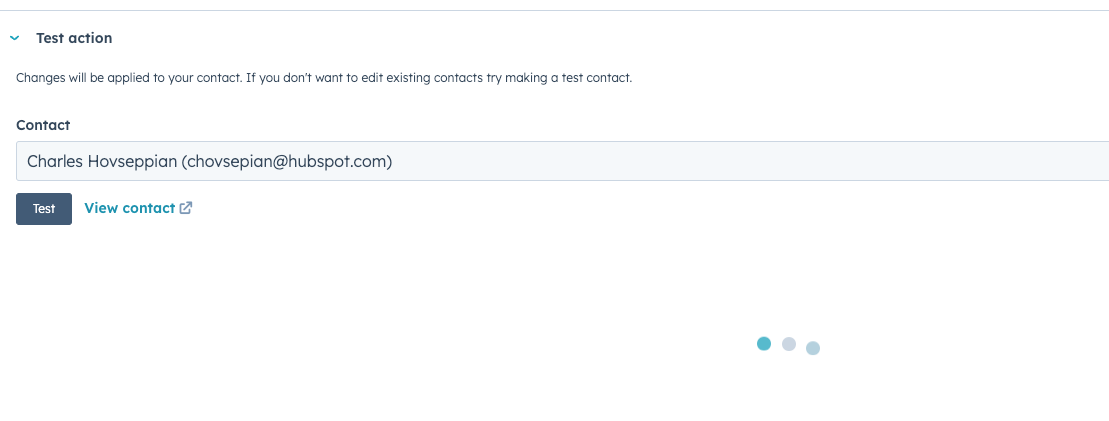
The result will look like this :
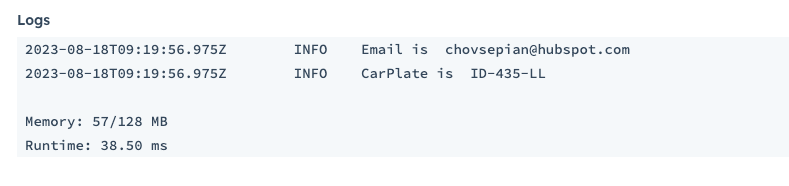
Here’s the code you can use to test this
exports.main = async (event, callback) => {

  const email = event.inputFields.email;

  console.log("Email is ", email);

  callback({
    outputFields: {
      email: email
    }
  });
}
Return data to the workflow
But this only display the value in the Logs section, if you want to return the data to the WorkFlow and use that date in an other block. You have to use the callBack function.
This is useful if for example to save the result of the Custom Coded Action in the contact
To return the data in the WorkFlow you have to use the callback
  callback({
    outputFields: {
      email: email
    }
  });
This part of the code will return the email value to the WorkFlow, then it will be accessible to other blocks.
- 1 – Write
email : emailinside the{ }of the outputfields - 2 – Add the value in the data outputs section
Like so :
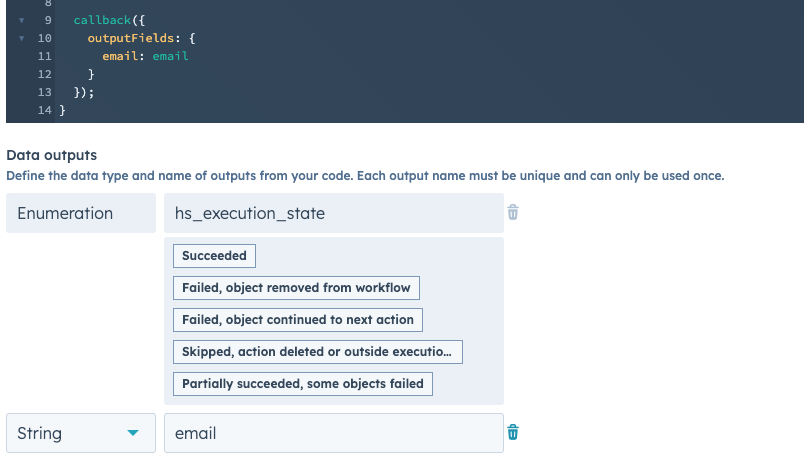
If you click save in the top right corner, now the email variable will be accessible to other blocks.
I use the set property value block and can select the email from the Custom Coded Action.
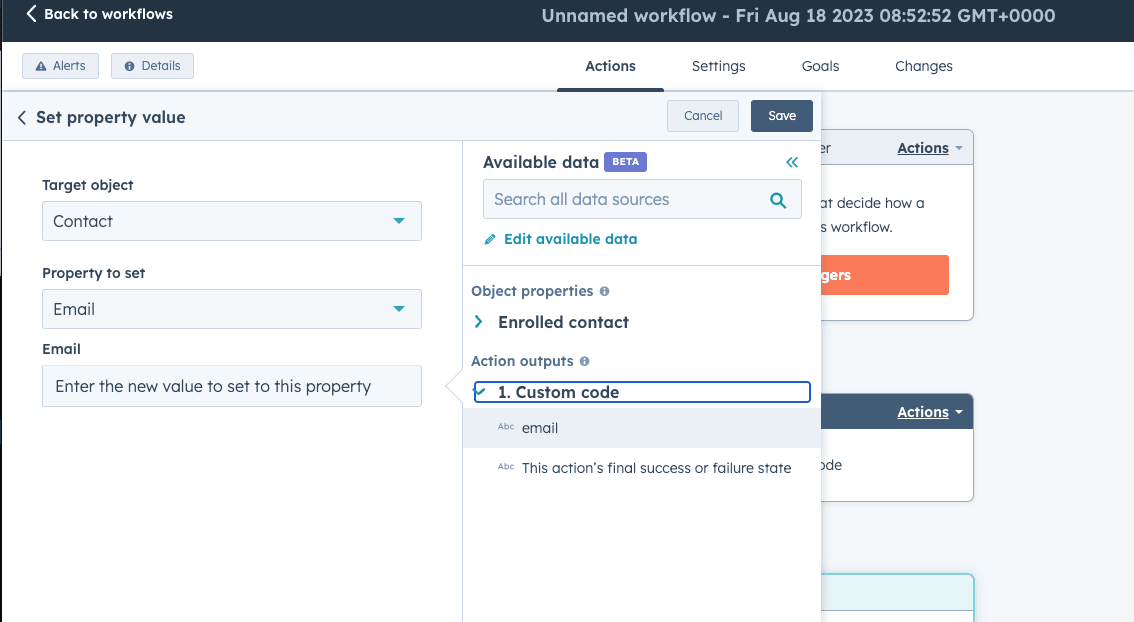
IF statements
An « if statement » in JavaScript is like a decision-making tool in your everyday life. Imagine you’re deciding whether to go outside or stay indoors based on the weather. The « if statement » in JavaScript helps your program make similar decisions based on certain conditions.
Here’s a simple way to understand it:
Imagine you’re a robot programmed to make decisions based on weather conditions:
If it’s sunny: You’ll decide to go for a walk outside.
If it’s rainy: You’ll decide to stay indoors and read a book
In JavaScript, an « if statement » works similarly:
let weather = "sunny"; // You can change this value to "rainy" or something else

let activity;

if (weather === "sunny") {
    activity = "go for a walk";
} else if (weather === "rainy") {
    activity = "stay indoors and read a book";
} else {
    activity = "not sure what to do";
}

console.log("Today's weather is " + weather + ". I will " + activity + ".");
Functions
A function in JavaScript is similar to the functions you use in Excel or Google spreadsheet.
As an example, imagine you have a « Greet » machine that takes a name as input and gives you a greeting as output:
- Greet Machine (Function): You have a machine with a big button labeled « Greet. » When you press the button, it asks for a name, and then it prints out a greeting.
-
Your Friend’s Name (Parameter): Before you press the button, you know your friend’s name. You’ll tell the machine this name so it can use it to greet your friend properly.
-
Greeting Message (Function Body): When you press the button, the machine uses the name you gave it to create a greeting message like « Hello, [Friend’s Name]! »
-
Greeting (Return Value): After pressing the button, the machine shows you the greeting message it created.
In JavaScript code, it might look like this:
// This is the "Greet" machine (function)
function greetFriend(name) {
    let greeting = "Hello, " + name + "!";
    return greeting;
}

// You press the button (call the function) and provide your friend's name
let friendName = "Alice";
let greetingMessage = greetFriend(friendName); // The machine gives you a greeting

console.log(greetingMessage); // You see the greeting: "Hello, Alice!"
Let’s use this function in a Custom Code :
exports.main = async (event, callback) => {

  const email = event.inputFields['email'];

  const firstName = event.inputFields.firstname;

  function greetFriend(name){

    const greeting = "Hello, "+name+" !"; // Hello, Antoine !

    return greeting;
  }

  const functionResult = greetFriend(firstName);

  console.log(functionResult);

  callback({
    outputFields: {
      email: email
    }
  });


}
Create and use a JavaScript function with ChatGPT
It can be faster and easier to create a fuction with chatGPT here’s how I created a function to test if a car is a preimum one or not.
The function :
function isPremiumCar(carBrand) {
    const premiumCarBrands = [
        'Audi', 'BMW', 'Bentley', 'Jaguar', 'Land Rover', 'Lexus', 'Maserati', 'Mercedes', 'Porsche', 'Rolls-Royce', 'Tesla', // Add more premium brands here
    ];

    return premiumCarBrands.includes(carBrand);
}
The complete Operations Hub custom code :
exports.main = async (event, callback) => {


  const carManufacturer = event.inputFields.carmanufacturer;

  function isPremiumCar(carBrand) {
    const premiumCarBrands = [
        'Audi', 'BMW', 'Bentley', 'Jaguar', 'Land Rover', 'Lexus', 'Maserati', 'Mercedes', 'Porsche', 'Rolls-Royce', 'Tesla', // Add more premium brands here
    ];

    return premiumCarBrands.includes(carBrand);
}


  const isCarPremium = isPremiumCar(carManufacturer);

  callback({
    outputFields: {
     isCarPremium
    }
  });


}
A chat GPT prompt you can use :
Context : serverless function developement
Help Needed : I want you to help me to write a logic with JavaScript
Constrains : the code should we written in this format :

exports.main = async (event, callback) => {

     // code here


    callback({
        outputFields: {

        }
    });

}


The logic should be written inside the main function.
If the logic returns data the data should be returned by the callback function inside the outputFields object.

When you get external data input as parameters. The data comes from event.inputFields object. E.g : you get the contact email adress then the email variable should be set like :

const email = event.inputFields.email;


logic to implement :
Conclusion
In this article I gave you dome basic knowledge to get started with Custom Coded Action in HubSpot. However to use the Custom Coded Action at their full potential you need solid JavaScript fudenmental. If you are interested I definitely recomend this training :
What HubSpot gives us by default
On the platform in a Workflow, if you add a Custom Coded Action block, you have an interface where you can select the programming language you would like to use. A dropdown to manage / use your API secrets etc…
Underneath, you can write your code, but in that small editor there’s no autocompletion, you can’t format automatically your code. You can’t automatically write doc blocks for your functions…
That’s why I prefer to write my code locally in my IDE, that the way I produce better code, and I can also keep track of my changes with Git.
If you are interested to set up something similar, I will explain in this article how to set up a Custom Coded Action enviroment locally.
A JavaScript CLI to re-create the environment
The main idea is to have a local environment which provides the same functions and limitation as HubSpot. That’s why I created a CLI where I re-created the functions which are unique to the HubSpot Custom Coded Actions.
With this tool you can use your own IDE and feel like home.
prerequisites
- JavaScript / Node.js / Git knowledge
- Git
- Node.js installed on your machine
Install the CLI
To install the CLI clone the following repository :
git clone https://github.com/Antoinebr/HubSpot-Operations-Hub-Custom-Coded-Action.git
Then install all the dependencies
cd HubSpot-Operations-Hub-Custom-Coded-Action
npm install
Start a new project
To start a new project type :
npm run init my-new-custom-coded-action
This will copy the folder __TEMPLATE__ which is a scaffolding of a Custom Coded Action
Understand the unique functions and variables
In this video, I will explain some specific functions and variable used in the Custom Coded Actions. Nothing complicated, but still very important.
Manage the secrets in HubSpot
In a Custom Coded Action you can manage your secrets, which is ideal to store an API key for example. Indeed, you do not want to have your API keys displayed in your code, you will want to have them as environment variable.
To create a new secret :
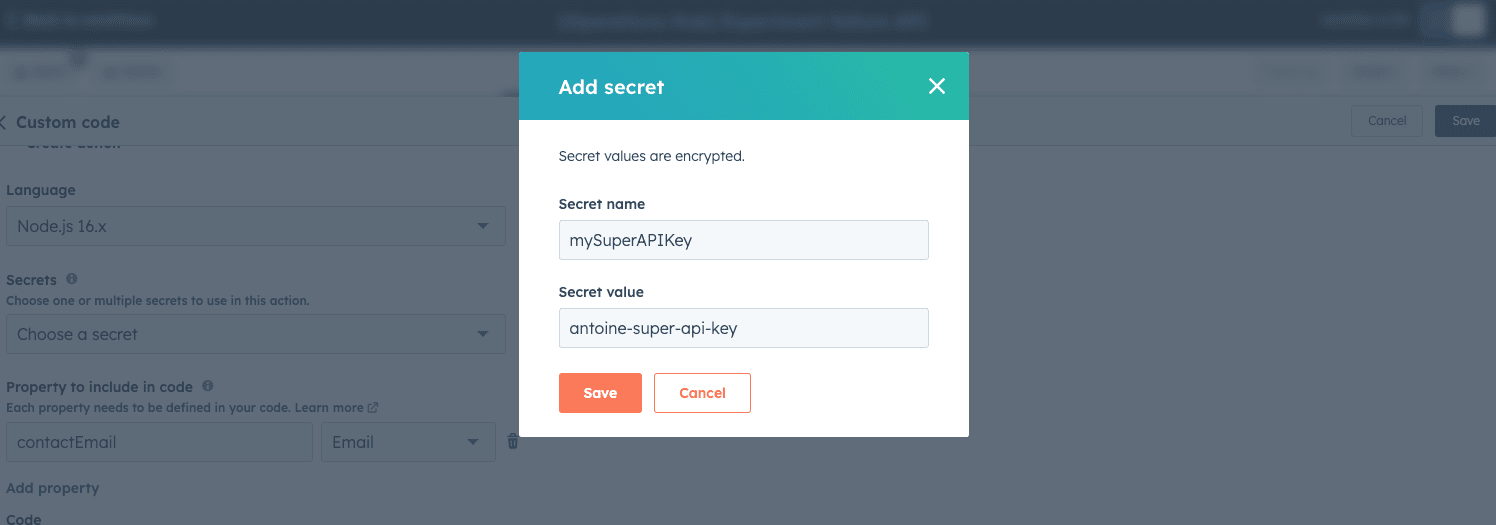
To access you secret use :
process.env.mySuperAPIKey;
console.log(process.env.mySuperAPIKey);
Use the contact, company… properties in the Custom Coded Action
To access the properties, first go to the section Property to include in code. In that section, you can use any property of the current object, and you can choose the variable name you want.
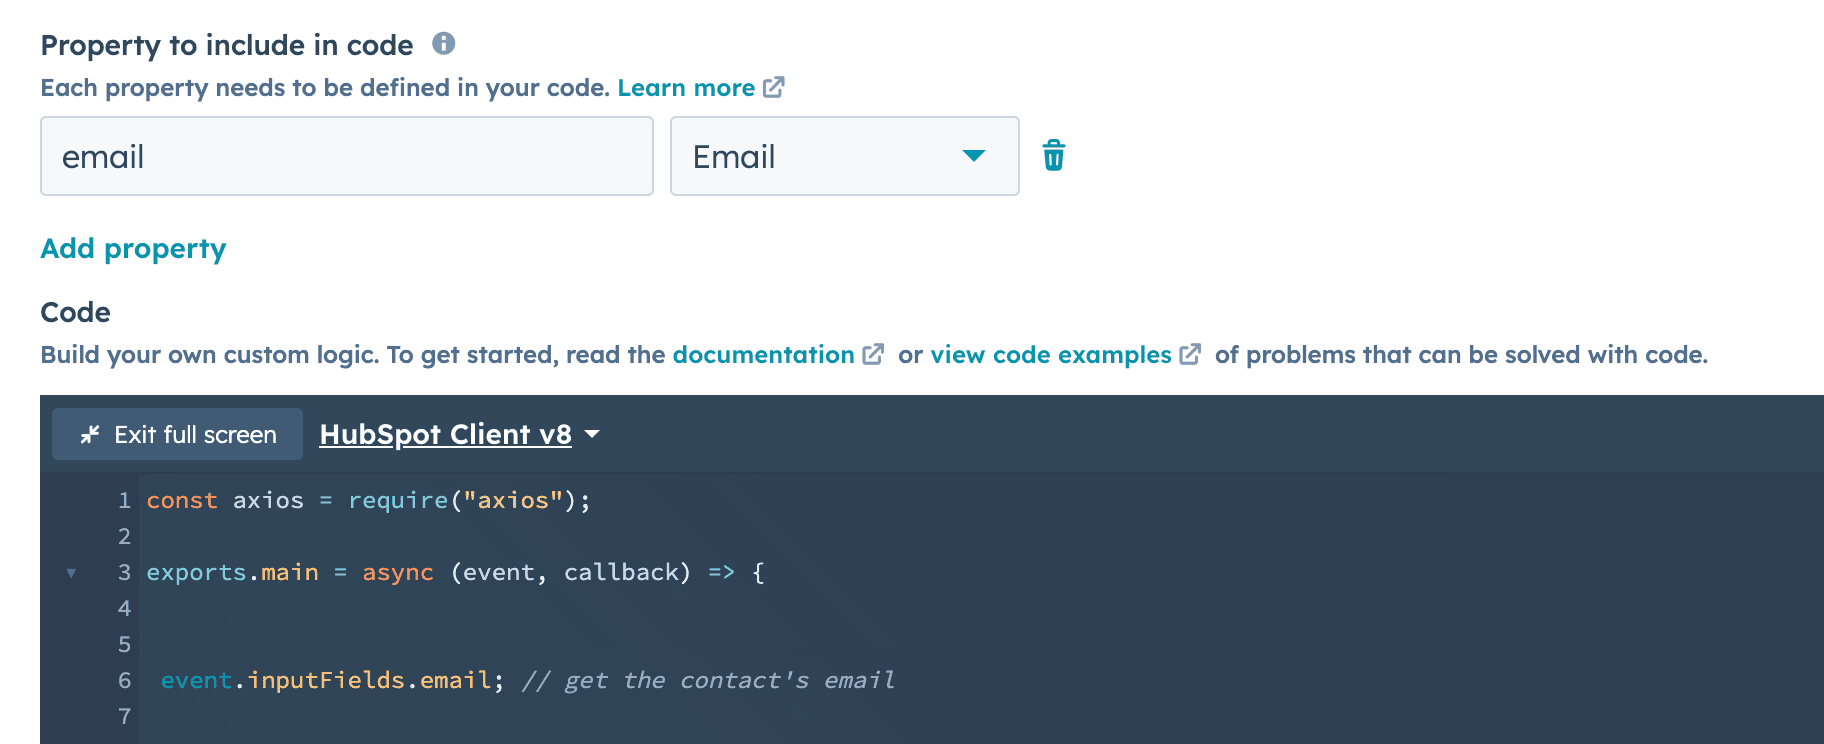
In that example, we can access the contact’s email by using :
event.inputFields.email
Get the id of the current object
If you need the id of the current object enrolled in the WorkFlow you can use :
event.object.objectId
Run your code locally
Manage / access the secrets locally
To use a secret locally, add it to your .env file at the root the cli project.
Set your secret in the .env like so
privateAppToken = "vcf-no9-ggt09tnz-a522-4002-b012-jngpmsecx"
dropContactAPI= "qdkqsnksqnknvvvppmqmqsdds"
To access the secret in your code, in the cca.js where you write your code use :
process.env.privateAppToken
Watch the video to learn more :
Manage / access the objects’ properties locally
To set a property to include in code locally, add to the ./your-cca/event.js file the keys you need :
exports.events = {
    object: {
        objectId: 3401
    },
    inputFields: {
        domainName : "google.com",
        email : "[email protected]"
    }
}
To access it in your code
    const domainName = event.inputFields.domainName;

    const email = event.inputFields.email;

    console.log('--> ', domainName, '-----> ', email)
Manage / access the current object’s id
If your code, uses the object’s ID of the current object in the workflow you can use.
event.object.objectId; // this returns the id it the current object
To set it up locally in the « event.js« ` update the value :
exports.events = {
    object: {
        objectId: 3401
    },
    inputFields: {
        domainName : "google.com",
        email : "[email protected]"
    }
}
Test the code
To test the code type in your terminal :
npm run cca ./your-cca/cca.js
This runs your code and display what will be returned by the Custom Coded Action from the output function.
As you can see :
This very basic Custom Coded Action :
exports.main = async (event, callback) => {

    const domainName = event.inputFields.domainName;

    const email = event.inputFields.email;


    callback({
        outputFields: {
            domainName,
            email
        }
    });

}
Will display this in your terminal :
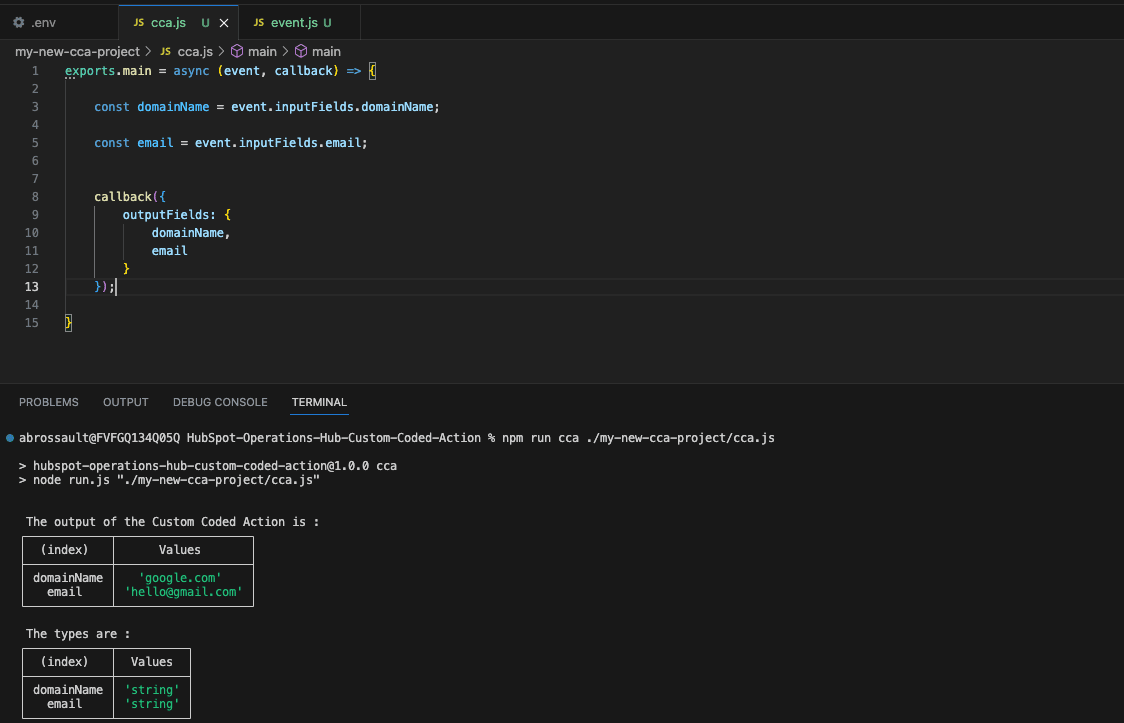
Deploy it
To deploy it nothing easier, copy the cca.js and paste in HubSpot.
Having unique data in a CRM system is important because it can help to avoid duplicate contacts, which can be annoying for customers and can also lead to lost opportunities. For example, if a customer is contacted by multiple salespeople, they may become frustrated and less likely to do business with you. Additionally, duplicate contacts can make it difficult to track customer interactions and to identify opportunities to upsell or cross-sell products or services.
What is needed to deduplicate ?
To deduplicate you need to have a unique key.
A unique key is a column or a combination of columns that uniquely identifies a record in a database. Unique keys are used to deduplicate data by identifying and removing duplicate records. This can improve the accuracy and reliability of data.
As an example when you register on an app like Instagram or Twitter they ask for your phone number. They use the phone number as a unique key if they need to deduplicate.
Indeed, it’s quite easy to have multiple email addresses, you can also use another name and nickname, but few people have more than one phone number. So for an APP like Instagram a phone number is a pretty good unique key.
In the example below we have two records, with somewhat similar names, they maybe are duplicates. But what unique key could we use here ? As you can see the only common key value pair in the two records is carPlate so we can use this key to deduplicate.

How to look for duplicates when a new data is inserted in HubSpot ?
To avoid duplicates, each time we get a new record in our CRM we can ask HubSpot to give us the list of all the records with a matching key value pair.
In our example, each time we get a new contact, we can ask HubSpot the list of contacts with the property carPlate = RM-123-IE
If he gets more than one record back, it means we have a duplicate.
In HubSpot you can use a workflow to run a logic each time something happens in our CRM. In that example each time we get a new contact with the carPlate value set.
The request looks like this :
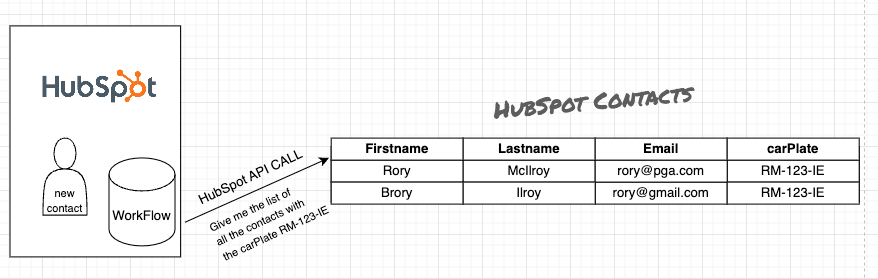
As you can see on this schema, the request will return those two records :

Once we identified two records, we can compare them and decide the one we keep.
Deduplication works if we found 2 records, if we find more than 2 the logic is a bit more complicated as we have to perform two merges. It’s what we call an ambiguous merge. In this article, we will put this concept aside.
Merging criterias
Now that we have our duplicated records, we have to merge them. But before, we have to choose the record we keep and the one we remove.
That logic is up to you, but there are common logics.
Keep the record created first
With that criteria, the oldest recorded will remain, and the new one will be merged. It’s the most common criteria to merge.
Keep the record created last
As you can expect with that criteria, the latest record will remain and the oldest one will be merged into the newest.
Keep the record most recently updated
Keep the record which had the most recent update
Keep the record most recent engagement
Keep the record with the most recent meeting, calls, tasks…
Keep the record with the oldest engagement
Keep the record with the oldest meeting, calls, tasks…
How to set up a deduplication workflow in HubSpot ?
Create a workflow based on the type of objects you want to dedupe.
In this example, I create a contact based Workflow.
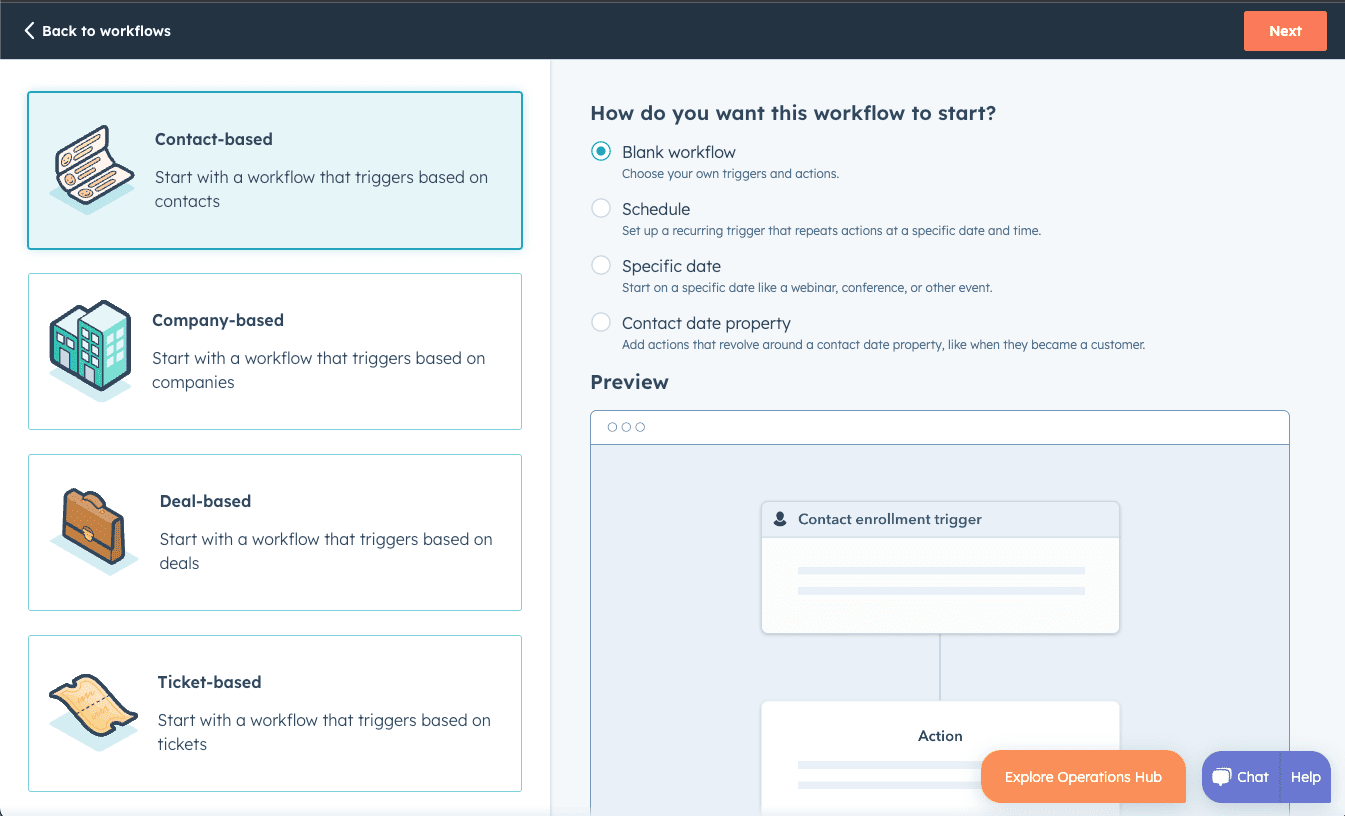
Add a trigger
A HubSpot workflow trigger is an event that causes a workflow to start. For example, you could create a workflow that is triggered when a contact fills out a form or in our case when criteria is met.
When the contact has a carPlate set, the workflow will start and the contact will be enrolled in the workflow.
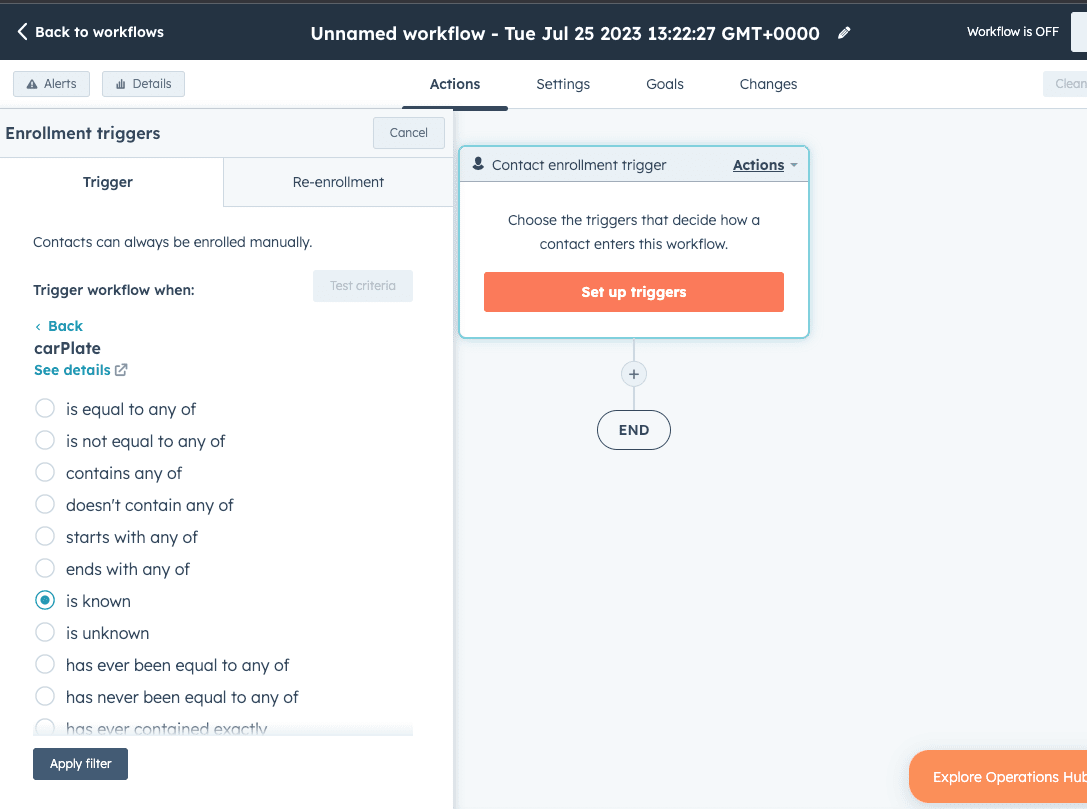
Add a Custom Coded Action block
A custom coded action block in an HubSpot Workflow is a block of JavaScript or Python code that you can add to a workflow to perform custom actions. It’s a super block that you can use to create your own logic inside a workflow.
In our case we are going to use a Custom Coded Action block to add a logic to deduplicate our contacts based an the carPlate value.
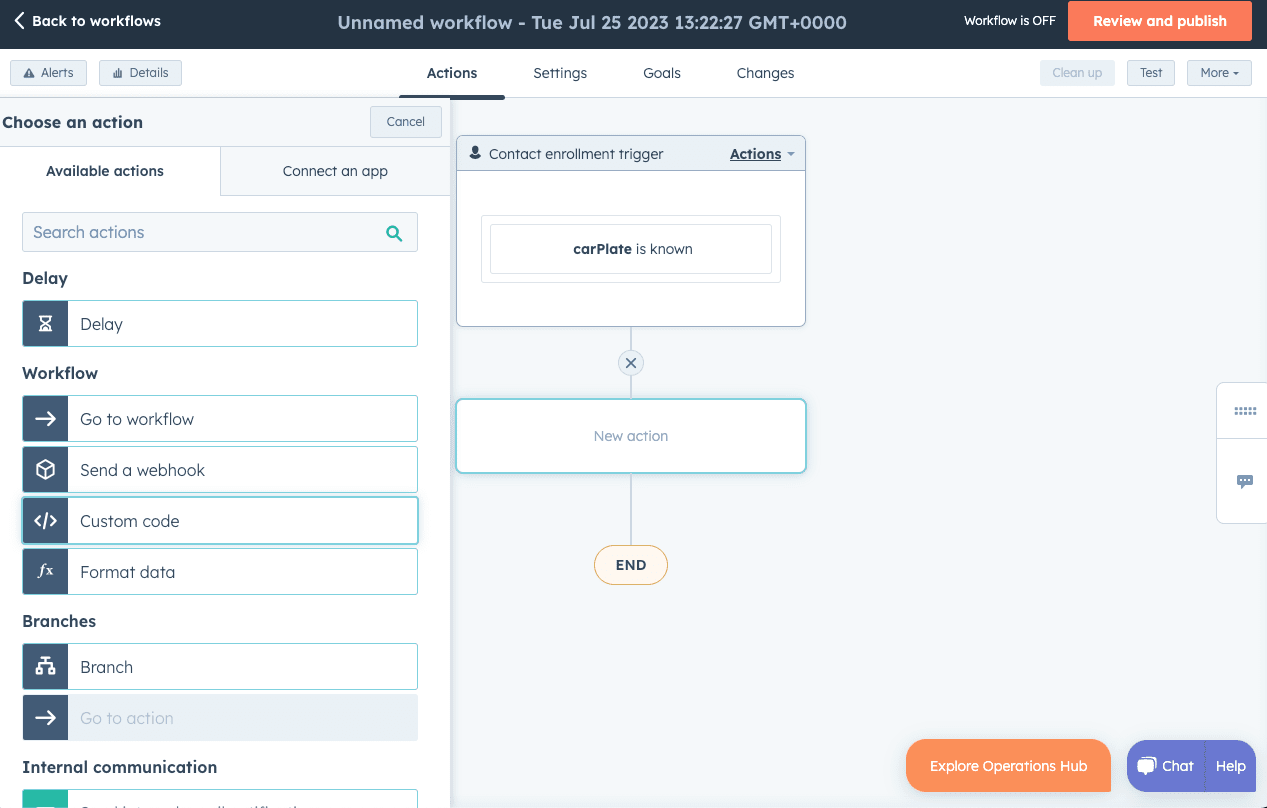
Add your private app token
In the secret section you can save your API keys, pass phrases… that you don’t want to display in your custom code.
To deduplicate we need to call the HubSpot API so you need to have a private app token with the corresponding scope.
The scopes for our custom coded actions should be at least : read companies, write companies, read contacts, write contacts
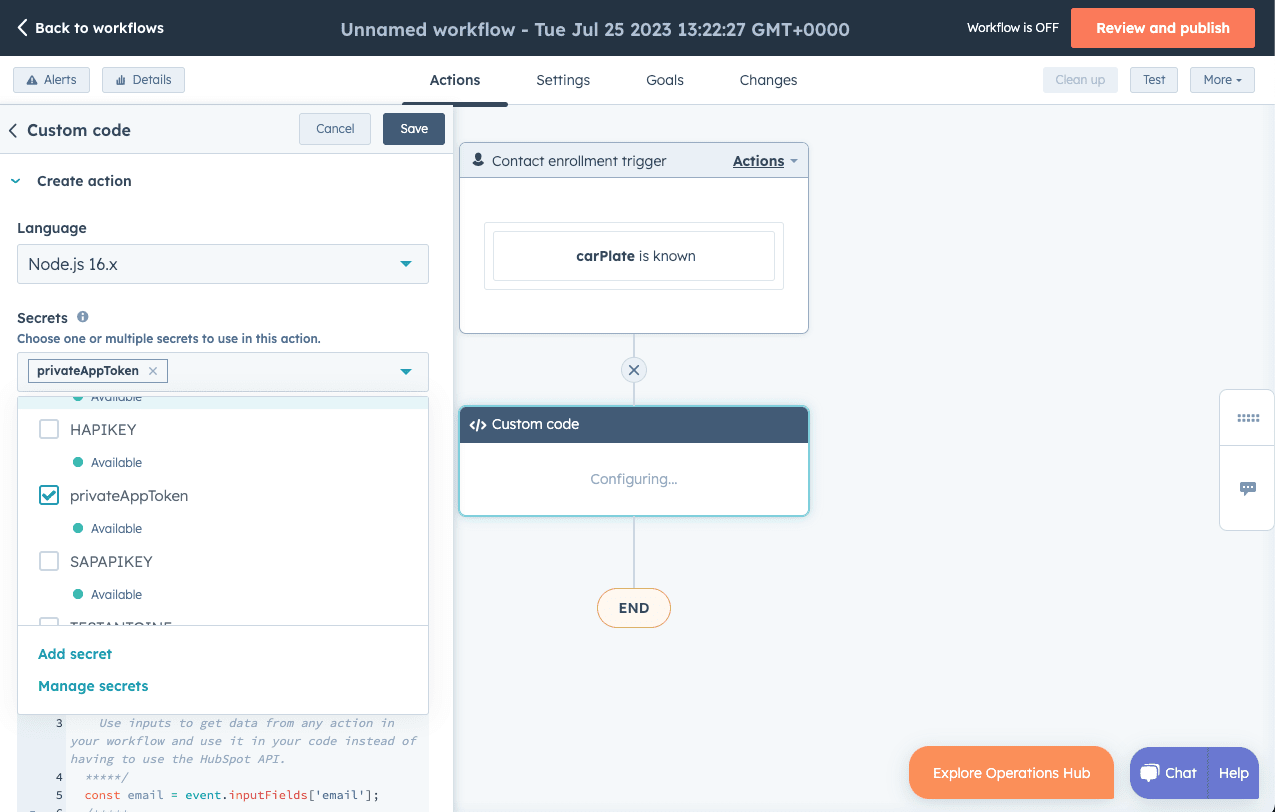
As name you can use the name you want, in my setup I use the name privateAppToken
Paste the Custom Coded Action
First remove all the existing code then if you want to deduplicate contacts you have to use this code , if you want to deduplicate companies use that one.
Edit the Options
At the top of the code you can set the options you want.
/*
 *
 * Edit your Secret Name here
 */
const SECRET_NAME = "privateAppToken"

/*
 *
 * Choose the dedupe key
 */
const DEDUPE_KEY = "carplate";

/*
 *  Choose the merging criteria you want in that list
 *
 *   Possible values :
 *
 *   most-recent-engagement
 *   oldest-engagement
 *   created-first
 *   created-last
 *   most-recently-updated
 */
const MERGE_CRITERIA_KEEP_THE_ONE = "created-first";

/*
 *
 * If the DRY_RUN is true, no merge will be performed
 */
const DRY_RUN = false;
SECRET_NAME :
If your secret name is not privateAppToken edit the line :
const SECRET_NAME = "privateAppToken"
With your secret name like :
const SECRET_NAME = "myOwnPrivateAppName"
DEDUPE_KEY :
In my case If have the dedupe key carPlate but yours will be different so edit this line :
const DEDUPE_KEY = "carplate";
with your own key like :
const DEDUPE_KEY = "yourOwnKey";
To find the key you have to use you can follow this video :
MERGE_CRITERIA_KEEP_THE_ONE :
Set the merging criteria you want to use between those possibilities :
- most-recent-engagement
- oldest-engagement
- created-first
- created-last
- most-recently-updated
DRY_RUN :
If const DRY_RUN = false; then nothing will be merged, this option is interesting to test the logic.
Possible values :
const DRY_RUN = false;
const DRY_RUN = true;
Data outputs
In a Custom Coded Action, you can specify a return. In other words, what the Custom Coded Action will throw back to the Workflow. This Custom Coded Action returns couple of things
As an example :
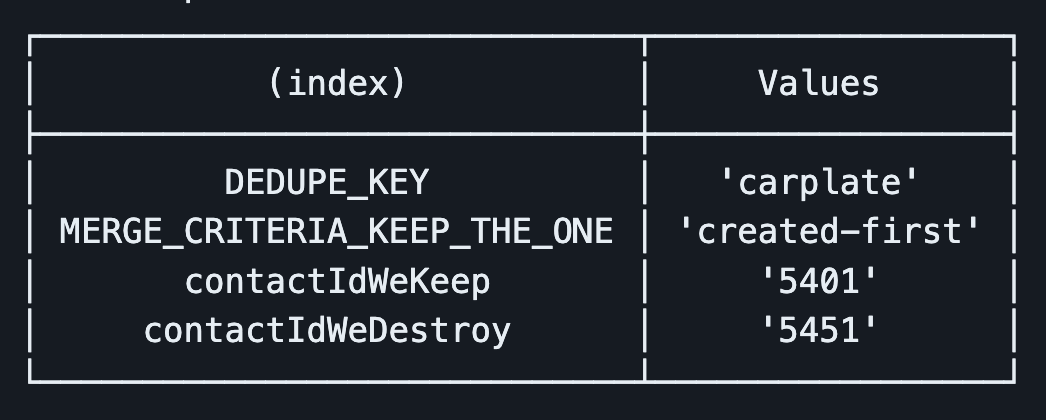
To set the output underneath the code there’s a « Data outputs » section where you have to put the following :

It should look like this :
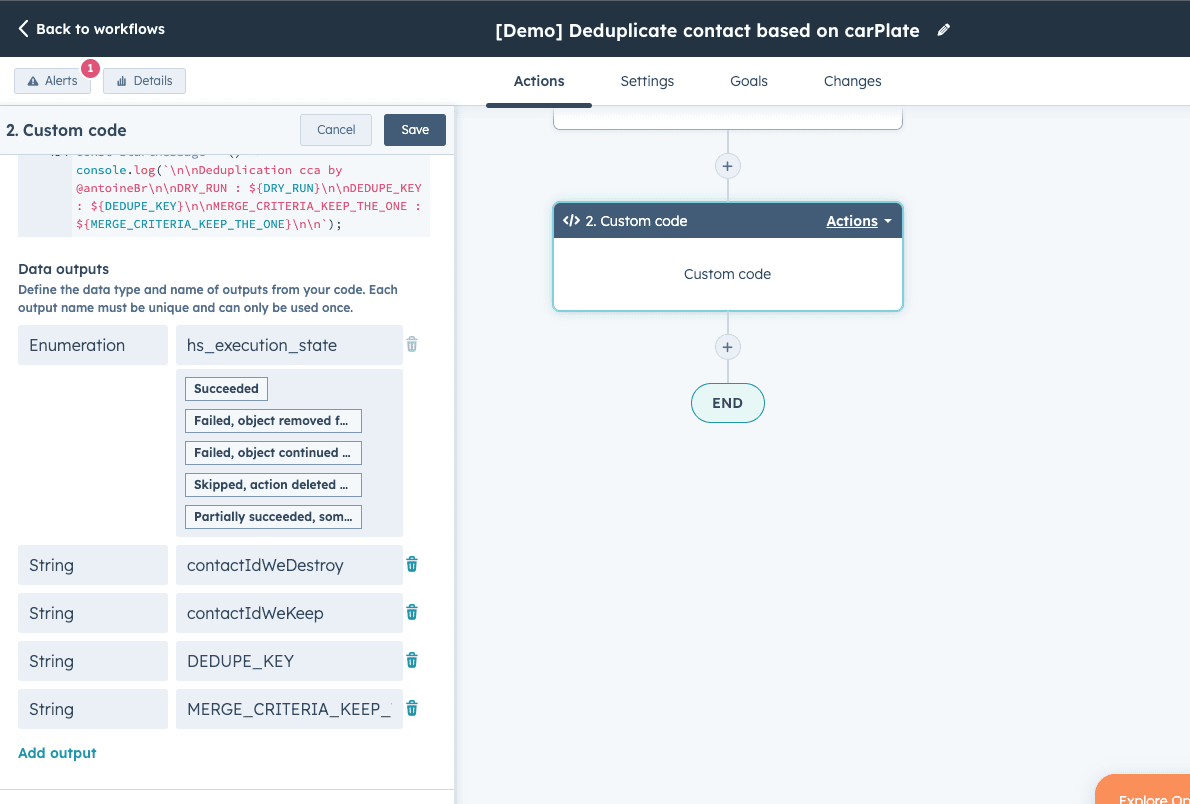
Turn the workflow on
TO turn the workflow on, you can follow this video :
NB : You can’t use the option Yes, enroll existing companies which meet the trigger criteria as of now as it will trigger API rate limit error. ( I’m working on it to find a fix)
Télécharger node depuis les sources ( apt-get…)
Franchement, c’est assez pénible et c’est prompt à encore plus d’erreur. Car si vous êtes ici, c’est que quelque chose ne se passe pas comme prévu.
Bref, je vous déconseille cette solution.
Utiliser le package « n »
Le plus simple et le plus efficace, parce que ce package va permettre d’activer une version de node en particulier.
Pour l’installer rien de plus simple :
npm install -g n # Install n globally
Puis télécharger la version que l’on souhaite :
n <version> # Install node <version>
Pour activer la version de node que l’on souhaite rien de plus simple, il suffit de juste taper :
n
Ensuite, il faut sélectionner la version que l’on souhaite.
En cas de problèmes :
Vérifiez quelle version de Node est active sur votre machine avec :
which node
Cela devrait retourner :
/usr/local/bin/node
Homebrew
Si vous avez installé Node avec Homebrew ce n’est pas impossible que l’installation de cette nouvelle version avec le package n n’active pas la version voulue.
Désinstaller node depuis Homebrew
brew uninstal node
Maintenant la seule version de Node activée devrait être celle qui vient de n
Et voilà, c’est terminé !
Enjoy ! 🙂