09/10/2023
HubSpot's Visitor Identification API provides a powerful way to identify and authenticate visitors to your website using your own external authentication system. This integration allows for more personalized interactions and access to previous chat history across devices. In this article, we'll walk you through the process of integrating this feature into your web application.
Demo
In the upcoming video, we’ll start by explaining the fundamental concept behind the Visitor Identification API. Then, we’ll walk you through the code that brings this concept to life. Whether you’re an experienced developer or just getting started, this video will provide valuable insights into leveraging the full potential of HubSpot’s Visitor Identification API
The visitor identification API doc
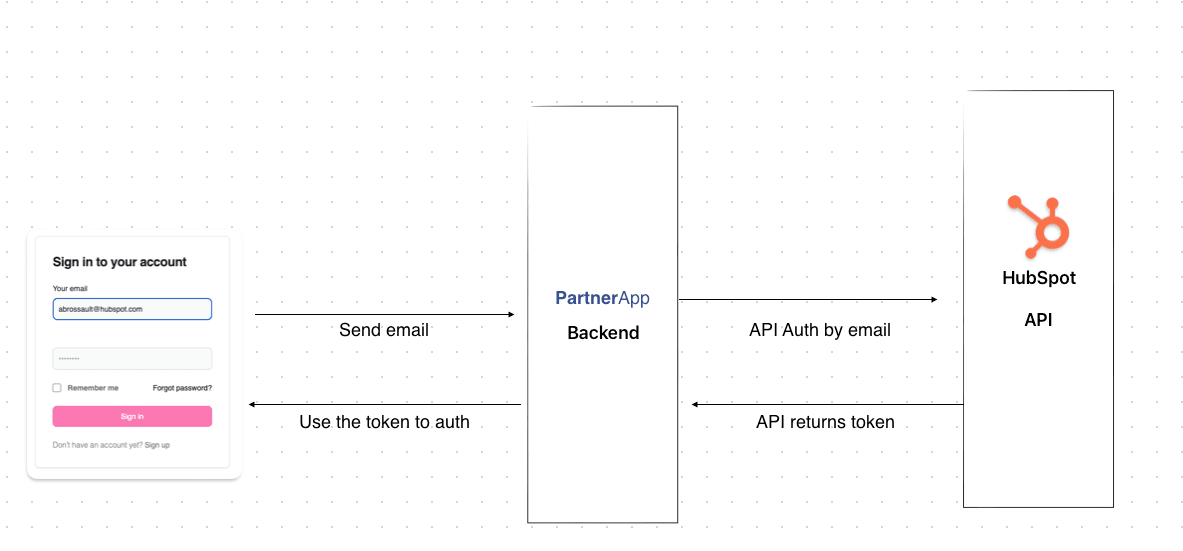
Schema
Prerequisites
Before you get started, ensure that you meet the following prerequisites:
- You must have an existing web application with an authentication system.
- Set up a private app in HubSpot.
- Your HubSpot account should have a qualifying Professional or Enterprise subscription.
Integration Steps
1. User Authentication
Begin by allowing users to log in with your current login form on your website. Ensure that your authentication system is in place.
As an example, the auth form could look like this :
This HTML form with the id « login » contains an email input field where users can enter their email address. When they click the « Send » button, the form will be submitted.
<form id="login">
    <input type="email" id="email" >
    <input type="password" id="password" >
    <button type="submit"> Login </button>
</form>
2. Generate an Identification Token
To generate an identification token, you will need to use the Visitor Identification API. This should be done on the backend of your web application. You can pass in the email address of the authenticated visitor.
Here’s the router which handldes the POST request to login the user :
fastify.post("/login", async function(request, reply) {

  const user = {
    email: request.body.email,
  };

  const authResult = await hubSpotAPI.authVisitor(user.email);

  console.log(authResult);

  reply.send({token:authResult});

});
As you can see I call a function I created :
const authResult = await hubSpotAPI.authVisitor(user.email);
The function looks like this :
In this function I call ( POST ) the HubSpot API on the following endpoint
curl --request POST \
  --url https://api.hubapi.com/conversations/v3/visitor-identification/tokens/create \
  --header 'authorization: Bearer YOUR_ACCESS_TOKEN' \
  --header 'content-type: application/json' \
  --data '{
  "email": "visitor-email@example.com",
  "firstName": "Gob",
  "lastName": "Bluth"
}'
NB : you need to use your private app token to make this call.
exports.authVisitor = async (email) => {

    if (!email) throw new Error('you need to set an email ');

    const url = 'https://api.hubspot.com/conversations/v3/visitor-identification/tokens/create';

    const postData = {
        email
    };

    const response = await axios.post(url, postData, axiosConfig).catch(axiosErrorHandler)

    if(!response) throw new Error(`API didn't respond...`)

    if(!response.data) throw new Error(`API didn't respond with data ...`)

    if(!response.data.token) throw new Error(`API didn't respond with a token ...`)

    return response.data.token;

}
Once I get the token I return the token to my controller, to pass it to the front-end.
3. Set Properties in hsConversationsSettings
Using the token generated in Step 2, you should set specific properties on the hsConversationsSettings object on the window. These properties include the identificationEmail and identificationToken. Here’s an example:
window.hsConversationsSettings = {
   identificationEmail: "visitor-email@example.com",
   identificationToken: "<TOKEN FROM STEP 2>"
};
My JavaScript code executed for the login and the auth with HubSpot looks like this
document.querySelector('#login')?.addEventListener("submit", async (event) => {

    event.preventDefault();

    const emailInput = document.querySelector('#email');

      try {

            const response = await fetch("/login",  {
                method: 'POST',
                headers: {
                'Content-Type': 'application/json',
                },
                body: JSON.stringify({
                    email : emailInput.value
                })
            });


            if (!response.ok) throw new Error(`Request failed with status: ${response.status}`);

            const data = await response.json();

            if(!data.token) throw new Error(`No token received by the backend`);

            window.hsConversationsSettings = {
                identificationEmail: emailInput.value,
                identificationToken: data.token
            };

            window.HubSpotConversations.widget.load();


            window.location.replace("/mytickets/");


    } catch (error) {

            console.error('An error occurred:', error);

    }
}
The important part is :
In this part, I use the token to set the right cookie in the user browser. Thanks to this cookie the user will not have to put his email address in the forms / chat
window.hsConversationsSettings = {
    identificationEmail: emailInput.value,
    identificationToken: data.token
};

window.HubSpotConversations.widget.load();